I’ve been watching all warcraft 2 videos yesterday. (it got a little old :eek:)
As I told before, for me Blizzard is my favourite CG reference.
Thanks for your nice comment ![]()
I’ve been watching all warcraft 2 videos yesterday. (it got a little old :eek:)
As I told before, for me Blizzard is my favourite CG reference.
Thanks for your nice comment ![]()
very well done!
I Hear you. I still adore Blizzard’s cinematics. So ever inspiring videos. Oh thank you dear Youtube!
Hi Thanks for your comment.
Currently, I’ve watched all warcraft 3 videos yesterday. (It got a bit old)
For me , BLIZZARD is my favourite CG reference.
Looks fantastic so far!  lot’s of detail on The Orc. The armour and weapons look great too
Reminds me of Skyrim for some reason. Great work man, Looking forward to the finished project 
Very nice shading so far, especially on the assets. But I think the skin could use a little touch of white fresnel if you don’t plan to use sss. Although - if I think about it - his green skin will absorb green light. Therefore the reflection would perhaps be white minus green which is a purplish light. Could be interesting to see him with either with or with a purlish variation.
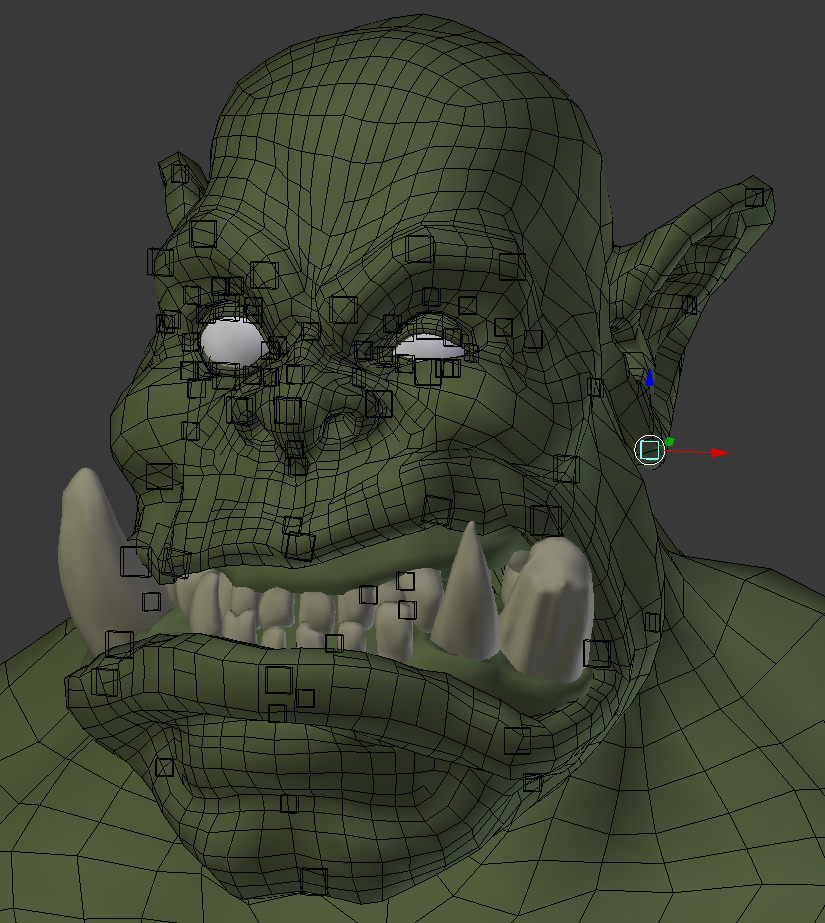
hi minoribus. There is actually SSS ![]() and I spent a lot of time to set it as green skin with red blood was a pain. I’ve used an epidermic map, a Sss factor map to set depth.
and I spent a lot of time to set it as green skin with red blood was a pain. I’ve used an epidermic map, a Sss factor map to set depth.
there are purple variation in the darker skin areas and I’ve used a lot of fresnel to set reflection strenght and royghtness.
maybe my lighting setup is shitty. Final version with all shaders and hair system is rendering.
i will post it tomorow morning France time.
could you advise?
especially on tone variation you were talking about.
thanks for your support.
nice work pierrick, I like very much the assets textures, looks like how videogame!
Nice topology of your character, I want increase my speed workflow that you!
There is actually SSS
and I spent a lot of time to set it as green skin with red blood was a pain. I’ve used an epidermic map, a Sss factor map to set depth.
there are purple variation in the darker skin areas and I’ve used a lot of fresnel to set reflection strenght and royghtness.
maybe my lighting setup is shitty. Final version with all shaders and hair system is rendering.
Geez! No, no, your lighting is good. I see a tangential key light from the front left top and - I guess - a fill light from the right. You set your light to make all the 3d pop out really nice. And it seems to me that you’ve used an AO bake or dirty vertex colors as base for your texture, which supports the 3d effect well.
Of course it’s your artistic decision what you want the skin to look like. But if I should describe his skin as it is now I’d say it is dry, thin, smooth and glossy. What I miss is a basic rough humidity and a certain thickness. And with humidity I don’t mean the glossy areas where it is wet and oily.
I think the smooth, dry, glossy character shows best where the skin stretches over his muscles, for example at the abs or at the forearm muscles or at his brow ridge. There you have rather sharp reflections. A humid skin would not show this sharp reflections there. Perhaps more roughness in the glossy shader could help here. At the same time these areas and bulges are the places where the subsurface scattering would show and give the impression of a thicker skin. Not necessarily at the brow ridge, where the skin is more stretched, but at the other parts.
Currently, I’ve forgotten to bake the AO so I’ve hand painted the dirty map ![]() (also it gives it some more tyle I guess).
(also it gives it some more tyle I guess).
Also I believe I should make other view that show the SSS effect and skin relief.
Currently, the lighting is pretty “perfect” meaning it might not be super natural or something like this.
I use an enviromental HDR light, very subtle, a key area light on the top left aligned with HDR light and 2 planes as rim light and fill light. ![]()
Give me a few minutes and I’ll post the final render of the portrait
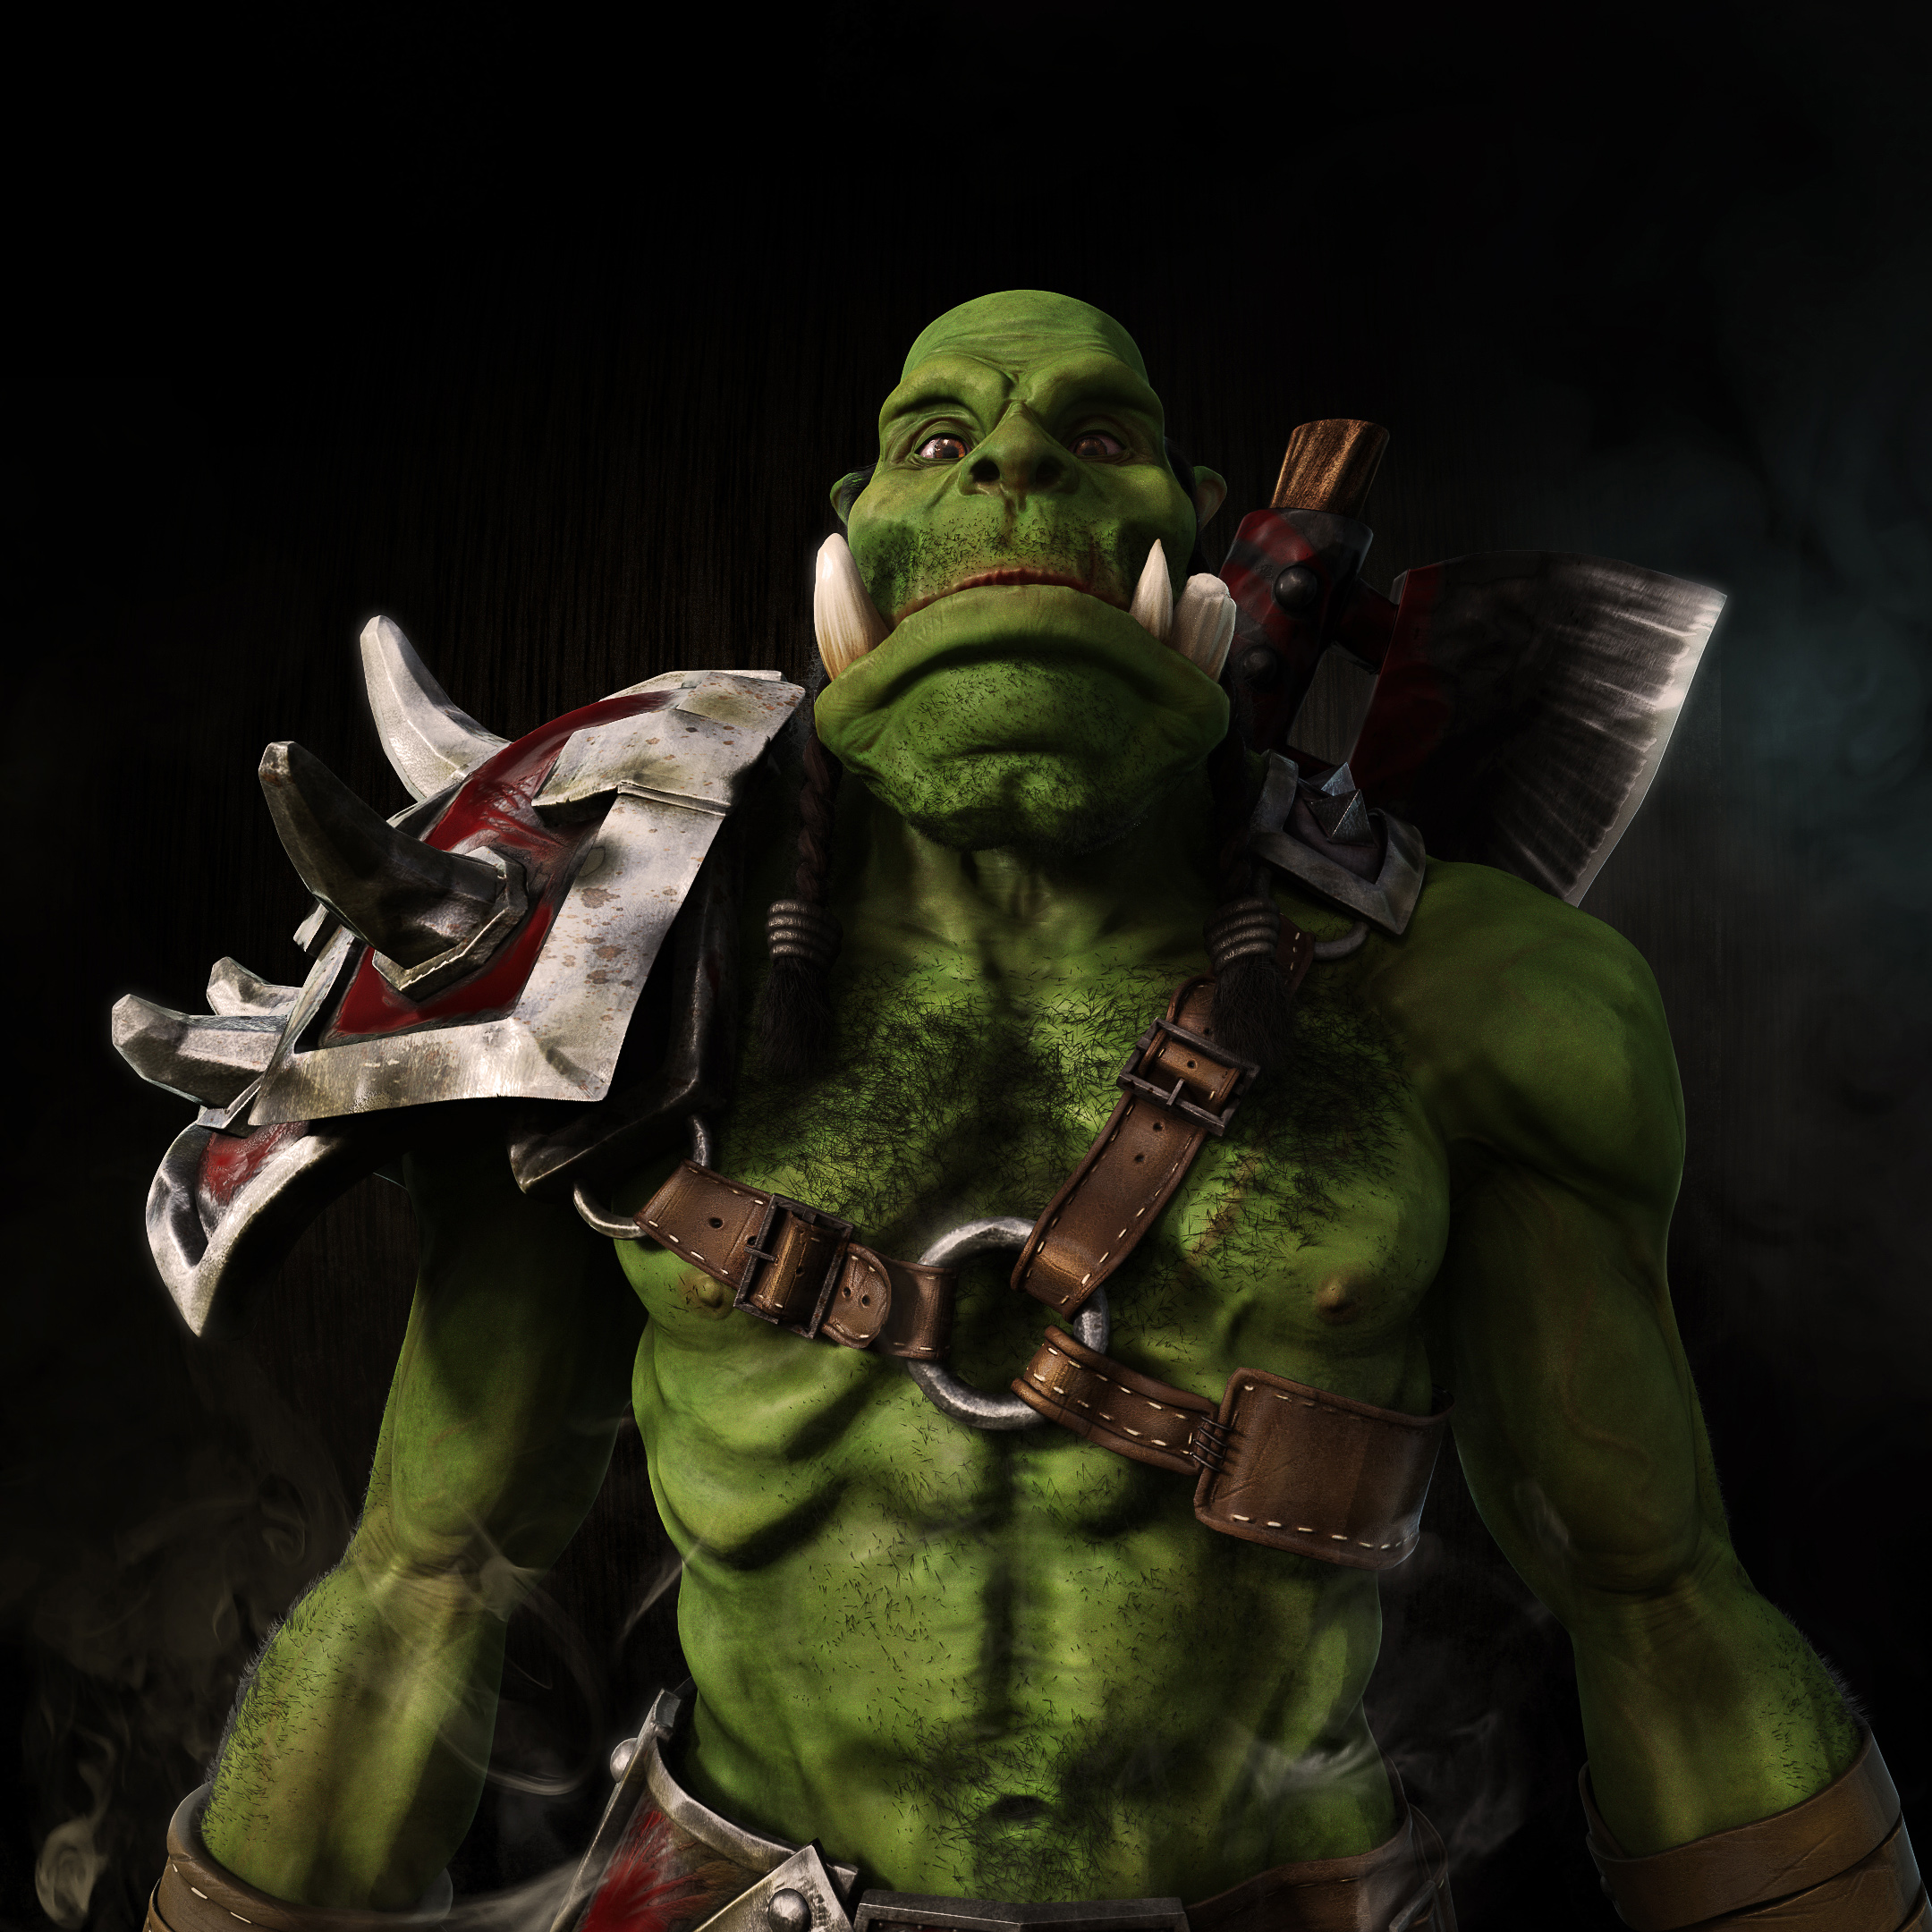
So, Here is the final shadded version of this character.
I’ve added the hairs as schedduled.
I will start rigging ASAP.
Rendered in 2160×2160.
Took 45 minutes on Asus Titan Black.
Post production in photoshop.
I’ve tried to make postprod as light as possible.
My former creature was enhanced with a lot of postprod while here, I’m trying to get the best result possible outputed from blender. Playing with nodes and lighting is really a hard task.
Hi Pierrick, just a quick post to say that despite my nitpicking I like it very much. Great work on the hairs.
Hi Minoribus.
Don’t worry, I didn’t take your words badely. I’m sorry if you felt so, my english isn’t good enought to make subtle states of mind ![]()
I’ve been following your work and as you’re kind of a super shadderer, I was just asking for more info.
Thanks for your kind words. ![]()
Cheers pieriko, I’m glad that you see it this way. And it looks like we are following each other 
Hi All,
I’ve been using and testing the PichiPoy version of the metarigg and I must say it is unbelievable.
I’ve customised the face rigg to fit my character lips adding one control point.
I generaly use empty groups while for skinning but I’ve used automatic weight instead. It works pretty well and offer nice and smouth transition.
I spent like 2 hours of polishing weight paint.
the result is just amazing.
the only thing I would humbly criticise is the finger control.
there are copy rotations and they are not relevent. the original metarig is more accurate and natural. It offers more control over the fingersand a faster animation process. So I will modify this part to fit the original meta rigg as I alllways do 
Look how the contorll is insane. There is no shapekeys involved here  :eek: :spin:
AWESOME!!
Reminds me of the Kor’kron Elite card in Hearthstone.
.jpg/360px-Kor%27kron_Elite_(art).jpg?version=4fc8f4860b1dec0996f4dda2ab5462e7)
Awesome job on this.
Just awesome stuff, loving it!
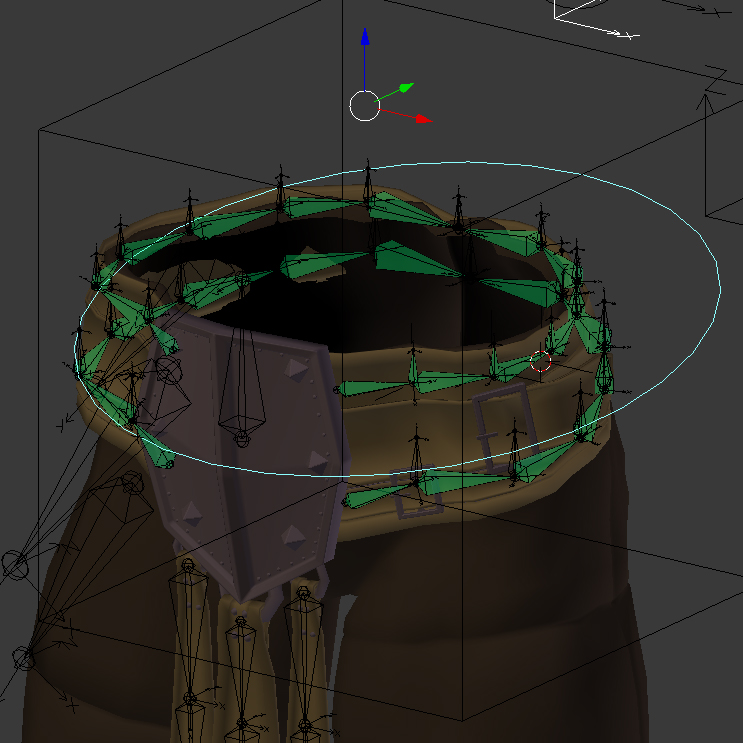
Hi Everyone, I just wanted to share this with you as it kept me awaken till 4 A.M.
I couldn’t sleep, thinking of what I was going to do next, of what animation I will do etc… and how to rigg parts.
I think I’ve found a killer way to rigg Belts.
This is a screen cap of the deformation bones.
There won’t be any control on the belt but the leather laniard and the front plate and I think I can guaranty there won’t be any clipping with the pant without using any masking modifier.
I wish to launch a little contest.
What technic have I used?
FYO, I’ve been recording everything till I’ve started rigging process.
So I will be able to publish a first tutorial covering rigging, (at least it will be a making off with some timeplapse but I will comment every crucial steps) as soon as this character is done.
I will then publish tutorial related to every step to create this.
I wish to launch a little contest.
What technic have I used?
Hm, green color of the bones means constraints. I guess you’ve made an IK chain. But perhaps that is thought too simple … ? Really curious about this.