Thanks so much Ziggyv great feedback and nitpicking it exactly what I’m looking for I’ll work on the points you raised tonight thanks for taking the time to reply, I want to have this as a base asset to work from in the future as well so want to get it the best I can! I think I depended too much on just one referance for this I should have looked at multiple ones.
Had a look at some of your work the other day as it happens, I really liked you style some really nice work there! Thanks again
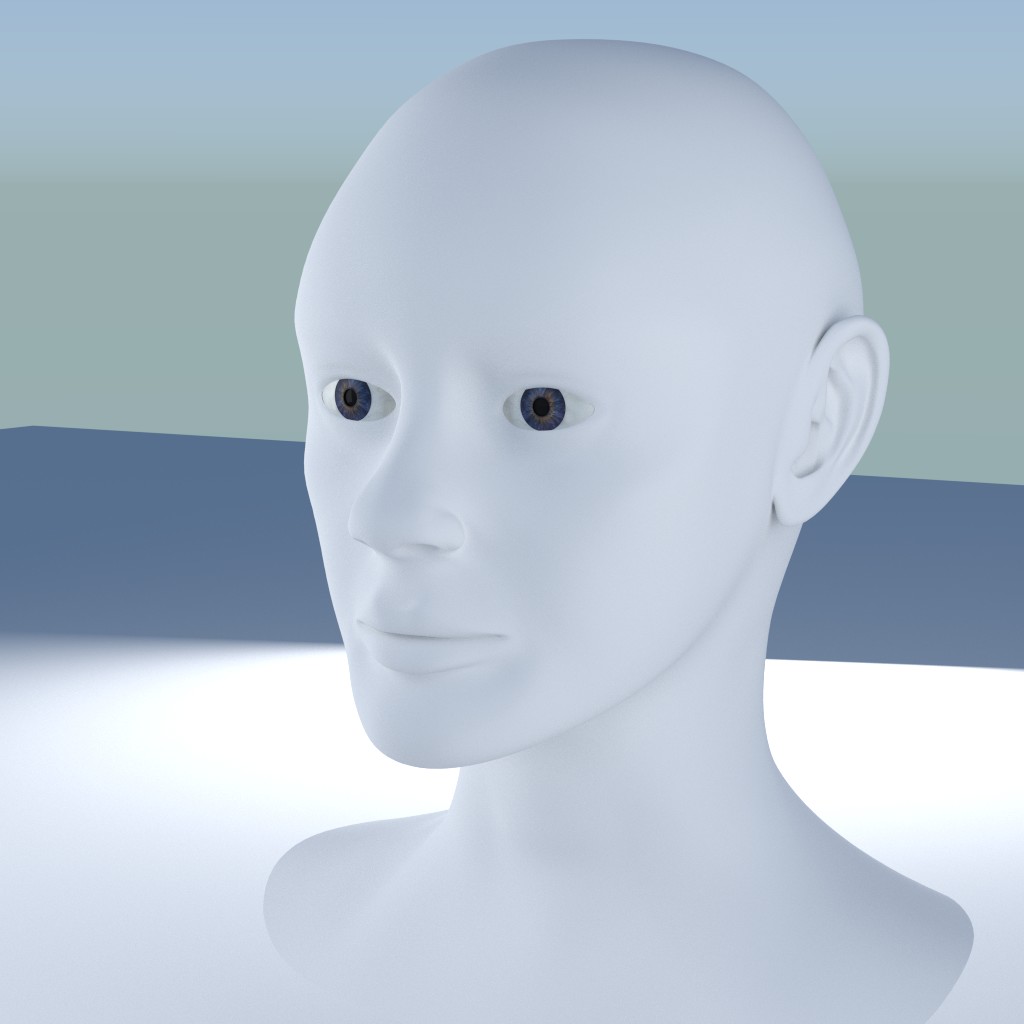
I can see how bad my first one was now! not sure how I missed that, I’ve got some proper human reference pictures now rather than just anatomy diagrams and I think I was also going wrong as I was spending too much time in orthographic rather than perspective or at least bouncing between the two to check what it looked like. I also think if I’m honest I was trying to hard to exactly copy the image rather than trusting that I could do it by eye, this time I just used reference images every now and then to check proportions and the rest of the time I just had them up in a separate screen referring to them and I think I’m getting a better result I also had not just front and side but angled shots as well to work from so I hopefully got a getter sense of where the depth should be. At least I had the base mesh to start from this time so it was not totally wasted, well I learnt loads as well, mainly what not to do
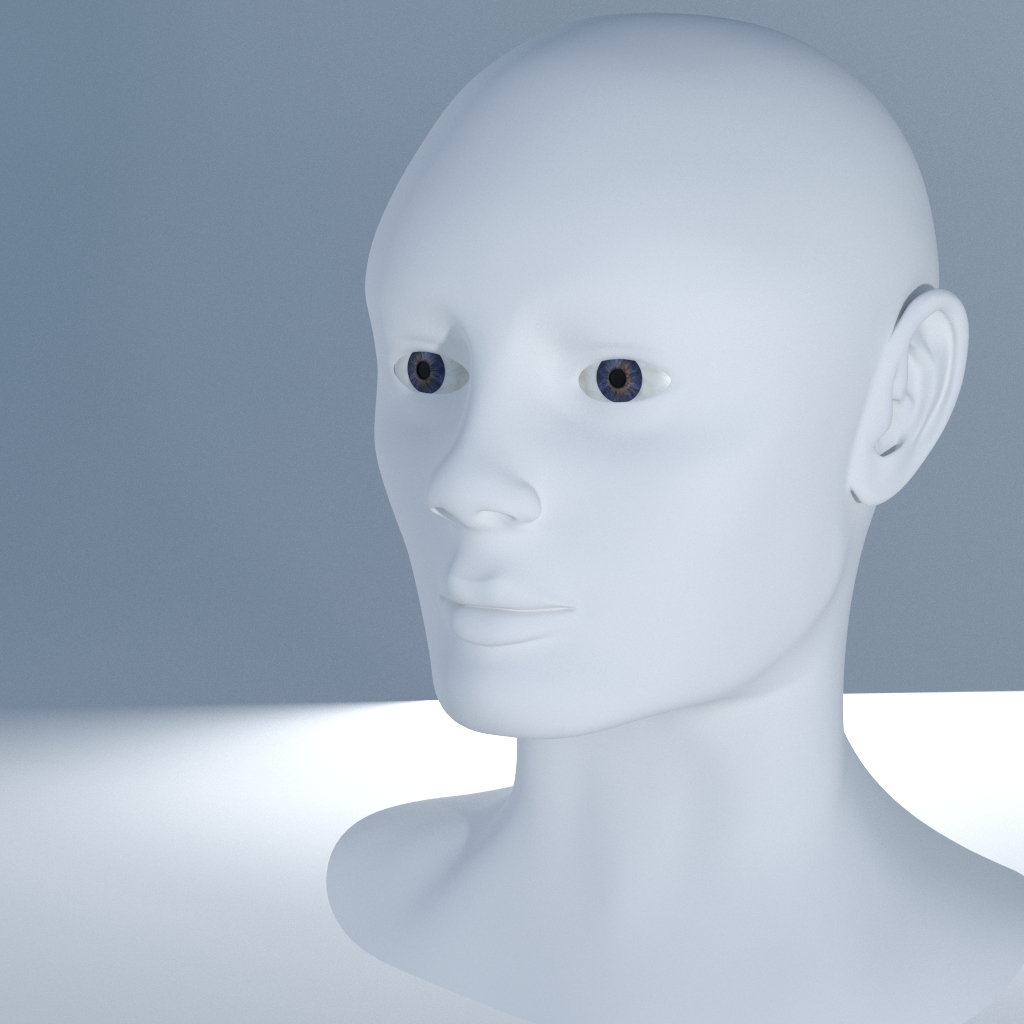
Is this heading in a better direction, happy to take it on the chin if it is not! tried to take on board feedback.
No, no, no! It wasn’t bad at all. It was just undefined and it was missing some more pronounced features that would change it from a well made base mesh with proper edge flow to something more natural and life like with proper edge flow.
Now it’s gone worse in my opinion. But don’t worry, in the process of creating a natural human head and practicing anatomy that’s normal, I guess. You are just floating between the extremes
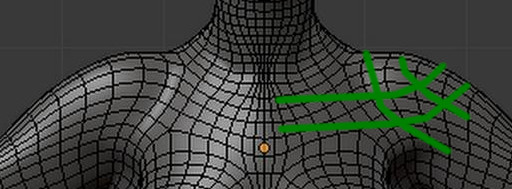
The whole face is stretched in the x direction. The eyes are too far apart and the two tips of the upper lip are also too far apart. The lips are too big (although maybe possible). There are two edges now at the forehead that don’t belong there - at least not that much (don’t take planes of the head too literally in this region). The groove you placed at the temple won’t work with a normal zygomatic arch.
I did all that also, went back and forth, thought how good the model was, went sleeping, thought how bad was in the morning, went back and forth …
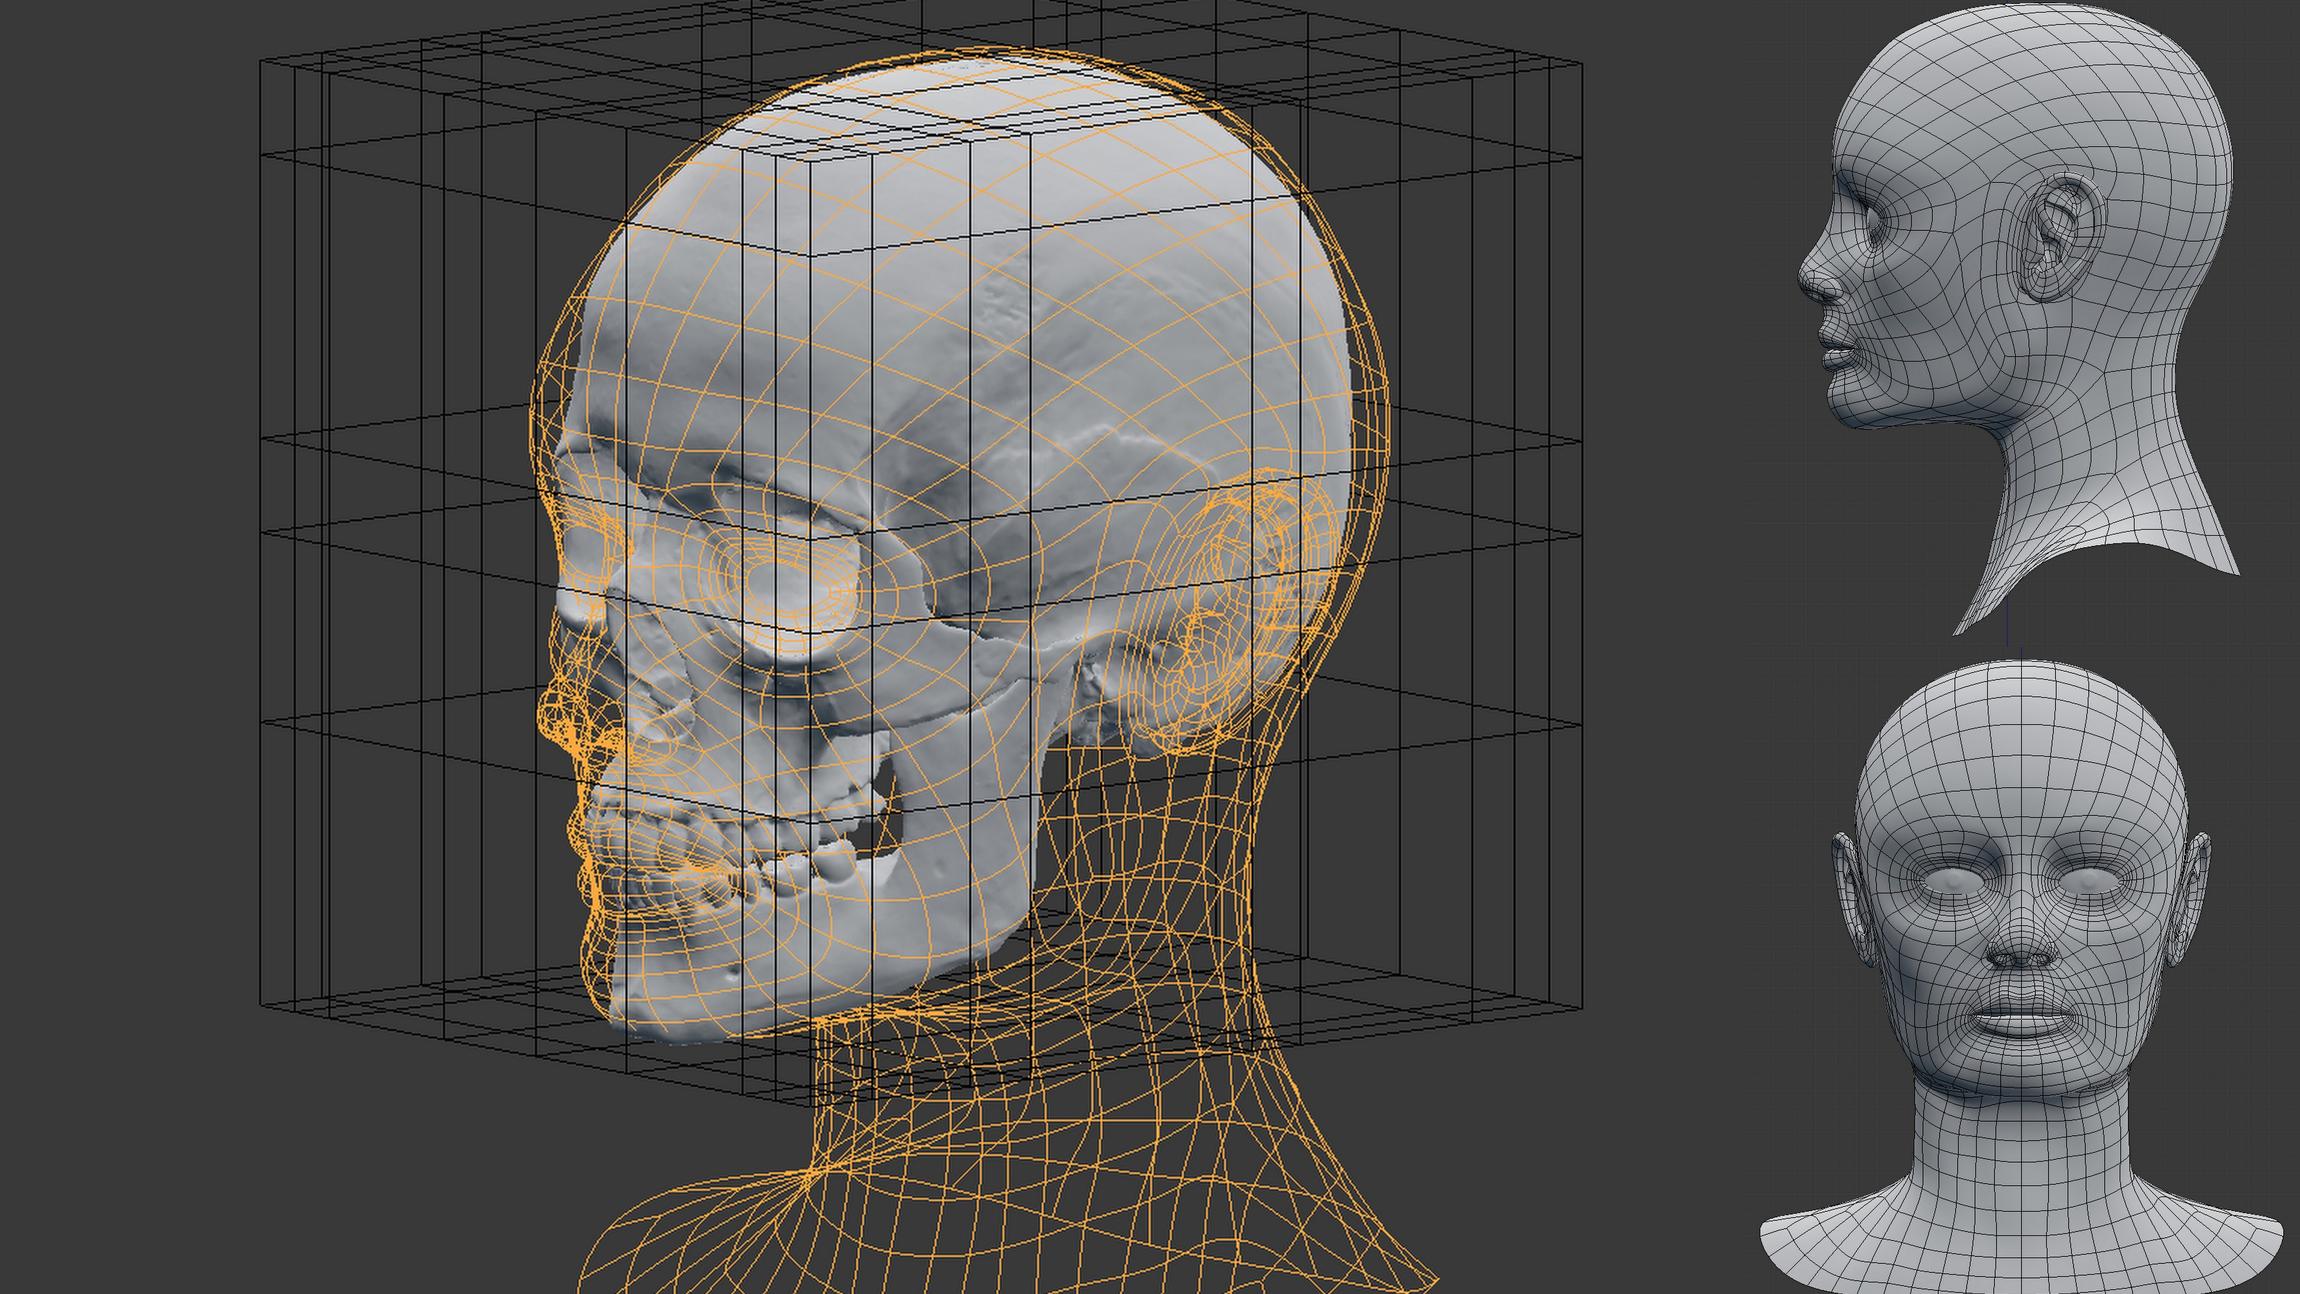
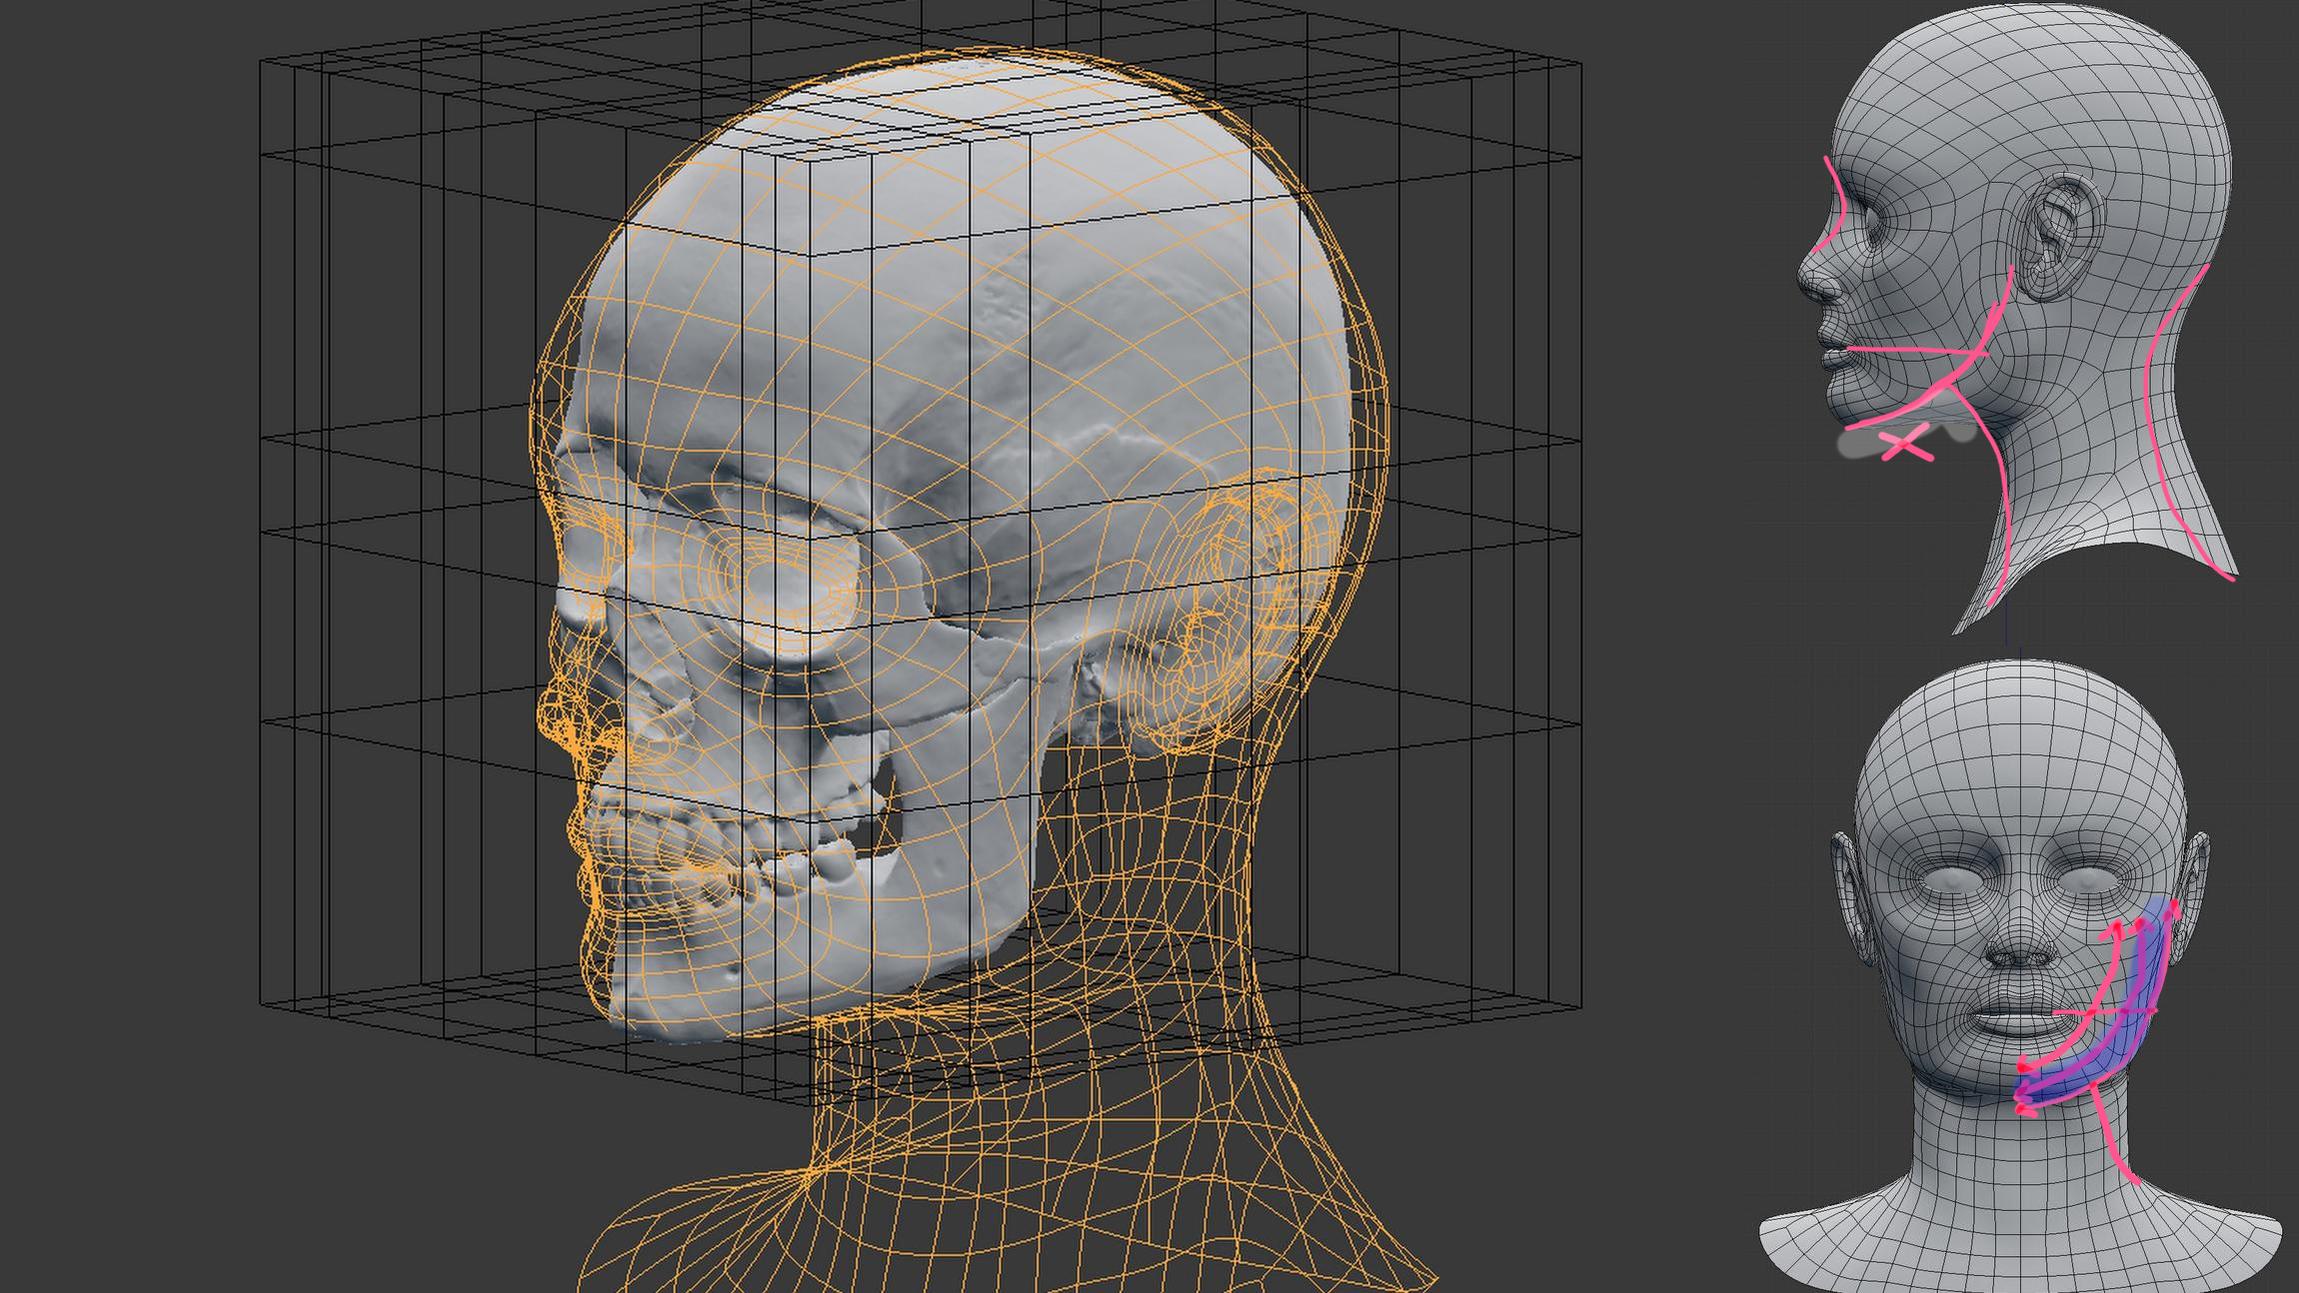
What could be helpful - at least it was for me to some extent - is to take a skull (a good and anatomically correct mesh from one of the 3d sites or blend swap) and put it in your head. Does it work? Or does it look wrong in this place?
Hope that helps and believe me, I know how difficult this is.
Thanks so much for the feedback again, I thought this would be the bit I found hardest I’m more geek than artist but that’s why I’m enjoying it as there is a lot of both in this and I want to get better on the art side mainly. Going for 3rd time lucky now great tip about the skull I’ll go find one! Saying that I do like the second one it’s almost cat like, will save it, perhaps I’ll have some alien interest in the final scene although I’m not going to cheat and go that route now, this has to look human, I’ve come to far, no claiming robot or alien influence allowed
If your trying to get better on the art side I recommend figure drawing and learning all the guidelines for proportions because it helps you to plan out your characters an gives a better result. Also it helps you to understand those forms better in 3D space.
Here is some useful resources.
Also Pinterest is a great place to find images that go into proportions and really useful for finding reference images
Here is Search on head proportions you will need to register or it won’t let you search or look.It’s annoying like that lol.
Thanks Ziggyv good links, I’ve had a pleasurable afternoon working through the female drawing course and I’ve also combined minoribus’s suggestion of trying a female skull. I treated myself 2 a 3d scan of a European female skull will have some fun retopologising that at some point!
I recreated the grid in the drawing course in blender in 3d then followed along but in blender rather than drawing and with my reference pics.
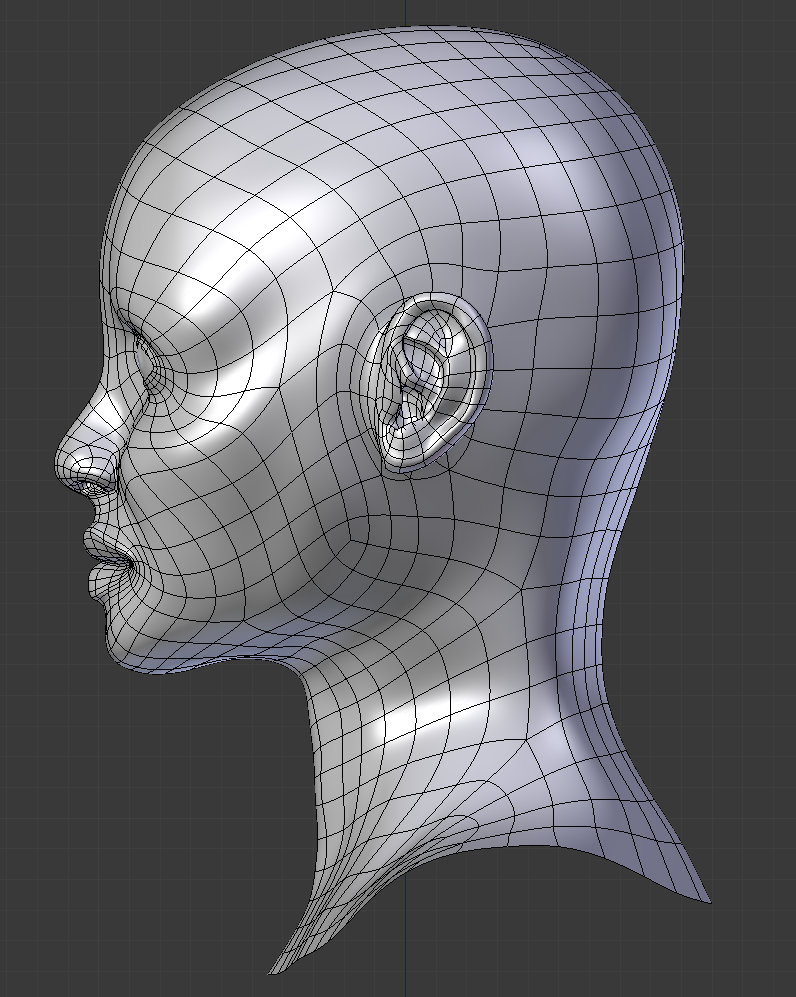
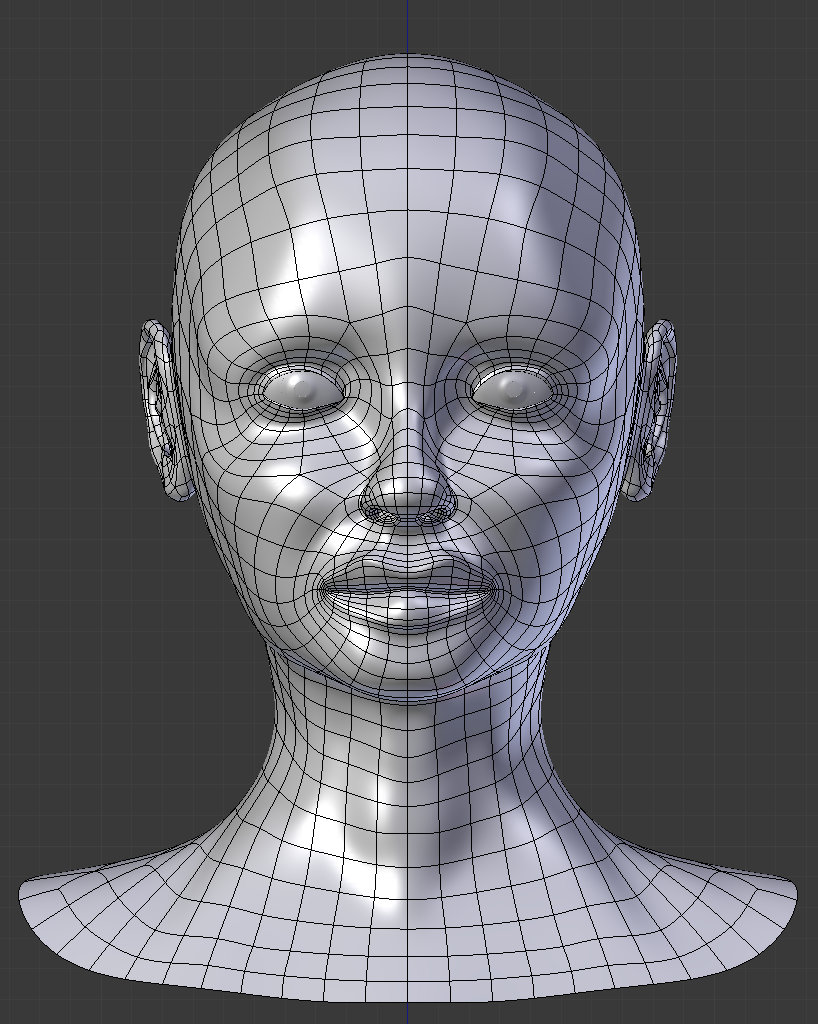
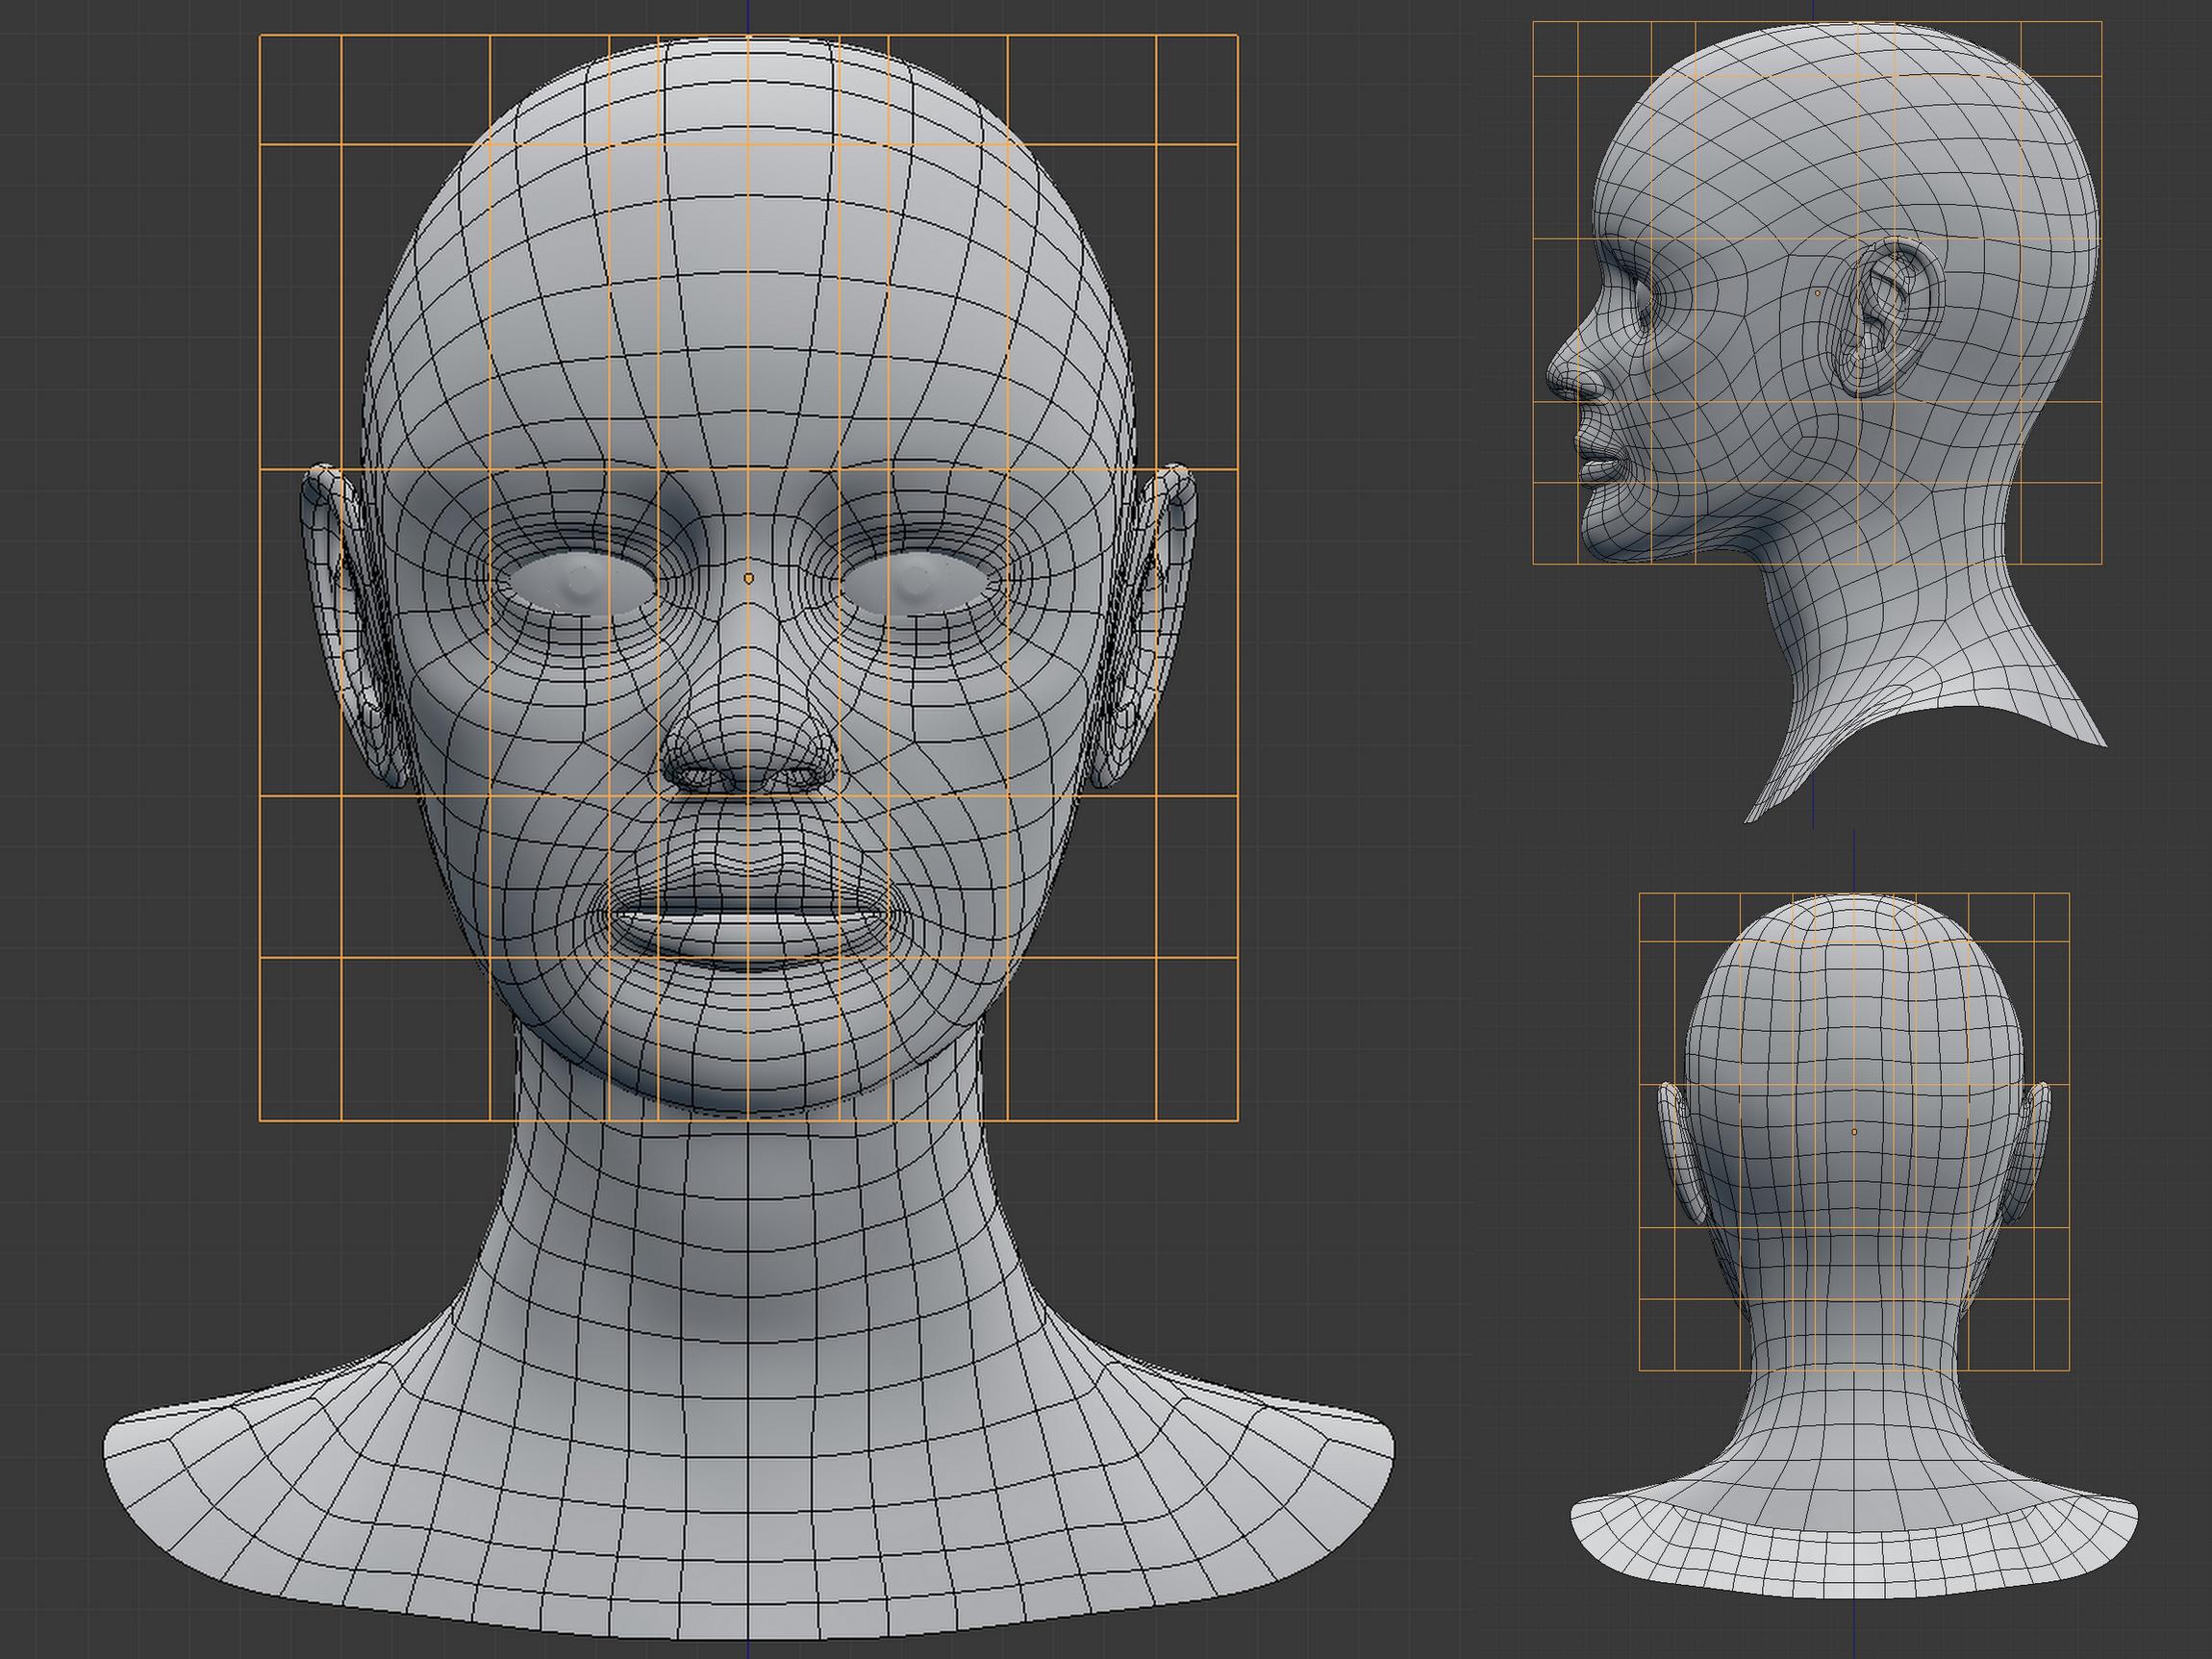
Was very interesting helped me loads getting everything in the correct place I was all over the place on my origionaly model but some bits were ok, I didn’t bother with the second model I did that’s way out was not worth it (but I still like it :)). The only thing that didn’t seem to cross over was the ear position not the height but how far back where it is in the course is so much further back than the skull and my reference pics unless I screwed up my grid but I don’t think I did. I used the skull and ref pics to check that positioning. Here’s result after, needs detail and tweaking but I’m going to do that later I just want to get it looking roughly how I want it to look and everything in the correct place, fingers crossed 3rd time lucky!
Thanks again Ziggyv guess what I will be doing this afternoon!! I’ll get there and really appreciate the time your taking and the detail of the replies.
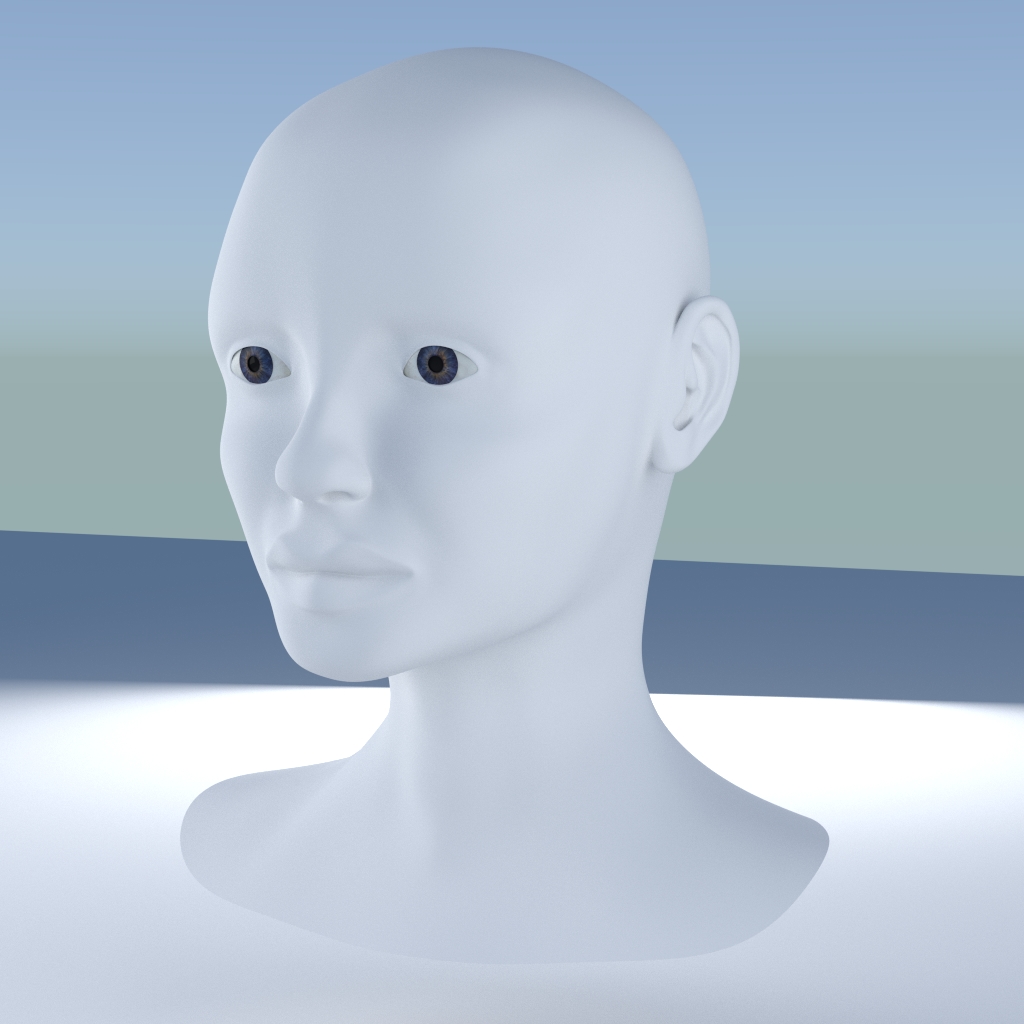
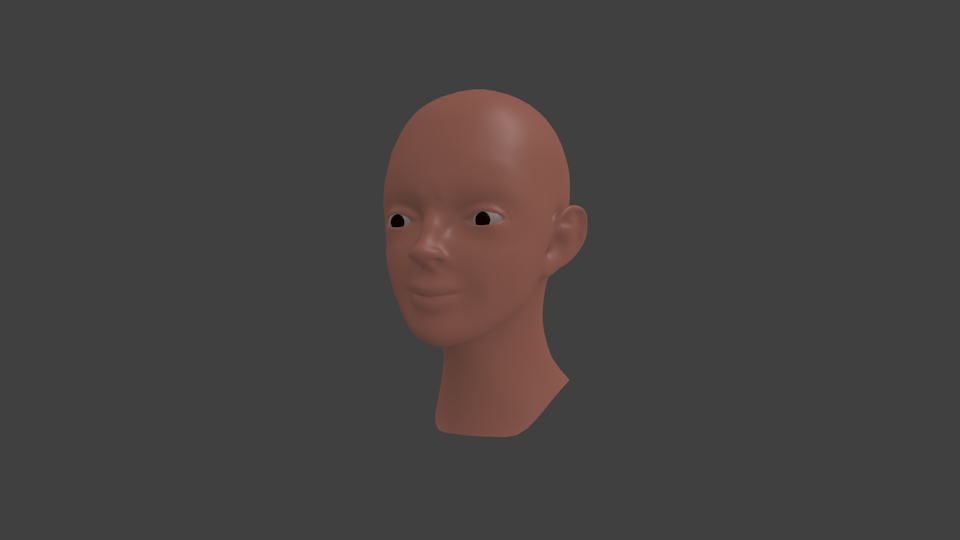
Hopefully getting close now and not wasting everyone’s help How did i miss that I had such a square jaw I’ve never not spotted stuff wrong so badly before not used to it!
Good progress, Umii. The skull fits the head well. Now that the skin is covering the bones you need to consider an additional layer of muscles and fatty tissue between the skull and the skin. That will make her head appear much smoother immediately and that is also what Ziggvy with the paintover for the chin meant. Especially this area needs some more flesh.
Edit1:
You posted you last post while I was writing mine. Your last version is really good. Give me a minute to think about it.
Edit2:
I could still mention some things in your mesh. But that would be more a matter of taste, like: she has sharp nostrils, a pointy nose (noses are rarely pointy because of the two cartilages in the tip), the tip of the nose could be a bit more downwards and so on. One thing thats missing are the neck tendons. It’s good to model them with real geometry.
But most important is: You are getting there. You are developing an understanding of basic proportions and the anatomy of the head and the tissue. And you’re doing that well.
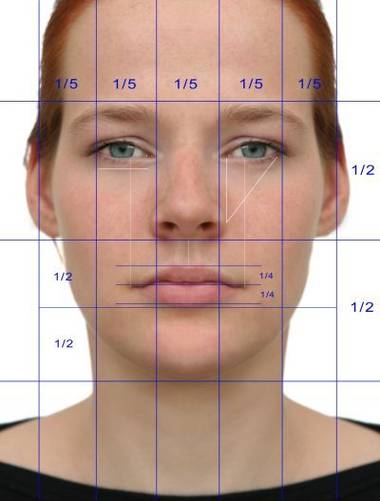
After that you should not forget, that there are a ton of variations in real life and that no face is symmetrical. Although symmetry is a ideal of beauty it isn’t happening in perfection in real life. But be aware that the difference between a normal variation and something not normal is small. Therefore it is important to know the basic rules like “a head should be 5 eyes wide” and so on. Regarding proportions and symmetry there is another rule that is called the golden ratio. Have a look at this video - they are using a golden ratio overlay for the photoshop work.
Thank’s minoribus learnt a lot doing that and I really appreciate your’s and Ziggyv’s help and feedback. Think I’m going to start on the body and the rest of the model then come back and do a layer of detailing on the face and fineness when I start texturing etc. I’ve still got to unwrap the horse and create the actual scene this is going to take so long but if I finish it I should have covered a lot of what blender has to offer that’s the plan!
I should have my tablet by then it’s taking ages to arrive!! I had forgotten about the golden ratio stuff I’ve done a bit in the past playing with fractals etc. and I’m fairly sure I read more about it in GEB where he compares Gödel, Escher and Bach and recursion etc. although it was a while ago and I might have miss remembered! actually doing one of Escher’s scenes in blender could be fun!
Watch this space now going to bore everyone with my attempts to model a female figure, my main aim is it looks like a real female not lara croft how hard can that be to do the rest of the body
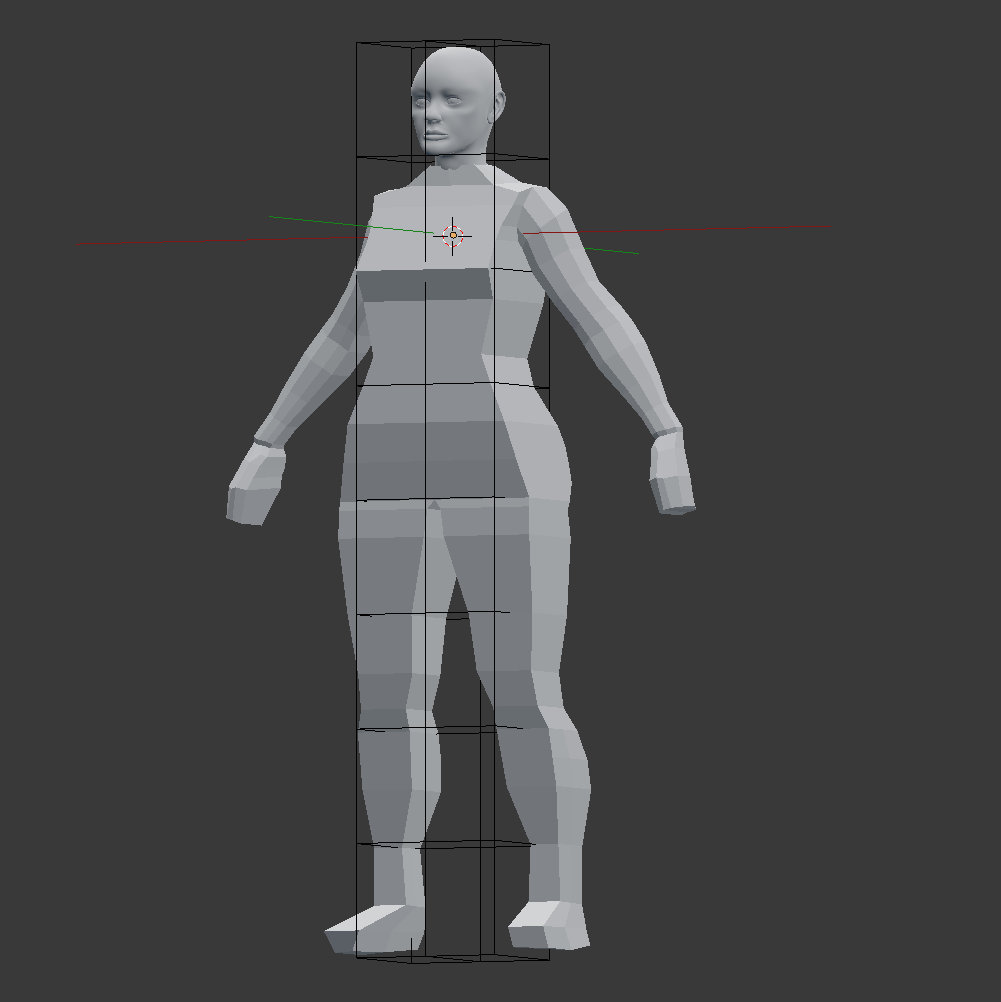
Hopefully have learnt from head, checked proportions before I started 2 heads wide and 8 high, not sure if this is the best way to approach it but going to try have blocked out rough shape going to hack away at it sculpting and then make good base mesh with a view to doing detail sculpt later, I guess I will perhaps break hands and feet off as they will be fairly detailed will do those last will take me a while now more sculpting less forums for a bit She’s not looking her best at the moment
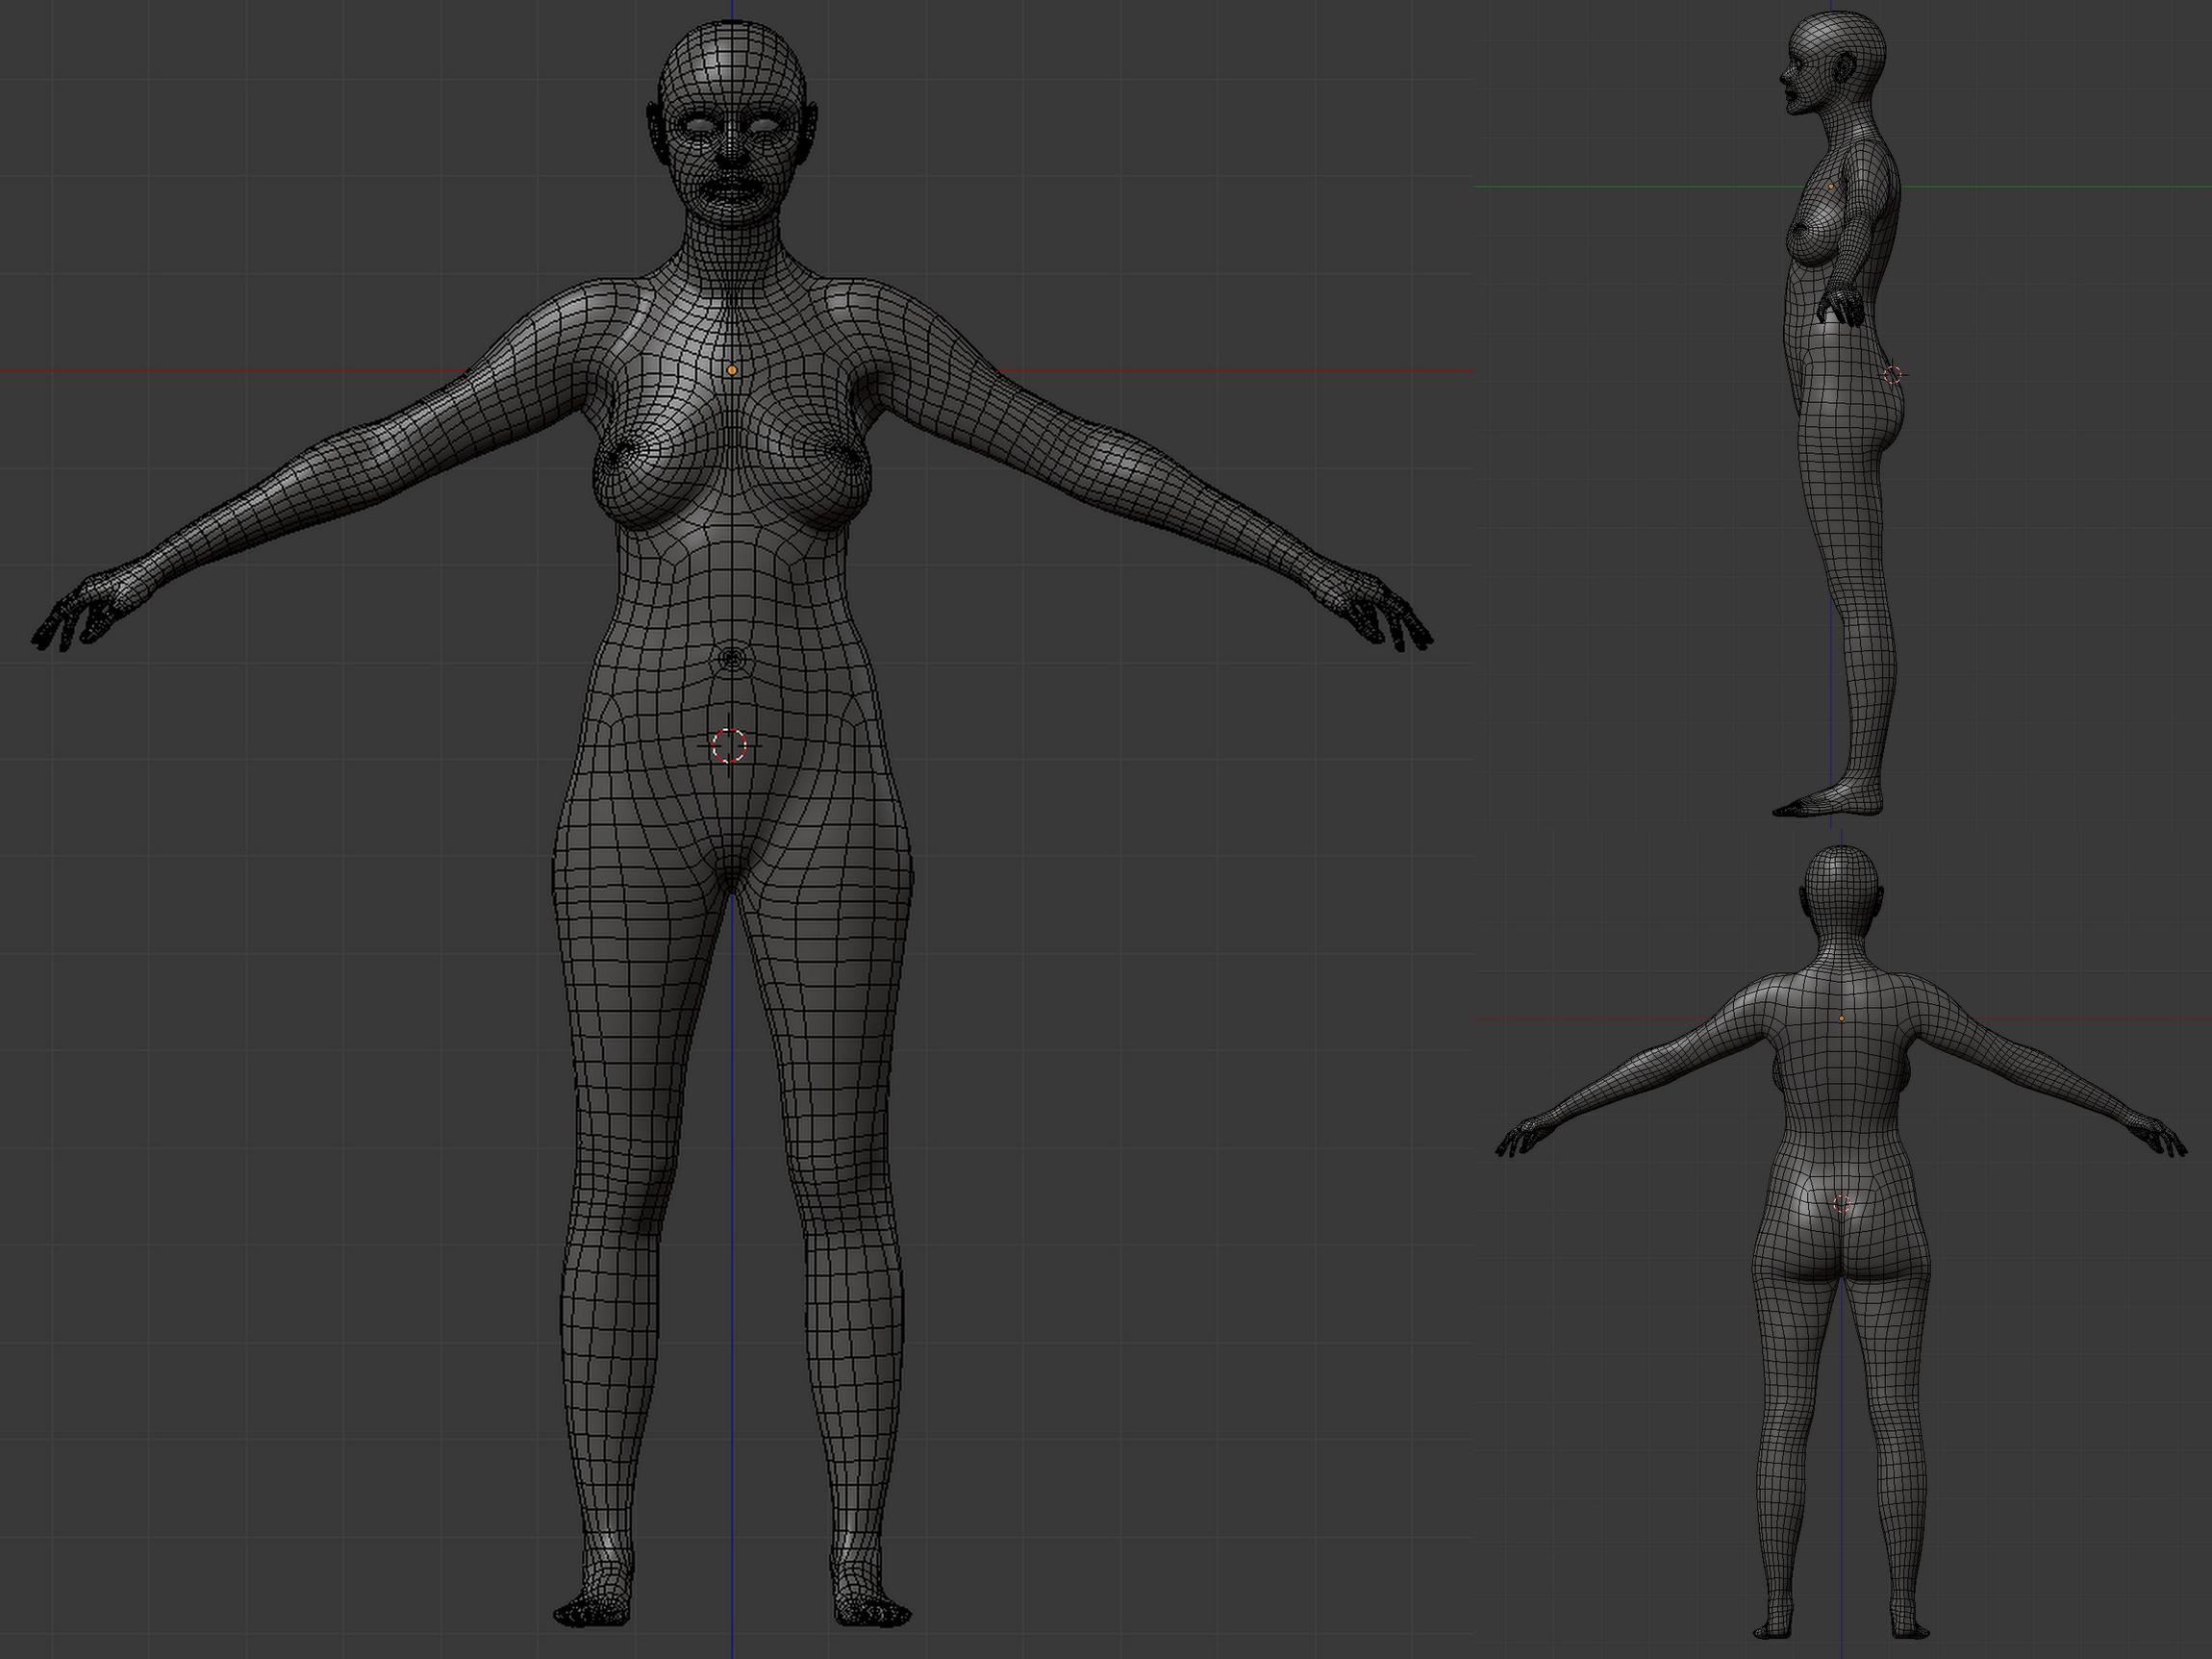
At a point where I could do with a little feedback and nitpicking before I go to much further with the body if anyone has a sec. I ended up doing a combination of a bit of sculpting, and mesh work but I found some body scans I really liked so ended up playing dr Frankenstein more chopping them up and resculpting and retopologising rather than doing it from scratch and I real wanted a normal looking body.
I’ve started with a (hopefully) natural pose i.e. no support from clothing so gravity is in effect!, I’ll do another one with that once I’m happy with this but wanted to start from this as a guide. I’ve intentionally tried to make the body look like a normal fairly fit female rather than the hero proportions! so it’s quite soft intentionally.
I didn’t go mad on getting a low poly mesh, it’s not crazy and I could easily probably drop half the edge loops if I wanted. I was not sure about the elbow and leg joints, because I kept it with a higher poly count I’ve just put some extra edge loops there rather than doing an inset which I’ve seen a lot, I didn’t know if there was a different reason for doing the inset perhaps it helps maintain the shape ? but I’m going quite soft anyway I can easily add them if it will help me pose later.
I’ve tried to put the polls where I don’t think they will matter, I’m not overly concerned as I can easily move them later and there are not many but if anyone spots something really obvious let me know or any other topology blunders!
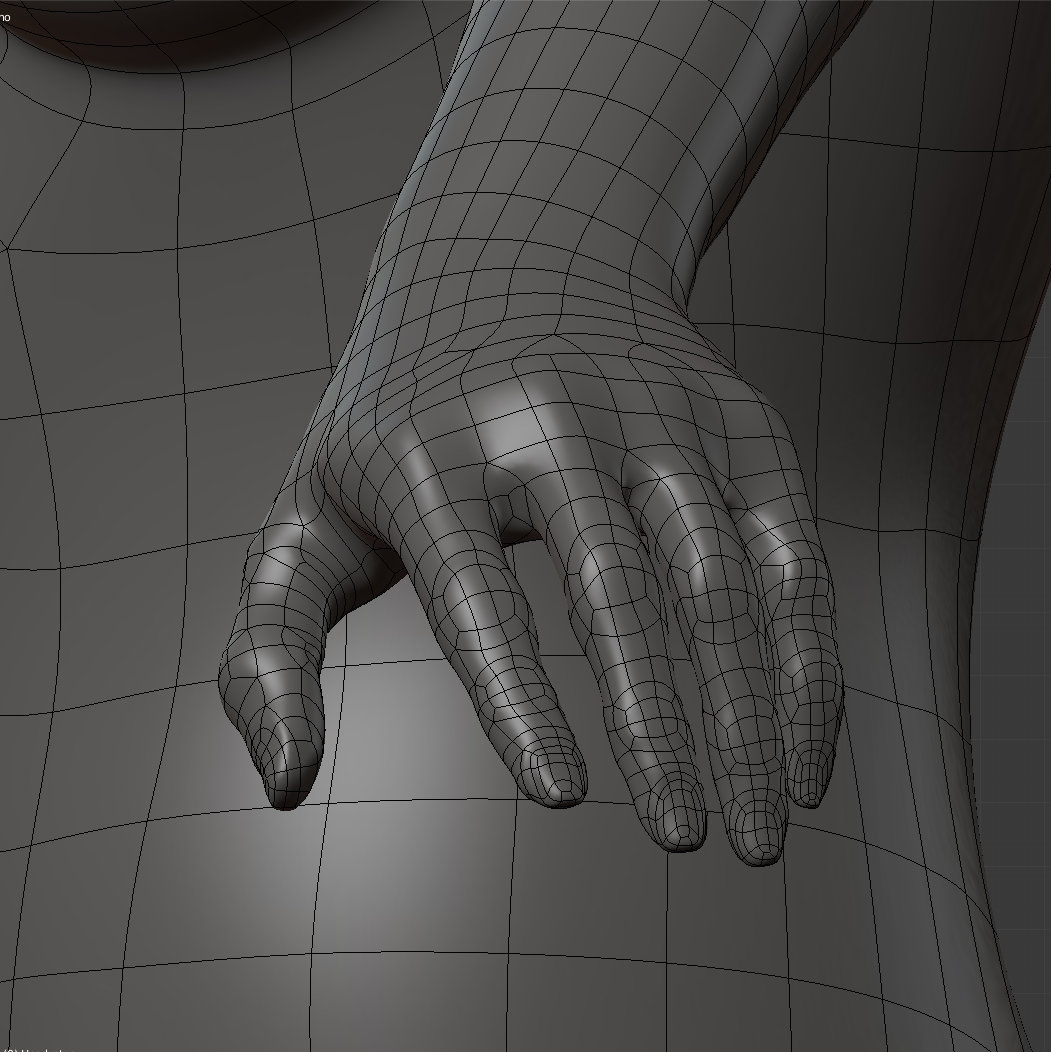
I was not sure if I should have topologised the hand in a relaxed position I thought it was a good idea rather then straight out then have to stretch everything all the time.
I was lazy on the feet don’t looks closely at them!, if I ever need to do close up foot work for some reason I’ll redo them
Hopefully I have proportions correct! I might need to make the face a little softer to match I think but will do that later.
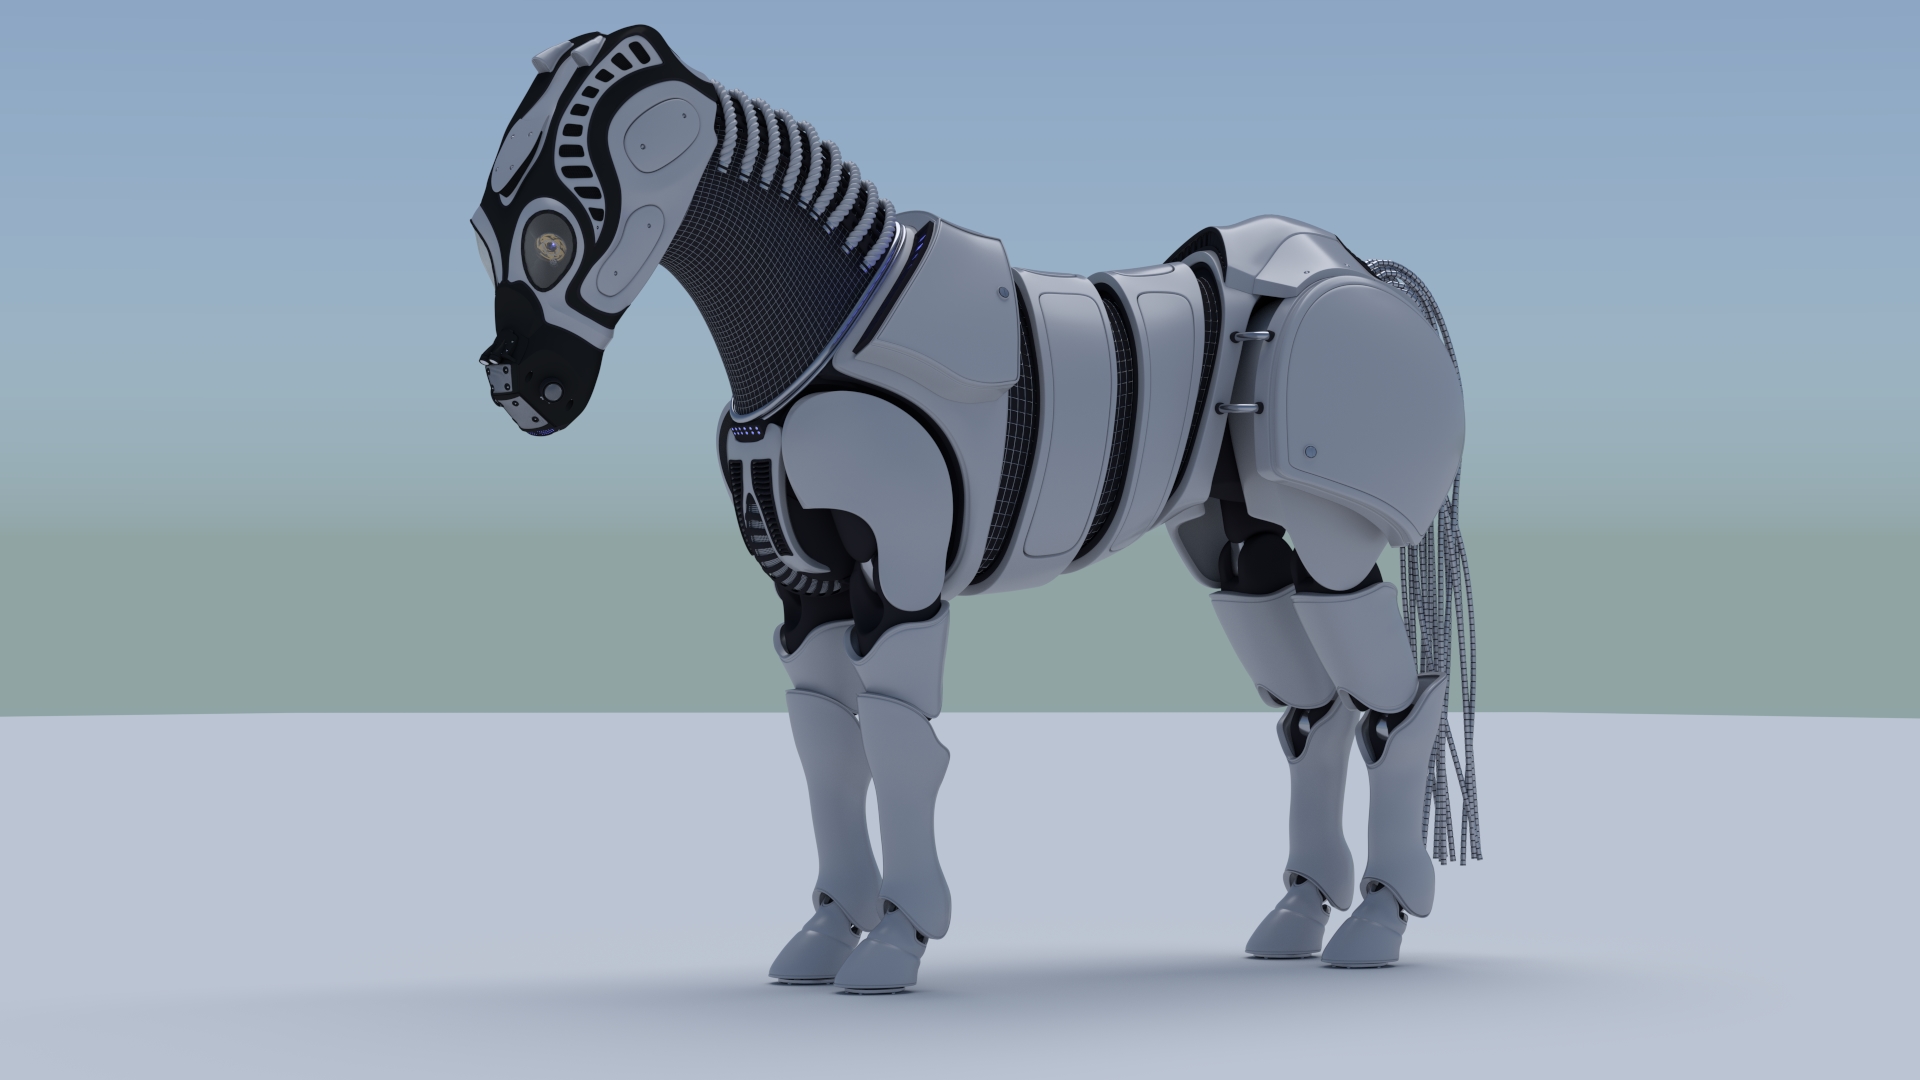
Hi, So impressive work here in both modeling and rigging. this is going to be an epic model.
+1 to Minoribus comment.
I also think adding ears shapes upon the head would break the curvature of the neck and head and give dynamism to your character.
whatever you’ll use (ears, anthena…) it could be a good benefit.
I also agree with the tail, and if you’re going to animate your charater, the tail will give you a super result with counter movement of the body…
Thanks Pierriko, high praise coming from you looking at your work! I did end up adding a tail and small ears (I may revisit the ears later) The tail I’m really please with it’s fully rigged as below! Now working on the female companion as posts above Clothing for her next!
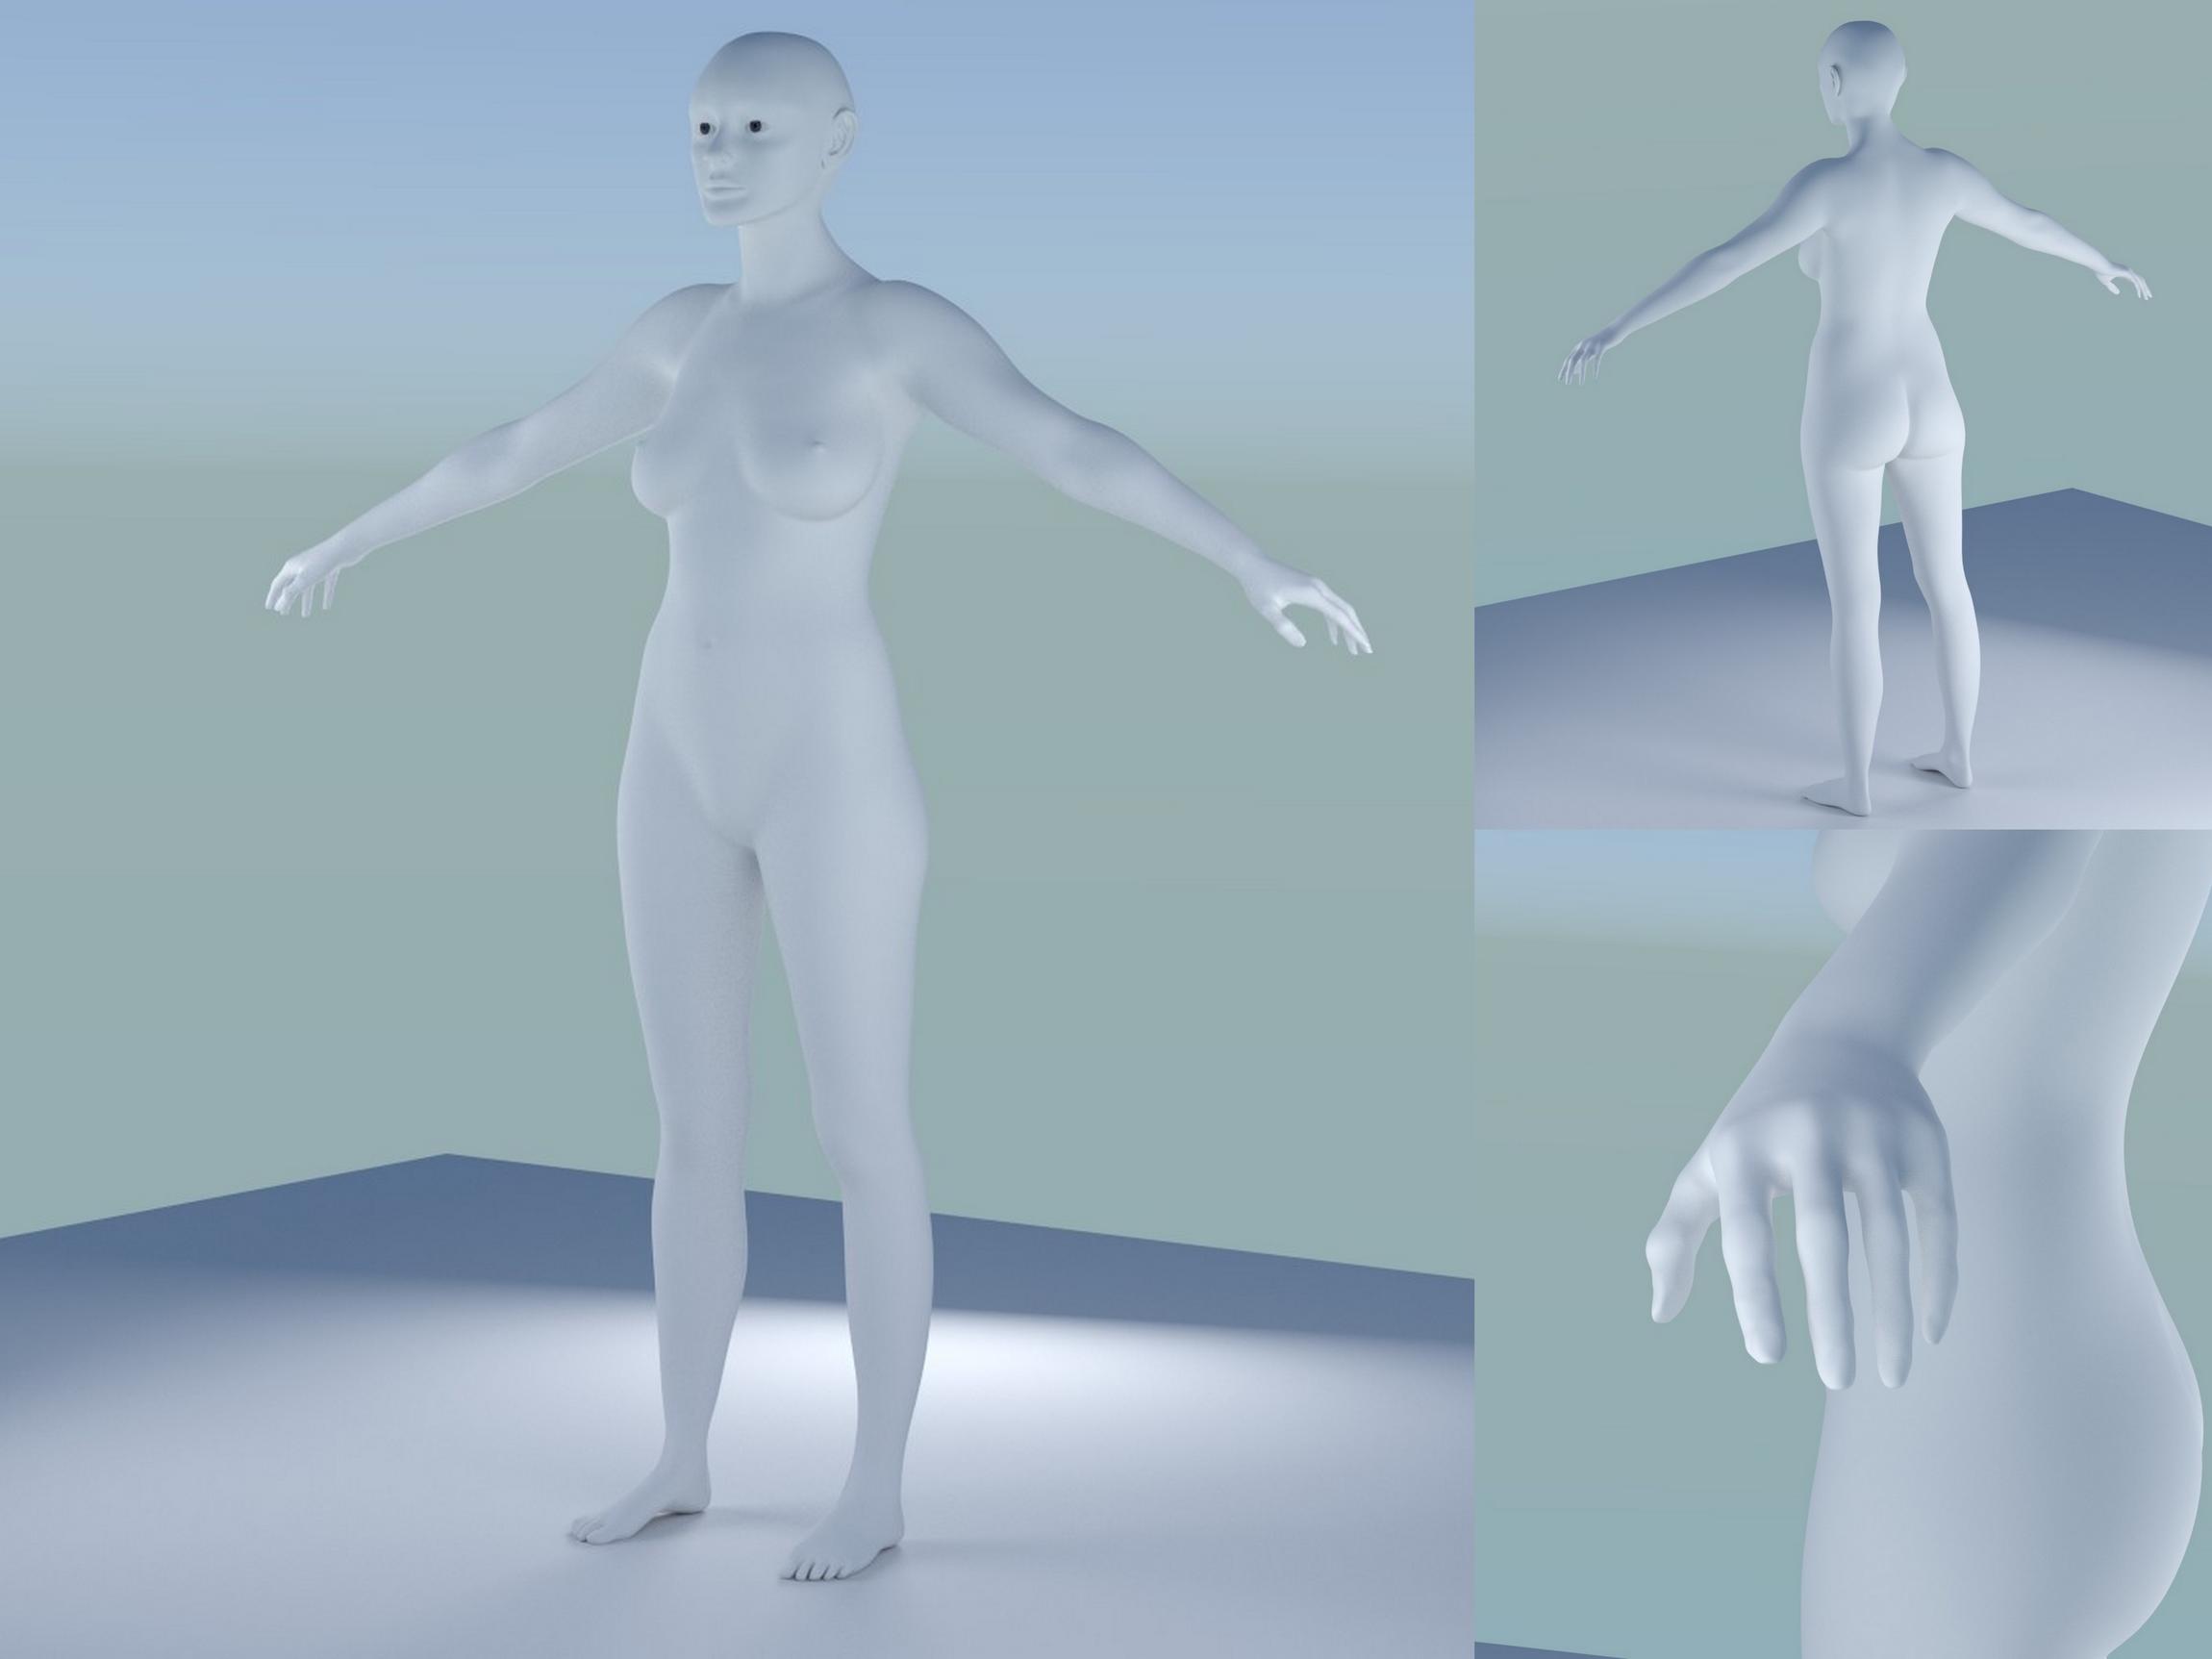
Good work on the body and the topology, Umii. Everything looks soft and super natural. Excellent! But I have some humble suggestions.
The hands could be a little larger, compared to the body. And I don’t comment on the feet
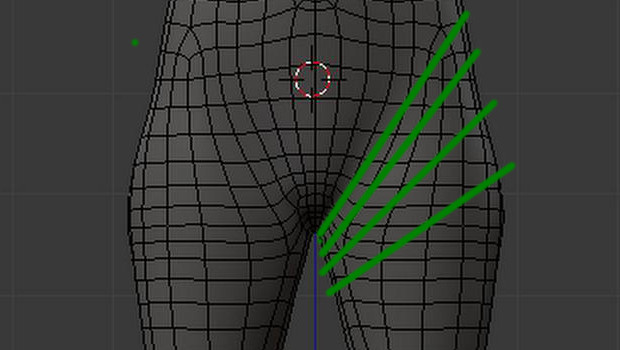
Later, when you rig and animate the mesh, you must try how it behaves in the hips and shoulder area. Most probably it isn’t necessary, but perhaps the hips will bend a little more naturally if your topology has diagonal lines like so.
I guess the shoulders - as you have them now - will give no problem, because you can weight paint them nice and gradually. Another approach is this one, though, which is also seen often.
Thanks minoribus!! let me rig before I do anything else and see what happens then I can adjust if needed before unwrapping etc. I figured there was a good reason why some of the meshes had the geometry different I need to make her a tshirt or something as well Think I’m going to try rigify will have a read up, I did all the horse rigging from scratch but now I understand it I’ll have a go with a tool and like people must have rigged humans a million times will stand on the shoulders of giants for this one Will have a play around with the hand size as well, that didn’t jump out at me but will be interesting to see as I tweak it, whoever implemented proportional editing deserves a medal!
Glad it looks natural to you I really wanted to do something that hopefully was a little different and my own, well I’m sure I’m not the first to use some of the references and scans but my take on it, I’m starting to recognise bits on other models now I’ve been looking in more detail
Rigged it and it all works fine which was a surprise! Will need shape keys on the elbows and knees but I can easily add drivers to those if I want to automate animation later.
Only small issue is OMG I suck at posing the rigging was easy but can I get it posed nicely without looking like a 3 year old did it!!, anyway I’ll leave that for another day, I just wanted to check it all works and it does, going to start on the scene now, I was going to to clothes and hair but it occurred to me that that’s really going to depend on what scene I put them in in the end so going to do that next then I’ve got a ton of texturing, skin, hair uv unwrapping etc. to do! but I’ll do all that together will finish the modelling first.
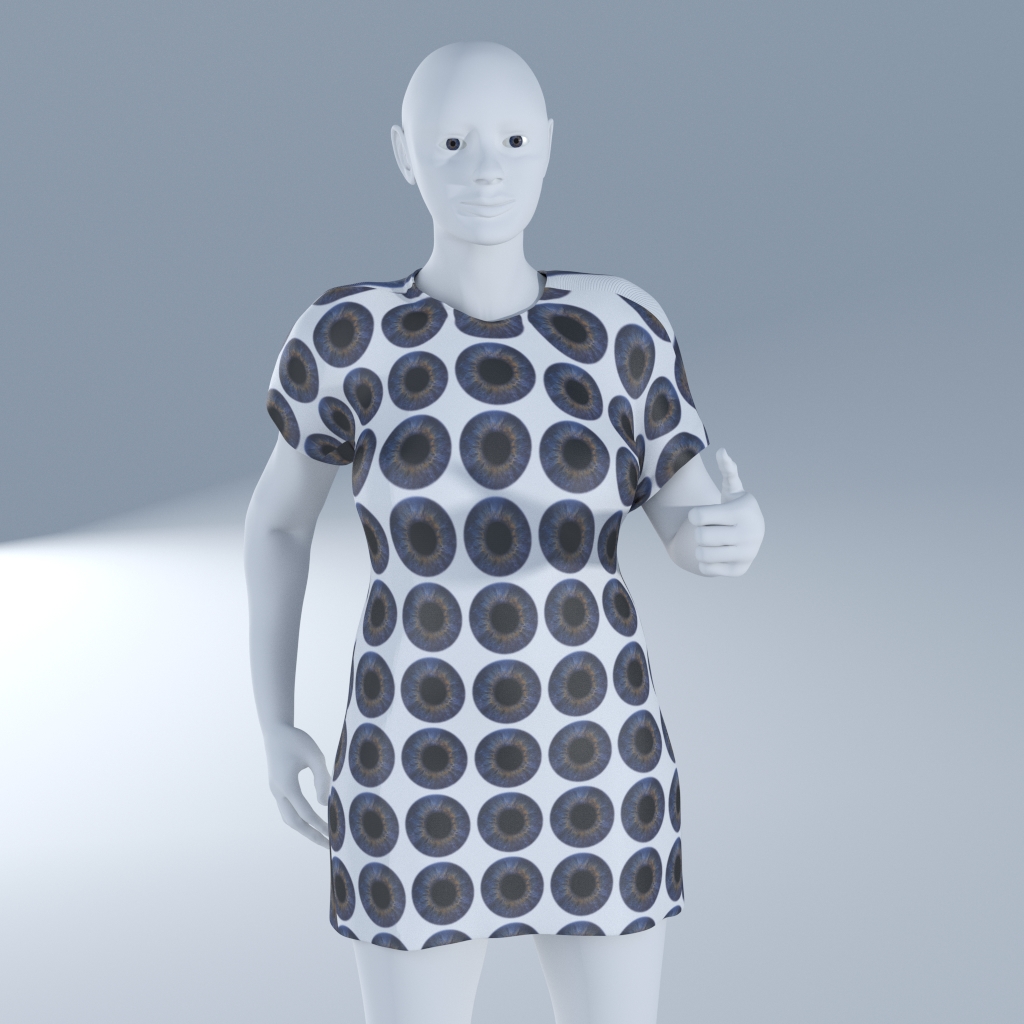
My really bad pose and I don’t think any fashion house is going to be beating my door down for my temp modesty dress either It’s a bit sad I have obviously paid more attention in my life to how horses move than humans!
Looks like a good rig and the pose isn’t bad either. You could lower the shoulders a bit, what would make her appear a bit more relaxed. But perhaps its just the dress. I wonder how this would look if you would give the cloth modifier a short try.
I think you are being generous about my pose I’ll have a play about with the cloth sim a bit later, good suggestion! I jut wanted to check it rigged ok for now and couldn’t resist just trying something clothing wise while I was there! She’s going to have some sort of combat medic clothing in the scene. I think I have my head around what I’m doing for the scene, I’m going big hopefully i.e. whole city under attack in the background which I was a bit overwhelmed with thinking about it to start with but I think I’ve got a plan now as to how I can do it and split it into achievable pieces. Going to work from the back forward in layers, currently working on the hdri image for it then will come in from there closer and closer is the plan! Hopefully have something blocked out over the week!


