Customization questions from a Blender-curious 2d/3d artist.

Not a bug or a missing feature.To be honest,i hate it when photoshop remembers its layout.I sometimes screw something up and then restarting it doesn’t fix it.

Just start up blender,set up your interface how you like it and then save the startup file.

In the past,blender didn’t even warn you if you clicked the close button accidentally (which wasn’t really a problem)

This would be the best place for reporting bugs. You have to register.

Depending on availibility of developers, and the complexity of bugs, I’ve had some get fixed the same day. Then tomorrow having it on buildbot with the bug fixed. That’s a huge upside for Blender.

I’m sure you know about buildbot, just in case:

The problem is a lot of bugs will be declared ‘features’. Make sure to try and explain your case as concise as possible, if it’s a complex thing to explain provide blend file or make a video demo for the case. I’ve had success when providing video as demonstration of bugs.

In terms of feature requests, frankly I haven’t seen much success if it’s coming from user base.

Thanks a lot for the details and links Orange, this will come in handy since I had no idea where to start when it comes to submitting such reports. And indeed, I can confirm that in many cases video reports can be more efficient than any lengthy description, as I experienced it myself when providing feedback for beta software in the past.

Hello again - I have a few more questions, this time related to Cycles.

  • Adaptive viewport mode

During the early stages of a project (= when it is not time yet for long render jobs) it seems natural to run Cycles in the viewport through the “Rendered” display option. It is very powerful and very fast. Yet even though I have a hotkey set to “Solid” mode letting me jump out of the Cycles render at any desired time, I often find myself wishing for an option to automatically turn off Cycles whenever the viewport is being manipulated, to then only switch back to “Rendered” mode when no user input is being performed. This would be similar to the way some 3d programs have the option to only display the bounding box of an object when a scene becomes too heavy to manipulate. Is there such an option for the Rendered mode in Blender ? I think it would make everything more fluid as it would fully eliminate viewport navigation slowdown.

(I actually attempted to hack this in by assigning the input used for viewport rotation to “Solid” mode as well, hoping that the two events would happen at the same time, but it didn’t work.)


  • Adding samples to an existing render

    When working on a proper render (high sample count, and rendered into an UV/Image Editor window) I like having the render happen in an undocked window, which frees up the viewport and the working space :

Now is there a way to ask for the finished render performed in that secondary window to “follow through” with an extra number of samples without having to restart the whole render from the start ?

I hope this makes sense ! Thanks a lot in advance :slight_smile:

  1. No, there is no such function.

  2. Unfortunately, no. What you could do instead (you’re interested in reducing noise?) is to render the whole thing again but with a different seed, and then mix the two renders together (in Blender’s compositor or Photoshop/Gimp/etc).

Thanks man, I appreciate the responses.

Regarding 1, I think this will be a good excuse for me to get into Python ! It is basically a simple sequence of events so that seems within the reach of a beginner. (if the viewport is currently set as “Rendered” and a click-drag is detected, then switch to “Solid” mode ; and when click drag is released switch back to "Rendered.)

Regarding 2, it’s too bad that it is not currently possible but this is not a deal breaker. I’ll just set the samples to something very high and I’ll pause whenever a good enough result is reached. I like the idea of rendering another pass with a different seed too, as it could create some interesting results. Thanks for the suggestion !

I don’t mean to discourage you with devils which are details right from the start, but it may not be as simple as it looks: indeed you’d need such operator to be modal (so it’s not one-shot, but continues to run while mouse is dragged) and either it would need to run the built-in operators to actually navigate the viewport or you’d need to reimplement the rotate/pan/zoom functionality.

Totally ! I am not hoping to wrap my head around that kind of things anytime soon. It still is fun to think about tho :slight_smile:

Besides that, I am back with a few more questions on basics …

1 - Object delete confirmation popup
Is there a way to get rid of it ? I’ve read about a few suggested workarounds for this issue and also spotted some custom scripts but I would like to know of the best possible way to get rid of this popup for good. I am confident that this will be eventually removed from the program altogether at some point, but it would be great to be able to get rid of it now :slight_smile:

2 - Sculpt mode display behavior
I am puzzled by this one. When toggling between edit and sculpt mode the model preview changes to something unexpected. This happens when the viewport is set to Cycles (which for some reason seems to be faster than the default when it comes to handling large polygon count in realtime, which is a bit peculiar !) in Solid display mode, with a model which has a textured material applied to it. This is probably caused by the sculpting mode switching to some kind of default display mode when a textured material is detected, and I would like to avoid that. Any idea ?

In the example below I just want the model to be consistently grey at all times in Solid viewport mode regardless of the editing mode, instead of unexpectedly becoming white when sculpting :

3 - On hidden menus
This is more of a general question related to some of the UI/UX threads floating around the forum. New Blender users often complain that some functions of the program seem to be hidden behind secret menus only reachable through a keyboard shortcut, as opposed to being accessible through the regular interface - to which it is often replied that everything is actually accessible through the various menus and panels. Most of the time this in indeed the case, but it occurred to me that the Specials mesh menu is, indeed, a totally hidden menu only reachable through the default W hotkey. As far as I know the spacebar/search tool is another example of that.

Is there a list of such hidden features somewhere and/or a way of accessing them without using hotkeys ? I actually really like the way Blender is organized and I am quite successful at solving my own issues thanks to my growing understanding of the program, but it is a bit frustrating to find out that there are still some things that just cannot be guessed or discovered by oneself. This is of course all the more relevant when one is using fully custom shortcuts :slight_smile:

Thanks !

2 - Sculpt mode display behavior
I’ve had that pop up before, but haven’t had it in a long time. Can’t remember exactly what it was.
But Sculpt Mode did have major inconsistencies in both Blender Render and Cycles Render modes. On Friday a patch was applied to fix the absence of specularity in viewport when in Cycles Render mode.

Here’s a few screenshots, both object have the same shader and displey the same in Object Mode
http://edge-loop.com/images/blender/support/sculptDisplay_01.jpg

In Sculpt Mode they don’t display the same. There is an Options tab, that is Mode sensitive and is available when in Sculpt Mode.
http://edge-loop.com/images/blender/support/sculptDisplay_02.jpg

Checking ‘Show Diffuse Color’ will correct that.
In addition, the new patch from Friday brings specularity in viewport under Cycles Render. For now, the default settings still makes it different than when in Blender Render, but it’s a start. Check for new settings marked with red.
To get the new feature, grab the latest version off buildbot!
http://edge-loop.com/images/blender/support/sculptDisplay_03.jpg

3 - On hidden menus
As you may have guessed, the purpose of Hidden Menus is: nowhere to be found. That’s like a feature. It’s like bragging rights for all the Blender Experts.
If you would integrate them somehow in the UI, you’d have to change their name as well! No No
:slight_smile:

Ha, nice ! The “Show diffuse color” tickbox seems to do the trick, thanks. As you mentioned it it might not be perfectly accurate but at least it sorts out the issue I was having with the model turning white when entering sculpt mode. Great ! That’s one more thing solved :slight_smile:

Regarding the “Specials” menu, I don’t think you’d find anything in there that is not present in different menus such as Vertex, Edge and Face menus.

As for delete confirmation, the only option to overcome it is to change the execution context of the built-in operator so that it’s invoke() function is not called. That is, use a script/addon:


bl_info = {
    "name" : "Delete without confirmation",
    "author" : "Stan Pancakes",
    "version" : (1, 0, 0),
    "blender" : (2, 72, 0),
    "description" : "An operator to delete objects without confirmation pop-up",
    "category" : "3D View", }

import bpy

class OBJECT_xOT_delete(bpy.types.Operator):
    bl_idname = "object.addon_delete_no_popup"
    bl_label = "Delete without pop-up"

    def execute(self, context):
        return bpy.ops.object.delete('EXEC_DEFAULT')

def register():
    bpy.utils.register_class(OBJECT_xOT_delete)

def unregister():
    bpy.utils.unregister_class(OBJECT_xOT_delete)

if __name__ == "__main__":
    register()

Once you install it as addon or run via Text Editor, an operator called “Delete without pop-up” would be accessible via the spacebar menu. Or you could rebind the delete key to call it, using “object.addon_delete_no_popup” as operator name.

1 - On object delete

That’s fantastic Stan ! Good to hear that a script is the way to go, and knowing that it comes from you I am confident in trying it out. Very cool, that will certainly save me some time and frustration. And again I am sure that this will eventually become a toggle in User Preferences at some point in time.

3 - On hidden menus

I see what you mean - indeed, the functions within the Specials menu seem to come from various parts of the program. It is sill a very odd design decision to not place a UI access to it right next to View/Select/Add/Mesh though, as it strikes me as inconsistent. As a matter of fact it almost feels like the Specials menu is some kind of user-made menu that has been integrated into the program after the fact somehow … Is there any other “Specials” hidden menus like this one that one should be aware of ?


Besides that, I have a few more questions for you all, this time on UV mapping (this is probably less of “Basic & Interface” topic, but I thought I’d keep all my questions in this thread for the sake of convenience).

Most of the UV tools actually make a lot of sense and seem adequate, but I am left confused by the Sticky Selection mode and its consequences on UV integrity. These are my observations :

It seems very odd to me that disabling the “stickiness” toggle allows Blender to automatically break off UVs as soon as they are manipulated. For some time I was actually thinking that all my UVs were split since they were all breaking off when I was manipulating them, but exporting the model as OBJ to another program actually reveals that only the effectively manipulated points created a split, like on the vertical edge here :

http://img.photobucket.com/albums/v242/pior_ubb/2014-11-2419_49_06-Untitled-Autodesk3dsMax2010_zps717ef661.png~original

So my questions are :

4 - Is there a way to visualize the actual UV splits/borders directly on the model (or at the very least, in the UV editor window …), similarly to the green line above ? Not being able to tell if all my UVs are split or not is major issue :confused:

5 - Is there a way to prevent Blender from breaking off UVs when manipulating them ? (without having to resort to the Sticky : Shared Vertex mode, which makes UV manipulation and welding very hazardous)
[edit : I just found that this is solved by the Sticky : Shared Location mode. So this one is kind of solved, but the following visualization problem remains]

6 - Is there a way to visualize UV vertex sharing across a model (like on the second and third screenshots of the above picture, where Sticky : Shared Vertex is enabled ) without having the “partner” points being affected by transformations and UV welding ?

Thanks a lot for your help !

(And if needed, I am very eager to participate in any feedback group related to UV mapping in Blender, as I have extensive experience in the matter for both mechanical and organic models in other programs. It seems to me than in its current state Blender is underperforming in that area, especially compared to its very complete modeling toolset)

4 - If you are marking seams in 3D View from the “Edge Menu”, then they will show up on your model (3D View). Unfortunately if you do anything with the UV Editor in terms of creating seams, it wont be reflected on the mesh in 3D View. To update the 3D View display, UV Editor > (menu) UVz > Seams From Islands.
This is all quite an issue. There is an unnecessary disconnect between 3D View and UV Editor, weather by design, or lack of love. To me the whole UV Editor is quite cumbersome and almost seems like an independent module slapped into the app.

Agreed, UVz are one of the few things I still find myself using Silo to do the job. Any time I try to stick to Blender it’s a wrestle.

Texture Painting as well, I own 3DCoat … and it’s night and day in terms of ease of use.
UV Mapping and Texture Painting ned a lot of love still.

I see - “seams from Islands” seems like a useful way of checking UV integrity, so I will be using it as a workaround in the future. Thank you for mentioning it ! Now of course there is still an obvious need for a way to automatically display this updated information in realtime (similarly to face normals display), so I will be writing a design document covering this as well as other UV related improvements as soon as time allows. I actually feel like the UV editor only needs a few extra features to become very good.


Here another one that I’ve been running into a lot :

7 - visual feedback on selection of partially occluded objects

This one became apparent when I started to tackle more complex projects in Blender, and I am now running into it multiple time each day. I believe I am simply unaware of a setting somewhere, as this is essential in many scenarios :

Most 3d programs usually offer a setting like the one at the bottom (“display selected objects as wireframe”) ; Zbrush does its own thing by displaying the currently selected subtool with a brighter shade than the others ; and Marmoset Toolbag flashes in the wireframe of selected objects for a split second before fading back to a regular shaded view. Now I am not necessarily looking for either of these specific solutions - anything would work really. I also don’t mind it being a temporary viewport toggle to turn on and off, but it obviously cannot be a per-object setting as it would have no purpose in this case.

(sometimes the center point can help, but of course it is not always located in the center of an object so this is irrelevant here).

Note that most of the time I actually really like the unobtrusive elegance of the default orange outline, as it is less jarring than always displaying the wireframe of selected objects like other other often programs do. It’s just than in the specific scenario at play here it falls short in terms of user feedback and error prevention. How do you guys tackle this problem in your every day use of the program ?

Here’s another one, quite puzzling :

8 - viewport zoom limit

I am working on a character which I scaled accordingly to the default Blender paradigm of 1 default unit = 1 meter (for the sake of compatibility with Cycles, sculpting, and physics). However I seem unable to zoom in enough for detail work. To give you an idea, I need to work on the inner components of an eyeball but I am just unable to reach that point in space. I of course adjusted my camera near clipping plane as needed, and also framed/focused the camera on a relevant point of the surface of the model, but this didn’t seem to make any difference.

Online discussions on the matter suggest switching to orthographic view, but this doesn’t work either. Any ideas ?

Note that I am aware that I can dolly the camera in using shift numpad+. This kind of works but it jumps ahead too far, which then requires me to slowly dolly out with the mouse. Furthermore, if I center the viewport on the 3D cursor, which is something I do all the time for precision modeling, everything goes back to the default behavior of not being able to zoom in :confused:

The only workaround I found is to temporarily enable “Rotate Around Selection” after shift numpad+ dollying in and mouse dollying out, to at least lock the camera rotation on a component. But as soon as I zoom out with the mouse wheel from there I cannot zoom back in anymore …

Thanks !

  1. dont know if its possible but you can play with “object” options of your mesh. You should find display options for your mesh. If you still have problems with selecting object you can use Outliner or ctrl+alt+select button.
  2. this is not a limit, it just zooms to a place in 3d space. You are not moving along camera Z axis. I assume that you are in edit mode, so to zoom to place you want to see really close. Select nearest vertex of place you want to see and use “view selected”. By default its numpad “,”. I always switch that to “q”. Its even cooler if you sculpt in blender, cause it works on last sculpted place.

7 - visual feedback on selection of partially occluded objects

I do get into the same problem of selecting the right object and I like your idea of flashing the outline for a moment to indicate what’s being selected. However, these are the current solutions I know of:

In object mode, you can hold alt when selecting to get a list of all objects viable for selection. If there is only one object it’ll select it without the menu. Of course, if they are named cube.001, cube.002 it won’t help solve the problem.

Repeatedly selecting on a group of objects will cycles through available selections. A useful indicator is the name of the currently selected object in the bottom-left corner of the 3d screen.

Thank you guys for chiming in ! And sorry for a late follow-up, things got pretty busy over here.

Pachup :

On 7 : Changing the display options of objects that are hard to select is one way to overcome the problem, but as I stated before this is not something that the user should have to do in order to make sure that an object is selected to begin with.

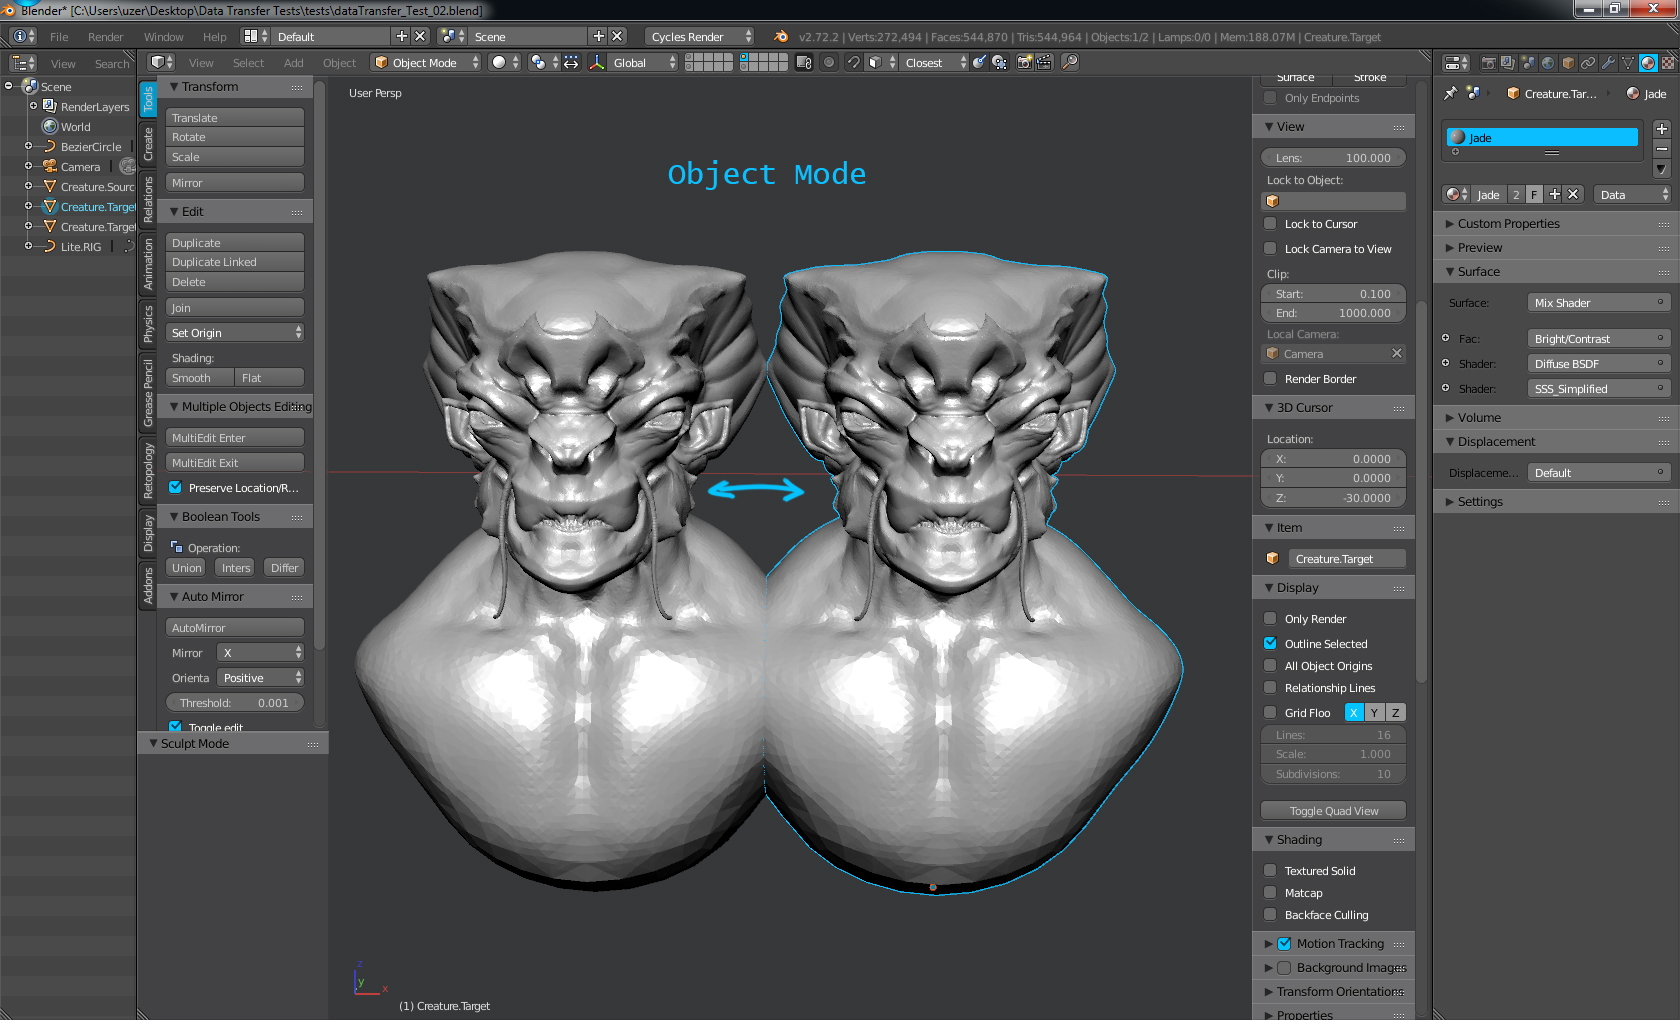
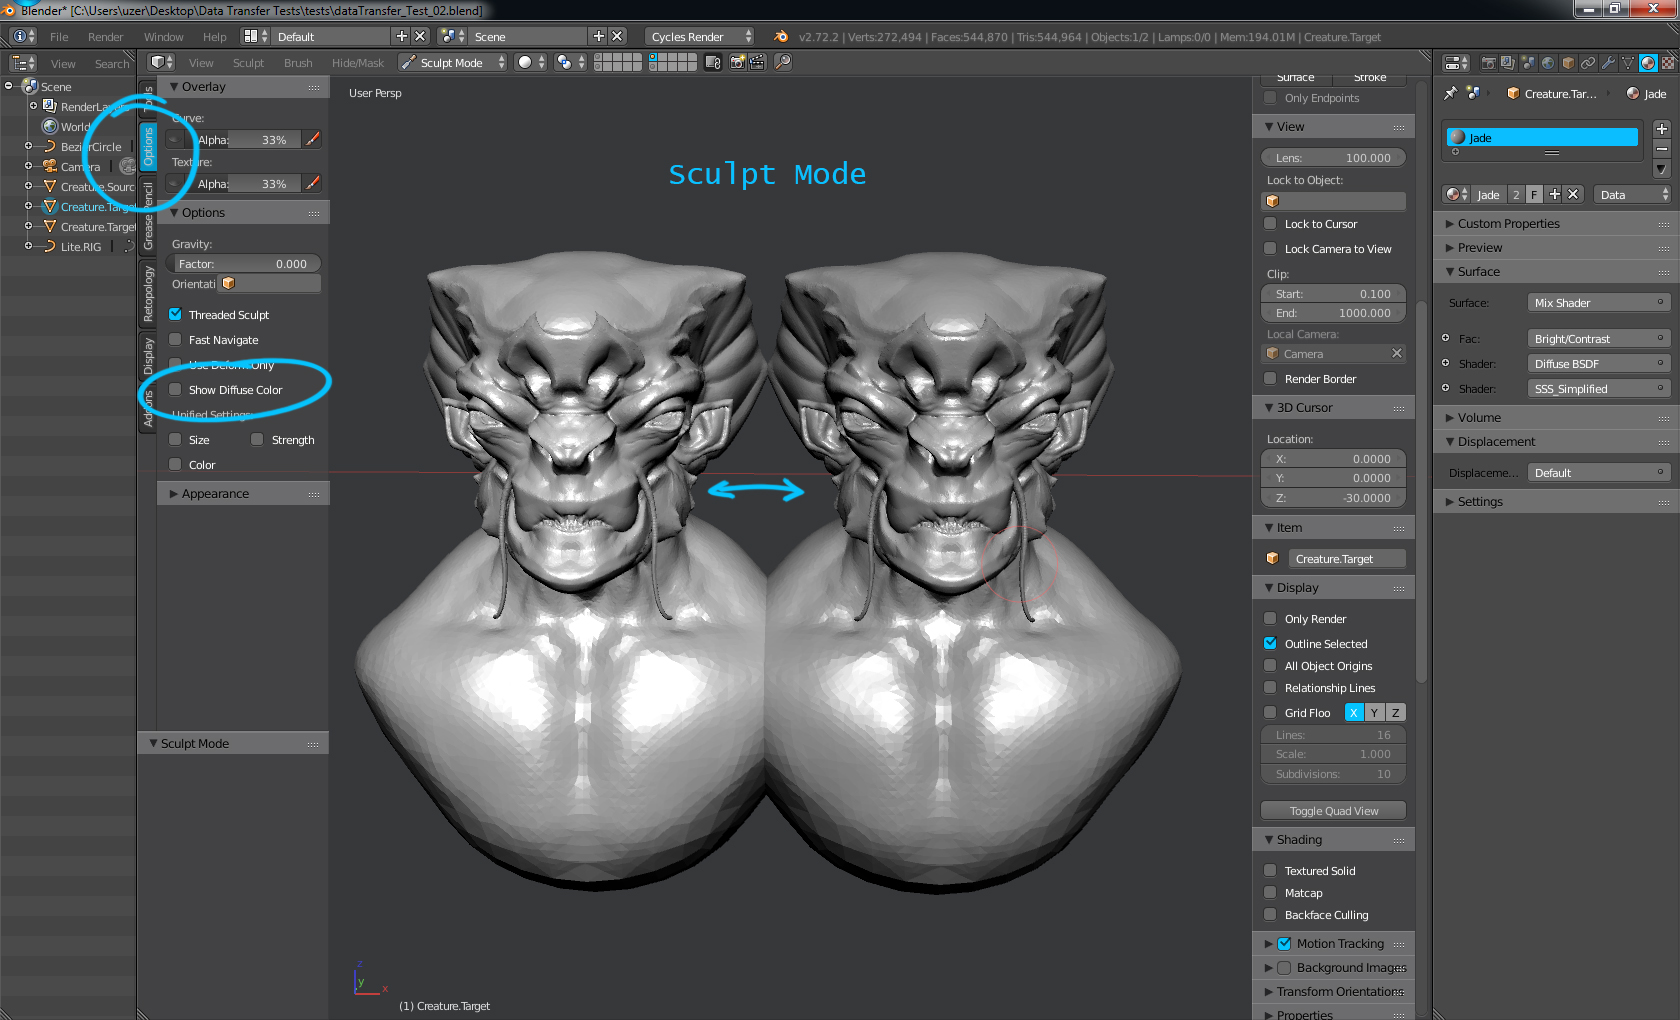
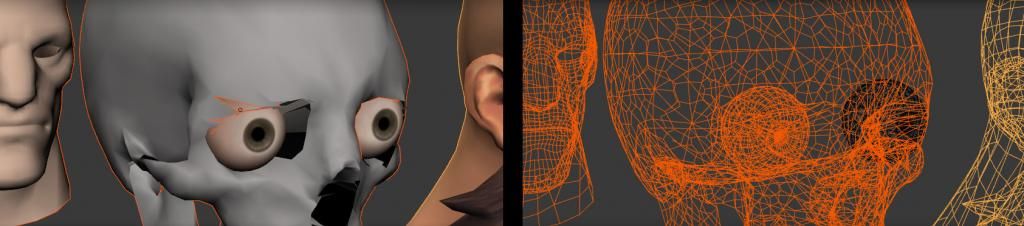
Here is another example of this problem. In this scene, the right eyeball (left on the screenshot) is selected, but the other eyeball is not, and there is no way to know that unless the user takes the time to switch to wireframe mode to confirm. That’s a UX issue.

Now I am aware that this is not necessarily a deal breaker, but I think that is something that the devs should keep in mind (which is why I am taking the time to clearly report it here for future reference). I personally constantly run into this issue when working on complex scenes made of multiple objects and this can get very irritating and result in unnecessarily wasted time.

On 8 : I am confident that there is a hard limit coded in somewhere, as the camera just stops zooming at a definite point in space for an arbitrary reason. However, your suggestion of framing a mesh component to get closer indeed works ! Thank you for suggesting that. I usually don’t rely on component-based camera framing since I work by first placing the 3d cursor exactly where I want to go and then frame on that, which is faster than framing an object, selecting a component, and framing that component ; but it certainly is a good enough workaround in this case. The peculiar thing is that if I frame on the component and then zoom out just a bit, the camera gets locked out again … Pretty odd …

Another odd thing about this behavior is that it is not consistent. I was running into it over the last few days, but today I can zoom into details without a problem even though I am working with the same scene. Maybe toggling some layers on and off is what solved it, but I cannot confirm it. If anyone has any more info on this issue, please let me know !

Lamoot :

On 7 : The name being displayed at the bottom left is indeed a good way to overcome the issue. It’s not perfectly safe as it doesn’t give much information on the overall selection, but it sure helps.

The alt key menu is indeed another good little trick. To be even better I think it should have a preselection highlighting effect to show which object is about to be selected. But that’s a good start !

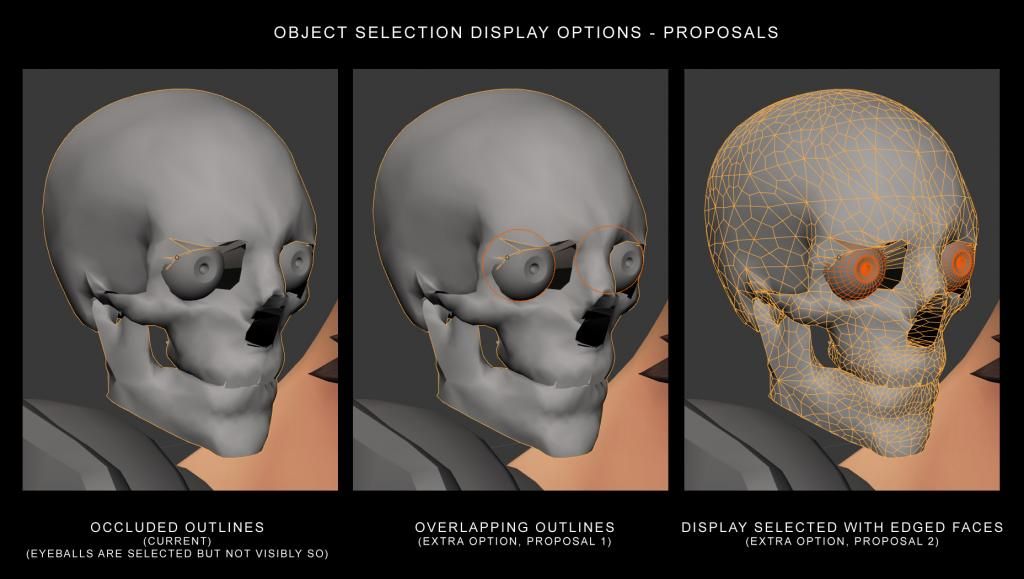
At the end of the day, besides the idea of flashing the outline (which could be a bit distracting…) I think we simply need 3 options for object selection display in Solid and Textured modes.

1 : Occluded outlines (= the current look)
2 : Overlapping outlines
3 : Display selected with edged faces

I think this would solve the issue for everybody, while not disrupting the legacy look that some users would probably like to keep as an option …myself included ! :slight_smile:

Thank you guys for your help !

hi
check this
http://pioroberson.com/wp2014/
then this
http://pioroberson.com/wp2014/resume/

and listen to this guy :wink:

@Pior, do you stream some of your work? on google hangouts for eg?

I used this method since forever and it does indeed work. However, you need to select an element first and it doesn’t work that well in Object mode when the mesh is spread out. A few versions ago Blender got a really cool option Center View to Mouse. This will zoom and set viewport zoom/orbit point at whatever is under the mouse cursor, no selection needed. It works on objects, meshes, lamps, anything.

By default it’s mapped to alt+F, but it gets really smooth to use if you map it to alt+MMB click (presuming you use Blender’s default viewport controls). This way you have all the essential viewport controls on MMB + key.
MMB = orbit
MMB + ctrl = zoom
MMB + shift = pan
MMB + alt = focus view on under camera stuff.