Did you saw my model on the page before? There is very easy explanation how to do realistic cast steel. If you have more questions ask me.
@Tech-freak - Thanks!
@ McGavish - Yes thank you - I have started dissecting it -there is a lot to go through! Once I have a better understanding of it I will implement your ideas for the cast parts. Thanks for sharing this engine model, I really appreciate it. I am trying to get my head around the Node Editor and all the bits in there and what they do, so once I have this in my head I will understand your model. I am going to mod some of the larger gears so they have more “cast” elements in them to bring more detail and life to the model. The problem is the more I do - the more I have to learn and the longer everything takes! But I think it is all worthwhile to end up with a good model.
Thanks to all, Clock.
It is really detailed. You do a great work on this. I feel like if it was real! 
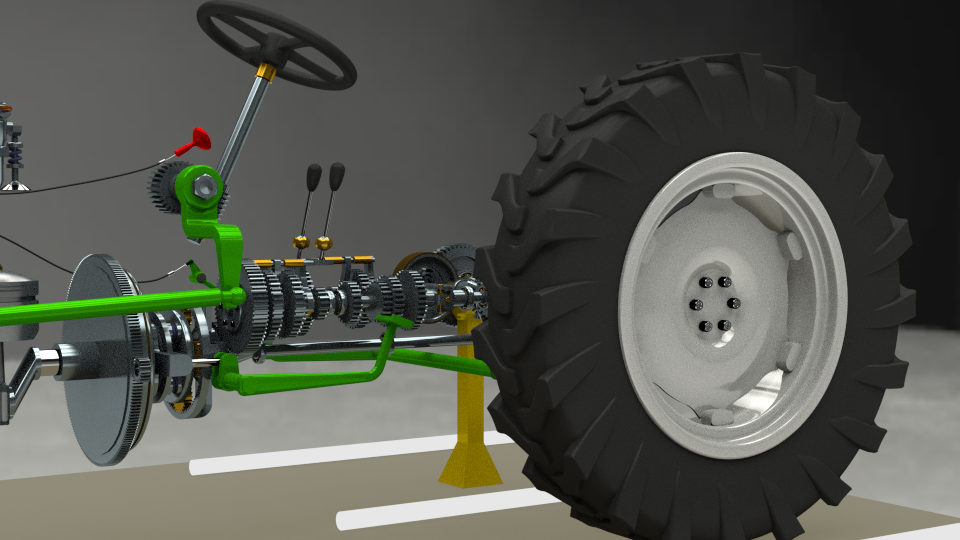
Am making progress with McGavish’s cast metal - more in a couple of days. In the meantime I have started with some wheels and tyres:

Had real fun trying to get the treads to insert properly into the base shape - I will probably redo these several times before I am satisfied with them - this is just my starter. I have also added some floor strip lighting to compliment the HDRI map, to add some reflections low down.
Cheers, Clock.
Update: Can I pose two questions:
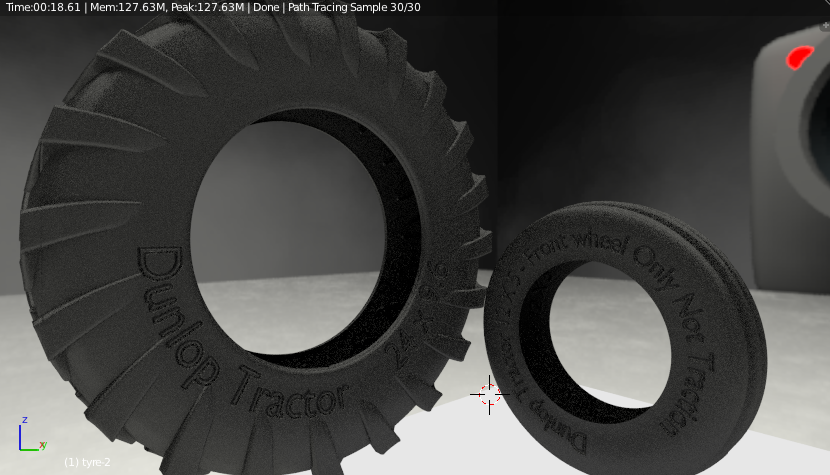
What is the best way to put writing around the tyre?
What is the best way to deform the tyre where it touches the ground.
Here’s the wheel with the spray finish paintwork:
how many verts for tires ?
did some and got like 90 K verts per tires X 5
tires are bad !
happy bl
How do I find that out? sorry a bit of a dumb question…
Update - that was a dumb question - just select them and look in the Status bar - D’oh, anyway there are 10,025 vertices in the back tyre and 1,008 in the front.
“What is the best way to put writing around the tyre?
What is the best way to deform the tyre where it touches the ground.”
The best way to put the text on the tire is with a normal/bump map - it does not add any geometry. Also the tire deformation I remember there was a post on Blender Nation last year - the guy had a car rig set-up and it had tire deformation control - can’t remember anything else about the author, maybe look on Blend swap.
The material blend file you posted - the bump/normal map is way too big, your previous attempt was closer but if you downloaded McGavish model he really nailed the cast material there.
Rigging everything while you model, that is a very time consuming thing but nice going on that its looking good.
I see the model tractor you were referencing - I don’t have any experience with DB’s but I hate to say I believe they were 3 cylinders - at least all the ones I searched for did  None the less you are making good progress.
I see what you were saying about the gear add-on, it is very basic. Keep up the good work…
for deform try the Lattice method!
happy bl
@RickyBlender - thanks - I have never done this so will experiment a little.
@ajcdfin - Yep I know it only had three cylinders, I uprated the engine for my model, plus it was an easier crank than the three-pot version, so yes I cheated a bit, it’s a fair cop guv’nor!
Thanks for your advice on the materials, I will use McG’s material (I now have my head around it), as the very strong basis for my cast look, I was just playing to see what happened. Presumably for the tyre writing I need a black and white image with the letters in white and the background black, with perhaps some grey ghosting around the letters to smooth the lift off the tyre surface - I will play and report back.
I am rigging as I go because I do not get lost that way - it suits my workflow to add a piece, then rig it to work with the rest of the model, before adding anything new. I can just concentrate on one piece at a time then, rather than having to revisit later when perhaps I have forgotten some key piece of information, its my age you know…
Thanks again for the help to all who have!
Cheers, Clock.
for the tire you could also add text to mesh then retopo it over !
happy cl
Eureka!
I have a UV map based material working - just - typos excepted- sort of, yak, yak, yak…
I know it’s crude and needs lots of work, but at least I got this far in only 2 hours or so. Before you ask - Studio015 :eyebrowlift2:
Thanks for the pointers chaps, Clock.
After several more hours of study and work I came up with this:

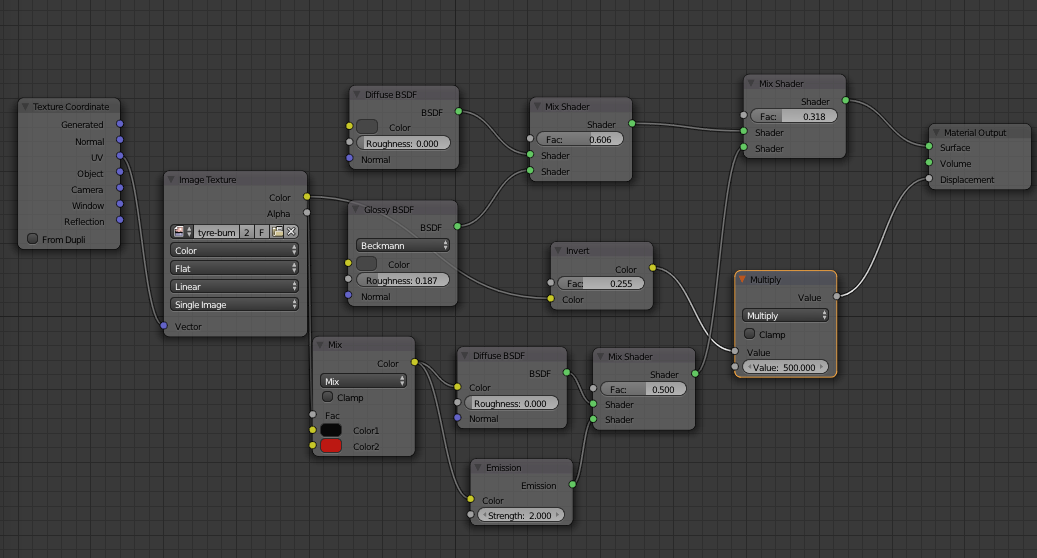
I have also implemented McG’s cast metal material on the wheels - they are looking quite nice now - probably need some tweaking though. The smaller wheel is nearing a good result, I need to work on the lettering of the big wheel. I have also incorporated some of McG’s nodes into this material to get the raised red lettering, is there any way I can get the lettering to look “sunk in” rather than raised? I’d appreciate a heads-up on this. 
Cheers, Clock.
show nodes set up
but change the value to negative !
happy cl
This is my nodes setup:
Which one do I change to negative? - must admit I am getting a bit brain-dead just now - probably time for sleep and try again in the morning. :spin:
Thanks again, Clock.
Hi.
Excellent. Very good job
for displacement on output
remove the invert and replace with BW convert
then change the value in the multiply node like -7 to 7
not 500 way too high !
happy cl
@Tecna - thanks for your kind comment.
@RickyRender
Gotcha - thanks for that, it renders really nice now.
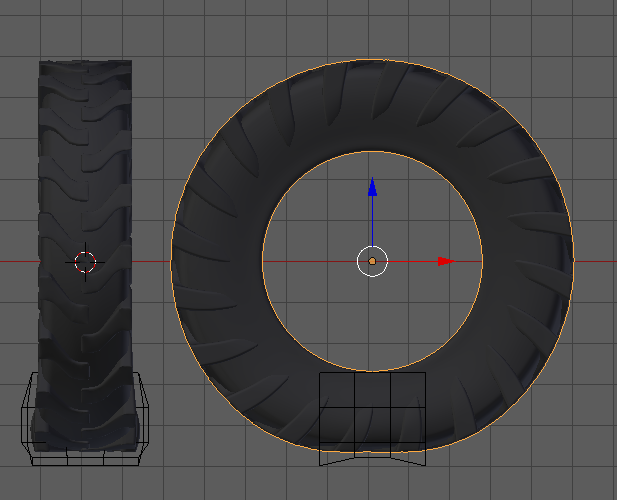
Here is my back tyre with deform lattice - had some trouble here until Mr. Horseman told me not to change the radius of the lattice from 1, but to scale it instead to fit the tyre. I actually scaled it to fit just the bit I wanted deformed, anyway the result, un-rendered, is below. The beauty of it is as I rotate the tyre the deformed bit stays on the ground, unless you apply the modifier of course.
I am currently cooking an animation of the engine on its own - will post when it’s ready., looks like it will take around 8 hours on my server.
Cheers, Clock.
Do you mean like raised outline text on the tire? If you use a bump map create the image using a middle grey color (RGB 128) then anything darker will sink in and anything lighter will be raised - the farther away in color you get from the base color the more pronounced the results will be. I always use this method. Plus if you need to make a normal map this will produce the correct results.
Your tire looks good
Excellent tip - thank you, I will experiment with this along with the changes RickyBlender posted. I was wondering how to effect different levels off the same image.
Cheers, Clock.
Thank you sir, you are a gentleman!
I have been playing with the alternator and fan belt - see below, the text goes round at the right speed :spin: of the engine you will be pleased to know - took some doing, but then if something is too easy - it isn’t worth doing.

Cheers, Clock.