Needless Things

The new ‘Default Light Paths’ you gave CC are working great and animating with Cycles, even with my card, is fast approaching if not here already for some subjects. I read where one animation team is clamping at 3 sometimes and using almost non existent Diffuse:, Glossy: values for bounces.

@minoribus your modeling expertise is really something. Please tell us how long you have seriously been using blender? And, you realize what I mean by seriously. Past the particle play, animations using just primitives, jumping from tutorial to tutorial, the usual hobby start in other words and things I still waste time on. To be even more specific how long have you seriously been involved in modeling?

i like this idea :slight_smile:

Here are some others…

A spike coming up from the bottom making it impossible to drink
barbed wire around the rim
Make it fixed upside to something
Handle made of metal that is glowing red with heat
Handle is not actually attached but leaves two small holes when removed
Cup is actually frozen milk
Top of cup is actually solid, with a texture that looks like it is not if you look at it at a certain angle.

Wow, Guys, thanks for so many suggestions. I took them and interpreted them as you’ll see below.

@Harleynut, here you find the springs on the handle, that was a really funny idea :slight_smile:

@dns_di, thanks for stopping by. No bottom is another good idea. And that would make it unusable without doubt. But it would also be hard to show, but I took your idea as starting point and added holes near the bottom. I hope you’ll accept that also :slight_smile:

@Monk, from the plethora of your ideas I took a variation of the barbed wire. I was tempted to make the glowing handle, but actually this inspired me to do the battery and the wires.


Please regard this more or less as an elaborated kind of blocking out the composition for now. I’ll have to fix some things and maybe I’ll have to do some sculpting also. At the moment all gadgets that you see are modelled, not sculpted.

I’m not sure, how to do the materials and the textures. The cup will have some vintage flower decor. That’s sure. But I like the porcelain look - even on the barbed wires. So I’m not sure if I change that to metal. The springs can’t remain porcelain, that’s sure also. Maybe gold.

@Ghost, thank you for your kind compliment on my modelling. And because you asked, please allow me go a little deeper.

I’m using Blender a little more than two years now. I started in late 2011, it must have been November. I struggled a lot with it in the beginning. Nothing worked and even when I followed a tutorial I wasn’t able to reproduce it. But at the same time it was fascination and I also had little successes. So it became a passion.

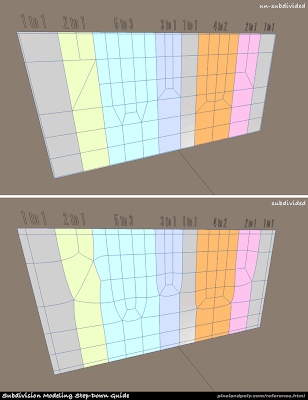
The time that I started modelling seriously was nearly the time that I joined BA. And at least it was the start of the unspecified vehicle when modelling became more important. A big breakthrough was, when I learned how to add more geography to a restricted area. Before that I used a huge amount of edge loops to produce something like that - if at all.


And I must say that modelling means fun to me. I love creating things that haven’t been there before and then become a body and a material and a texture and that are getting more and more “real”.

But now enough from me! What do you guys think about this last piece? Any further additions needed to make it needless ? :slight_smile:

Any further additions needed to make it needless

ummmmm… I would say it’s pretty needless now Minoribus. I love the little feet you put on it.

Thank you, Harleynut. Today I started to refine some things. There is this little lion head of which several instances are hooked on the springs. This model should get some additional details and so I took the base mesh and did a little sculpting exercise.

From the left to the right you see the base mesh, the sculpted version, the retopo’ed mesh, the wire of the retopologized one and the low poly with normal and AO map.


My workflow regarding sculpting isn’t that firm until now. Some of you will most probably say that the low poly isn’t low poly enough. But I had problems to bake the sculpted version onto the base mesh. To get a decent result I had to use a low poly with a topology more similar to the sculpted mesh. Therefore I simply used the decimate modifier and let it unsubdivide the sculpted mesh 12 times after I applied the multires modifier to the high poly version. The low poly has 2,518 vertices now. That’s not that much I think. And isn’t the result fairly decent?


so how do you add more geography to a restricted area? (I’m a noob and just wondering)

btw… very funny and nicely done work!

Hey, m_squared, thanks for having a look at my work and I’m glad that you like it :slight_smile:

Since you asked about local geometry I try to explain it. This technique is sometimes called “subdivision modelling”. You make a locally more subdivided mesh - not by using edge loops around the whole mesh and not by using the subsurface modifier. Instead you create vertices and edges where you need them.

Let’s say I want to model this little thing with the structure on its top.


There are two ways to do that. The left one has local restricted geometry one the top and the front whereas the right one is made with normal edge loops around the whole mesh. The right one has this edge loops on the back and on his sides. The left one has simple unsubdivided faces at his back and at his sides.


I often do such little tasks by using edge loops myself, of course, because it’s fast. And there is nothing wrong with it. But the left way has some advantages. The first is: the left mesh has only 58 vertices. The right one has 100 vertices. That’s not much difference but sometimes this can matter. Imagine thousands of this cubes in a scene for whatever reason :slight_smile:

But the main advantage of the left method is, that this local geometry is delimited. I can make changes to this area without influencing other parts of my mesh. That’s very important in many cases. One additional edge loop around a whole object can cause unwanted geometry and creases in areas where you don’t expect it.

Let’s say that I want to make the top structure larger along the y and the x axis. With the left mesh this can be done without influencing the rest of the mesh. When I do this with the right mesh I’m changing the shape of the hexagon on the front face also by moving this edge loops.


This can be fixed of course, but sometimes this unwanted changes are hard to fix and sometimes you’ll see them too late when the final render is finished :slight_smile:

And it is simple to do this. You could do this by placing vertices and making edges by hand and so on. Or you just use the knife tool. With this tool you can “cut” the additional edges into your mesh.

Here is a video by VscorpianC to show how you can use the knife tool.

When you use the tool you should take care that your model remains all quad and you don’t create triangles with it. Because triangles behave very badly if you plan to use the subsurface modifier later. For this it is worth to study how you can split or reduce your geometry and still have a quad only mesh.

Have a look at this image for example, made by Jeffry Gugick (linked from http://www.gotwires.info/2011/12/tutorial-jeffry-gugick-sub-d-modeling.html)

http://1.bp.blogspot.com/-BB1d8tzSqO0/TtAFL-nLW4I/AAAAAAAABjE/Z-pgKFgHri0/s400/step-down-guide.png

He makes subdividing edges and stays with a quad only mesh.

Happy modelling :slight_smile:

Thaaat sounds interesting - have to watch this :slight_smile:

Thank you Scott. To learn how to do this was really helpful and it opened a whole new world of modelling possibilities.

I completed the modelling of the actual piece for the moment and I started with the materials and texturing. Here is the last version.


Inspiring work. :ba: It is seeing stuff like this that kicks my brain in the nuts, waking it up from the periodic creative irrelevance it sometimes slips into.

Hey, Rocz3d, thank you very much, man :slight_smile: And I know what you mean. I myself had the strongest feeling that I had to do “something else”. And believe me, I have really fun over here with this kind of stuff :smiley:

… and the first items have their texture … I’m not a big fan of that gold … hm …


… hmm …

Really interesting work !! :slight_smile:
Love the concepts !
Yes, your last shader of gold is not the best. Sure you’ll find something better !! :slight_smile:

Alex

Cheers, Alex, and thanks for your kind compliments :slight_smile:

I’m finished with materials and textures for the first pass. Next step will be lighting and camera work. Is there anything off in your eyes, folks?


thanks for the explanation minoribus… I dig the newest render… yeah the gold is somehow strange… too clean…

was strange, the new one looks way better…

Looks like the saucer needs some feet :slight_smile: Are you using a hdri… might make that gold pop. The texturing looks very good.

Hey, m_squared and Harleynut, thank you. I changed the gold shader from #52 to #54 to make it more vivid. I’m not exactly using an HDRI but I’m using a normal JPEG as environment texture as light source at the moment. But lighting is still to come to complete everything that makes a good render - modelling, materials and textures, lightning :slight_smile:

But one small detail was still missing:


And some more detail renders …


hahaha I love that humor in your work!

Great job !