I’m doing some poses right now and the finger controls are indeed a bit of a pain to work with. I can’t imagine animating with the automatic rotations on the fingers, but otherwise the rig is really good.
For the retopology, it was done mostly in Blender. I did try to use Mudbox’s auto retopology tools, but the only retopo from that that I decided to keep were the sleeves of the jacket (and only because it looked good enough and I was being particularly lazy that day). For the polygon flow of the rest of the clothes, I don’t actually know what the proper practice is in production when dealing with topology for non-simulated clothing, so I just referred to the works of Alessando Baldasseroni (http://www.eklettica.com/) who works (worked?) at Blur. It did end up pretty dense, though.
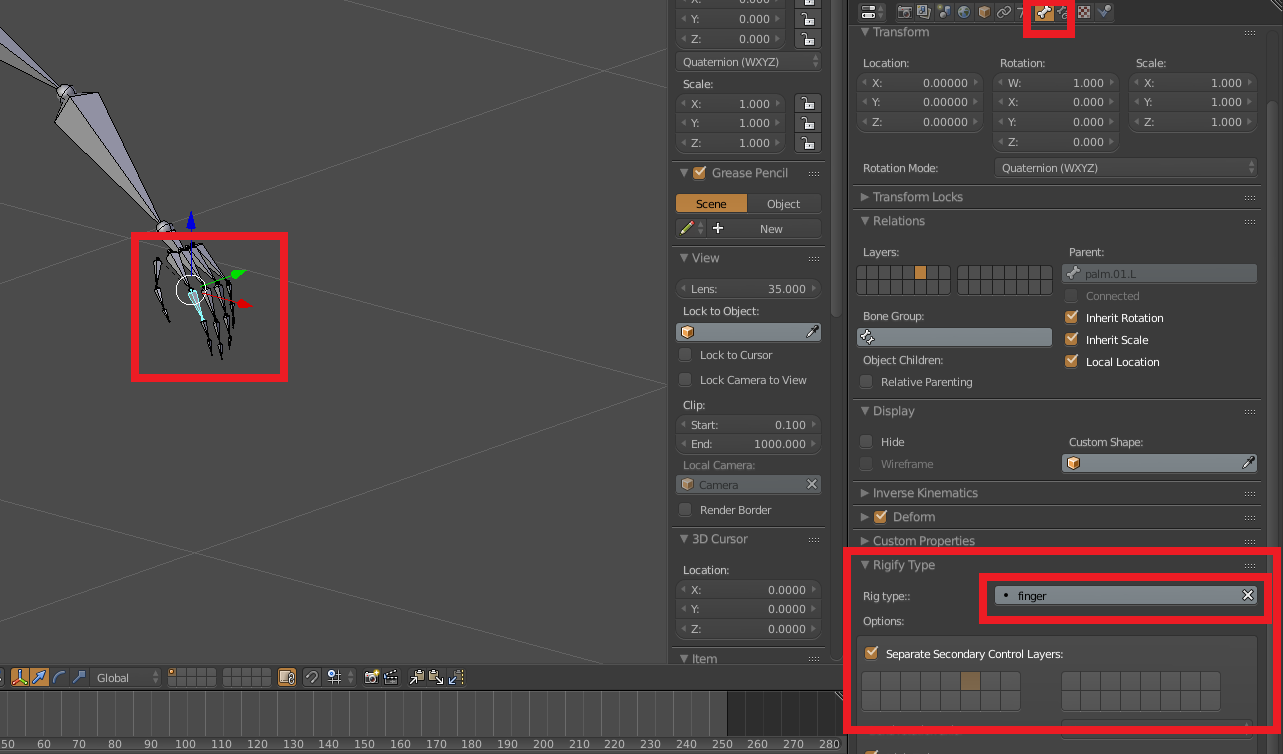
You can change the metarig to generate the original Rigify finger rig by entering pose mode of the metarig, selecting the first finger joint, then in the bone properties select finger as the rig type (instead if pitchypoy_super_finger.) Regenerate your rig. You may need reweight and parent the mesh to the new armature. If you have done a lot of weight painting already and you want to preserve that work, just fix the vertex groups that have changed between rigs. The rigify version adds a two bones for deformation at the first finger joint unless you uncheck the option “Digit Twist”. Repeat the process for all fingers and thumbs.
This is one reason that I NEVER EVER delete my metarig from my original character file. (I store it on the last layer with the custom bone shapes.) It makes regenerating a rig very simple and I can always make changes to the metarig and generate a new rig with those changes later or experiment with different rig types without spending an hour positioning bones in edit mode.
Its like impossible to find any fault! She is flawless like disney made her. Will this model or something similar ever be available for download id love to animate her!!
Thanks, Koumis! Sorry, but I can’t give this model away since I have some very specific plans for this project. As for another character of a similar style, who knows what the future brings? Perhaps when I have some free time, but that probably won’t be for another year or so. I’ve gone and buried myself in a ton of work for the foreseeable future.
Great work! Is the body a manifold mesh? or are you using some kind of shrink wrap modifier to get the clothing to form to the body? How do you animate the clothing and the body mesh and keep it from from intersecting? Thanks. -BlenderNewbs-
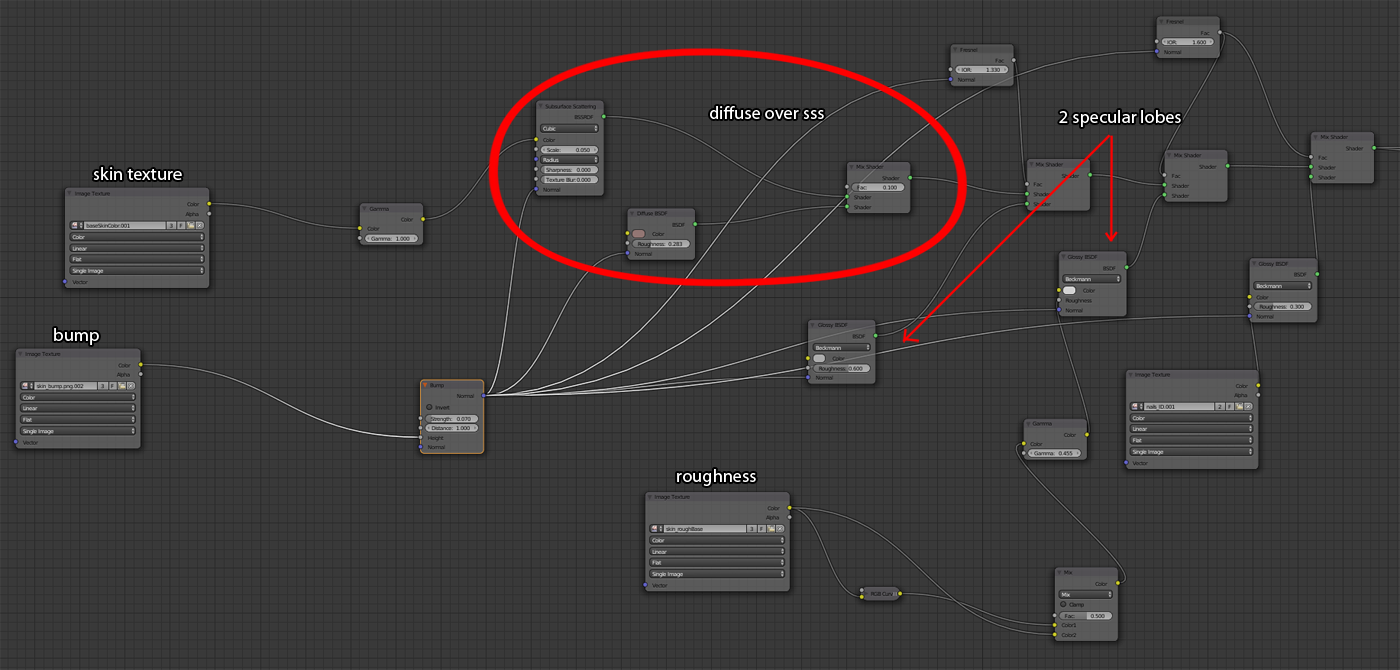
Platyperson, the skin setup is very basic. It’s 10% diffuse over 90% subsurface and has two specular lobes, one with high roughness and one with lower roughness. There is a VERY subtle bump map and roughness map. I was trying to go for a Disney style and if you look at their recent characters, there is very little bump and specular variation, if there is any at all. Honey Lemon’s skin from the promotional renders looks a bit like plastic.
blendernewbs, the rig is a just posing rig so there are a lot of penetrating surfaces when you move it. I just sculpt the fixes in once the pose is locked down. It doesn’t animate well in its current state. I used a Mesh Deform modifier where there are small bits, like the zippers and the boots.
Really digging it. Can you do a close up wire view of the boots? I really like’m.
I think for a critique, I find that the SSS for the skin to be a bit strange feeling. But I’m not too sure what. Maybe it’s the skin texture? It could have a bit more variation in it? For example, maybe some more reds and greys here and there. The hands probably need a bit more variation.
Hope that’s a helpful critique. Love the hair, how was it made in Blender? The new hair tools mostly? (I haven’t tried them yet).
blendernewbs: To make this animatable, I’d need to fix the weights for everything, create all the shapekeys for the face and set up the controls for those, create corrective shapekeys, and create proxy geometry so that it doesn’t animate at 10 fps or less.
RealityFox: Thanks for the critique! I’ll look over the skin again. For the hair, I’m actually not sure which of the tools are new. I just separated them into regions (sides, bangs, bun, ponytail) and groomed them in particle edit mode. Also, here are the wires for the boots:
rombout: I’m actually not sure if that topology will be problematic or not. I don’t have much experience making characters for actual production. As I mentioned in an earlier post, I just tried to copy the clothes topology style of Alessando Baldasseroni (http://www.eklettica.com/) and hoped for the best.
Returing to this project now. Here are the latest WIP shots.
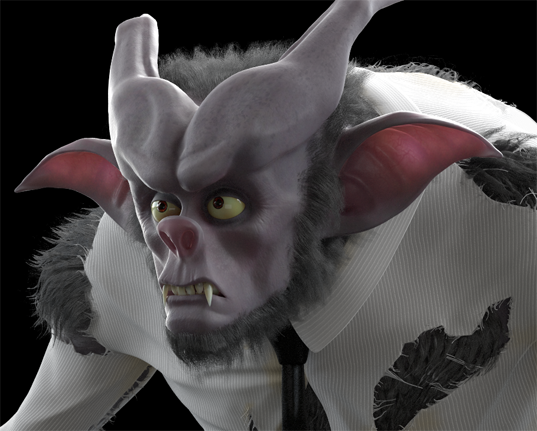
I migrated the hunter character to V-Ray from cycles, updated the environment and finished the vampire character asset. Everything is being rendered in V-Ray now as I originally intended. I changed the design of the vampire to be more brutish because I think it will fit the final scene better. I’m still a bit iffy on the environment. I might change it entirely, but I’ll place the characters into the scene before making a decision on that.
Here’s the latest update. The poses and expressions aren’t final and not all of the props are in place yet, but the basic idea is that the vampire hunter is struggling to pull out her stake which has gotten tangled up in the contents of her bag. I’m trying to figure out what sort of framing and composition would best convey an imminent sense of danger. I’m guessing I’ll have to pull in close to clearly show that her stuff is all tangled.
Thanks! I’m using a V-Ray for Blender nightly build. I’m doing the lighting in Cycles though since V-ray for Blender doesn’t have any interactive rendering. Luckily it’s easy enough to switch back to V-ray when I’m done positioning the lights and then it’s just a matter of dialing in the proper intensity. The above clay render is still in Cycles.