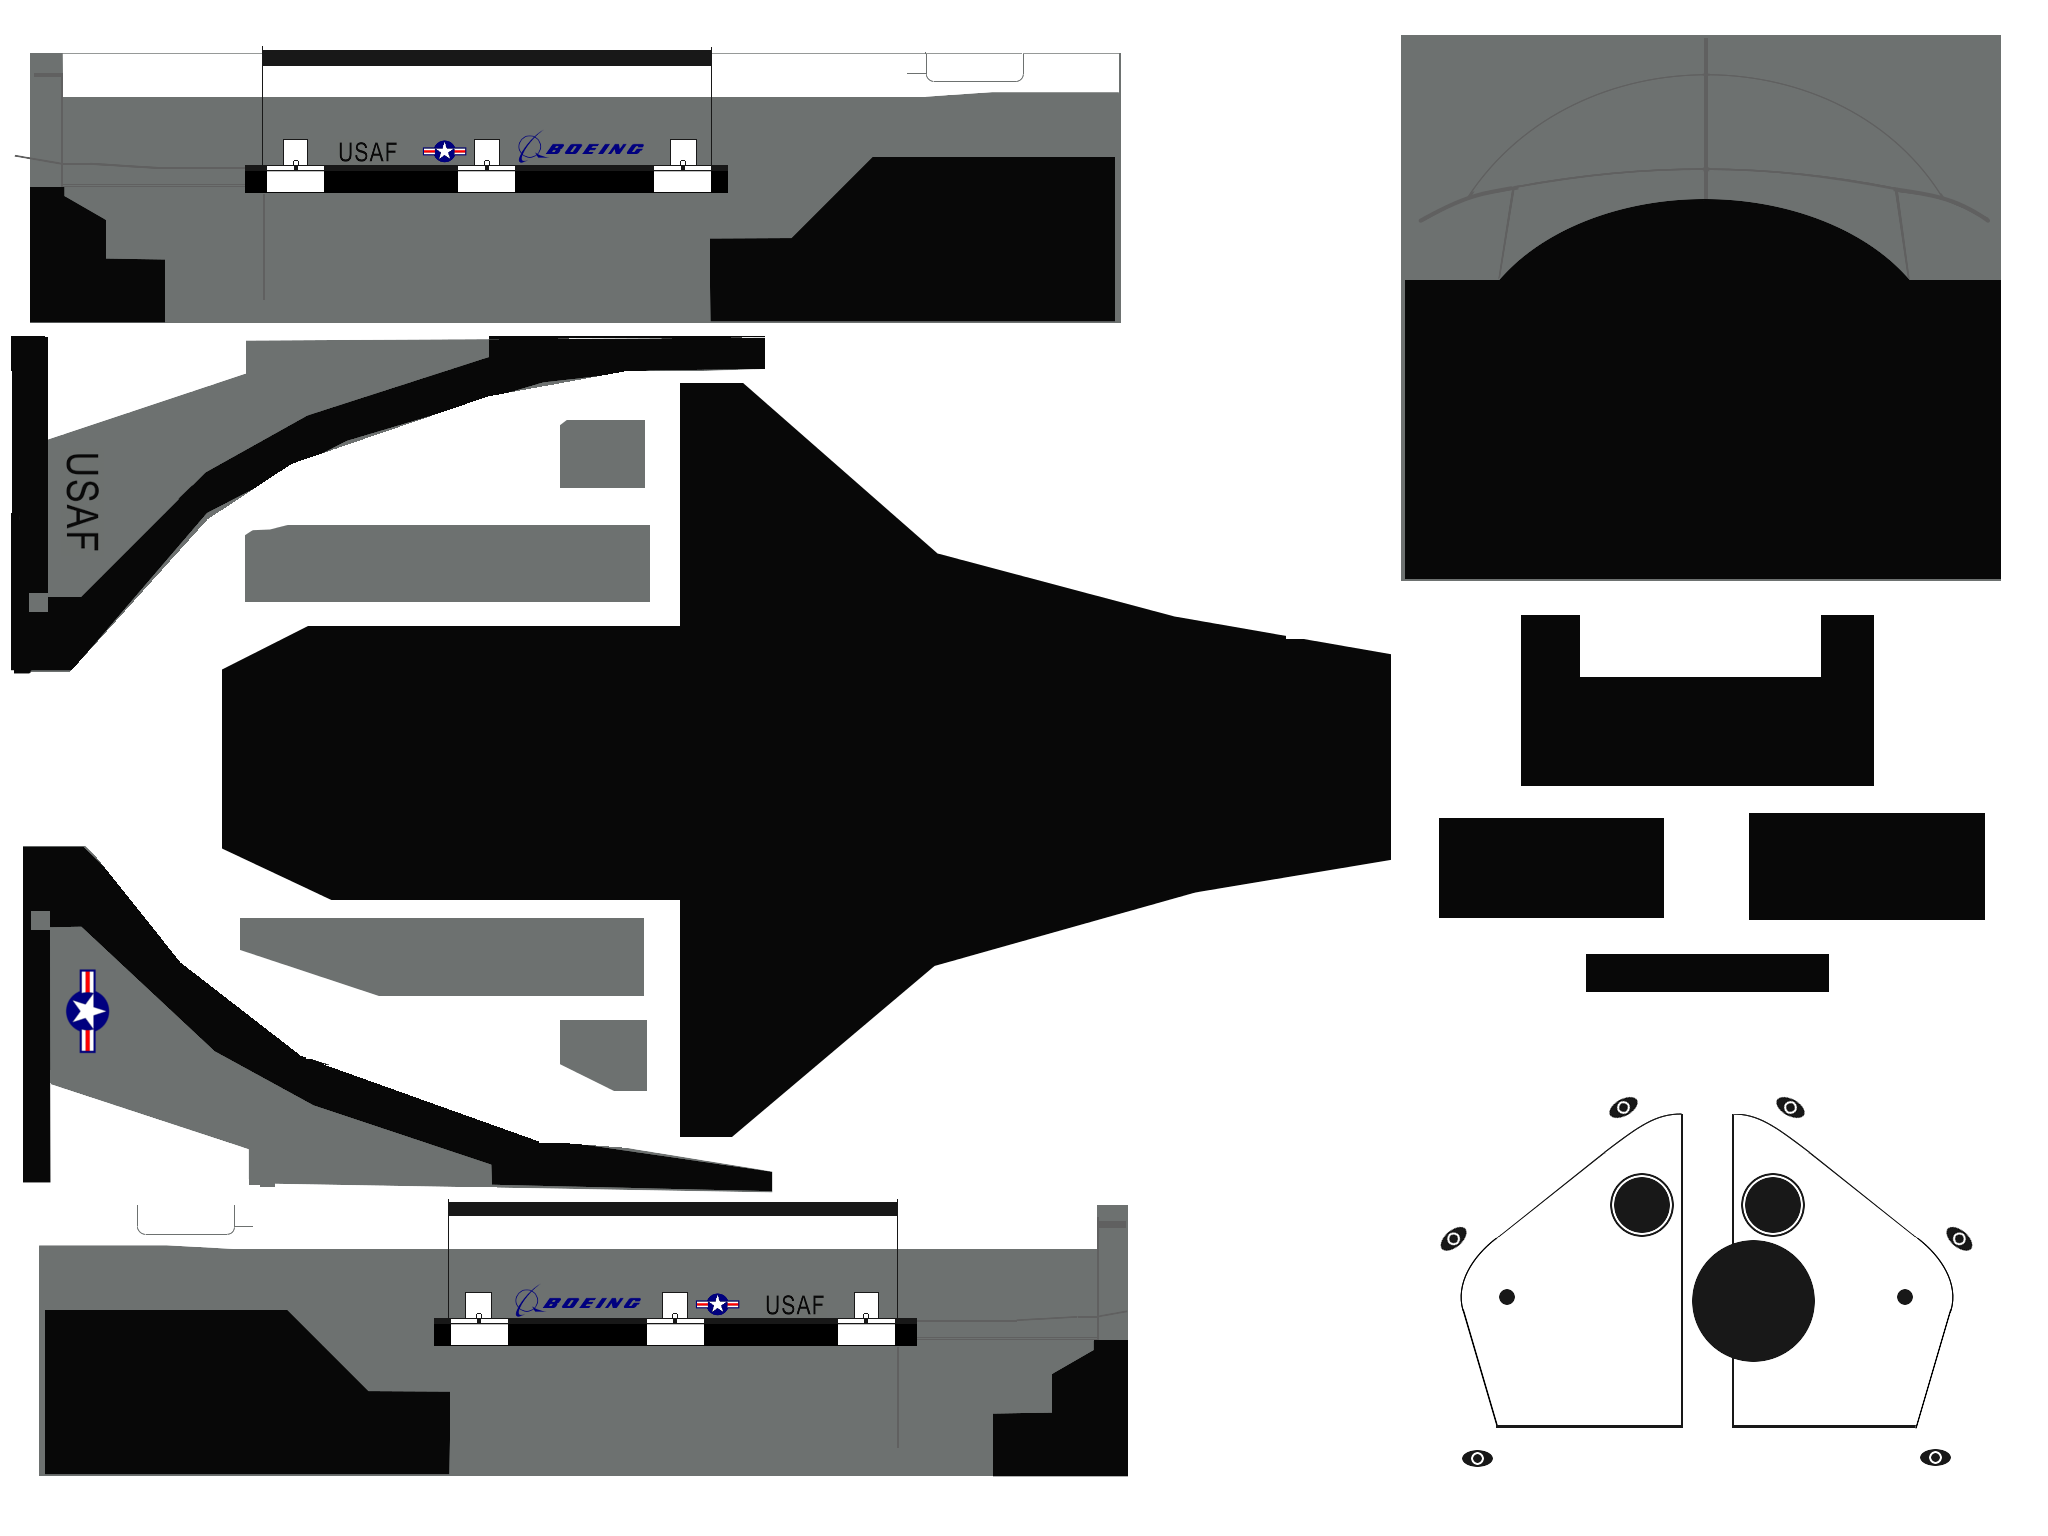
Looks good - the texture is mapped properly, all the vertical and horizontal lines are in place, the edges of all graphical elements are sharp.
:). However, the contour of the dark panels along the wing leading edge has different shape than in the drawing from post #4. (In post #4 their contours are gentle curved. On your texture this contour is built of 3 straight lines).
Witold, were you referring to post #5 instead, post #4 has similarly sharp leading edge contours.
This looks pretty good as a start, I am curious how you are going about producing the color maps. I was almost thinking that you might could make these directly modifying blueprints or copying their patterns with them in a separate layer in GIMP or Photoshop.
The white patch appears that it should contract a bit near the back of the fuselage.
I would also second the idea that you should look into normal mapping, as previously mentioned by BluePrintRandom. Normal maps are generally a lot better looking than bumpmaps, and can be made fairly easily inside of Blender.
Thank you, you are absolutely right! Post #5.
On the other hand, to create a good normal map you have to build a detailed 3d mesh, then bake it from such a model. In the case of these ceramic plates you can simplify this task by creating a simple central square and the faces around, then tweak this basic normal map pattern in GIMP/Photoshop, recreating the whole surface covered by plates of different shape.
However, before you do it, try to draw these plates in a simple, 2D image. It may happen that even such a bump map will create the effect good enough. If it doesn’t you will have a reference drawing for the normal map :).
Greetings Andvari and Witold,
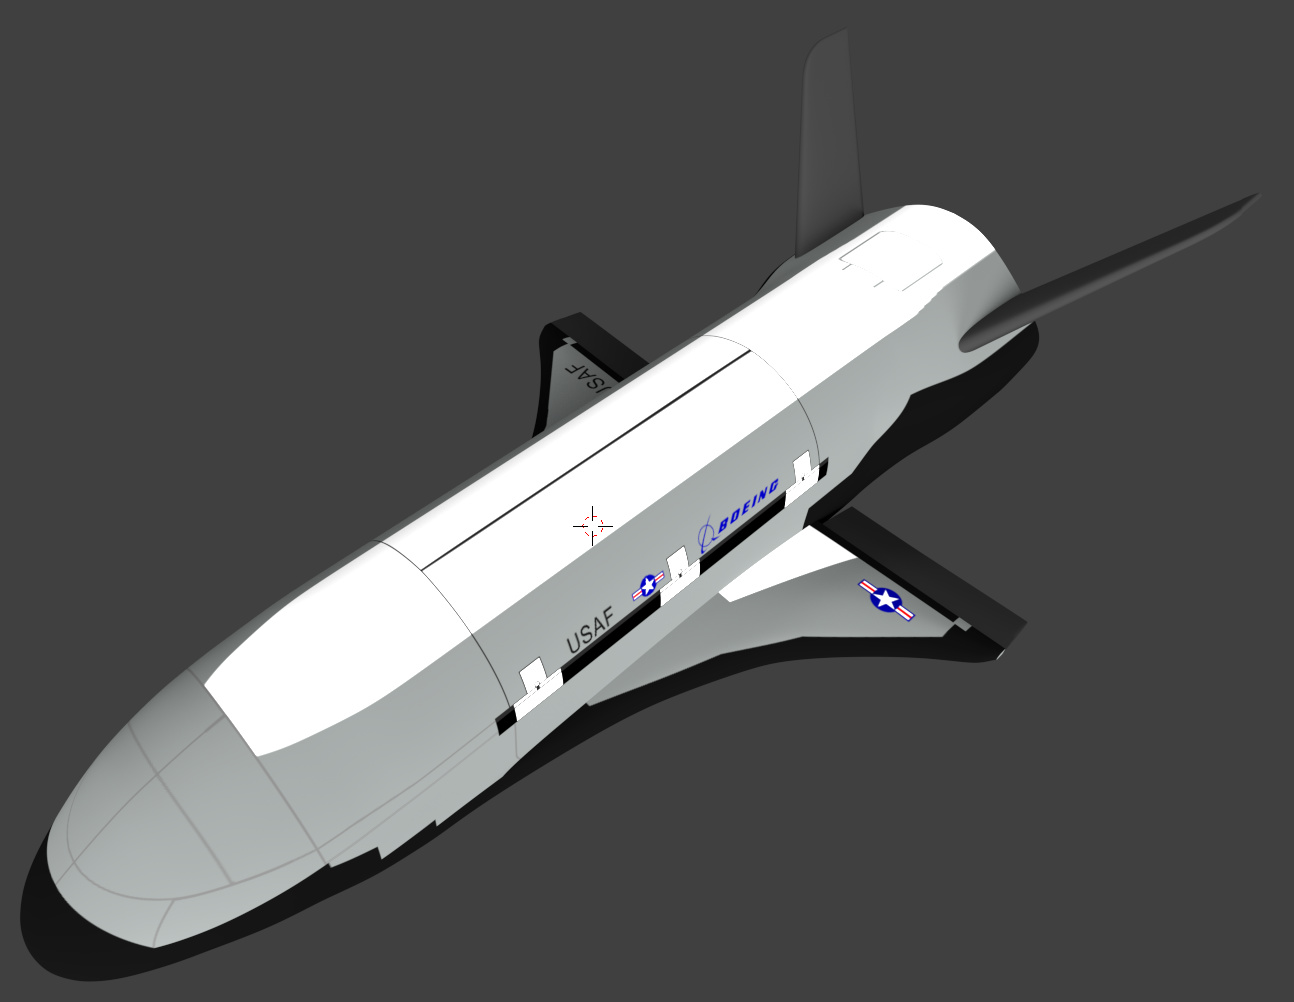
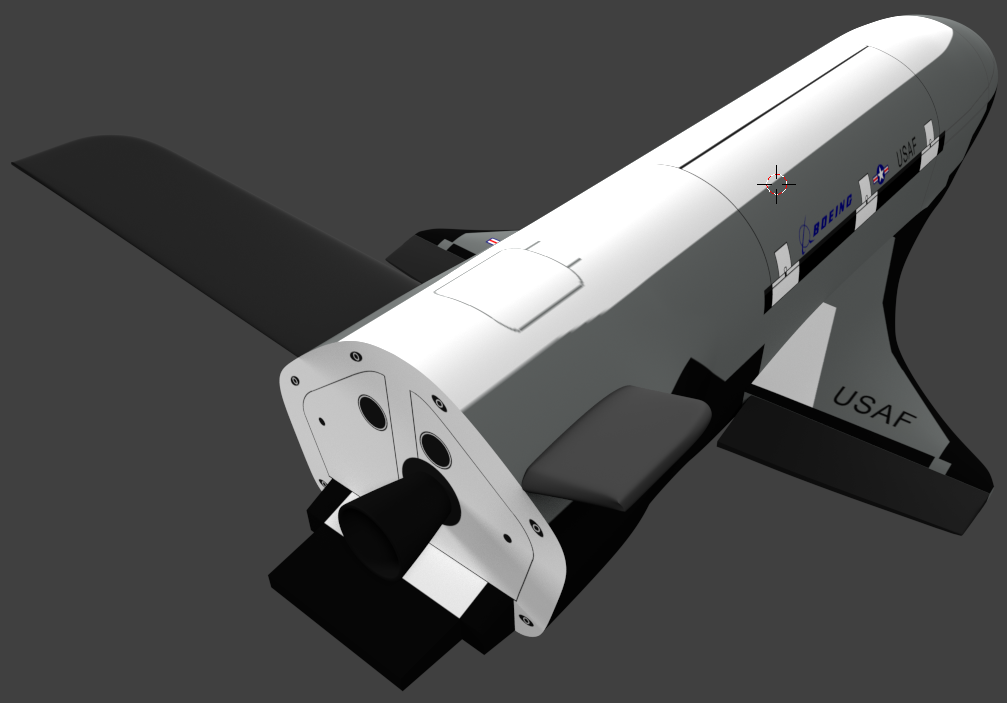
Here’s an update. These are 1024 Cycles renders using my new Nvidia GTX 970 card which blazes!
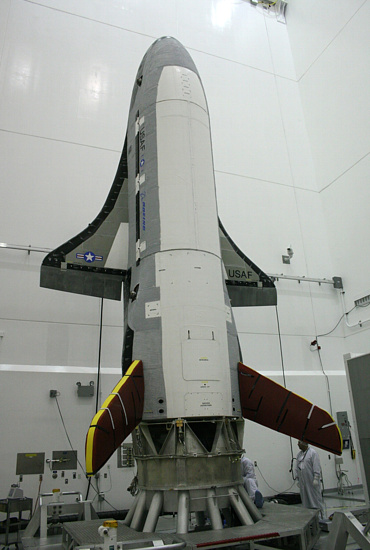
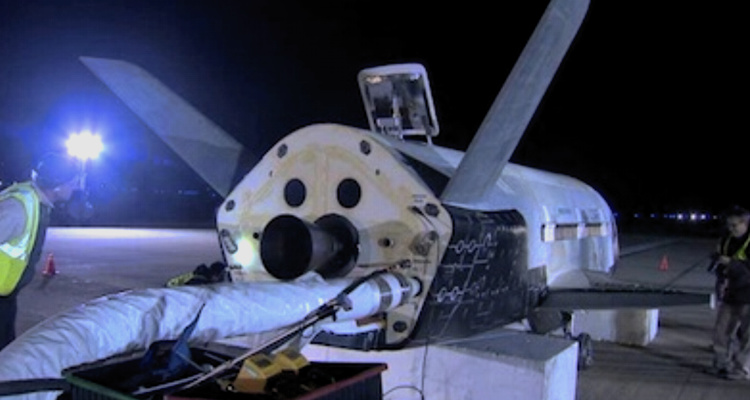
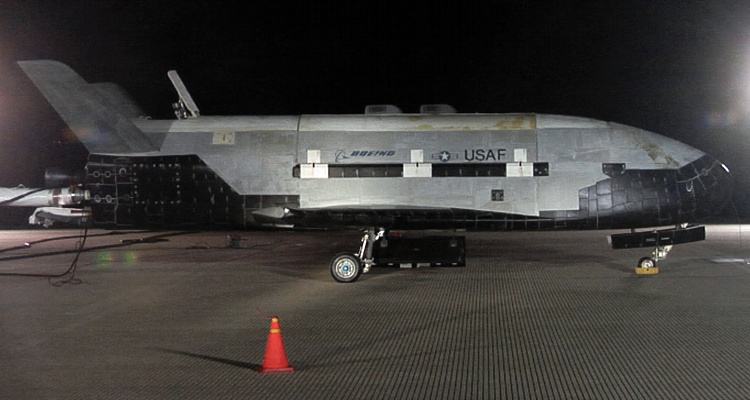
My rendering has been based on photographs more than the drawings (I’ll post the key photos I’m using in another message). Witold, on my photographs I see sharp edges on black to white leading edge of the wings, so I did it that way. Andvari, I put in a squeeze near the back of the white area.
What’s left are the RCS jets and the tiles. I’ll use the technique you mentioned earlier Witold for the RCS jets. The tiles are just going to be tedious drawing on the Gimp image ![]()
However, before I do that I’d like to get a texture on the grey area. Having studied these photos at length, there appears to be a base metal for the fuselage (which is generally painted a matte white) and then the lower portions of the fuselage that are not tiled seem to have some sort of additional thermal wrap treatment, almost like a cloth of some sort. Thats the grey material. I’d like to get some sort of fine mesh pattern applied on these areas and then bump it or normal it I think? You both eluded to bump/normal. Maybe this description will provide you with more ideas on the best way to go about that?
Reciprocation of Greetings!
If you have not already, I would suggest that you do a tutorial or two to familiarize yourself with material creation and the node interface, so you have some idea of what tools are available. Probably you will need to make several two-tone, black and white images, that will define the regions of each of your different materials – the grey region, the heatsheild, the transparent places for the RCS nozzels, et cetera – and use those as factors is ‘mix’ nodes between the different shaders elsewhere. You seem to know your way around GIMP, very well, so that should be a fairly easy thing to do (the start on the texturing looks pretty good, and detailed).
As for the grey material, looking at some pictures I see what you are getting at with the mesh. Cloth is a popular material, so it might help to look into how different people try to texture that, and base your material on some of the same principles. In order to get all the details of that material you would probably need to use something apart from the UV map, unless you can work with images of absurd resolution. I would look into the different options of the ‘texture coordinate’ node (under inputs) to try to tile an image texture, or look into procedurals, which can generate the details without need for an image texture. You also might be able to do a second UV map that is just for the details of the grey material, and gives a large space preference to that, or that tiles it itself.
Bump and Normal Maps are used to give the illusion of surface complexity without actually modeling in each of the tiny details, and thus save time and polygon counts. Bump maps are greyscale heightmaps, that show the topography of a surface, whereas normal maps show edge data through an RGB image. Probably it would (I think) serve you well to use at least one of these to provide the textures for the heatsheild tiles, as well as other details on the surface of the vehicle. You might not need to have a complex image texture for the mesh, just a bumpmap, as a lot of the qualities associated with that sort of material are merely shadows and bends on an essentially homogeneously colored surface. It is easy to paint bump maps, and you can generate normals in Blender (there are many tutorials on this, and Witold mentioned a clever technique to make them without needing to make an entire higher poly model).
As for photos, that is absolutely superior to simply following the drawings, and I see the angular quality of the leading edge now that you mentioned it. I have to do all my renders on a CPU, but some of those graphics cards are amazingly fast by comparison. I am sure it speeds things up a lot to have one.
(Sorry for the really long post)
Hello!
You are absolutely right - the photos always are the ultimate source, drawings often cheat us, more or less (I just saw only these drawings, thus my comments).
Andvari, a long post as yours is a good post! It is impossible to provide a precise technical information in the “twitter style” :).
fwmiller: the textures looks good. I would suggest to add more minor details, visible on the photos: for example there are labels on the top of the fuselage (if your photo is too small, you just have to guess, what was written there - I had sometimes to do it in this way). The photo still reveals more panels than on your texture - I think that adding these minor details will further improve your model. Have you tried to draw them in Inkscape? Personally I have found such a vector-based 2D editor a better tool for drawing all the “technical” skin details (for example bump maps) than GIMP. I also think that it will be easier to paint (and modify!) the bottom tiles in Inkscape than in GIMP…
Wow, check this out. I found a fine greyscale cloth mesh that seemed pretty good. I created a separate layer in Gimp and filled in the grey areas with this mesh, then applied it as a bump map. Any suggestions? Thanks Andvari!

Hi Witold,
As I’ve been reading your material on texturing and bumping, its becoming apparent to me that I need to learn Inkscape. I’ve been using Gimp exclusively so far and I’m running into limitations, particularly with sharply defined details. Sigh, another tool to learn… 