ah, foto of spider web…lol,of course, perfect choice here!..but yes, that is why post pro is so important! many things are way too time consuming to fix them in the render. better render enough passes and layers etc, and compose and tweak. … just curious,do you have a new project in mind?
I am not sure about next project…but I feel like something with a quicker turn around time. Any ideas?
you said about sculpting,why not do a 1 week sculpting challenge for yourself. pick a topic you want improve on, and a time schedule (like 1 or 2 days for each, or whatever suits you) and try your best at it, do 7 of them with focus on the task set, not a finely rendered artwork. you said about difficulty in figures from different views, so may be a figure challenge, copy from masters you love? of course, this would work also with non sculpting topics, if you choose … ideas for big projects come from heart, i cannot help you with that  and i don’t need to, your project laokoon is the proof
Thanks, I think this is probably what I need most right now. I am going to reduce the workload a little for a while, but something fairly regular and with a goal would be very beneficial. ![]()
I am finishing my work, I go to the blenderatrist, and what do I see?
Render which I did at work. : D Great job!
You truly deserve a place among the thumbnails on the main page.
Holy shineola, really really amazing. Could I accomplish this in one lifetime. very nice.
Thanks! Good to see you on the forum (can’t tell who you are from your Forum name though ;)). That reminds me I need to credit you guys in the OP!
Brilliant piece, congrats!! 
Thanks ShaylaSS & Vicky
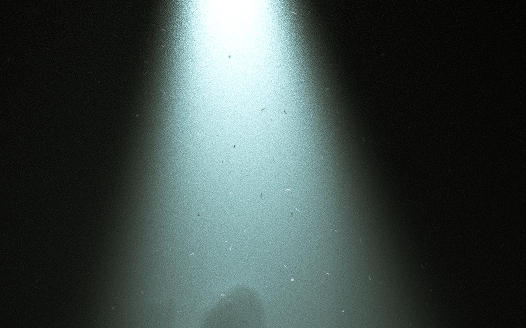
I was just collecting some images to provide some extra info about the process and I realised why my volumetric lighting didn’t look quite right - I had somehow set the angle of two spot lights to 1 degree rather than the intended 38…no idea how that happened. Oh well, it didn’t make too much difference, but I do think that the lighting was a little more vibrant and interesting the way that I intended it to be.
Anyway, on the info!
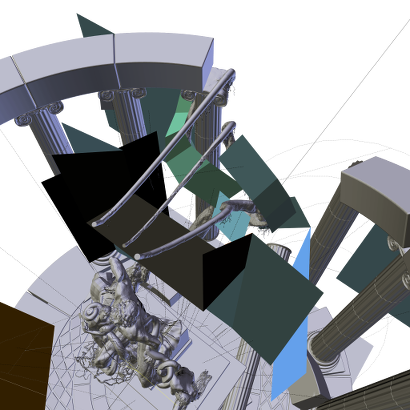
The scene:
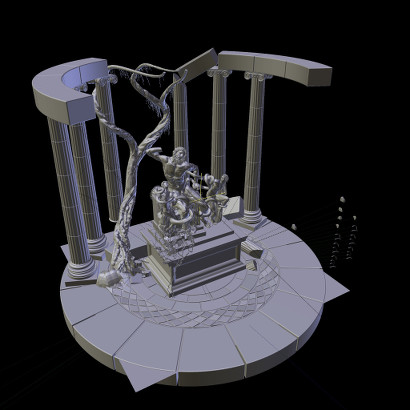
The first thing you may notice is the strange shape of the tree at the top. The reason it is like that was simply because it allowed me to prevent the trees receding too much into the light. The lighting rig itself consisted of two large blue mesh rim lights for the columns, two smaller front lights (orange and blue…shows up black below) to provide a horizontal colour grading on the contours of the statue, one large overhead blue mesh light for general illumination, a series of small turquoise/blue/green lights to light and hue the tree as intended, and one large curved mesh in between the pillars and the statue to provide fill lighting on the statue (there is a shadow shadow box to intercept light from that mesh so that it does not interfere with the tree lighting):


Part 2 to come (only 3 images per post!).
Lighting from another angle:
The render passes consist of the following…
The solid objects + main lighting rig:

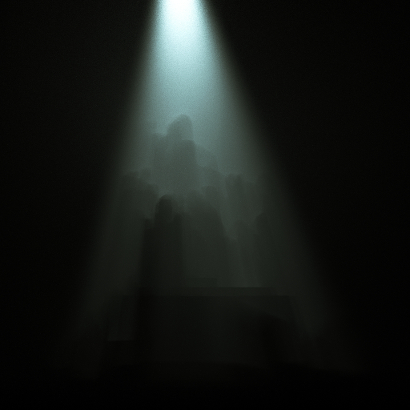
Volumetric lighting with objects casting shadows but not being rendered:
What is probably the most correct way to combine those two passes (z-combine in lieu of true deep compositing) results in something that looks quite cool, but wasn’t going to work for my image:
In the compositor I set it up so that I could scale linearly between that, and an alpha overlay with the mist pass as a factor. Before combining though, the volumetric pass was combined with pass of particles to create a dust effect:
…and finally the mist layer was created with a smoke simulation in Blender Internal (turbulence force with a mesh emitter):
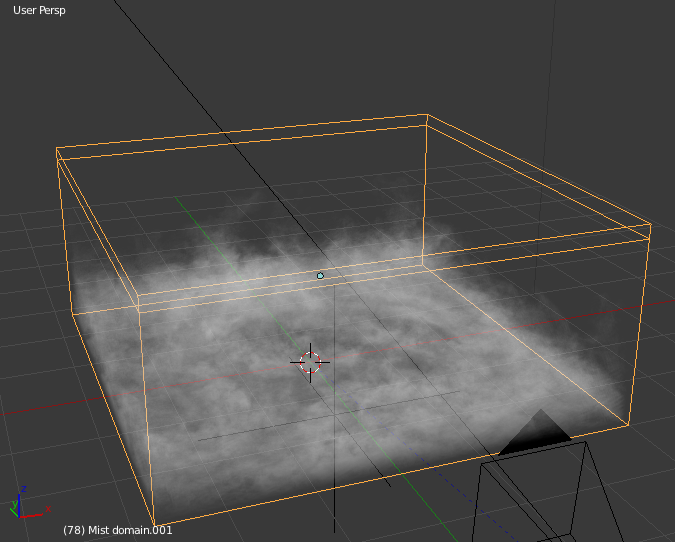
The scene objects were added post sim and rendered so that the objects were obscuring the smoke (older version shown below):

All of the render passes were saved as Multi Layer EXR files, so that I could access the individual components of each pass.
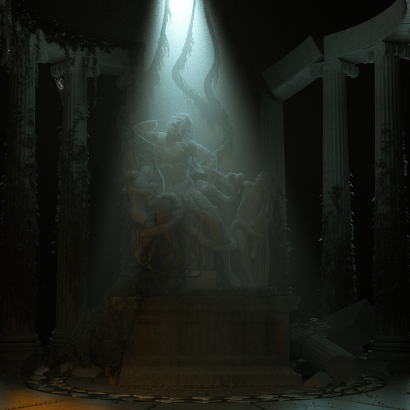
These passes were all combined to give the result seen on page 1.
I’m considering doing another render now with the lighting fixed…hmm.
O___O next level work right here!
This is just awesome! Especially the sculpting is superb! The only crit I have is the black background. This gives me the impression of a an artwork that isn’t really finished - a little uninspired - as if you had no ideas for the background or wanted to call this piece finished because you’d spent enough time on it already.
Marco
congatulation for the feature row, matt!! and, thanks for the additional info (though 2 attachments don’t show, in post#33)
Hi Blender Matt,
Like the others, congratulations for your very beautiful job!
But like a architure professionnal, I have a a remark about the material “Marble, Carrara type” column. These columns were certainly made in a marble high quality as the career that was used to make the Parthenon in Athens. Their peculiarities were certainly not have veins. Because the veins for the sculpture are a source to broken, this column must to have stability over time.
Veins was a romantic sign of the time but not for the origin period.
I think it would be better to reduce that aspect to increase its authentic character but also the purity that led the artists of that time.
Congrats
This is an awesome piece of work. Congrats, Matt.
But now I have a question: how do you sculpt the statue hair? I mean, from the beggining to
the final result, what is your workflow of brushes and settings for sculpting hair? I find hair/beards more difficult to do
than usual anatomy work stuff.
Hi Matt, great work!
There was something that was making me uncorfortable in the final render, and I couldn’t pinpoint it until now.
The volumetric light that comes from the top in the final image does not overlap strongly enough the background column, giving the impression that it is behind the columns… but then it gives a strange feeling because if it is behind the column, how could it be lighting the sculpture that is in front of it? You see?
http://www.pasteall.org/pic/show.php?id=67442
In your screenshots of the creation process, I can clearly see that the light is in front of the columns, but in the final render it doesn’t appear so. So a guess is that the final blend mode of the composited volumetric light was the issue.
Hope you and everyone else doesn’t take my criticism as offense.