It looks as if there was no subdermal layer, but with some balances it will look great  And btw, really nice modeling, I would like to be able to model nice shapes like this…
I followed your instructions. That is I made sure all the materials were indexed in the model and then I assigned all the faces to the combined material. I also observed that the rendering process was going through several steps so I assumed it was rendering all the layers.
I think that one of the issues is the scale of the model.
Could you post your Suzanne blend file so I can examine the material setup and also watch the rendering process to see if I get the same thing?
Sure I can ! 
I modified the lighting setup but the shader is the same, except for the textures. Have fun with it^^ As you said, when you use it on another mesh, it has to be balanced, especially for the scale and the sss radius, etc.
Thanks for the blend file. In the meantime I kept playing with this shader. I replaced the plane in your file with Suzanne, added two lights, a camera and AAO and here is the result.

I made a small adjustment to your SSS radius parameters. Scientific measurements show that for Human Skin, the Red radius is approximately twice larger tand the Green radius and the Blue radius is approximatey twice smaller than the Green radius. So I changed all 1.0, 1.0, 1.0 to 2.0, 1.0, 0.5 and the radius 0.135, 0.135, 0.135 to 0.270, 0.135, 0.70. The resulting difference is subtle but worth it IMO.
And indeed, my head model is smaller that the Suzanne model so now I’m going to size down all the textures and SSS parameters.
So here is where I am with this Skin shader. I fixed the scales. I tweaked the SSS RGB radius some more and here are the results and this is really starting to feel good:
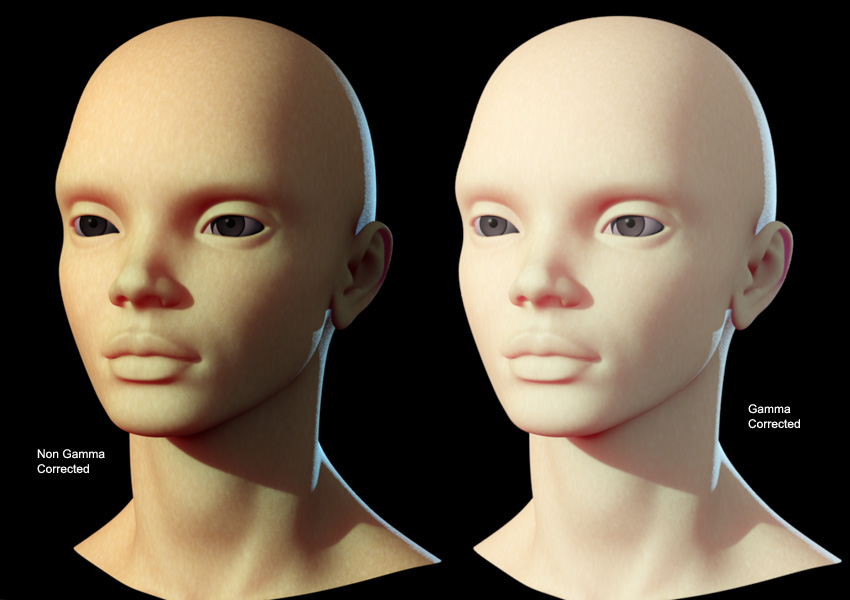
The colors settings are not yet suitable for post Gamma correction. That is the next issue I will tackle.
hmm that looks good, I’m glad to see that you improved it^^ Thanks a lot for the accurate information about the sss radius, I’m gonna change it on the shader. By now it still scatters the light too much, but it just needs to be balanced.
Today I hadn’t very much lessons, so I found time to work on a PC at school. They really run slowly, but I succeeded in finding some patience to install Blender on their computers (the beginning of the spread of Blender in schools :)), and after having downloaded the Blend file, I tried your parameters for the sss radius, which are really convincing, giving the skin a more natural look, much warmer, exactly what I had expected :). I did a quick comparison, and IMO we can now “feel” better the underneath blood :

Thanks for your help 
And btw, I’m really having fun when doing that kind of “explanation-aimed” images  (didn’t find an accurate enough word to express this)
Nice, you might want to try and add veins - I tried, but couldn’t figure out your setup completely. also, I get a “sand” feeling rather than “skin” feeling - but I’m sure you are on the right direction! keep it up!
In order to add veins, by texturing the shader it could look nice, but flat, I mean, not volumetric, for example we do can occlude the “back_sss” shader with a veins texture, but imagine you rotate the camera around… It will look as if the veins were not underneath because the texture is applied on the mesh… And about the “sand” look, I’m convinced that with some nice texturing, some nice modelling, some nice lighting, some skilled artist, it could look great Indeed, my aim wasn’t to create a cool skin texture, but rather a good shader. I wish I’ll find some time to model a face and texture it soon.
Make the skin color effect the specularity color to add warmth? Just an idea. It may be that the whiteness of the specularity subconsciously plants the idea of an inanimate object like sand as opposed to the warmth and touch-ability of real skin. You can’t hardly go wrong with skin since there are so many types out there lol I’m following this thread closely I like what you’ve done so far!
I tweaked the colors gamma so I can do a post gamma correction on the render and this is what I get so far. Still not where I like it though. More tweaking to d.

After a few more tweaks I got this result:

For this, I made a fe more changes to the dermis bas color and I changed some of the node blending operators
The first operator change is the blending betwen the Dermis and the Epidermis was done with a “Screen” operator and it should be done with a “Mix” oprator. This is really what it should be. The Screen operator is a sort of inverse multiply that caps values at 1 and we certainly don’t want that to happen here. What we really want is a proper balance between the dermis and epidermis whaich is what the Mix blending operator will allow us to do.
The second operator change is the blending between the skin and the sweat specularity. This should really be an “Add” operator. It was also set to “Screen”.
And here is the blend file with Suzanne and the modified SSS Skin shader.
The specularity color would come from the material that is reflecting light. That material would be either water or oil or both. Water reflectance would be quite white but oil reflectance would be yellowish.
ypoissant, everything you’re saying is right However, I have to defend myself First, for the dermis and epidermis, I just saw that it looked better with a screen node, though in my mind a mix node was exactly “what had to be”, since we want to see both epidermis and dermis… But in the end, it’s better with a screen node, innit ? And for the speculars, I also thought of it some time ago, and I believed that the more “natural” way of making the specularity overlap was to add it above all others layers, but then I read on the release logs of Blender.org about render passes that : when rendering without composite nodes, shadows are of course multiplied to the diffuse pass, for example, but speculars,instead of being added, are screened… (I cannot quote it from the website because by now it’s down, it happens quite often those times btw ). That’s why I use a screen node for speculars as much as dermis.
And about the speculars color, I use a quite blueish tint but I don’t know if it’s physically accurate… The fast skin shader of mental ray also does I stared at my hand a little and I succeded in convincing myself that the speculars were - slightly- blue, but I guess it was also because of the sky… We should ask to an expert
I classical CG rendering equations, specularity is added. Not screened. See this wikipedia page. I doubt Blender would do it otherwise. Anyway, the Screen operator between two layers A and B is defines as 1.0 - (1.0-A) * (1.0-B). In other word, it does the same operation as Multiply but inverses the values between 0 and 1 first. That is why I call that an inverse multiply. The problem with that operator is that it assumes the values in A and B will never be higher than 1 otherwise, it will fall in the negative values with the inverse operation. Anyway, there are no foundations in any lighting models for the Screen operator. As for shadows, it would multiply both the diffuse and the specular components of the shading.
Specularity does not exist in reality, It is a qualificative we give to bright reflected lights spots. In CG, lights are not real objects and thus are not reflected so we have to add highlights to simulate light reflection. The reflected beam of light that reaches the eye is a multiply of the light color and the material that reflets the light. In other words, the light color is filtered by the material color. If you stared at your hand outside during a clear and sunny day, then yur hand mostly reflected the bue sky, indeed. And the blue from the sky stayed blue because it was very little filtered by the sweat or the tiny layer of oil on your skin.
You’re right, moreover, I did some tests quickly, and the speculars appeared as “normal” as usual, whereas with the screen node, they looked a little bit flattened. I will check the release log when Blender.org isn’t oversaturated anymore.
And about what you say next, I know all of this (sorry if I appear proud of myself :D) that’s why I was thinking that with soft reflections we could get great and accurate results. The speculars shaders are to my sense quite disappointing, first because the basic concept of “speculars” is a kind of physical heresy in order to simulate bright reflections, and secundly… The speculars shaders of Blender are lacking of accuracy imo, for example, the phong specular shader doesn’t produce convincing highlights… I read something about the Lafortune shader model, which is, as they say “tri-lobe”, whereas Phong, Blinn, etc, are simplified… I didn’t understand everything about the Lafortune shader (it’s the least I can say XD), unfortunately. I had to understand fully before all what BRDF was, and I had to eat at the same time… Hard Maybe you have some information about it which are accessible considering my “young” knowledge ? I would really be interested, since I’m keen on physics and simulating/modelling the real world
Finally, I think that soft reflections could be a proper way of simulating the behaviour of light, if we could be able to have objects which appear pure white in a reflection even if the mesh has its raymirror parameter set to 10% for example. Is HDRI really the only way of having such reflections ? I mean, having objects whose reflections appear white on a window even though the window reflects 10% of light… But in every case, such a use of soft reflections will be costly, and the render times will explode
[edit] I checked the release logs, and seemingly I have been dreaming, there’s nowhere we can read that the specular pass is screened above the others. Sorry about this
Yeah! I could already tell that you know a lot about that ubject. Not everybody can talk about BRDF and much less with the right context. I think that for your age, you’ve got good reasons to be proud.
that’s why I was thinking that with soft reflections we could get great and accurate results.
Soft reflection will definitely get you closer to that.
The speculars shaders are to my sense quite disappointing, first because the basic concept of “speculars” is a kind of physical heresy in order to simulate bright reflections, and secundly… The speculars shaders of Blender are lacking of accuracy imo, for example, the phong specular shader doesn’t produce convincing highlights… I read something about the Lafortune shader model, which is, as they say “tri-lobe”, whereas Phong, Blinn, etc, are simplified… I didn’t understand everything about the Lafortune shader (it’s the least I can say XD), unfortunately.
I agree that the concept of specular shader is a kind of heresy. But for a long while that is all CG artists could use for simulating soft reflective surfaces. This said, specular shaders are a good introductions to the oncept of BRDF even though they aren’t BRDFs. They are a much simplified representation of a BRDF.
Lafortune model is a more flexible reflectance model. But used in the context of a specular shader, it is also jut as disapointing as any other specular models because they have no actual light to reflect. They only hve a light direction vector and they have no way of sampling the actual light.
I had to understand fully before all what BRDF was, and I had to eat at the same time… Hard
Maybe you have some information about it which are accessible considering my “young” knowledge ? I would really be interested, since I’m keen on physics and simulating/modelling the real world
I would not know where to start. BRDF is a large concept. There are two or three things that comes to mind. 1) BRDF really only make sense in the context of QMC based renderers because the BRDF defines the sampling pattern over the hemisphere to a point being shaded. 2) BRDF reflection pattern can be more complex than simple models such as Phong, Blin and even Lafortune. The reflectance pattern can change dramatically as viewing and light angle increase from the surface. 3) BRDF are probability distribution functions (PDF). They define sampling distribution / densities in relation to view, light and normal angles where light, in this case is the whole hemispherical environment. Specular shader models are much simpler because they define intensity in relation to view, light and normal and the only lights considered are the light objects in the scene.
Finally, I think that soft reflections could be a proper way of simulating the behaviour of light,
As I mentioned, soft reflections are a good step in the right direction. However, soft reflection can only simulate very simple BRDFs although a wide range of surface roughness but the roughness is assumed to be very uniform.
if we could be able to have objects which appear pure white in a reflection even if the mesh has its raymirror parameter set to 10% for example. Is HDRI really the only way of having such reflections ? I mean, having objects whose reflections appear white on a window even though the window reflects 10% of light…
Yes. HDRI is the only way to get that sort of strong reflections in colored surfaces. But it have nothing to do with soft reflections. Soft reflections will change the quality or the crispness of the reflection. Reflected images are multiplied by the surface BRDF, which, in the case of simplified CG models is multiplied by the diffuse color. So if you have a surface with 10% reflectivity (RGB: 0.1, 0.1, 0.1), Then you need to have bright areas in your environment that are at least 10 times brighter than white in order to get white reflections. Of course, you could also have CG models that receive 10 times more light than white in your CG envronment to get the same effect. But here, specular shader will not do that because speular shaders do not reflect objects. they only reflect point lights.
But in every case, such a use of soft reflections will be costly, and the render times will explode
Yup. And that is the main reason why hacks like specular shaders persist still today. They are so cheap to use.
actually raytraced soft reflections are a proper way to replace or complement regular shader based speculars. You can use angular maps and/or some big diffusers or white plains to make better looking speculars; if you match this planes with the location of the lamps producing the diffuse lighting and shadows you get a better effect of course
Thanks a lot for your explanations about BRDF, I also read some articles on Wikipedia, and now I understand better how unaccurate Lambert, Phong, shaders are… I was wondering why Phong speculars looked always round, even when the light came from almost behind (normally it should look like an arc of a circle or something like that) But it seems that we have no other way to simulate it, and I don’t want to use any monte carlo progressive render engine such as Indigo (imagine how boring the shading tests could be if you had to wait at least two hours to see if your shader looks good…).
About soft reflections… I did a quick (and ugly) test in order to see if the “emit” parameter was taken into account when calculating the reflections, and seemingly the answer is yes Just take a look at this :

The only changing parameter for the shader of the white planes is their “emit” parameter (from left to right, it increases) So it’s a kind of “hdr” lighting, since with the emit parameter, object can be “more-than-white” for the raytracer. It means that we surely can get proper speculars with soft reflections, the only inconvenient being the render times increase.
Cool man :D, nice info. You could use the Bilateral Blur node to do the job with far less samples!
You’re right, it can be helpfull, especially for intermediate test renders - because it isn’t as nice as soft reflections, and when you switch to the “final” render, you can activate proper reflections.
I’m currently back to the mixing tests between the epidermis and the dermis,and I’m working hard to get proper results with a “mix” node instead of a “screen” node… But it isn’t as convincing as I expect it to be. By now, it looks far better with a screen node… Anyway, if after some hours I see that it still looks better with a screen node, I’ll forget the “mix” node, even though it’s the most natural way of combining epidermis and dermis. After all, we’re doing CG, which means, cheating with the behaviour of light, as always, and I keep believing that the most important is the final output, no matter if the way we obtain it is totally physically wrong.