QUESTION re NODES, SCRIPTS (noob) - plotting points from data

You asked of I could tell you if your angles are good or not. I really don’t know what to say because I can’t make that file work, and from looking at the script, I can’t tell what’s different from what I gave you. Please just give me a chance to learn some of this Blender stuff, it really is a huge load and a steep learning curve.

I tried uploading a Blender file I found online, but once again the UI won’t let me upload. The text is appended. I found it linked to this YouTube video, which was very helpful. This file is doing similar things to what I intend, generating multiple spheres from data and positioning them according to trigonometric functions. I’m going to play around with this and try to figure out how it works. The only other thing I need to figure out is how to get Blender to import position data from an external file. Hopefully, at that point, this project will be straightforward. Thanks again.

import bpy
from bpy import context
from math import sin, cos, radians
cubeobject = bpy.ops.mesh.primitive_ico_sphere_add

get cursor loc - Script Modified by SardiPax

cursor = context.scene.cursor_location
radialdist = 2.0
xsize = 0.15
ysize = 0.15
zsize = 0.15
theta = 0.0
pi_over_8 = 6.28 / 16.0
levels = -10
maxlevels = 10
divi = 2.0
inci = 0.25
while levels < maxlevels:
while theta < 6.28:
x = cursor.x + (radialdist-(levels+ 2cos (theta+levels/divi))) * cos (theta-levels/divi)
y = cursor.x + (radialdist-(levels+ 2
sin (theta-levels/divi))) * sin (theta-levels/divi)
z = cursor.z+levels
cubeobject(location=(x, y, z))

       bpy.ops.transform.resize(value=(xsize* cos (theta-levels/divi), ysize* cos (theta-levels/divi),  zsize* cos (theta-levels/divi)), constraint_axis=(False, False, False), constraint_orientation='GLOBAL', mirror=False, proportional='DISABLED', proportional_edit_falloff='SMOOTH', proportional_size=1, snap=False, snap_target='CLOSEST', snap_point=(0, 0, 0), snap_align=False, snap_normal=(0, 0, 0), texture_space=False, release_confirm=False)
       theta += pi_over_8
theta = 0.0
levels += inci

radialdist = 1.0

Python and Blender are both quite easy to learn, I would first start with beginning Blender tutorials regarding Basic UI usage. Python is a bit difficult to take in through videos doing searches on your own so I would recomend grabbing this video

He shows you how to get to the scripting area to run scripts and he also shows how to make groups of objects in certain patterns which may come in handy later for what you are interested in doing. As well as how to run a script. Note that his script is written for an older version of blender and may not work but the UI Usage regarding scripting in python still applies.

You wont be able to upload until after your 10th post is approved by the moderators, your currently on post 9 so just post 1 more time and probably wait 24 hours and you should have no more problems with the forum. Anti-Spam thing that seems to work quite well. The same happens to all new forum users.

as I said look at post 14 I’v drawn one star with angles and wondering if these angles make sense
in this case let say that the floor XY would like the ecliptic plane I guess!

also I found another way to read the data more evolve
but it will read the data as well as the one I did !

can you give the link for script in post 21
indentations have been lost !

happy bl

Ugh, the forum once again ate my post from yesterday! I will contact forum help whenever time permits, but there are too many bugs in this forum!

Are you asking about the angles in the pic you posted? I can’t really see them well. They are the correct basic idea, but xyz transform into equatorial coordinates as follows:

x = R*cos(DEC)cos(RA)
y = R
cos(DEC)sin(RA)
z = R
sin(DEC)

where:

R = the radial distance of a star from the center (assume a large equal distance for all stars)
DEC = declination, similar to latitude, measured up from the plane of the celestial equator (0 degrees) to the poles (+/- 90 degrees)
RA = right ascension, similar to longitude, measured in hours (15 degree increments) from the point of the vernal equinox

I found this script online and it generates spheres and places them in xyz positions directly from data. I will play around with this for a while in the hopes of figuring out how it works. After that, I will need to figure out how data can be imported from an external file, to be used to place objects in xyz positions. After that, it should not be too hard to generate my star maps (I hope!) Thanks

import bpy
from bpy import context
from math import sin, cos, radians
cubeobject = bpy.ops.mesh.primitive_ico_sphere_add

get cursor loc - Script Modified by SardiPax

cursor = context.scene.cursor_location
radialdist = 2.0
xsize = 0.15
ysize = 0.15
zsize = 0.15
theta = 0.0
pi_over_8 = 6.28 / 16.0
levels = -10
maxlevels = 10
divi = 2.0
inci = 0.25
while levels < maxlevels:
while theta < 6.28:
x = cursor.x + (radialdist-(levels+ 2cos (theta+levels/divi))) * cos (theta-levels/divi)
y = cursor.x + (radialdist-(levels+ 2
sin (theta-levels/divi))) * sin (theta-levels/divi)
z = cursor.z+levels
cubeobject(location=(x, y, z))

       bpy.ops.transform.resize(value=(xsize* cos (theta-levels/divi), ysize* cos (theta-levels/divi),  zsize* cos (theta-levels/divi)), constraint_axis=(False, False, False), constraint_orientation='GLOBAL', mirror=False, proportional='DISABLED', proportional_edit_falloff='SMOOTH', proportional_size=1, snap=False, snap_target='CLOSEST', snap_point=(0, 0, 0), snap_align=False, snap_normal=(0, 0, 0), texture_space=False, release_confirm=False)

       theta += pi_over_8

theta = 0.0

levels += inci

radialdist = 1.0

Sorry guys, I didn’t even see these comments when I posted a comment before. Don’t know why I’m having so much trouble with this forum, I’ve been on the web since 1995 and have used a million forum UIs, but this one does not like me (and visa versa!) Just trying to inhale all this Blender/Python/Whatever stuff, as meager time permits. I’m also in the middle of a website design and a huge writing project, in addition to my day job and a particularly eventful personal life. I appreciate your help and comments, insofar as I can process it all. thanks, jay

Ricky, the script from post 21 is at this link, which was linked to the YouTube video above:

Yay, my posts are coming through immediately, unmoderated! Thanks Jorge. Now if I can only post using “reply” or “advanced” without the forum eating my posts…

what does the script in post 27 is suppose to do or model ?

and it seems to take a long time like 30 seconds to execute
wow sluggish this one not certain why !

thanks

Ugh, in comment 24 you asked for a link to the script in comment 21 and I gave you the link in comment 27! You can see what it does by looking at the Youtube video linked in comment 21. It creates a lot of spheres and places them in xyz positions, which is part of the problem I’m trying to figure out. The other part is how to import position data from csv.

@jayfromclevelan
this might help you format your posts if you are having trouble with the advanced button

http://blenderartists.org/forum/misc.php?do=bbcode

You realy only need the QUOTE and CODE tags.

I’m familiar with the tags, but the issue is, posts sent under “advanced” or “reply” have tended to disappear. “Quick reply” has been the only reliable way to respond. thx

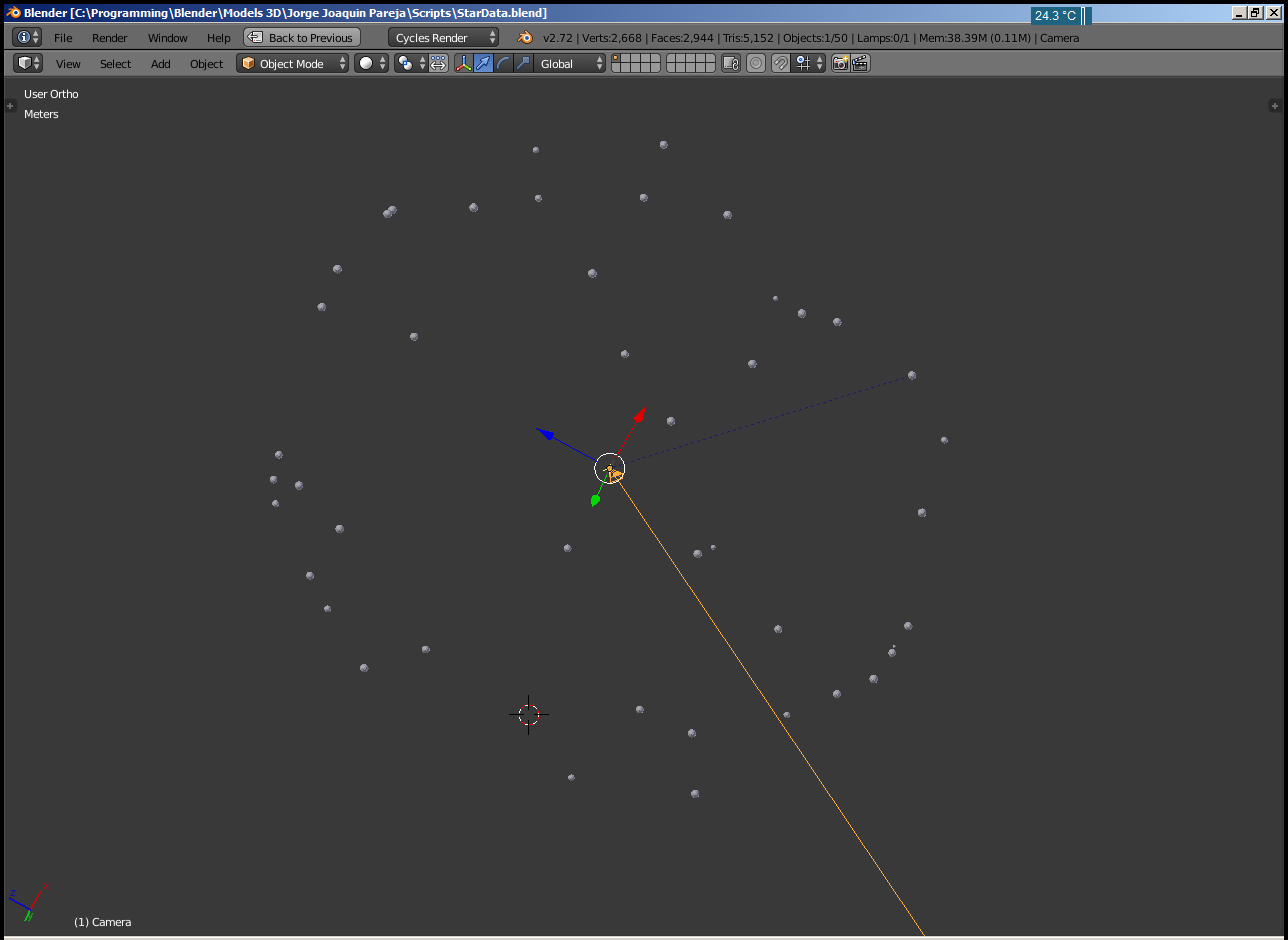
I just added the 40+ ephemeris from the actionscript you posted earlier and was able to debug my script a bit. I forgot to convert the data from CSV to floating point number, the previous script just read the data as text and won’t work so I fixed it in this post.

The D variable I was using was being used by Blenders Python console so I renamed it to DD. I did have to alter the R distance to 400, I didn’t change the magnatude. I also made each sphere have a lower amount of verts. If you toss 20,000 stars at the script it will create 20,000 spheres just as you wanted in your first post. Each sphere is 58 verts right now so that will be a about 1.1 million verts if you run this new script as is. I may be able to get it lower but I’ll have to wait for the actual csv file from you.

If you still have the origional yale V4 files and have the program to convert the star data I would realy recomend also putting the star name into the csv output and alter the script to name each sphere, I was only able to get the V5 data. In order to get image data you will need to add some support in the script for lighting the stars.

Below the code window is the starData.csv file I ran my tests with.


# BrightStarData_CSV.py V2
#
# place this file in C:\blender-2.73-windows32\2.73\Python\lib
#
#
#  MIT License
#
#    Copyright (c) 2012-2015 Jorge Joaquin Pareja
#
#
#    Permission is hereby granted, free of charge, to any person obtaining a copy of this software and
#    associated documentation files (the "Software"), to deal in the Software without restriction,
#    including without limitation the rights to use, copy, modify, merge, publish, distribute,
#    sublicense, and/or sell copies of the Software, and to permit persons to whom the Software is
#    furnished to do so, subject to the following conditions:
#
#    The above copyright notice and this permission notice shall be included in all copies or
#    substantial portions of the Software.
#
#    THE SOFTWARE IS PROVIDED "AS IS", WITHOUT WARRANTY OF ANY KIND, EXPRESS OR IMPLIED, INCLUDING BUT
#    NOT LIMITED TO THE WARRANTIES OF MERCHANTABILITY, FITNESS FOR A PARTICULAR PURPOSE AND
#    NONINFRINGEMENT. IN NO EVENT SHALL THE AUTHORS OR COPYRIGHT HOLDERS BE LIABLE FOR ANY CLAIM,
#    DAMAGES OR OTHER LIABILITY, WHETHER IN AN ACTION OF CONTRACT, TORT OR OTHERWISE, ARISING FROM,
#    OUT OF OR IN CONNECTION WITH THE SOFTWARE OR THE USE OR OTHER DEALINGS IN THE SOFTWARE.
#
'''
A Blender python library for reading star data.

For more information see http://blenderartists.org/forum/showthread.php?359731
'''
import csv   # for CSV files
import math  #
import bpy   # for blender

##########
# declare some variables global to this scripts functions

i = 0   # for iterating some loops

x = 0.0
y = 0.0
z = 0.0

numStars = 0 # set the number of stars to be zero

magnatude = [] # a list with each stars magnatude 
RA = []        # a list with each stars Right Ascention
DD = []         # a list with each stars Declination

##########
# define some functions we can call later, the three single quotes are for
# help about the function when called with help(functionName).

def clearVars():
    '''
    Clear this scripts global variables to defaults
    
    this is automaticaly called by:
        readStarData()
    '''
    i = 0

    numStars = 0
    x = 0.0
    y = 0.0
    z = 0.0
    magnatude = []
    RA = []
    DD = []


def readStarData(file):
    '''
    Opens a star data file with the following format
    
        Magnatude, RA, D
    
    file indicates the full path and name to the file to read
    
    '''

    # clear all variables by calling the clearVars function
    clearVars()
    numLines = 0
    
    # open the given file to read in all data
    with open(file, newline='') as f:
        # setup reader for comma delimited file
        reader = csv.reader(f, delimiter=',', quoting=csv.QUOTE_NONE)
        
        # for each line in the file, break the rows into the proper parts
        # populating the magnatude, RA, and D variables
        for row in reader:
            magnatude.append(float(row[0]))
            RA.append(float(row[1]))
            DD.append(float(row[2]))
            numLines += 1      # keep track, globaly, of how many stars there are
            
    return numLines -1
    

def processStars():
    # we are using numStars to create a seperate object for each star
    # using spheres.  We can use the magnatude data to tell blender how
    # large to make each sphere.
    #
    # 
    #
    i = 0
    while i != numStars:
        # math from post http://blenderartists.org/forum/showthread.php?359731&p=2802867&viewfull=1#post2802867
        #
        x = 0.0
        y = 0.0
        z = 0.0
        #
        R = 400 # in meters for this test, if stars are too close this will need to be higher
        
        x = R * math.cos(DD[i]) * math.cos(RA[i])
        y = R * math.cos(DD[i]) * math.sin(RA[i])
        z = R * math.sin(DD[i])
        
        # add an object at this x,y,z location
        bpy.ops.mesh.primitive_uv_sphere_add(location=(x, y, z), size=magnatude[i], segments=8, ring_count=8)

        i += 1 # incriment i and go to start of while until we are done
        

###################
# The following is all that should need to be edited when done
# this should be last
myStarFilePath = 'C:\\StarData\\starData.csv'


################
# no need to editing anything below yet
numStars = readStarData(myStarFilePath)

processStars()


sample starData.csv file


4.0, 30.001, -21.078
5.35, 30.311, -30.002
5.14, 30.426, -44.713
4.33, 30.511, 2.764
5.23, 30.511, 2.764
2.26, 30.975, 42.33
4.84, 30.978, 42.331
4.69, 31.123, -29.297
5.03, 31.641, 22.648
2.0, 31.793, 23.463
4.82, 32.122, 37.859
4.98, 32.355, 25.94
3.0, 32.385, 34.987
4.94, 33.093, 30.303
5.27, 33.2, 21.211
5.28, 33.227, -30.724
4.37, 33.25, 8.847
4.83, 33.305, 44.232
5.28, 33.984, 33.359
4.87, 34.263, 34.224
4.01, 34.328, 33.847
5.03, 34.738, 28.643
5.3, 34.82, 47.38
3.04, 34.836, -2.978
5.28, 35.485, -0.396
5.2, 35.635, -23.816
5.19, 36.103, 50.007
4.89, 36.487, -12.291
4.25, 36.746, -47.704
5.14, 37.007, -33.811
4.28, 37.04, 8.46
5.29, 37.041, 29.669
5.25, 37.875, 2.267
4.75, 38.021, -15.245
5.15, 38.025, 36.147
5.35, 38.039, -1.035
4.9, 38.461, -28.233
5.35, 38.945, 34.688
4.86, 38.968, 5.593
5.3, 39.26, 34.264
5.3, 39.704, 21.961
4.07, 39.87, -0.329
4.84, 39.89, -11.872
4.75, 39.95, -42.892
4.11, 40.167, -39.855
5.3, 40.171, 27.061
4.91, 40.562, 40.194

what coordinates system is used for this ?
equatorial , ecliptic ?

thanks
happy bl

I think jayfromclevelan said it was equatorial, the math he posted for the x,y,z axis will put all the objects the same distance from the viewers standpoint as if looking at it from earth. It will project as if viewing on a curved screen of a planitarium.

Here is a screen shot of what the script and csv file does.


thats with the 45 positions in the csv.

so this assume it is equatorial

now can I assume there is no conversion to Horizon system

will check wiki page for coordinates

I want to check the system I did for proper angles for Dec

Equatorial / Celestial coordinates to Horizon

alpha - RA right ascension
delta - declination
h - hour angle


from

also the data file has the RA in degrees !

will try to see where first start is located

here I assume in your 3D model that the Blender XY plane is the equatorial
plane.

happy bl

@jayfromclevelan

a few questions

1 - is it possible to add to small stars table a star name?
it would be nice if you select a start in viewport to have a name + RA + Dec

2 - Stars color
any info on this - might be able to color ob in viewport

3 - Stars Size Magnitude
how to size it - is it linear size function of magnitude
or make a table of size function of magnitude ?

4 - star objects in blender
need a minimum size of object’s vert
like a very small Uv-sphere seg = 4 X 4 may be
so each start would be like Verts = 14
so for 1000 stars = 14 000 verts

here I assume you don’t want to show all stars in the sky

but now how do you limit the stars quantity for rendering ?
function of RA with + - 20 degrees ?

also need to set the camera location rotation and angle for rendering!
for this need some info where to set the camera
may be from some RA DEC to render !

thanks
happy bl

@JorgeP

did a test with your file
and it does not shows all stars
I think the last one is not shown

did a test with 5 stars in data file and it shows only 4 !

another thing is that you Y values are inverted in blender !
you need to set Y as - Y I think

to name stars just add

starname = str(‘RA {0:.4}’.format(RA[i])) +"/" + str(’{0:.3}’.format(DD[i]))
print (‘Star name =’,starname )

ob = bpy.context.object # stores the active object (the UV Sphere created above)
ob.name= starname; ob.data.name = starname # just naming

can you confirm

happy bl

made a new version of your script
just change the data file name in it !

1 - corrected the Y for -Y
2 - added some colors
3 - added name for each star

starprog3a1.blend (96.1 KB)

still one star missing !

happy bl

@@jayfromclevelan

can you upload your txt file for the big data file for all the stars

might be able to begin doing some interesting simulation

happy bl