Pro-Lighting: Skies My review

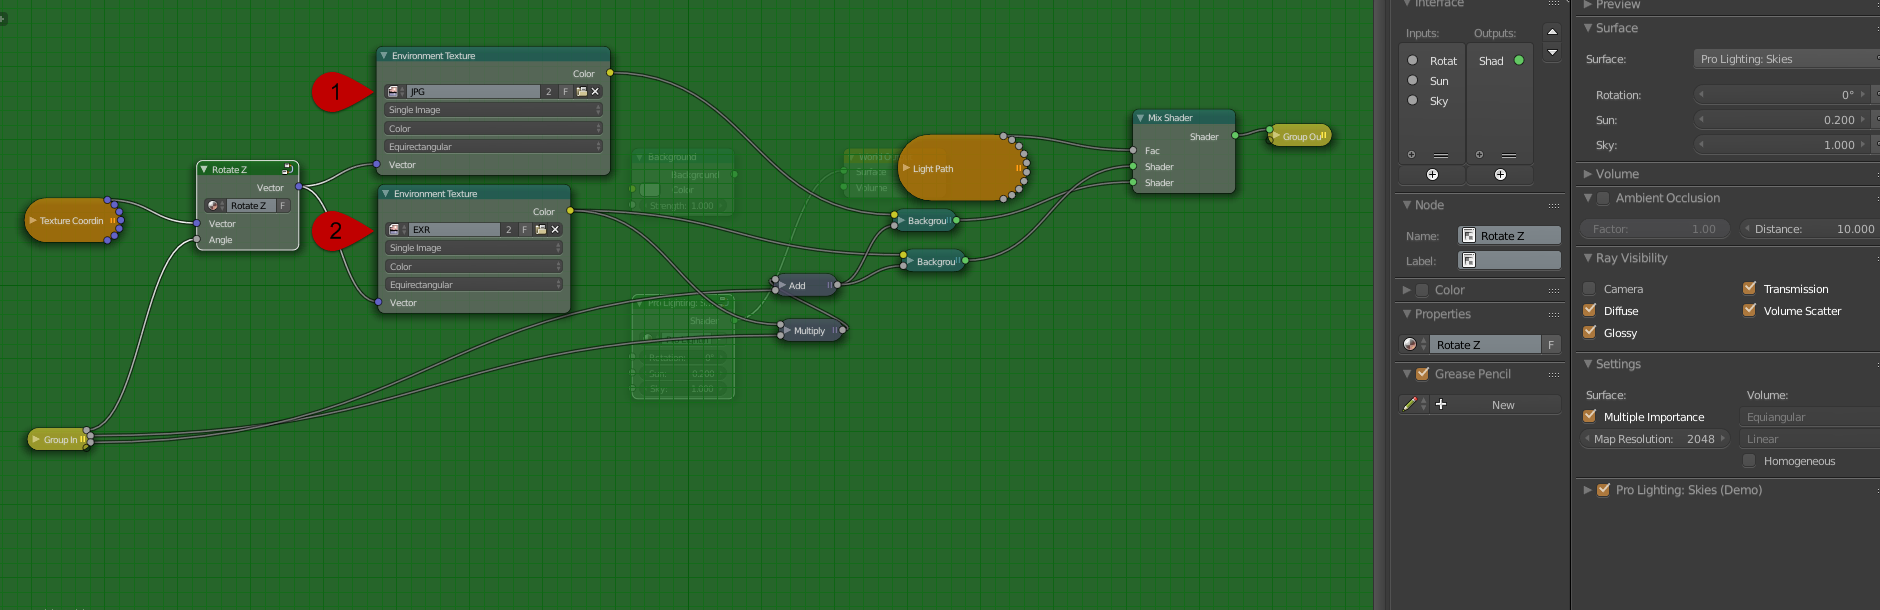
Just a remark: In videos about this add-on, the typical claim that doing fancy node setups for the strength of the background shader will give “more realistic” results is brought up.
However, this is just flat out wrong: The most realistic and correct way is to just take a HDR into a Environment Map node and plug it into the color input. Seriously.

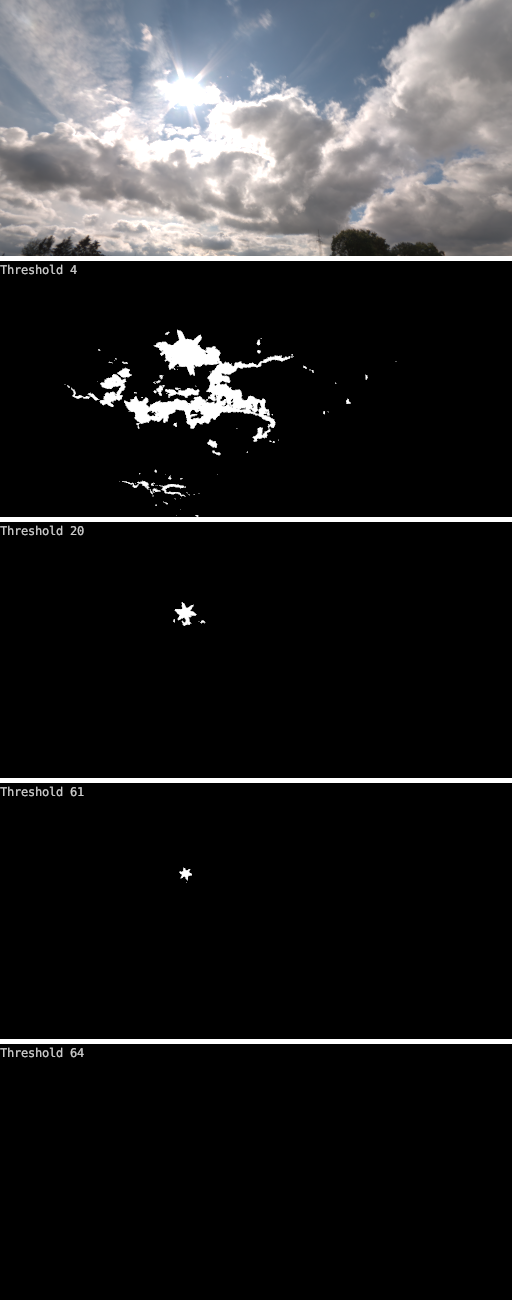
Now, why does it look better with these tricks? The answer is “bad” HDRs (bad is in quotation marks because it’s seriously hard to create HDRs without this flaw). Nearly no camera can directly capture HDR because of the range of brightness present in the image (that’s what High Dynamic Range is about: these images can span a way bigger range of brightnesses), the usual approach is to take many different exposures and combine them. Done right, this will give you a perfect HDR that you can use without any tricks for realistic results.

However, the range of exposures you need is quite extreme. Most consumer cameras offer something like a ± 3EV exposure series, which is enough if you want to use HDR for having nicer photographs, but not nearly enough to cover the dynamic range of a typical clear sky*.
The result is that most HDRs you find are still clipping the brightness of some parts, not because of image format limitations like with regular photos, but because even the shortest exposure used for its creation was not short enough to get a non-overexposed sun (the same effect also happens for the dark areas, where the longest exposure is not long enough, but for HDR-based lighing that doesn’t matter).

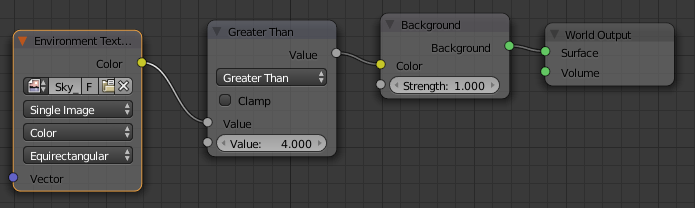
That’s why these node tricks can help: They boost the over-exposed sun to the brightness it should have if it was recorded correctly (again, doing this correctly is really hard). However, they only retouch a “bad” HDR to look somewhat like it should, and aren’t “necessary for realistic lighting” or something like that.

Sorry for that rant, but this “make it more realistic” stuff comes up soo often. Technically, in physically correct rendering, there is no more/less realistic, it’s either correct or not. And while tricks like these can make renders look better, it’s certainly not required for correct results.

  • The sun itself goes up to 10^9 cd/m², while a typical sky has around 10^3 cd/m². This means that the sun is 100000 times brigher, a difference of 16.6 stops (=> ± 8.3 EV)! And that doesn’t even include stuff on or below the horizon, which will be even darker.

@FloridaJoe

   Could you take a screen shot of the rendered image so you have the size and render time? As well the sky map you used. Really lets get one thing out there, and to be fair i need to update my review. This is an add-on and we have been treating it as some kind of new and improved HRDI. Its a lot more than that, to Andrews point the speed of loading from a list of maps is fraction of what it normally takes me. As well you don't have to add the mapping node to rotate the map. third it has a powerful "sun" lamp effect that you don't get with HRDI maps normally. 

I am still have sevral maps to test but i will be revamping my review with the coming days. More like this 9/10 for cycles render engine, 7.5 out of 10 for addons, and 7.5 or 8 out of 10 for Blender as a whole still working that one out.

Here’s what I think it does
it takes a low res/blurry version of the HDRI to light the scene
it takes the high res HDR of the HDRI as the reflection
and it takes a super high res Jpeg as the background

Presumably with some (Ray node or something I can’t recall it)

Just like the Sibl plugin for Cinema 4D
and it promises the exact same things(less memory,more speed,etc)

@lukasstockner

  I think you are splitting hairs over the term more realistic. However I love the topic here and if you have some data to back this up maybe some render comparisons that would be great!

Do you have the demo or any version of skies? you can choose the setting but its only one version at a time " correct me if I am wrong here andrew" . there are two active images however in the node setup seen here.

Attachments


I KNEW IT
This is exactly the same way this free plugin works!
http://wiki.blender.org/index.php/Extensions:2.6/Py/Scripts/Import-Export/sIBL_GUI
And for the HDRIs
http://www.hdrlabs.com/sibl/archive.html

If you dont know jeffrey Lukas is a cycles developer, I believe he is responsible for the portals patch for cycles amongst other developents. He is absolutely correct… Realistic lighting doesnt work with tricks… If you have a solid HDR Sphere, you should not need to do these exposure tweaks.

Okay, I have to agree, as an artist one probably doesn’t care :smiley:
Sorry, that kind of splitting hairs what you pick up if you’re reading scientific rendering papers and books for four years - compared to what some of these pull up, my post was actually quite relaxed.

Regarding data:

Regarding render comparisons: I never actually created own HDRs, so it’s hard for me to attach exposure ranges etc. to ones found online for comparing them…

Oh, and I should probably mention: I’m not criticizing the Skies addon in any way, just the “you need this setup for realism” claim and some misconceptions about environment maps and HDR. The addon seems to give great results, and if you need stuff like that professionally, it seems quite reasonable.

In that node setup you posted, you can actually see how the retouching works: The environment node itself outputs “color * strength” into your scene, so strength=1 gives the pure HDR. By setting the strength to be the color multiplied with the Sun value, you get “color * (color * Sun)”, a quadratic relationship that pronounces the bright areas (where the sun is, of course). However, this will kill your darker areas (the rest of the sky), so you add in the Sky parameter to get “color * (color * Sun + Sky)”, which means that, in the end, Sky controls the HDR (which makes sense, since the sky will be nicely exposed in the HDR) while Sun controls an additional boost of the bright parts.

The “two images” part you mention basically uses Image 1 for the directly visible background and Image 2 for the lighting (since they are mixed based on Is Camera Ray). I assume that Image 1 is tonemapped, which means that with this mixing, you get both nice sharp shadows (from the retouched HDR) and a nice-looking tonemapped sky above your rendered house without actually tonemapping the render itself.

Come on I can’t be the only one who has noticed the “light path” node…

I just added a part about that in my answer, but you were faster :wink:

We can’t judge that if you don’t post more info about the HDR’s, the render times, etc. Pro lighting skies isn’t claiming to look better than HDR lighting (at it’s core, it is just HDR lighting with a few extra features in the node setup), it’s claiming to more easily set up HDR’s, and to reduce memory overhead and render times.

EDIT, should have reloaded the page sooner. I didn’t see that Andrew answered :slight_smile:

Oh, and because I have nothing to do right now anyways, here’s how I’d do the retouching setup if you need it:

  1. Step: Identify cutoff brightness

Build this node setup:


The value you can tweak in the Greater Than node is your threshold. Just go into Viewport rendering and look at the environment: Bright parts will be white, darker ones black. For a perfect HDR, the white spot should get smaller as you increase the value, until it only covers the sun. What will actually happen is that, once you reach a certain value, the white spot will disappear completely. That’s the point where the camera that took the HDR has clipped the brightness.
An example:


In that case the clipping was at ~62. Now, that’s suspiciously close to 64, which would correspond to the upper limit of a ±3EV exposure, where the darkest exposure corresponds to the 0-1 range. This would actually make sense, but it might just be coincidence…

Anyways, you see what happens: Although the sun would be much brighter (look at the star shape of the white spot: Even the glare streaks of the sun were too bright, and we can assume that they are darker than the sun itself), up to 100000 times brighter according to Wikipedia, the HDR doesn’t have that information. That’s why you get boring shadows: The sun is just too dark.

  1. Step: Make it brighter

Now, if you have a HDR like this but still want nice shadows, this is where the tweaking comes in - you have to enhance that clipped spot. However, instead of using the brightness for the strength input, which is essentially just squaring the brightness of the HDR, I’d use the following setup:


See how it works? It isolates the bright area with a Greater Than node set to the highest threshold where the white spot is still there. This info is then used to increase the strength of the Background Shader just where the sun is, not at every bright spot. The intuition here is: If the HDR’s brightness is in that range, we can assume that it would be brighter, but was clipped. Therefore, making these parts brighter is cleaner that just enhancing everything that’s bright.

Now you can mix this Background Shader with another one based on Is Camera Ray if you want to to get that tonemapping trick, and you have a nice HDR lighting!

@lucasstockner97

Very interesting! Thanks for putting that together, I’ll have to try that pretty soon. Would be nice to see some comparisons though.

I’ve done my own HDRI images (not intended for rendering use, but the normal tonemapping ordeal) before, but when I tried shooting a sunny scene I found it impossible to capture the full dynamic range. Max shutter is 1/4000 and using F9-F11 ISO100 for maximum sharpness I couldn’t “dim down the sun” using what I had of EV compensation. Meaning the sun would get clipped. And I guess that’s the same as happens for most people shooting those. But for those of us who like freebies, we have to live with those flaws and correct it either with nodes or “painting in brightness values” to the result, or allow clipping and painfully try to track a sunlight to where the sun is in the HDRI.

I recently posted an alternative in this thread which avoids that odd squaring stuff happening in the visible tones of the image (also nothing happens to saturation, and safe to use same image as background), and in fact it lets you visually preview what area will be scaled up. Then turn off preview and adjust until nice highlights and terminator is achieved - there is no general one-solution-fits-all on this one. I’m still “doing stuff” to it, I guess one of them never ending projects of mine :smiley:

I kind of disagree on the “use provided tonemapped image as background” approach. The only reason to use this is because they tend to have a greater resolution, giving enough pixel detail for camera use. Isn’t it better to use same, provided resolution is okay, and have the same tonemapping results on the background as in a heavily reflected part of it?

Will get the screenshots tomorrow from work computer.
As for it isn’t claiming to look better I believe it is with this statement, “It’s the fastest easiest and most realistic outdoor lighting available for Blender.”

I don’t want to bash someone trying to make a product and sell it, but I don’t want noobs to be suckered into an overprice product that is just an over-marketed node group. (I understand it includes easier browsing and 80 HDRs, but there is a lot of free ones out there.) I bought the book on Nodes back when that came out for $47, and it was over marketed and low value. I bought the Architecture Academy and found that to be a fair price at $249 for the assets and number of hours of tutorials even if it was mostly useful to me as motivation. I’m just thinking this product is leaning back to the over marketed low value day of the node book.

This has been a really helpfull post so thank for all of this. I need to look at this in the morning and really take some notes here.

Andrew, I just want to say that I love you… In a manly respecting sort of way. Keep on rolling dude, you rock!

And this addon is pretty awesome!
(would be nice if blender supported the advantageous .dxt compression though)

  That's my issue with the price as well. When you take the 249 for AA, I did as well, you get a a massive bang for your buck. Sure this thing is great but I think its over priced. the grass pack was on target, AA was cheep if you ask me and this is over. Should be more in the 29.99 for a small 15 20 pack and 99 cents for each map or something. Maybe I am getting carried away. I think he missed the mark on the price is all on this. I am sure there was a fair amount of work by multiple people and he hired contractors to boot for the fancy video. 
  I am sitting here writing this and on my other screen is a render and I am think.."well theirs some light...97 dollars worth of light? maybe not?" It is fast and easy though so maybe you have to look at it over time as a real saver. If i made money from blender I could see this being worth it. But for my hobbyist renders not so much.

I think one of the big reasons why it’s supposed to be worth it, is that you get so many HDR’s for so little cost. While they aren’t the best HDR’s (since they need that trick in the first place, I’ve used HDR’s that don’t need it), I would assume that they are still fairly good, and can be extremely helpful when it comes to getting the right one for your scene.

Also, there is a lot of equipment that is required for making HDR’s. As in several thousand dollars worth. It’s not a light investment. That’s why they’re so expensive, and why we’re so lucky to have even remotely good ones.

Remember, a good HDR by it’s self could easily be $30 and up, minimum. For the lite version, you’re paying approximately $3 dollars for each HDR. That’s not even including the actual script. In the full version, it’s a bit less than that. That’s not a whole lot for an HDR compared to that average prices.