This is looking really good, but I have a question:
Are you planning on make the final render with internal or cycles? If is Cycles, I think you should be testing your textures and shaders with cycles and not internal. Because you’ll have to redo all the shaders.
Thanks Julperado. Yep - I plan on rendering in Cycles. I’ll need to re-do the shaders so I’m not taking them much beyond basic presets for now. The reason I’m staying in Blender Render right now is that it’s fast for me for quick viewport render tests and makes playing with multiple normals, bumps, and diffuse textures nice and easy without getting into the node editor yet.
Once I have the pose and facial expression feeling good, I agree, it’ll be time to make the switch over completely to Cycles.
Do you think the textures will render differently in Cycles?
beginning to look nice
so here are some comments on last pic in post 16
the mouth and shin don’t look like the original pic
shin should be more squarish a little
edges of the of the mouth got wrong angle
still very nice work
keep it up
if you do it in cycles then do it
don’t have to worry afterward !
happy bl
Thanks Ricky - I appreciate your feedback.
Yep I agree that I may have moved beyond the sculpt a little too prematurely. As others have noticed, I have his eyes a little wide apart too. My plan is to use a blend shape / key and some proportional editing to make another round of adjustments once I have a rig in place - that way I won’t loose my texture work and bakes to date. Definitely an experiment, but my hope is that given I’ve created animate-friendly retopology I should be able to move some things around without too much breaking. Fingers crossed.
Do you think the textures will render differently in Cycles?
Not exactly the textures, but since the 2 engines are so different from each other is going to look different of course. Take the tests you made with the SSS for example, if the final render is going to be in cycles then those tests were wasted time, because the SSS shader in Cycles is completely different and you have to approach it in a different way.
My point is, if cycles is the chosen engine, then do your tests in cycles. You’re not being quicker by testing in BI first, you’re wasting time, because eventually you’ll have to everything again in Cycles; so better start now and polish it along the way.
Thanks Julperado - sounds like it’s time to make the renderer switch. 
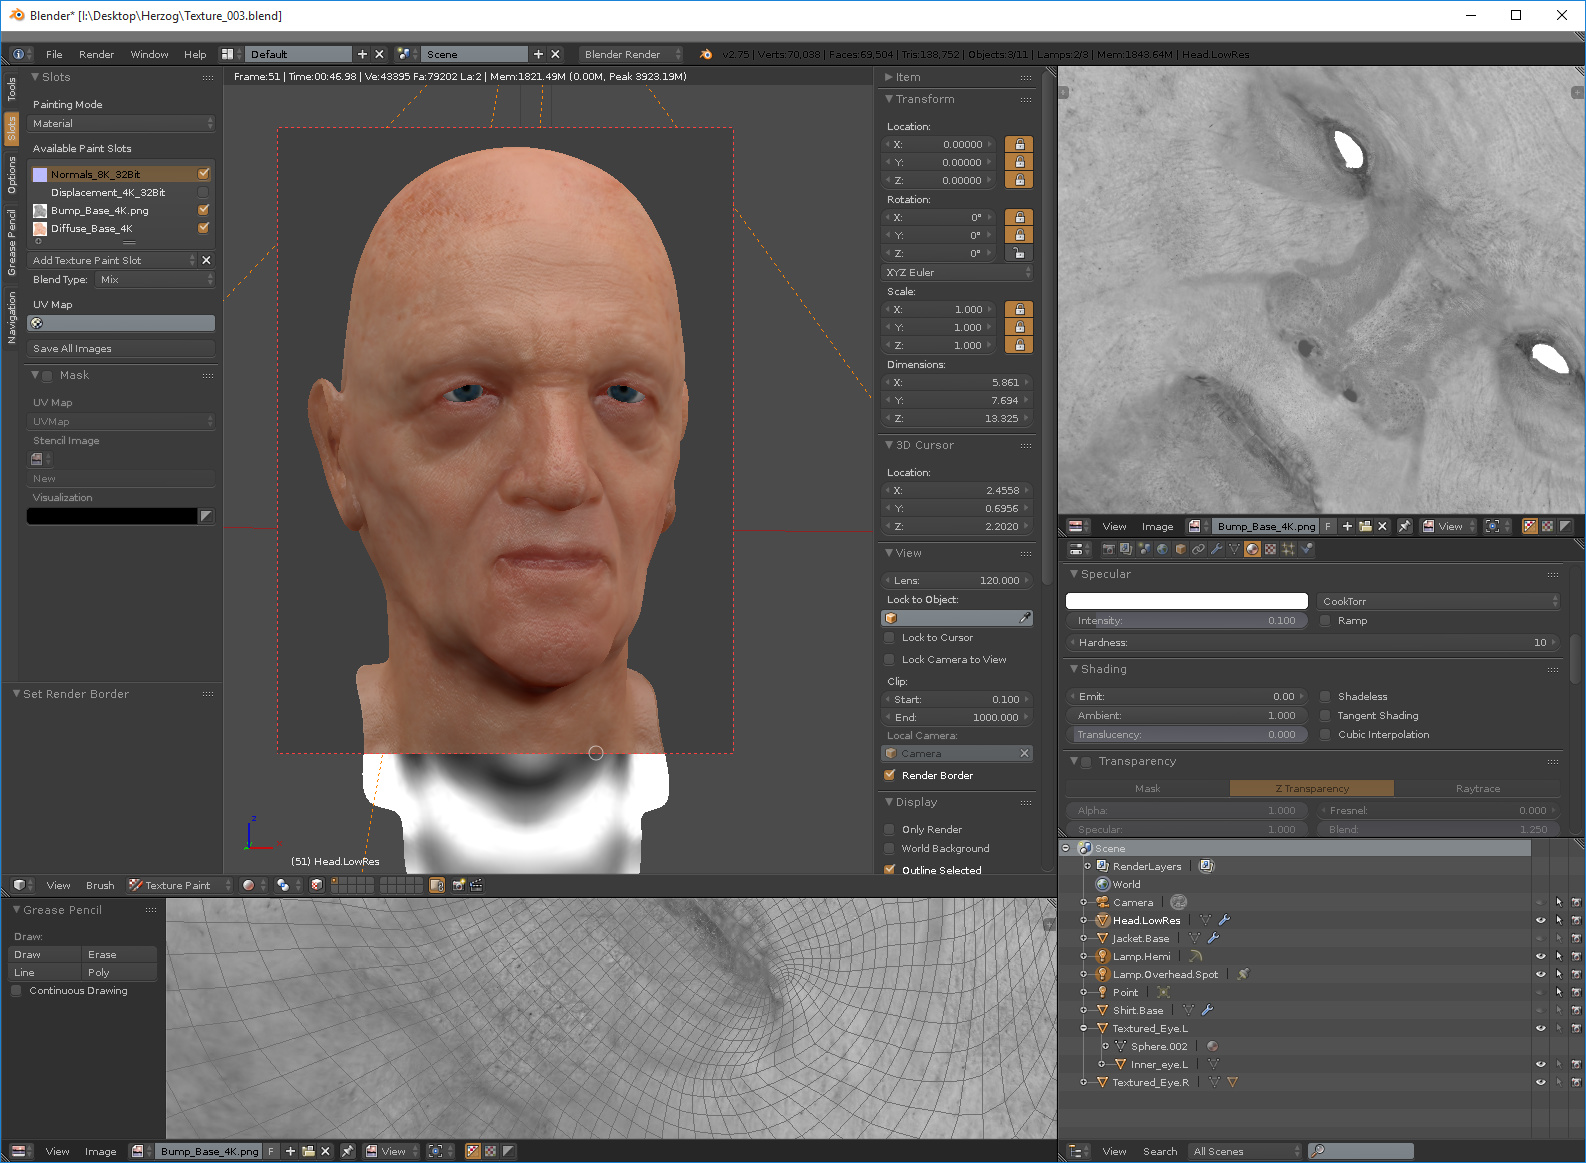
As noted, I need to do some work on better matching my source photo so I’m going to rig and pose the face. Just before I do, while I have a base diffuse texture I wanted to try a quick bump map.
I derived the bump map by desaturating a copy of the diffuse map in Krita (open source alternative to Photoshop.) Given I made no other adjustment, I think it creates a great starting point that I can build on to. No more texturing or mapping now though until I can nail the pose…
Here’s a quick viewport snap…

And here’s a quick look with the Blender Render SSS skin default before I move over to Cycles…
If I can give you an advice, before doing any texture work, you should set up a proper lighting rig that looks good with a clay material, then start shading and texturing. You’ll see that it’s much easier to get realistic lighting with cycles as well.
Thanks Cahfouin. I do have a basic set lighting set up but it’s still not super accurate to the lighting in the photo sounds like something else I should set up when I move everything over into Cycles before I continue on with textures.
skin are difficult to get a nice render with SSS
but start simple then cycles nodes set up can be modified afterward
a simple light set up with 3 lamps should give a nice render
add some background wall greyish diffuse
happy cl
Thanks to everyone for their feedback so far. This has been a great learning experience. I’m putting texturing aside for a couple of days to get Herzog’s pose and expression right.
I’ve only really done one sculpt in the past and I made life difficult for myself by getting asymmetrical too early in the process. This time I’m trying to keep Werner symmetrical for as long as possible, so I’m setting up a simple rig to give him a pose to match the reference photo with a plan to use a shape key to then further alter his expression to match the photo. That way I can keep the base mesh both intact and symmetrical for as long as possible – if not throughout – by returning the rig to it’s rest position and shape key back to its basis.
Here’s a simple rig I set up to match the pose in the photo. It’s a subtle pose with Werner’s right shoulder (camera left) leaning slightly forward and his head cocked very slightly. I also set up a simple eye rig with a target empty with a tracking constraint. Thanks to Nathan Vegdahl over and his terrific Humane Rigging training over at the Blender Cloud for the theory behind this basic rig…

Now that I’ve got a basic pose in place using the rig, I’m spending a little time doing some further modeling (almost posing) on his jacket and shirt to match the photograph. You can also see the UVs I’ve set up…

As practice for the shape key I’m going to apply to his face to get the expression I want, I’m actually using a shape key to “pose” the vertices of the jacket rather than pushing and pulling the original vertices. I had thought that this would let me texture the jacket in a symmetrical “rest” position rather than in the new pose but I am finding that to get the least stretch in my UVs, I needed to re-unwrap the jacket in the posed position rather than the rest position. I’ll play with this moving forward, but it’s working for now.
My thinking is that it will be easier to texture the pin-stripes in a pure symmetrical position but we’ll have to see. Here’s the final positioning for now. You can also see how I’m using the photo as an image plane…

That’s a pretty snappy checkered jacket Mr. Herzog…
Now that I have a basic pose in place and have adjusted and UV’d the shirt and jacket to match, it’s time to turn my attention back to the head mesh and take a critical look at how he’s matching up to the reference image. As some of you have pointed out, there is some disparity in the eyes and chin, but I also noticed that I’ve positioned the ears too low, which means going back in and adjusting the mesh.
Unfortunately I realized that at this stage even on my retopologized mesh, I still have a lot of geometry…

This is going to be a pain to raise the ears, and even more so to set an expression on his face using a shape key.
Thankfully because the mesh is all quads, a simple decimate modifier to the factor of two instantly reduces my mesh by half. I wasn’t sure this would work, but it worked like a charm.
This allowed me to get back into the mesh and raise the ears.
Basically I had positioned the ears too low because I had lined up the bottom of where the ear enters the head with the bottom of the nose based on my recollection of how to draw a head. Turns out I needed to match the bottom of the earlobes with the bottom of the nose. So I adjusted this by proportionally editing around the ear, scaling slightly in Z and sliding some vertices.
Thankfully this didn’t stretch my existing textures too much, but I did go back in and retexture around the ears a little. Here’s a shot of making the adjustments on the decimated mesh…

I should be in good shape now with this reduced mesh to go ahead and adjust his expression away from symmetry to match the reference photo…
why do u use a shapekey to change shape
why not simply use control bones to control it !
did u port to cycles ?
happy cl
Hey Ricky! If I were animating expressions I’d agree that bones would be the way to go, but given I’m just looking to move vertices here for a static portrait that seems like overkill. I’ll see how it goes. It might be worth just altering the base mesh further but I like the idea of experimenting with a shape key as a modeling method so that whenever I want to return to a rest position for sub-dermal texturing and things like that I can use symmetrical brushes.
I’ve done some initial cycles tests on another mesh will have something to post soon…
As many of you have said, I’ve been leaving this late in the game to move over to a Cycles rendering workflow. I had stayed in Blender Render because I thought that was needed to use the texture slot painting system. I hadn’t realized that it works just as well in Cycles.
I’ll come out and say it. I’ve had a tough time trying to replicate the look of even the basic Skin preset in the the Blender Render SSS material. My base diffuse material and base bump map (in particular) that “just worked” in Blender Render have not translated over well to Cycles in my initial tests, making it hard to get a convincing skin, so I’m trying a different approach - getting a shader set up that I feel good about on a simpler model with simpler texturing without normals, displacement, and bump mapping first so I have a good base-level look before I pull in the specifics of my sculpt.
After several Cycles tests. Here’s where I am currently using a modified version of Brecht’s multi-layered SSS node set up plus a fresnel plus an overall specular sheen. To get this base-level look looking good first, I’m working on my original base mesh that I set up before sculpting:
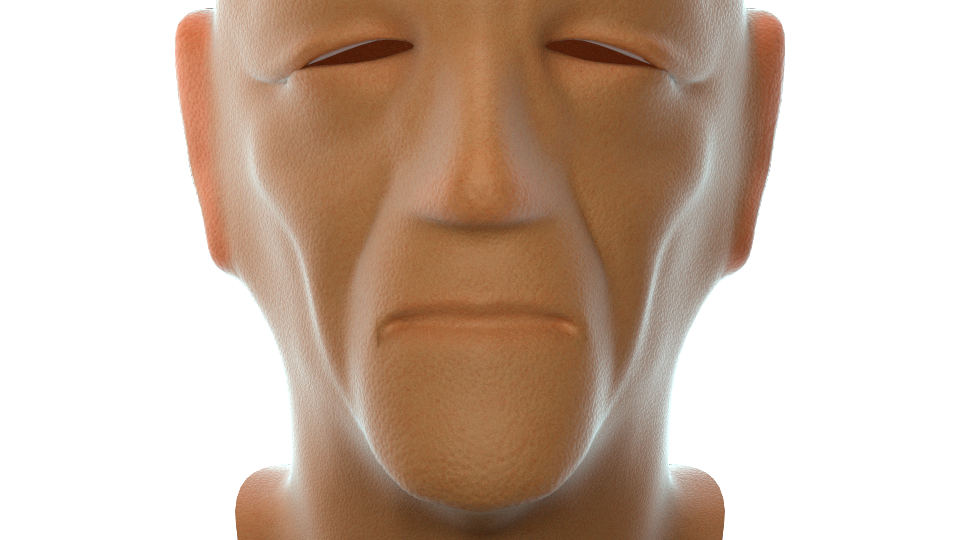
Starting to get a look I’m feeling good about. The above shot is achieved using a basic tile-able skin texture, and a basic tile-able pore bump map. I’m also testing a quick down and dirty back scatter map on the ears, lips, eye lids, and tip of the nose.
More to come, but I’m pleased this is getting somewhere. Of course the real test will be moving this over to my actual mesh…
…in an effort to show this as a true work in progress it seems fair to share when things go wrong as well as go right in the hope that it might help others as others have helped me.
Back in post #33 I had mentioned how I realized that my low-resolution mesh had too much geometry to be practical for rigging or shape keys and so used a decimate modifier to reduce the mesh. Because the mesh was all quads, using the “subdivide” setting allowed me to reduce the mesh by a complete subdivide while still maintaining good form and supporting my existing texture, displace, and normal maps.
What I didn’t realize until a few steps later was that somewhere along the line I had accidentally set a ring of edges along the back seam of the head as “marked seams” which did something funky to the UVs when I un-subdivided.
Thankfully, all I needed to do was to manually grab and reset my UV points in the UV window using the stretch feature as a guide. This fixed the problem by 90% but because I couldn’t get a 100% match to my original UV border, a little bit of diffuse and bump map cloning patched up the issue. Thankfully because this was an un-displaced part of the head I didn’t have to attempt to patch up the 32 bit float displacement map which I’m sure would have been harder.
Here’s a shot of fixing the UVs and getting them back on track…

told you skin are a bit difficult to get realist in cycles
and pure SSS is not very good at doing it
but still looking good
not certain if color is not too pinkish
show us nodes set up if you can
also qty of faces would gives a better render = more faces and angles
if your not doing any anim with it
I would like to do some head too
but did not do a lot of character and head are very difficult to get realist look
happy cl
Thanks Ricky. Yep Cycles is proving a challenge but I’m getting somewhere. The test probably is too pink, plus a lot of starting point skin shaders and suggestions out there are for young youthful skin. Werner is 72, so I’m having to use this as a starting point and then build from there to something that looks natural for his age, skin elasticity, etc. Man - learning so much about skin. LOL.
looking at first pic
it looks a bit overlit and pingkish
may be try to find other color pic more natural !
for color you can always add a Color node to change it or a RGB curve
happy cl