Great stuff! This has really helped my more recent head models.
I have a question though. How can you make just a single set of poles without messing up the rest of your topology, and without making your mesh too dense?
To make a single set of poles: T-loop or cut with a 90 degrees bend somewhere. Now the trick is to not to mess up your loop. To achieve that you’ll have to keep your poles at a minimum. A cluster of poles somewhere will make your mesh chaotic. They will spawn loops everywhere. There is a balance I guess in modeling organically and making a messy mesh. Keep your topology tight, but not too monotonous.
To control density: An E-pole ‘projects’ a denser area. Now you have 2 options in controlling loops most of the time:
Unpolling techniques that results in a denser mesh. Maybe that is desirable if you need more density in an empty topology.
Or unpolling techniques that reduces density. Most of the time that is achieved by the delete edge loop command or by merging a row of pair of verts. The latter is more elaborate. I have a blend from VorpalBlade and I will use this model to illustrate these techniques when I will clean up the topology.
Great, thanks for posting this! Several months ago I printed up the entire subdivisionmodeling.com thread (what there was of it at the time) and I would love to see this information all brought together in one place into a cohesive tutorial. It’s really valuable information.
A diamond loop is created by a perform a rip:

For a lack of a better name I call this diamond loop. In fact, it was SomeArtist that called it diamond, so I’ll stick to it too.
What is so special about it? Well for starters in one orientation (in this case horizontal), to loop stays almost unchanged, and vertically the loop shifts only one row.
And now I have to sidetrack here a little… Loops like the ones used for head modeling should be created so that those loops can flow nicely, which in turn is good for animation in the first place, and good to shape your model with as little poly’s as possible.
But there are times that flow is not important, while the goal is to keep your topology as clean as possible. The ear is clearly a good example of this. It doesn’t matter how you make your loops flow there, as long as you have a topology that is clean, but dense enough to give it the correct shape.
First we’ve seen the T-loop and now the <> - loop. These structures won’t introduce much flow in your mesh, but they are very important in some situation because you can exploit the poles directly. I’ll explaining that later more in depth when I’ll be talking about diagonal topology.
You could already guess that if you create more ’ diamonds’ in the path of loop, it will still be one loop. No new loop will be introduced despite the fact that you are putting more E-poles and N-poles in your mesh:

This stair like loop can be fashioned into a diagonal topology (I’m ahead on this subject  )
)

As you can see, there is little disturbance to the mesh. A warning though: The N-poles won’t stay straight if you use Catmull Clark subsurf. You’ll if to correct this after applying the modifier.
Next I’ll demonstrate how to move poles around to clean up your topology.
I would like to thank VorpalBlade for his model. As you can see, its shape/ geometry is just fine. There are some minor points though that should be tweaked (the lips for example :eyebrowlift2: ).

Now let’s have a look at the topology:

This topology is almost clean, so it is a good subject to show how to manipulate poles without making it look like magic. This face looks ‘almost’ human, because of the topology. There are loops that are not following the anatomical features. Once the topology is cleaned up, shaping it would make it look better. Heck! This could be the base topology for all your models from now on…
Let’s start at that 6 edged pole on the nose bridge. A few posts back the technique to reduce a 6 pole was explained. In this particular situation you have to cut all the way from the lips to forehead.

Like I said before, the shape of the face looks ok, but when you study the loops, you can’t help not to ignore that those loops give a hint of the underlying bone and muscle structure. Take a look at the eye socket for example, after correcting the 6 pole, the loop for the eye socket should be corrected too. As seen below, the loop suggest that the ridge of the eye socket continues southward.

And this is a crucial point that explains the mindset in these matters, SO PAY ATTENTION HERE!!! :ba: :ba: :ba: :ba:
The mindset: I’m looking at this and I’m think… hmmmm… how do we bend this loop here? A spin edge? No, forget about that. The answer is much simpler. Envision first how the loop should continue.There should an edge connecting the flow here somehow:

OK then… so how do we accomplish that? Well, with a little bit of work. There is no magic retopo button here ;) . So what we do is the first thing that makes us come closer to the solution and that is: triangulate the face where the blue arrow is on. That will create an edge and 2 triangles and 2 E-poles. So what! We are not afraid of triangles, so those WILL be cleaned up. So let’s start with this first:

Now, that wasn’t that hard now was it? I believe I sound a little condescending, but a lot of noobs has stage fear so to speak and others are just messing about for days until they get frustrated. With the right mindset, you don’t have to guess anymore.
OK, there are to types of triangle elimination.
The first, if you cut into the triangle, you’ll make it a N-pole. But we don’t want that here (experiment for yourself, it will create a lot of nonsense loops)
The second, by cutting along side the triangle, you’ll creating 3 other triangles which makes a total of 4 triangles and 4 triangles can be reduced to 2 quads. The penalty is extra density.
I choose for the second option because, if you take a look at the animation above, to eye socket loop is practically already there. You should only find a way to get rid of those triangles. No need to introduce more loops/ topology.

First of all, thank you for taking the time to write all this, but I’m confused on something. You mentioned that the “spin edge” function was located under ctrl+e, but it isn’t, at least not in my Blender 2.43. When selecting an edge in edit mode, ctrl+e yields:
Mark Seam, Clear Seam, Rotate Edge CW, Rotate Edge CCW, Loopcut, Edge Slide, Edge Loop Select, Edge Ring Select, Loop to Region, Region to Loop, Mark Sharp, Clear Sharp.
So, how do I “spin edge?”
He means Rotate edge.
.
Thank you toontje. Great advice once again!
I saw that page at SubD, but I never really understood it. Reading your explanation however made me understand it much clearer, thanks!
I stand corrected! :o
I mean rotate edge.
To answer your question better, I will perform the tweak above only this time following another path:

So what happened here? Here too a single E-pole was introduced, but instead of cutting alongside the tris, I merged the verts to get rid of the tris. Result: A pole was introduced without increasing density.
Now we’re moving to the next tweaks: the outer side of the eye edge loop. Beware of connected E-poles, it will created diagonal topology, which is also evident on the model. So we are going to move the poles around to create a nice looking Robin eye mask and a mouth loop that borders with it. This will be my target.

I see that in the original model, the cheek bone is indicated, so we’ll see if something could be done in that area in a later stage. The following method to fix the eye and mouth loops is but one of a few more methods to tweak this. I leave it up to you to try the other methods. Remember, it’s not a technique, it’s a mindset.

This is how it should be so far:

This the result so far. There is one little thing that is bothering me though: those two E-poles are directly connected and maybe I should tighten the the mouth loop a little by moving the E-pole of that loop 1 position closer to the middle of the face.

Yeah…I think I stick with this, It looks much better.
Next I’ll be talking about the topology at the nose area. By now it should be clear how to moves poles around, so I won’t go into great detail how that is accomplished anymore.
Cool man keep it up! Glad this is a sticky
Very informative…keep it coming…
The loops in the nose area are all concentrated in the upper lip region. The loop should flow more freely. In any case the loops at the sides of the nose should loop in a way to form the labia-nasal fold.
Some of the loops under the nostril should be reworked too.
This is roughly what I’m aiming for:

Some edge loops that originates in this area doesn’t follow the anatomical contours further along.This will be fixed too…

OK, let’s begin!
This is my mindset when I look a this:


OK, time for a checkpoint. This is what there is so far:

As you can see, there is a lot left to do on the model. I’ve noticed (and it is very evident in side view) that anatomy of the face is modeled without using poles. It is very important to put poles there. The consequence of not putting poles could be that your model will look like a lumpy rubber mask. If you put poles, you’re committing the anatomical features those pole forms. For example, look at the chin, don’t bend the mesh around the chin, rather put poles there and the bend is also automatically etched on the model. (look at many reference wire frames, you most likely will encounter a C-loop there.
Now to continue on the nose area: the lip edge loops is part of nostrils edge loops. Shaping the lips will modify the nostrils too and vice versa. So it is imperative that the nose loops should be decoupled from the mouth loops. So an extra loop should be cut under the nostrils. This is an important point at this moment, because how the loops flow around the nose will determine what kind of topology you’ll be shooting for. I’ll give here two examples:
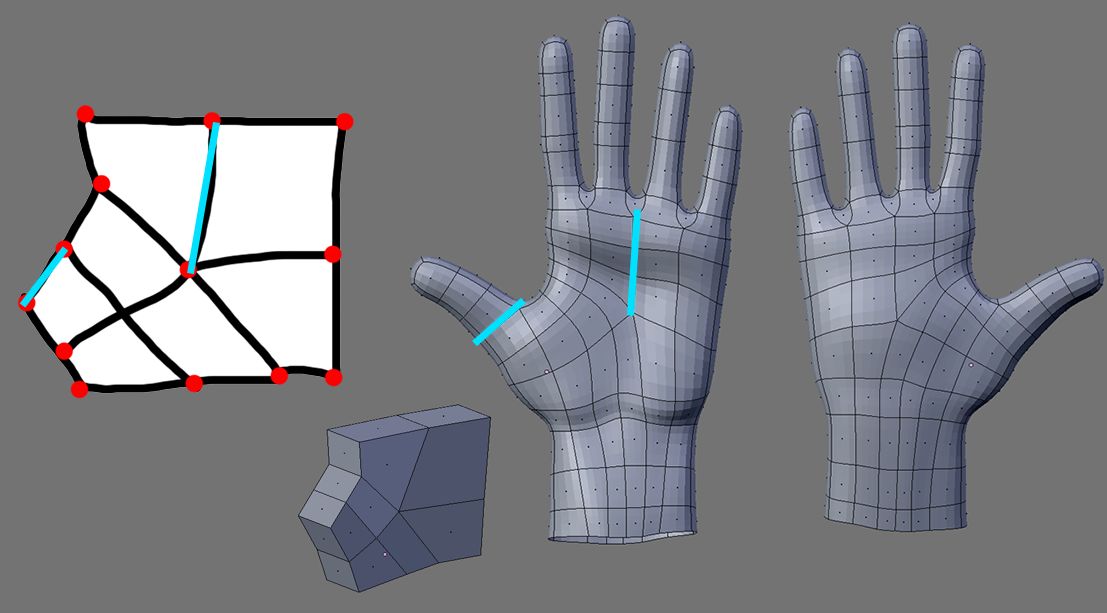
hey toontje, i have a hand-specific question. im trying to get the three sides of the palm to merge realistically, in the sortof triangular crease section. this is what i have so far, but it doesnt look clean.

have any suggestions? references?
thanks
i can’t see whatever it is your trying to show me…sry…
I didn’t catch your drift, sorry my fault. What do you mean by “3 sides of the palm” and “merge realistically, in the sortof triangular crease section”?
sry, what i meant by that is the circular loop of the thumb, the side opposite that, and then the “flab” or crease under the fingers, all on the palm.
so my question is about the palm of a hand, and all the creases on the palm that appear (to me) to make a sort of triangular shape. then what i was asking was how i should fix the palm in the picture i put up.
Hi Jason, I see what you mean. You are constructing this poly by poly style. I suggest you model the main feature first so that you are guaranteed that you have nice loops for those feature. Then you may worry about how to connect them and clean up the mesh later on. Permit me to finish the model clean up first and I’ll give you an example on how you could do that.
edit - sorry, i interrupted your thread toontje. if you could please check out my tess thread and continue our discussion there.