I watched the topology tutorials but..

Neither snapping nor using increments will help you get an evenly spaced quad mesh. All you need to make an evenly spaced mesh is Extrude, Grab and the mouse to move each vertex to where you want it. Therein lies your main problem. You apparently do not know where you want to place that next vertex. So you look for a tool that will help you figure out where you want to put the vertex, and watch tutorials and look everywhere, but you are chasing moonbeams.

You are looking in the wrong place for that magic tool. It exists, but it is NOT right in front of your nose. It is behind your eyeballs.

It is your brain, your artistic sensibility, your judgement. Your hand-eye coordination in using the mouse and keyboard. And there is good news, and bad news.

The bad news is that your artistic sensibility, your artistic judgement, is not very well developed at present. The good news is, you can improve. All it takes is practice.

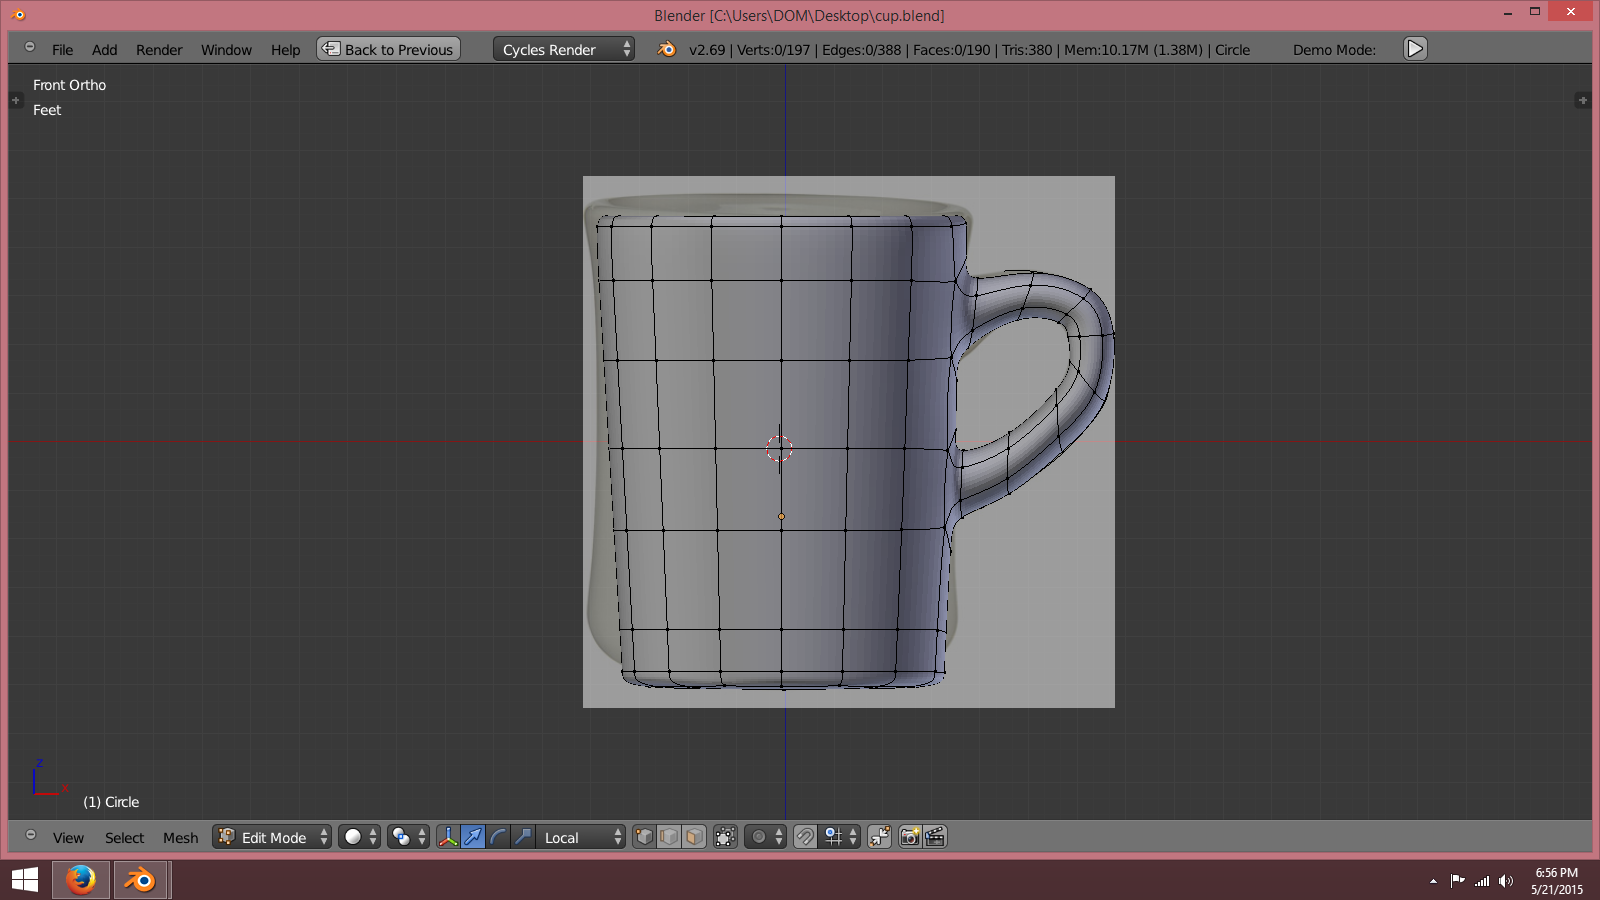
There is nothing, nothing anyone can tell you about what to do that will be half as helpful as you sitting down and spending half an hour making that coffee cup photox recommended.

The courses in topology you are taking, the tutorials you refer to, the white papers you read, are all advanced topics whose intended audience already knows how to place verts where they want them. Once you have learned that, they may be useful to you, but they are not useful now, because they will NOT help you put the verts in your project where you want them to go.

Seriously, stop studying and start working. You have already studied too much, and all you have to show for it is confusion. Get to work. Model that coffee cup. Or find a “How to model X” tutorial, and follow it and model whatever it it about. Then, when you run into problems, and you surely will (we all did), post your work in a work in progress thread and ask for advice.

I will model the cup but one question. I don’t know what you mean? You say increment snapping, ctrl and ctrl shift with grid, face or vert snapping on wont help me get even extrudes and quads? wouldn’t using Numerical Entry Display help with the even extrude and snapping to grid? but the one thing I am confused on this is in edit mode its 2 times bigger than in object mode. is there a reason for this? or is this because I am using imperial and should be using default or metric? when I do a numeric entry and put in 1 for foot or 1’ and 5" it doubles this in edit mode.
and you say this wont help me until I learn where to put vertices. so do you mean ( learn topology for detail loops and n-gons etc or learn 3dspace and coordinates? I don’t see how that will work because image references don’t go by the grid so I have to move a vertices along that image then the grid coordinates.
? I know poles disrupt a loop cut but also helps in placing the structure of the mesh say a face with the eye, nose and mouth then you can start the side of the head to the back then you have a strategy and you start filling in quads in certain flows down, or back etc. in organic modeling like people. there is references to follow. but anything else like hard-surface its just modeling. so I am confused on what you are saying and what would help me learn this? Because frankly if it’s a model that wont be animated there is no flow but I don’t want to learn those bad habits. if I model a coffer cup (in which i think I can) and show a blender file… someone can see my topology and know what I have to fix? how does this different from my edge modeling when I have align different meshes say 2 car panels together compared to a cup that I can make with a cylinder and do some beveling and extruding with some loops cuts to help smoothing? anyway, I wanted to ask this, but I will model a cup tonight. a post tomorrow in projects.

I don’t mean to be annoying or sound like I am complaining I appreciate the help but i don’t understand when someone says I dont know where to put my verts? I do in a way. but I thought hard surface doesn’t really have a order besides loop cuts on the corners and I can use nurbs or curves to to loft or turn that into polygons so a hard-surface can have curves and so on. so I am confused by what you mean? anyway I thank you all for your help and comments.

Attachments


Stop thinking so much and model the mug so it looks like this with subsurf 2. If you finish that and the topology looks ok, then we’ll move on. Post a screenshot of the shading at subsurf 2, and a wire, or post the blend. The requirements are that it must be all quads, and look smooth with subsurf 2.

Like this:

i agree with Photox you might want to start with something a little simple before moving to something big that was my problem when i first started modeling i was thanking big and not working small and it made it harder for me when it came to hard surface modeling or figure modeling.
i still cant model a decent character so i make a base mesh and start sculpting on it, really i need to go back to character modeling and learn it so i can make a good model without sculpting so they will be low res when i render.

my cup file. I had to use a top view from another cup . I can do thing like this but not organic in detail like the stomach muscle , legs maybe arms haven’t tried the twist yet down at the forearms . I think modeling in sub-surf with cage is easier to see what is going on. but a model like this I don’t think, its when i think lol I make it more complicated. but I am watching all tutorials in cinema 4d, 3dsmax, Maya, silo, auto-cad etc to learn modeling techniques and how to make different objects.

Attachments


here is some tut on cup

coffee cup


thea cup
http://www.3dtotal.com/index_tutorial_detailed.php?id=1751

happy bl

Ok, good effort. You still have flat shading on. You didn’t match the silhouette of the cup, the handle is squashed at the end, and lastly is this what the inside of a coffee mug looks like? Match the reference photo.


I couldn’t figure out the bottom because it smaller but not really round from that view and I was using 2.69 to model a plant from one of the tutorials that needs 2.69 for the plant setting but I think if I used the 2.73 I could have used the ctrl F to bridge and add divisions since i could only fill the whole. and it took me awhile to use 16 vertices to get bottom quads I was using 12 and 8 and so on. but I know. i need to learn different ways and techniques to do the same things.

I know you said I need to practice but I cant really find and hard surface modeling techniques besides the airplane and using the skin modifier to make a base mesh. you said I need to learn where to put a vertices? in organic modeling there is a technique like the face or torso loops at certain areas or just even flow and moving vertices after loops and just tweaking.
Is there a technique for this for hard surfaces?
. i did find the cage and sub-modifier easier to model but like you said the handle was squeezed. I do plan on trying a curve/ b surface and more using the skin modifier to get a mesh than maybes pratcie re-topology over it for better quads.

I am not sure if blender has splines but curves, b surfaces and nurbs seems to be good if I can learn more about using the spans and manipulating the vertices with proportional editing and such so another goal. .
since I haven’t really learned that yet. so another thing on the list. thanks for your guys help. i will stop filling up this forum.lol but I do model everyday. I love it. would like to find hard-surface tutorials besides cars or sci-fi panels. but if not thanks and will practice for awhile until i come back on here.

Splines, skin modifier, human torsos, huh? Model the coffee cup using extrusion and manual creation of faces. Match the reference image exactly. Fact , if you can’t match that coffee mug forget airplanes and humans. Back to work on the mug.

I will but is there hard surface modeling techniques and do you know where I can find these tutorials? a lot of them are 3dsmax but I watch them. I was saying I was experimenting with those . learning new ways to model things. anyway i will stop emailing for now. i’m sure everybody is tried of me. lol thanks guys for your help.

Take your time and try and finish the mug.

@domo79 you have to relax a bit… Just try to think less about technical details and more about doing things, it all will come together as you progress.

THANKS. I still dont know what you mean guys about not knowing where to put a vertices at though?

thanks. I will watch it.

Well, I start with your initial issues first.

isnt your quads suppose to be the exact size?

> No. The quads could be of various sizes in the same model. This exact size or near same size rule usually only apply to base meshes for sculpting as even sizes of quads makes for even level of detail.

so when modeling from a image, should you extrude the same amount?

> No. As you can have various sizes of quads for your model, obviously this practice would not hold true.

and when your mesh goes from front ortho to side ortho, say a face cheek muscle. I am trying to figure out how to fix edge flow .

>The error here is your dependence on ortho views. Don’t depend on them. Rely more on the 3d/perspective view. Ortho views are flat views, while a face cheek muscle is a 3d surface. There would be 3d information/details that would not appear on your ortho views but do in 3d. Often times, your model would look fine in your ortho views but not in 3d view (like the common flat face models). The best way to view your model (aside from an actual render) is in the 3d view… so utilize it. Your are just handicaping yourself with just the ortho views.

The other stuff are quite advance tools and isn’t really helpful or useful at the moment.

Other things you are looking for are often garnered by experience. One thing that you have to have experience of to be capable of proper modeling is to understand the behaviour of subdivision surfaces (well since you are asking for topology and your topology speak deals with this, not gaming models for example). There are general quidlines around like avoid using ngons and poles, which is based on the behaviour of subsurf. While these are helpful they barely manage to cover all the situation you will face when modeling. Those other subtle behaviours and nuances would be garnered by seeing them in action.

Not only that, there are also various means of doing things, so for the same reference (like Photox mug) 10 artist will have 10 various topologies and all of those will be alright. Take a look at the wireframes of various head models and you will see that none of them have the same topology… and all of them would be alright (well except those very bad ones).

So the best path would be to actually just make something as the others prescribe. You can try things, make mistakes, find things that work and all the time garner knowledge and experience that you need.

As for your car… Well, you are already trying to make something. Good. You’ll gain experience that would help you in the future. Though you might be setting up yourself to failure if you have very little experience in modeling. Still it was an awesome effort and it still would not be wasted as you will gain knowledge and experience you could apply for your next project.

Back to the car: I will do it like this. Since you want to align those zigzag edges of the hood and the other parts the best thing would be just to duplicate those edges. Select the faces of the edge of the hood that comprises the zigzagy edge, Shift+D to duplicate, then move the duplicate a bit. There a perfectly aligned edge. You can then manipulate the duplicated faces to form the other parts and discarded those misalligned parts; or you can integrate the duplicated faces to those misalligned parts.

I think what orinoco meant is that creating a mesh with even density is not about numerical precision, snapping, or any other technical tool, it’s something you eyeball. Topology is about practice, about seeing the larger edge flow in your head, and then creating verts and faces that follow it.

This mug is a perfect example, you did not create a manifold mesh, you just slapped a solidify on a 2-d mesh and so the handle is completely hollow and the mug is paper thin.

It looks like the experienced modelers here understand what I am talking about. DOMO79, even with an object as straightforward and simple as a coffee mug, you still seem to be looking for tricks and techniques to do the work. You want to fly before you can run, run before you can walk, and walk before you can crawl.

Yes, I understand that crawling is slow and undignified, but look on it as the dues you have to pay to get the insight that others have gained by crawling. It’s not that crawling is important, but the insights are vital. Computer Graphics is art, not science, and you disrespect it by trying to treat it in any other way.

So, start over on the mug. Here are your ground rules for crawling in Blender:

  1. you are allowed to add any mesh primitive.
  2. you may extrude, grab, rotate, scale or delete, but no other modeling tools.
  3. you may use F to add edges or faces from selected vertices.
  4. you may use any viewport navigation aid (numeric keypad, middle mouse wheel, ctrl or shift or alt drag, etc.) to examine your mesh.
  5. you may use your mouse or the widget to position any selected vertices.
  6. you may use hide and unhide.
  7. you may use a subsurf modifier, level 1 or 2, and smooth shading, but no other modifiers.
  8. your finished mug must look like the example provided by photox.

Happy Blending.

Photox is right about this. It is practice. Though there are technical considerations about topology of the model, many important aspect is artistic and can’t be breakdown into individual specific rules. Being artistic, most of the decisions are more of gut feeling… of what feels right. This gut feeling is something developed from practice and trying things.

Yes. The mug was rather poor. For such a simple model, you put too little effort, or maybe you put your effort in the wrong places. Whatever the case was, it was still a rather poor performance. You can’t really build a complex model like a car if you can’t properly model such a simple thing as the mug. Please show us that you do have what it takes to model the mug. If you do then you have the foundation skill to build the car.

thanks guys. I plan to to start from the begning and wath these three sites for beginners.

http://support.cgcookie.com/article/157-blender-learning-flow

https://cgcookie.com/blender/cgc-courses/blender-basics-introduction-for-beginners/

https://cgcookie.com/blender/cgc-courses/mesh-modeling-fundamentals-blender/

then I will be caught up with basics and getting experience since I did just read and not really practice yet. the topology tutorials are good. but I do need to start from basic tutorials. i just went into modeling and never really watched or learned from the beginning or say chapter 1. I just skip and watched advanced tutorials . thanks for your all your help. Oh I will be in touch but not for awhile. thanks guys. any other suggestions or books for learning more about topology besides human topology? I know julperado said to check out the book for digital modeling. some cool stuff to learn would be how to make toon environments ( making the mesh more exaggerating like a slanted window or bent roof in which the latices I know will help with that. those architectural houses and demos you see. I haven’t found one tutorial on those high poly houses though . I want to learn more about topology. its all people topology on the web I noticed. and would like to learn more about hard surface and toon. but these 3 things I listed should get me up to speed and this learning flow 1) i listed goes from beginner tutorials. and I never really watched a full basic tutorial because I don’t know how to rig yet , animate or open the video sequence. so going to start from the beginning because they do go over them just to get you feet wet but at the time I was and still lost in some areas.

In general tutorials are great, especially cgcookie ones. In your case though, I think you should take a break from reading and start modeling. You need to start putting in your 10,000 hours. You can read 100 books on golf, but if you never go hack up a course you’ll never improve. I would stop everything and focus everything onto that coffee mug. Make it the best coffee mug you can, and if you run into issues post specific questions.