How to make hollows?

Wow, your character looks so good and cool, and your modeling is similar to what I want to create.

I want to try it if I can, but this is the first time I heard about shrinkwrap. So I will need some time to study about it and understand your process.

Thank you very much for telling. Your character is very good again.

Thank you always very much! I’m going to use my character in animation.

As a practice, I tried to make the similar mesh to yours.
But when I turned on subdivision surface, the mesh went crazy even though I set mean crease. I know this is a very elemental question. Should the mesh be quadrangle or triangle not N-gons to correctly apply subsurface modirier?
I used knife tool, should I use loop cut instead?


Booleans are not complete evil and they can be used.
http://www.pasteall.org/pic/show.php?id=90222
Not for animations though, and for this you could be better off using normalmap imho.

i would normally say “use quads only”, but for something called “hard surface modelling” it does not actually matter what you use, but be carefull! N-gons and trists does NOT deform well with subsurface, and should be avoided if posible.
when you can use Ngons?


big flat areas that will not be deformed anyway… those can contain N-gons, and the only benefit of using N-gons in cases like this is you maybe dont have to add that one extra loop witch does not really fit, and you might be able to reduce the amount of edges around the area, etc.

Any surface that is 100% flat, and ALL THE FACES next to it is also flat! if you look at all the faces connected to the Ngon, they are all flat, and has the same Y-axes position.

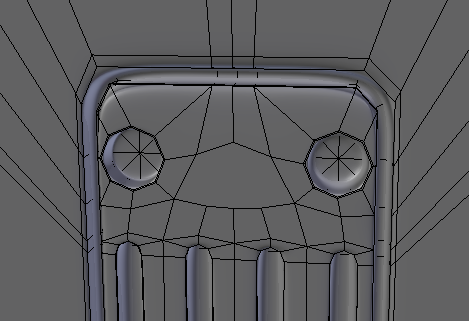
other than that i used triangles in the middle of the circle, and the best thing to do here is actually to extrude inwards and leave a small hole, and fill that with a grid. that will let you add a supporting edge to make it sharper.

what is supporting edge?


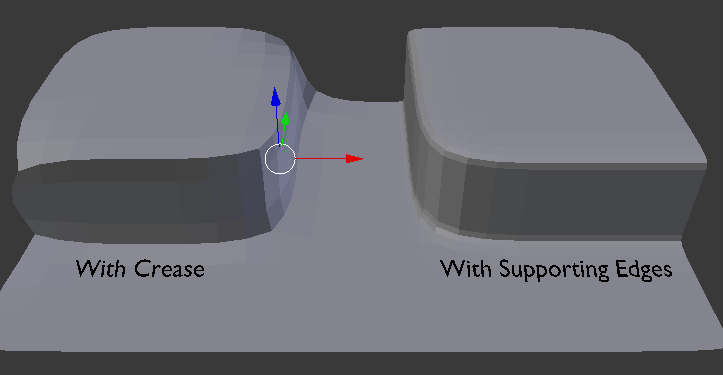
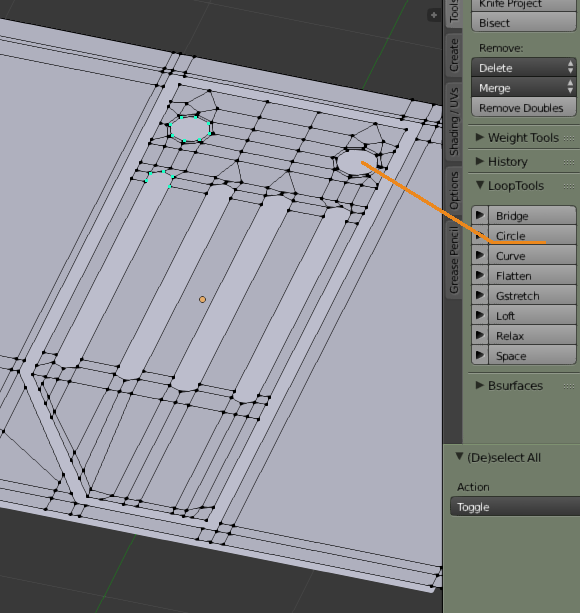
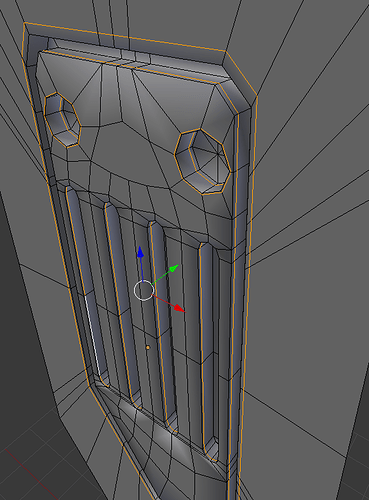
all of the selected edges in this image are supporting edges, and are there only to control the sharpness of the edge. basically the same as a mean crease, but if you use a mean crease you might sharpen edges witch you dont want to be sharp.

The paneling method Renzatic mentioned is quite easy. Dan Brown talks about it more in his old tutorial https://www.youtube.com/watch?v=3vsGxmhYZo8

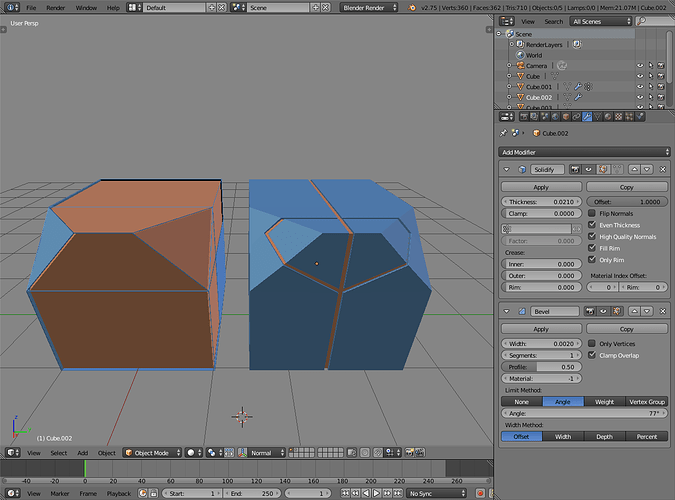
For angular surfaces, duplicating the object and using solidify modifier should be enough


Brown object on the left is the original. That was duplicated (blue) and solidify modifier was added with shown settings. I removed some of the geometry to reveal the original underneath.

Then once you cut and delete faces from the duplicate, solidify modifier makes panel edges for them. Could also add bevel modifier next to solidify to have extra level of detail.

Thank you very much for your comment and the great image!

Yeah, I sometimes see some professionals use boolean. So I don’t think it’s evil.
But it’s not good for animation? I didn’t know that. Because it makes mesh messy?

You think normal map is good too. It’s such a valuable feedback.
As you guys here suggest, normal maps seem good to make hollows in an easy way.

But this time, I decided to make hollows by deforming mesh to practice it.
Thank you for telling!

Thank you very much! I don’t know how to appreciate you better.
Thanks to your such great tutorial, I think I’ve learned a lot and I’m near a finish line about this topic.

I tried to make hollows as you did, and I have some questions, sorry for making trouble with you.

1 I’m glad that I could make the file attached, but mesh on the perimeter is still look bad. What do you think is wrong with that?

2Also, I created it by making perimeter first, something like eyes and mouth second, and finally I forcibly combined verticies to make triangles or quadrangles. Is this correct way to make hard surface modeling?

3 Somethings looks eyes that you made are looking regular octagon. Could you tell me how to make regular polygon? How did you make the eyes?

Attachments

hollow practice.blend (612 KB)

Wow, I did’t expect there were another method to make it. Thank you very much! Yes, I tried it.

I think the merit of this method is I can make this only by deleting faces? I mean, if I make hollows by extruding mesh, I need to use mean crease a lot. Also, this paneling method allows me to make an object separately, and later I can attach it on the character maybe.

What was difficult for me in a extruding method was to make geometry on a distorted mesh. I hope I can make good geometry in this paneling method.

Attachments

leg mark solidify.blend (483 KB)

You could clean the shape further by deleting ( Delete - Edge loop) not needed loops.
Circle needs 6 or 8 vertices to form nicely; use LoopTools addon.


http://www.pasteall.org/blend/36889

I’m sorry for being late to reply.
Thank you very much for telling me about LoopTools addon! That’s what I’ve wanted.
Also as you told me, I could delete more edges. Thank you!

I’m sorry for being late to reply and Thank you for teaching me a lot.

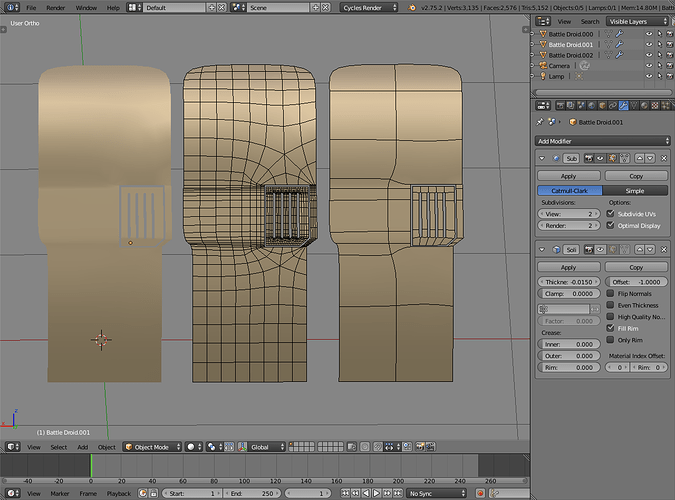
Because you told me the Paneling method, I could make the back of the character. I couldn’t had made the hollow of the back only on the rightside because of mirror modifier. But the Paneling method allowed me to do that. I hope this is the right way of using it.:slight_smile:

I noticed a problem that there is a N-gon. I can fix it but this way the top of the object diforms. How would you fix it?

Attachments

back hollows.blend (593 KB)

Fastest way is to make a support cut that holds the n-gon subdivision pattern away from the fold. Could use knife tool (K) in a specific view and enable axis constraint © to do that.


Subdivision adds a lot of unneeded geometry on flat areas though, could do it with less,
back hollows_ja12.blend (599 KB)

Thank you very very very much for your supports.
I think I’ve almost solved my problems.
You guys are great.

I saw you ask about making lossless images in Photoshop, but didn’t see a reply, so I’ll throw this in:

The different image formats are designed for different things. JPEG was designed for photography, and it does very well at that - especially natural scenes. It sucks eggs for drawings or things with sharp contrast, however. JPEG uses blocks of pixels and applies compression on those - but even without the compression, it’s not ideal for line drawings, and horrible for normal/bump maps.

PNG, on the other hand, uses a form of compression that doesn’t alter the image in any way. It makes for much larger files for photographs, but for line drawings it’s great.

For things like hard surface bump maps, PNG is definitely the way to go, unless you have specific needs (see below). It’s viewable anywhere and anything will edit it. Many other formats will work as well - TGA, EXR, etc. TGA uses RLE encoding which is especially nice for monochrome images with large areas of white or black. GIF works if you have less than 256 colors in your image, but it’s indexed color and works a bit different than you expect if you’re not used to working with indexed color images (plus you lose geek cred, 'cause GIF and BMP are what the uncool kids use :RocknRoll: ).

TLDR; PNG for maps and drawings, JPEG for photographs.

Now, if you’re dealing with greyscale gradients, you’ve got another issue; if you’re using 24bit color, you only get 256 values of grey. That can lead to a stair-stepping effect that’s unpleasant to look at (example: open Photoshop, use a gradient fill from one side of the screen to the other, black to white - you’ll see banding). Fortunately, you’re in Photoshop. which supports higher colors (GIMP doesn’t, yet - it’ll be in the next version). Unfortunately, your monitor probably doesn’t, so what you see won’t be what you get, so bear that in mind.

I assume Photoshop can save PNGs with 48bit color, but if not, you’ll need to use something like EXR files. If you’re not using long gradients, then it’s a non-issue.
Thank you very much for teaching in detail. That’s very helpful.