Thank you very much!
Thank you a lot, wonderful scene.
@Bao2 : If you could make a tutorial on how you optimize this scene (render time, memory requirement …) It would be really nice.
The green wireframe chair only. Change the number of subdivisions for viewport and render sufficient for it to render in GPU. It has three objects that don’t need such high number of polygons.
Basically the rule is to look what objects are far from the camera and don’t need such high subdivisions settings. Also in some cases you can resize the images used in such far objects. But in this case I only changed until it worked in GPU.
@Bao2 : I thought Geometry was not really an issue for memory, I suspected more textures. Thank you for the advice 
The chair pieces have a rather large number of doubles. Might try and remove those before lowering the sub.
Thank you for sharing your scene. I’ve seen in it that I can reduce my rendertime by lowering the min. Transparency Bounces to 0 without any worse imagequality ![]()
You don’t have to change it to a standard Particlesystem. Just switch to CPU rendering in the Renderpanel and choose “Experimental” in the Feature Set. Then you have to uncheck “Cycles Hair Rendering” in the Particlesystem.
For a more realistic (especially for Interiors) glassmaterial I would set it up like this (meanwhile I would do that slightly Bump with a Normalmap because Normalmaps give more realistic results but I’m not on my computer so I have to deal with an older Scene):
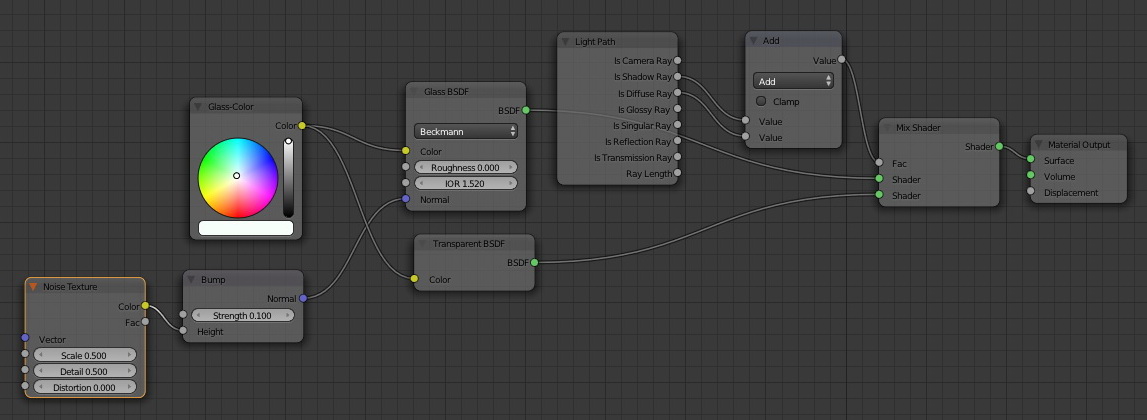
It lets more of the GI-Light (=Light from the Backgroundtexture in the Worldpanel) through the glass which makes it alot more realistic.
Kind regards
Alain
Thank you! Now I can finally play around in Cycles with professional models.
Hi everyone and thanks again for all the feedback and kind comments,
for the chair I’m sorry I haven’t noticed that it used all this geometry, it was already there when I downloaded the original file from blendswap
I tried the glass material setup and it gives dark glass shadow like this:

for the transparency, It’s true you can get radical performance improvement when lowering it’s value, but it affects the tree’s leafs (stacked litle transparent planes) that becomes darker (the deeper leaf will have black contour)
I think I’ve done all the necessary optimizations but I want to add some features before sharing the updated file again,
stay connected, thanks ![]()
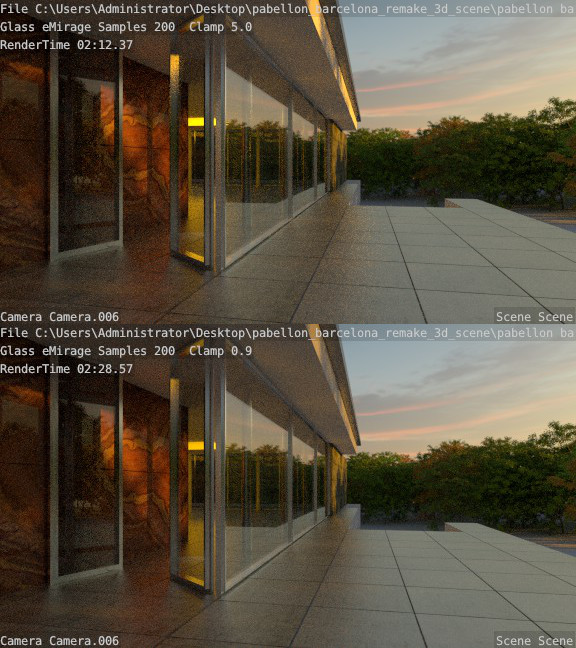
I guess you have done something wrong, see my comparison below:

BTW, you can get less noise if you set the Clampvalue to about 0.9.
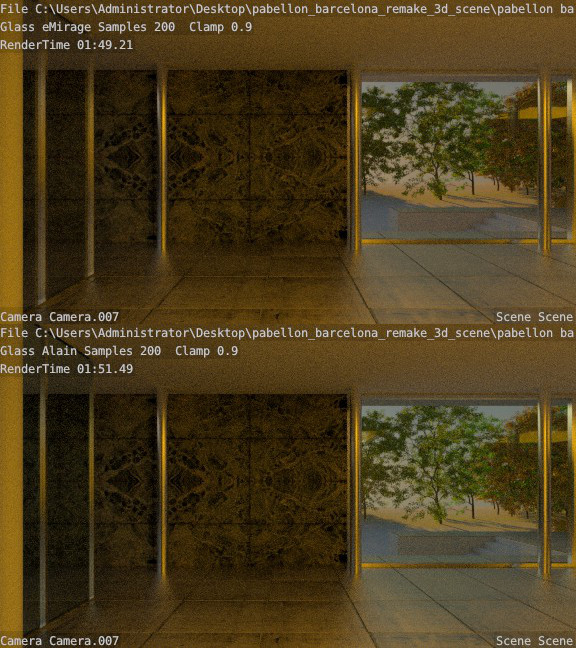
Comparison:
The benefit of my glass you see especially in interiors. It lets environlight into the room, you can see it on the ceiling above the right window or behind the glass in the left part of the image.
Comparison:
I also suggest to use Normalmaps for Bump (Normal). It gets mutch more realistic results.
See Andrew Price Tutorial here: http://www.blenderguru.com/videos/the-secrets-of-realistic-texturing/
Kind regards
Alain
Hi Alain; I tried the glass shader setup again and I’m still getting the dark shadows, but when increasing the transmission bounce value in light path (render panel) it works well at the cost of increasing render time, any suggestions ?
thanks
eMirage, in the /textures folder you have a image duplicated. One is named “DSC_8129…JPG” and the other is “…JPG” and if you are on Linux like me you need to turn on the option to see hidden files. I didn’t noticed until looking to the images in the compressed zip I posted.
I also like more eMirage glass than Alain one for this scene, seems doing better the reflections the eMirage glass.
But definitely lower the clamp to 0.9
EDIT: I tried with clamp 0.9 and it is worst. It lost a lot of light. So I like as it is, in 5. Also 0.9 is not understanding what clamp is. I will explain: the renderer converts the images to a linear space. A value of RGB 0,0,0 is the lower in a JPG image and RGB 255,255,255 is the maximum in a JPG image. But in linear space there is no upper limit. In a linear space a JPG is converted to the range 0 to 1. So RGB 255,255,255 is 1.0, 1.0, 1.0 in linear space.
Clamp truncates every value above the one you specify. So our 1.0, 1.0, 1.0 would be clamped to 0.9, 0.9, 0.9 and when saved the render the maximum value would be 229, 229, 229. And that is a little stupid because you are not using the whole RGB space, so you have an image that has few contrast.
I think clamp must be avoided (set it to 0 to deactivate it) and if fireflies show there you can simply fix them with several methods. But well if you uses clamp, it must be always at least superior to 1.0 because what I just explained.
Thanks for the explanation of the clamp theory, to be honest, my brain is not made for to mutch stuff like this ![]()
Does it mean that Clamp 5.0 is like RGB 1275,1275,1275,1275 ? Is this something that a monitor can show or our eyes can see ? Is it kind of a Supernova-White ? ![]()
I agree with the less contrast by lowering the Clamp value. But I prefer to correct that in Postproduction.
For me the effect of less noise is mutch more visible than the effect of less contrast in the image, this is why less noise and more renderspeed is more important for me than less contrast which I can correct in PP.
BTW: I like my glass more ![]()
I guess it just looks different because I have assigned a little bit of color to it and maybe I could increase the reflections.
As I already said, my glass is useful especially for interiors, in exterior the difference is almost not visible.
@eMirage
Sorry, I’ve no idea what you do wrong. I did join all glassobjects in your Scene and assigned my glassmaterial.
Here is my glass:
pabellon barcelona_remake_Alain_Glass_only.blend (379 KB)
Kind regards
Alain
Monitors clamp in 255,255,255.
When you render using clamp 5.0 your rendered image will have values in linear space from 0.0 to 5.0 and then when converted to JPG, the value 0.0 will be RGB 0,0,0 and the value 5.0 will be 255,255,255 and you get a very nice contrasted image. Better than using a lower clamp.
I don’t understand why values above 1.0 makes sence if the monitor and the JPG clamps it at 1.0.
I understand it in a mathematical way, but not in a visual way.
Can you show me a visual example please ?
One with Clamp 1.0, one with Clamp 5.0 ?
Kind regards
Alain
Render buffers have a float range which gets clamped to 1.0 for display. Essentially, for post processing/compositing it makes sense to keep the high dynamic range, but it can backfire in a few cases too.
Imagine your render has just these three pixels:
One pixel is black because the space is black and you like it in 0,0,0 RGB (Ton would disagree but just don’t pay attention to our Boss for this example)
Other pixel is our ship and it is 0.5, 0.5, 0.5.
The third pixel is the Sun and it is 16000, 16000, 16000
The power of the sun is diminished in a square ratio so when the photons come and light the ship the power is much lower and the ship gets in the rendering with a light of 0.7, 0.7, 0.7
So our final render has these values for the three pixels:
0.0, 0.0, 0.0
0.7, 0.7, 0.7
5.0, 5.0, 5.0 (we are clamping to 5)
Now when saved to jpg, the range that we have is 0 to 5.0 (minimum value is 0 and maximum value is 5 in our render) and it goes mapped to 0 to 255 and stored as RGB values.
If we clamp in 1.0 our render would have these pixel values:
0.0, 0.0, 0.0
0.7, 0.7, 0.7
1.0, 1.0, 1.0
and when saved as JPG our ship would be much brighter now. And that is not correct, you make all brighter losing contrast.
We need better documentation of such abstract matters in the wiki.
I think for many this simply is to hard to understand - while it is quite logical in its nature.
Why do you explain something visual with the help of mathematic ? This makes no sence for me because the image counts, not the mathematic.
The mathematic sounds logic but I still can’t imagine if this is really relevant for a final rendering.
I only care about that mathematic if it has any obvious and visible relevance to a final image or if it saves me time in my workflow.
So again, please show me a comparison between two images and maybe I will understand ![]()
@cekuhnen
I agree with you. And it has to be well illustrated ![]()
Kind regards
Alain
It is best to render yourself and use J and Alt+J to switch renders and compare what you loose.
But well, here they are. Up is 0.9 and bottom is default 5 of the scene. The most affected is the wall on the left.
Thanks Bao
Meanwhile I have done this tests as well.
I see this difference on the wall and I would say this is relevant.
But in my own Scene, I see almost no relevant difference (expect the noise !) between Clamp 0.9 and 5.0.
I’ll post a comparison as soon I’ll find a little time.
In eMirage Scene values above above 1.0 do produce more noise. Clampvalue 0.0 has the same quality of details on the wall to the left side like 5.0 but less noise.
Conclusion: Values above 1.0 don’t make sence, if a value is above 1.0 you better set it to 0.0 right ?
Kind regards
Alain