Eyeball + Eyelids + Lattice Deformer ??

“simple” is a funny word with blender. I see so many threads with a title like “I need help with a simple xyz…” and when you are working on an effect for the first time there is just no such thing as simple. Drivers seem to scare people, but they are really pretty simple. I think people get confused when you use bones to control them, sometimes it’s easier to visualize with an empty. In this case, the Z location controls the strength of the shapeky. z = 0, the shapekey =0. z = 1 ,the shapekey = 1.

A simple driver that use’s an empty’s Z location.

2 “simple” drivers in 3 minutes:

Brilliant! I must try play with the drivers now, start simple like in your example and then take it to the next level and try build a friendly GUI panel with it’s own camera… thanks for inspiring me again Tim! :slight_smile:

I think it will be much easier to animate if you have a face rig/gui of some sort. It’s just much easier to visually see all the controls in one spot. It lets you abstract the animating without thinking, ok, this lattice controls this object with this shapekey… you just pull the bone/empty/widget and something happens in real time.

Your early animation tests are so good, and your feel for timing so perfect that I wouldn’t burn too much time building the perfect rig, get something that works and start working on some animation.

I agree, The only question is if I can actually make this happen while trying and learning… I’m not in a hurry but still it may be too complicated for me.

The thing is that, it may be scary for me because it’s the first rig I’m trying to build, but the good thing is that I will be able to animate it for more than one cartoon once it’s ready with all the features possible.

The other thing I’m thinking is, what if I want 2 more characters (same style, different look)… Do I have a way to “duplicate” the all rig and controls to the new characters? or it’s all from the beginning? I’m wondering how these things work in Blender and hopefully there is a way to “duplicate” not the character but only the rig, and use the other rig on a new character and even change the rig and add/remove features for the new character instead of starting everything from scratch.

The good thing is that I’m a very curious person and I love learning new stuff so I bet all these will be a nice challenge to “fight” with while learning.

The way this rig is built it would be extremely easy to append it and use with another character. I wouldn’t worry about that it will be pretty painless. I would go through and rename every object and bone in the rig with .l or .L at the end of the name. Getting it ready for a right/left configuration. Also I forget (I think) to uncheck ‘deform’ on all those bones. None of them should have ‘deofrm’ chcecked. Did you change that?

I normally don’t push people so hard, but you just need a push through the process, and it’s a part of the learning curve that is very difficult for many people. But with your 2-d animation skills, I’m going an extra mile to get you through the roughest part, so you can get to the fun part which will be animating a character you created yourself. Slow but steady progress is best.

Oh… that’s encouraging, because if it’s painless I have a chance to get the idea as I did until now and get the idea when I’ll get there.

The name.L is a RULE now that I model a half character, so I can use the “flip names” on every object or bone, that’s a really cool feature after mirroring.
Yes, I think that I got the idea (hope so) about the bones that are only use for a “control” type, shouldn’t have the deform checked since we don’t want them to affect the object when skinning. but it is very easy to forget it so I should double check if I did uncheck these.

So what happens after my model is already attached to the character, if I’ll select all and clear parent or whatever I need to do… all the tiny setups (for the eyeball + eyelids for example) will be destroyed…

I normally don’t push people so hard, but you just need a push through the process, and it’s a part of the learning curve that is very difficult for many people. But with your 2-d animation skills, I’m going an extra mile to get you through the roughest part, so you can get to the fun part which will be animating a character you created yourself. Slow but steady progress is best.

Thank you so much Tim, I appreciate all you’re doing for me so far every tip and especially your step-by-step videos are very helpful for me and I hope that I’ll keep learn and won’t get lost when things will get much more complicated, I’m not afraid of hard learning as much as I’m a hard worker and I do love to learn new things, but these “experiments” I’m doing are very helpful for me to see if things are working and I can’t wait to get to the part where I animate characters! I’m very exciting about the all process.

Some people hate learning they want shortcuts all the time, I never believed in the short way because I love to understand how things are working, it’s a part of my curiosity also it’s good to know how to do things by myself in my opinion.

The bad news (not really bad because it’s my job and I need to pay the bills… but bad for the learning time) is that I’m getting into a massive project early next week so I’ll probably have less time to continue learning blender, but I will still do my best to do it here-and-there whenever I got a chance because if I’ll stop for a week or two… things will get blurry and it will slow me down. I hope it won’t happen.

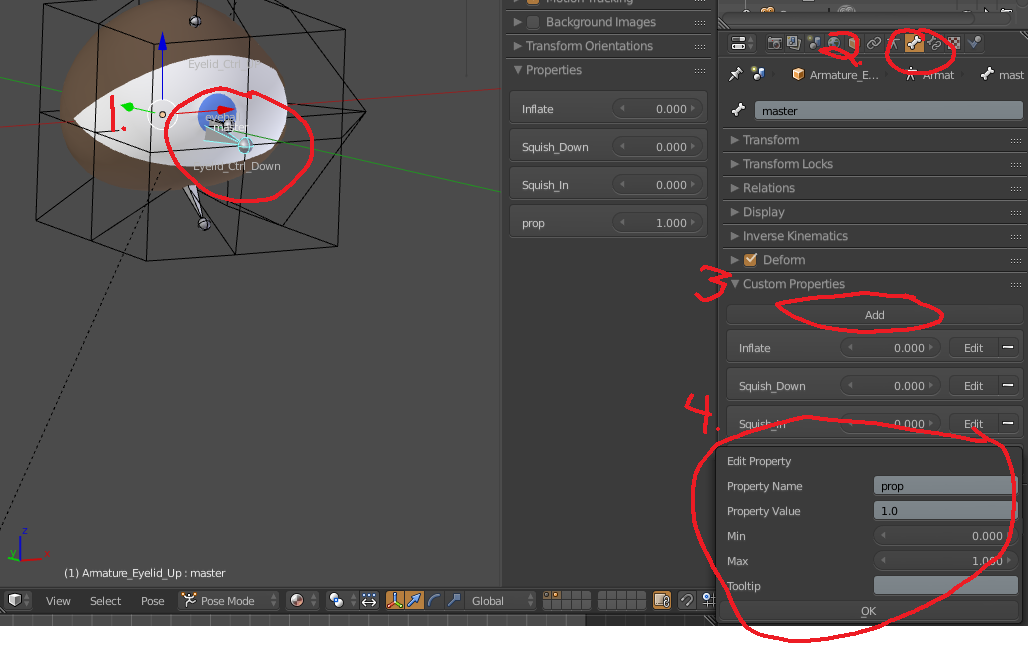
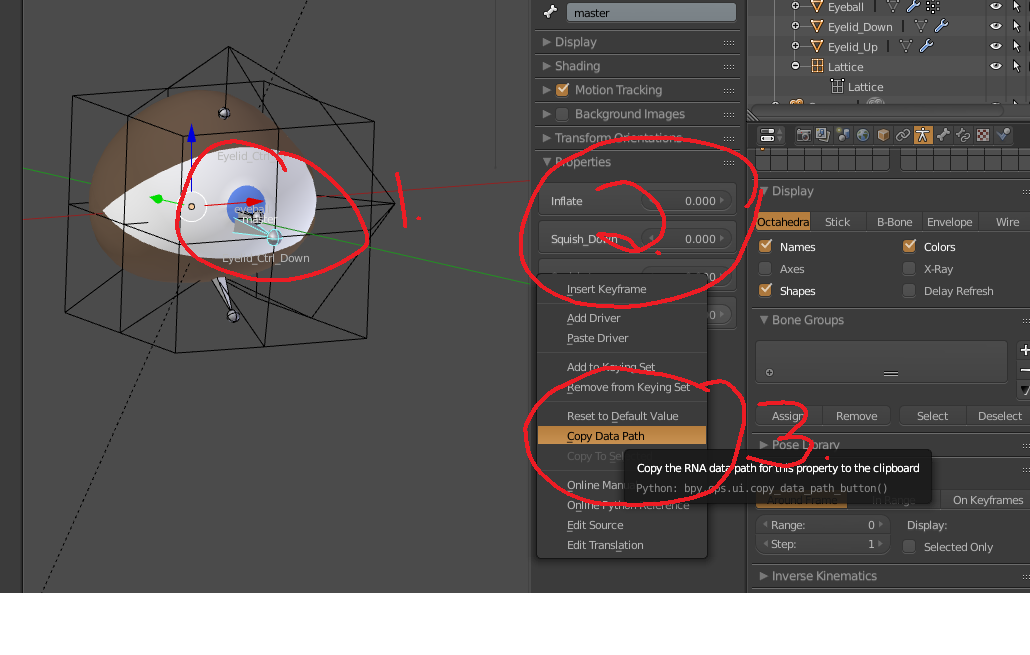
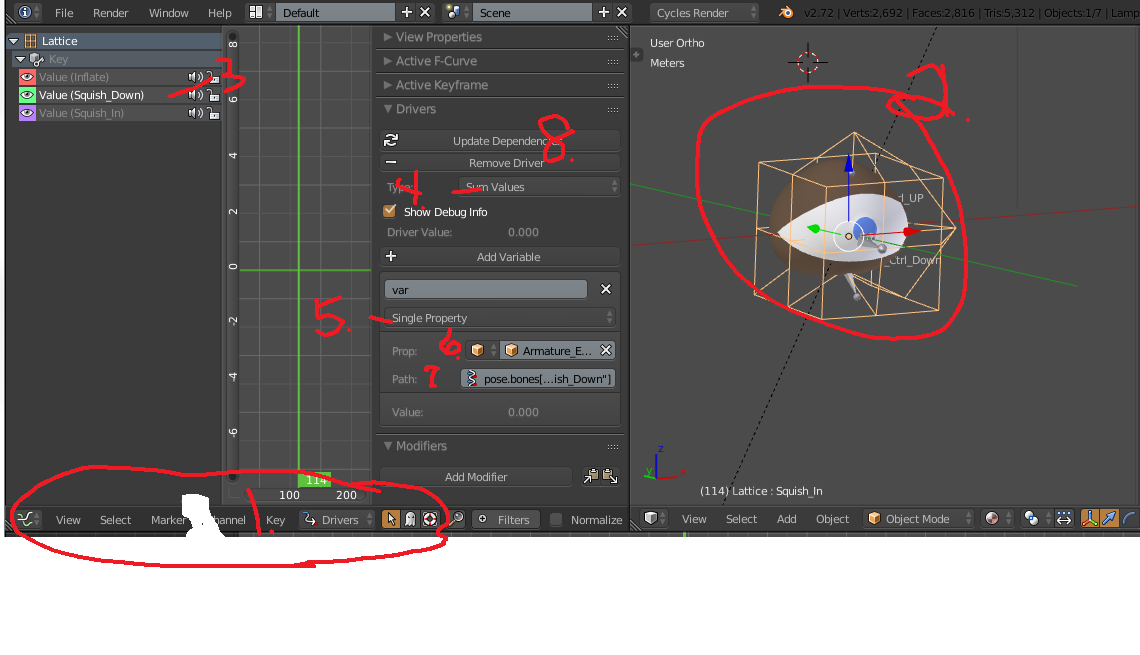
I’m now starting by adding a few basic shape keys I may need for the eyeballs (I just love the LATTICE deformer).

I still have much more to do and the steps I take are very tiny and slow as you notice… but I can’t wait to animate it and know that I built everything from scratch with your great help!

Work on it when you can. Slow and steady, brick by brick. And don’t lose too much sleep , literally. It’s 5 in the morning there. Get some rest and work on it when have some free time.

Hehe you got me Tim! I forget to sleep… I’m so into it, but thanks for the great tips and care I appreciate it. :slight_smile:
I’m just excited now that the eyeball + eyelids are working exactly as I want… I bet you know the feeling.

I hope you don’t mind me sticking my nose into this conversation, but I had an idea you may want to use for your eyeball rig.

It’s not as involved as your GUI and Camera idea, but it may work for you.

You could make a custom property on one of your main eye control bones that would drive the values of any number of shapekeys that you would want to create fro your lattice. Then, when you select the main control a list of sliders would pop up in the properties of the N-panel.

I’ll try to get a quick demo together. It may work for you until you get your other idea off the ground.

BTW, please share that when you get it working. I’d be very interested in seeing that.

DP

I’d like to see how that works DanPro.

alon, good that the rig is working how you want it. I do know the feeling with fighting with Blender for awhile and finally getting something to work. :yes:

Here you go. http://www.pasteall.org/blend/34116

When you select the main eye bone, you will get a list of sliders in N-Panel>Properties, that are driving some shapekeys.

That list goes away if you select a different bone.

Good Luck!

That’s really nice, I like that.

Thanks DanPro! you are more than welcome to share your ideas and suggestions!
I just grabbed it and had a quick look and this is amazing and very useful!

I was about to ask about creating buttons for the Blender Gui at one of the sides but I was afraid it’s more like scripting in Python or something which is probably very complicated for a noob like myself.

Any chance for a short video how to create such button if it’s not too complicated?
I have no clue but this idea is very useful for many uses not only for the eyeball.

here is a old fish i did. Maybe you remember it the image that inspired it. It is a simple rigging and far from perfect as I sometimes just want to animate and get past the rigging.
When you have lattice on eyes only they will stretch away from other mesh. When the socket and ball is part of the head mesh it will pull sometimes more mesh then you wish. I have another bat ray like fish and its eye lattice is very dense, so to have lattice verts that do not move, to hold in place the head mesh.
This fish has a simple lattice and it influences more then just the eyes, like my eye avatar.
Maybe there is something here to help. I think these are very fun to animate.
change the lattice controls to pose mode.
http://www.pasteall.org/blend/34128

I like this fish a lot, so smooth and squashy looking! :smiley:
For now what I did was the lattice to control the complete eyeball + eyelids for maximum control since I’m trying to think what I want from my character to be able to do when I’ll get to the animation part.
I still have to add drivers, controls, and if I’ll find out how to add buttons + sliders like in @DanPro’s example (if it’s not to complicated for me to learn of course). I’ll probably add these too.

I hope that my rig won’t get too heavy with stuff, because it is a very simple model as you can see (still working on it):

You better MUTE the music before your brain will explode… just a friendly advice :wink:


Looks great, lots of personality for being so simple.

Thanks! I can’t wait to animate this cute guy already but still have lots to do as I mentioned.
BTW - I really like your avatar with that one-eye! :slight_smile:

About the properties sliders, I found this great tutorial, I should try it:

I made the custom sliders by adding a custom property to the bone in the armature. I wish I knew how to do this with python, but that is beyond my abilities, atm.

Here is a quick tutorial on how make a custom property.

First, I made some crappy and very useless shapekeys for the lattice.


Next, I selected the main eye bone in the armature. (1.) In bone properties, (2.) look for the Custom Properties menu. (3.)
Click add. A new property will be created.

It’s default name will be prop. Click the edit button. Rename it to match your shapekey name.

You can leave the default values alone for this, but if you wanted to do something different, you could change the min and max, change the Property Value to an integer instead of a float and also add a tooltip text that will pop up when you mouse over the slider.

Click OK in the edit box when complete. Now, when you select the bone, you will see the slider in the N-Panel, under Properties.

Setting up the drivers:


Select the Lattice. (1.) Add a driver to the shapekey value slider. (2-3.) Right click to get the menu.


Next reselect the main eye bone in the armature. Right click on the value of the new custom prop. Select Copy Data Path. We will need this to configure the driver.

Continued…

Open up the F-Curves Editor and switch it to Drivers.(1.) Select the lattice (2.) so the keys show up in the editor.(3.)

Configure the driver: (4.) Sum Values, (5.) Single Property (6.) Armature name (7.) Paste the data path we copied earlier(CTR-V), (8.) Click Update Dependencies.


I hope that helps. I’m not a great tutorial writer.

Good Luck!

Thank you for the detailed guide! it’s very helpful. :slight_smile:
it’s similar to the video tutorial above but I think more people should see this guide of yours and learn especially if they’re beginners like myself.
I think it’s very useful and I hope I’ll have a chance to test it sometime soon, I’m very excited about this feature!