U dont have a build with the ramp node yet but when you use it maybe try to mix a diffuse shader with the ram info
over a second diffuse shader and use the voronoi as the blend mask so that the ramp shader gets dotted.
Then add the glossy coat.
Did some material observations here with test materials I have and noticed that light reflections are very strong and clearly visible but the reflection of the env is very weak.
Your first material test is very close to the Keyshot material which is pretty spot on how my test piece here looks in my hand.
I am not sure how that might be achieved with Cycles.
Regarding Cycles and how it renders however I must confess that I am impressed with the texture and detail level this renderer produces. In Blender Internal this texture approach was never so fine and detailed.
I was just trying to replicate your two reference images in different light conditions. It would be interesting to see an actual shot of your product (if you can show it) and your tests with materials
My approach to Cycles nodes is based on how I think actual surfaces are constructed, and I have almost no experience with BI, which I think could work to my advantage.
In this case you have a base color with a thin layer of clear coat on it that has little reflective pieces suspended in it. I suspect that if you actually modeled it with a base color mesh, and a slightly outset mesh with a refractive shader and a particle system for suspending reflective bits in it, you would get very close to how it should look, but of course this is pretty impractical.
So my solution was to cheat, have a base diffuse color, use a mask to make the little glossy specks right on that material (slightly rough/diffused to spread the light more), then add another gloss layer on top to simulate the reflectiveness of the clear coat. Everything else in my last setup is basically just tweaking to get a darker color on the faces that are not facing you directly to give a sense of light scattering under the clear coat.
I still like your idea about limiting sample times for certain materials, but I suspect it could generate a lot of fireflies or grainy looking caustics?
with HDRI probes this material gets very difficult because of how much env reflection he glossy shader pick up in general.
Here is the Blender Internal setup
Here are some reference objects from Phil Renalto a jewelry friend who works a lot of iridescent materials.
The shots are quite interesting to look at because you see different amounts of visible grain etc.
what would be nice if you could just add the glossy reflection of a glass shader onto a diffuse shader and not mix in the transparency of the glass shader as well.
As you can see in the Blender Internal material just specular values are added and not the base material as well. Of course that does not work with Cycles as it has no specular option anymore.
Yeah, I’ve wanted a better split in cycles materials as well, pure specular, pure reflection, pure refraction, etc. and then use mix or add nodes to put them together in quantities you want.
I have seen some crazy cycles nodes setups on this forum, clearly some people around here understand them very well and know how to get results with the math nodes, etc.
If you could create a material that is basically black with white for specular highlights, you could probably use that as the factor of a mix node.
Did you try rendering my node setup with hdri lighting? If so, did it just completely wash out the color because of reflection?
I think the bottom line is that something like this paint is really two materials layered, a diffuse color and a thin clear coat, the only way to really get close to a physically accurate result is to model both layers.
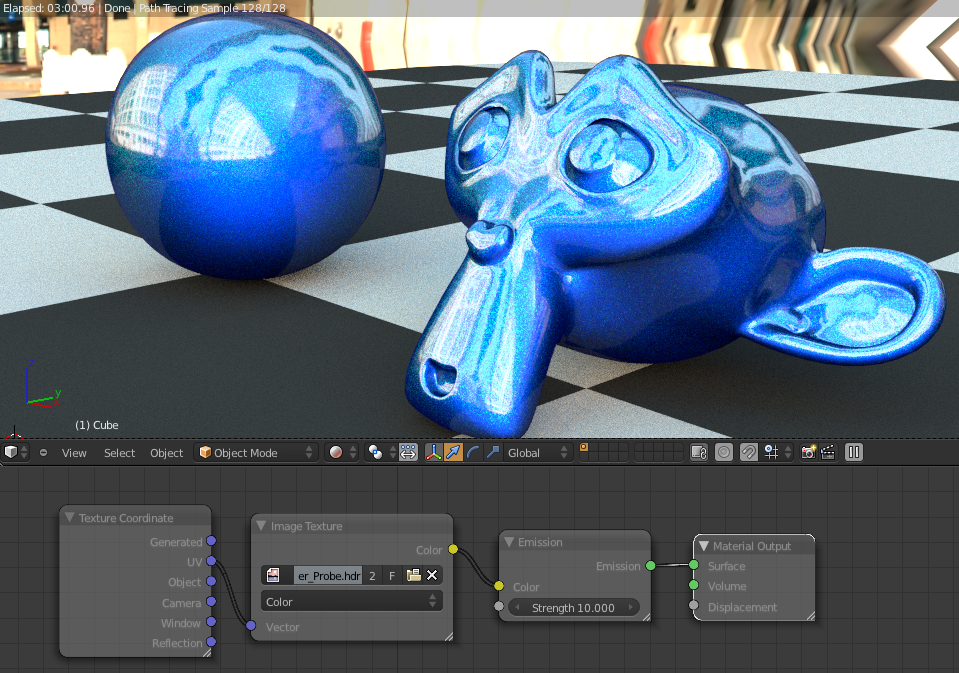
I tried rendering my last node setup with an HDRI light probe as the only lighting (mapped crudely to a sphere, light strength to 10).
If I did it correctly (let me know if I didn’t, showing the material nodes for the env light), the material still shows good color, depth and flecks. No idea how any of the previous iterations looks since I deleted them.
Not bad this looks pretty good. The reference images I included sometimes also show quite large flake areas. So the objects I have in my hand is different.
You can (at least somewhat) control how wide the flakes spread across the forward faces with the “Blend” value in the middle layer weight. Currently set to “0.500”, increase it and the flakes should shrink from any faces not pointing at you. I doubt this is physically correct behavior, also the faces pointing away from you will get darker with this setup.
With an isolated white reflection to use for a mix factor, I think this would look pretty good, but I have no idea how to do this or if its possible.
This is the paper that the car paint material in Lux is based on it would really be cool to see something like this implemented in cycles. The paper also describes how implement metal flakes something that if I am not mistaken is not in the Lux version.
Its a pretty hard shader to tweak by hand but you can fit measured data to it.
it like you have it but swap out the image texture node for an environment texture node and the emissions node for a background node and create this node setup with the little world icon clicked on the node editor.
Yeah, the hdr map is a picture of a round light probe, couldn’t figure out how to map it to the environment, so went with mapping it on a sphere instead. I hope it still gives off actual hdr light.
I noticed that the normal node works different in Cycles compared to BI with the main difference that it does not update with the view direction meaning it is in Cycles not working like a fresnel effect.
Ok the in Cycles the normal node works different for what ever reason however compared to Blender Internal we now also have a dedicated fresnel / layer weight node which at least makes perfect blends between perpendicular and tangent surfaces.
Pretty sweet setup, good idea to just mix the colors rather than shaders :facepalm:
I still haven’t exactly figured out the difference between Layer Weight:Fresnel and the dedicated Fresnel node. The Layer Weight node seems easier to control though.
Monster as far as I know layer weight seems to be more a linear blend between tangent and perpendicular while fresnel is more based on the well fresnel equation which seems not to be linear at all.
It is nice that in Cycles you can just use the layer weight to mix two colors based on the view angle now instead of having to use the longer normal node approach like in Blender Internal. The ramp shader has the advantage of being able to add a third or forth color if needed but this is rather good for simulating infra red images.


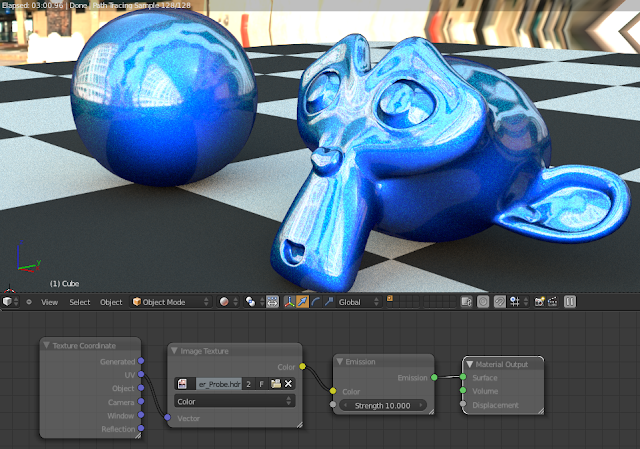


 Here is the node layout: