On D-day the invasion markings did go over the top. After D-day an order was giving to lose the stripes on the top. So yours are headed in the right direction. Realizing time is at a premium I went back through that clip and attempted to isolate the actual shots of the plane. Also many of the invasion markings were painted by any private they found standing around. Hence some looked pretty damn rough. One other thing caught my eye. On D-Day these planes had a surface almost without any specular. And, in the clip we see a guy swabbing on what looks like a flat substance?
https://dl.dropboxusercontent.com/u/81075043/Invasion%20Markings.wmv

Man thanks… what a great video! I loved the paint brush that guy was using, and the paint went on like it was colored water… I thought lead paint was thicker than that;) I did notice the guy pulling off masking tape for the star though. I was also impressed with how much gear those guys jumped with. It’s a miracle they didn’t break their legs when they hit the ground with all that stuff. Heaven help them if they hit water, they’d sink like a rock.
The Germans in anticipation of Airborne Troops had flooded many areas. And, although it was known where those areas were some did drown I understand. As far as the gear it was and still is without a doubt one of the worst ways to insert a man into battle. He had enough on him for hopefully several days.
This site dawned on me this morning for some reference pictures of the C-47. And, there is at least one in there of the interior of the plane and the ribs. Oh, and the paint brush. Yeah, that one guy had something like you might whitewash a fence with.
Forgot the link. http://www.bing.com/images/search?q=82nd+airborne+museum&qpvt=82nd+airborne+museum&FORM=IGRE#a
NRK, I don’t pretend to know anything about engineering but the size of the wing span and engines seem huge when you see the interior of the plane. Probably due to the horsepower they could get out of those old radial engines. In sifting through that site I came up with a few photographs. The first is a obvious reenactment in a restored C-47 shot with a modern zoom lens. But, the other two are not. And, we know a 50mm lens was the one of choice back in that day. Damn man for all I know your plumber has a wider bathroom then that.


Dang, I wasn’t going to model the interior and here you are getting me all excited to do it. The ribs look really easy to do.
LOL Sorry about that, guy. I’m still a little confused about the windows. In my post #61 we see two windows through the open door. And, we see right through them. Could that have been Photoshopped because from the interior shots it seems like the windows had a covering of some kind. I say covering actually I don’t see any windows from inside. This windows thing has bugged me from day one.
NRK you have enough on your plate with the exterior like I have to remind you. The interior could be a separate file way down the road or not. Maybe at some point a picture of a Jumpmaster standing in a door and then a quick interior shot. Back to a exterior shot from 3/4 front with several troops exiting the plane. A separate file could very easily be cut into a scene.
I did stumble across this. It seems the fuselage was 7’8" and it carried 28 troopers.

That’s a great graphic showing the history of the aircraft. It’s almost as if people were still driving Model A’s around today as a useful vehicle.
Rosy has been helping me, but I’m struggling slowly to get my arms around the materials and textures. Did some UV welding for the first time. Obviously I have to continue up the fuselage and I haven’t done anything to the rear elevators yet. Crits welcome:)

50,000 thousand rivets according to the little graphic, NRK. And, my thought is from any distance they couldn’t be seen. So I guess my point is do you show a few or none. Or, all so the camera is at liberty to move in for any close up?
And, I worked submarines and ships for years so I’m going to call it shell plating. Probably called something entirely different on a aircraft. But, the panels making up the radius were rather rough looking on many of those old planes apparently. Where if you move in even on a almost diffuse surface they became just slightly visible. On a submarine they were not so apparent (Constructed with rings) but on a surface ship it is noticeable. Although only barely on ships made by N.N. Ship years ago when they had talented ship fitters given enough time to do their job.
And, yeah I guess it is if the model A is still alive in the wonderful world of planes. Since in some countries a soul is sitting in C-47 hoping to get from point A to B. And, actually given the terrain they are probably in good hands. As, if the old bitch refused to die.
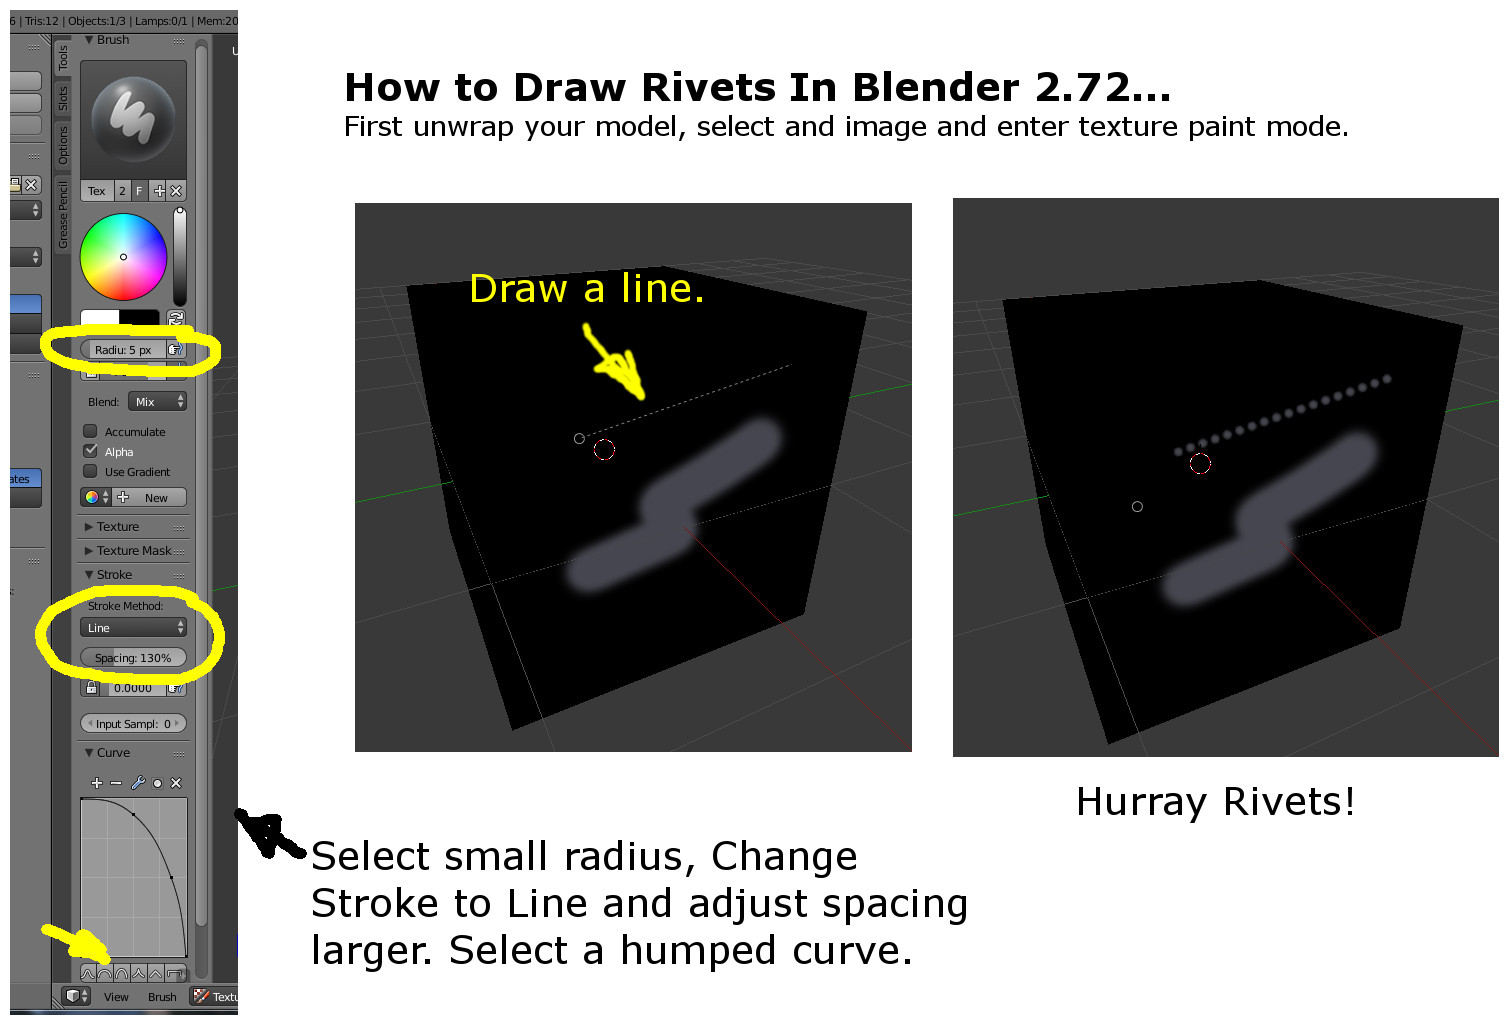
You are absolutely correct. The rivets are too large/big. I was trying to go with a 1024 texture/section and it isn’t working. I’ll move to 2048 and redo them. I really need to get panel lines in there and I was modelling them and it took way too long so I just thought of another way to do it. I’m thinking of going with midrange(grey) for the bump map color. Then I can paint black for creases and white for rivets. I’ve read other places that there a LOT more than 500k, it’s a little daunting, but the new unreleased buildbot 2.71 is really saving me time with the line function in psyfi’s paint tools.
NRK, about the bump map texture: you guess right, definitely use the neutral gray (R=50%, G=50%, B=50%) as the “zero” level for your textures. It allows creating the dome rivets and recesses along the panel borders. For such a double engine plane as this one, I would suggest a bump map of 4096x4096px. In such an image the rivets are relatively small - each of them is no larger than 2 pixels. The edges of these aircraft skin panels overlap each other. Many modelers recreate this effect using gradients. Personally I use Inkscape to draw such a texture. The advantages of such a vector-based drawing are:
- the ease of modification: you will often have to modify some details in the bump texture. It is much easier todo it for vector shapes;
- you can experiment with many alternate texture sizes - it is not a problem to generate a raster copy of a vector image, of any size;
- the fastest way to create rivets is to draw them as a custom dotted line. In a vector-based drawing you can easily modify them later;
- use clones of such elements as bolts: it is very easy to modify them later.
like to know more about these darn rivets
if you use latest paint tool to do it may be open another thread to show how to
need that for my big ship with dont’ know how many rivets !
thanks
Really appreciate the words of wisdom. You are so far above me in all this I feel I’m reinventing the wheel. I will consider the vector based, but then I need to export a uv and how do you keep them straight wait I just realized you are going to tell me to buy the book, and I probably should, a friend of mine at work bought it and is really enjoying it by the way. He let me read a few sections so I am aware of some of your work flow. I’m doing rivets with Psyfi’s new paint line function you just snap a line on the model directly in the 3d view and it puts them all in. It’s really slick… Man what I wouldn’t give for PTex and not have to unwrap at all:)
Interesting! Could you give me a link where I can learn more about this feature? I would like to check, if it fits to my workflow.
About the book: I know that you have your own, different workflow :). What I can do is to suggest my solution when you signalize that you have a problem. Well, in fact in the “full length” it is described in the book, but I am sure that you will experiment with other methods - that’s why this is a very interesting thread!
which tut did u follow to make bump map In cycles ?
trying to set it up and it has change I guess
happy cl
Here is a quick post on how to do rivets in 2.72 with the new line function in paint textures. Since 2.72 isn’t out yet you have to get it from buildbot:
well using new line function is nice but may still have to relocate rivets to fit where they should be
also if you have 1000’s of these you still have the image size problem VS resolution
also if rivets are not 1/2 sphere need to use a bake texture as a brush to paint it
I was doing some calculations for my big boat and I would need a map of around 2 GB in size
so that does not really make sense !
will have to sheat I guess!
thanks
Thanks to all of your help, I’m slowly figuring this out.
This is just a test section, but I’m fairly happy with it.

NRK, thank you for pointing these new features of 2.72 - I will try them next week
[SUB](such lines lin their continous version may be useful for another task, as painting camouflage splashes - I hope that I will describe it in the Volume II of the new edition of my book).[/SUB]
I thought about your bump map, presented in the post above. The effect is really interesting, but I would suggest to improve three elements:
-
take care about the various orthogonal lines: the curved upper edge of the doors does not look good.
-
the horizontal panel edges on your bump map seem to be welded. In that time it was impossible to weld the alumin alloys, and in fact these were overlapped alcald sheets, joined by a very dense row of rivets. See this close-up picture of another C-47 (this version has a wider doors than yours but it does not matter):
This photo comes from: http://www.primeportal.net/hangar/luc_colin3/c-47d_43-49728/index.php -
it seems that you have used a kind of noise as a gentle bump texture, which creates an effect of rough surface. It looks like a surface of a thick metal sheets (it looks precisely like a tank armour or a skin of a ship hull) - a very good effect, but not for this case. You can use this pattern in the color and reflectivity maps, to create an impression of a rough, dirt fuselage, like this one:
but keep the fuselage smooth - it was made from a smooth alcald sheets.


Ok, I totally agree, I just thought the rough texture looked cool, here’s take 2. It’s really hard to get a raised panel with a bump map. I’ve included the photo I took in the corner for reference. If you lookat my photos, they look like welds, but your right they’re raised panels.

Ok, I’m looking at this the next day, and I think this stinks too. I think my problem is I’m mistaking weld lines for rows of rivets and at this distnance you shouldn’t even be able to see the panel lines.