
Only a tiny update, I’m trying to work out these shape keys for facial expressions, so far a cheesy smile.

I’m now tinkering with textures, can’t really see it but she finally has lashes. This is significant for me because I couldn’t get it to work due to a Light Paths setting I had, which drove me mad.
With this post, I was experimenting with some bold dark/lighting that I remember seeing in come classic anime. I still need to setup Freestyle, and I hope to have some normal maps/textures for the uniform to make it less flat and plain, now that I know how to do this.

I’m trying to setup a scene (rendered in Cycles), so far this is all I got heh. Copying poses found on Images.Google (still trying to figure out the whole posing thing).
I’m not really sure where I was trying to go with this one, but with the long time spent on learning to use Blender – modeling, rigging, materials, etc. – when it comes time to actually apply what I’ve learned to create some art, I’m totally stumped on what to do next. Anyone have suggestions on how to break out of this funk?
Good news I finally got shape key drivers to work for me, but with some serious limitations though. I’m hoping to learn more about what it can do. So far I can only find the same few tutorials that only get me up to the point of getting one shape key driver to work, but with no help on going beyond that. If anyone has suggestions for this, I’d really appreciate it.

Edit: I actually intended to upload the one with Freestyle lines.
I finally got something to update with, yay!
I’m getting closer towards the end of this Blender Project, to create an anime-ish toon girl of the main character for my novel “In The Year 2525”. Since I’ve accomplished my goal character art-wise (now to work on scenery), it’s safe to say that I will indeed be using Blender to create the art for this book, which may possibly end up as a Graphic Novel.
It was rendered in Cycles and also utilized Internal w/Freestyle.
The image below is the main character, Irene, as depicted by a later chapter in the novel, the excerpt of which is available to read here: http://intheyear2525.com/wos (Warning, she has quite the potty mouth in this specific chapter).
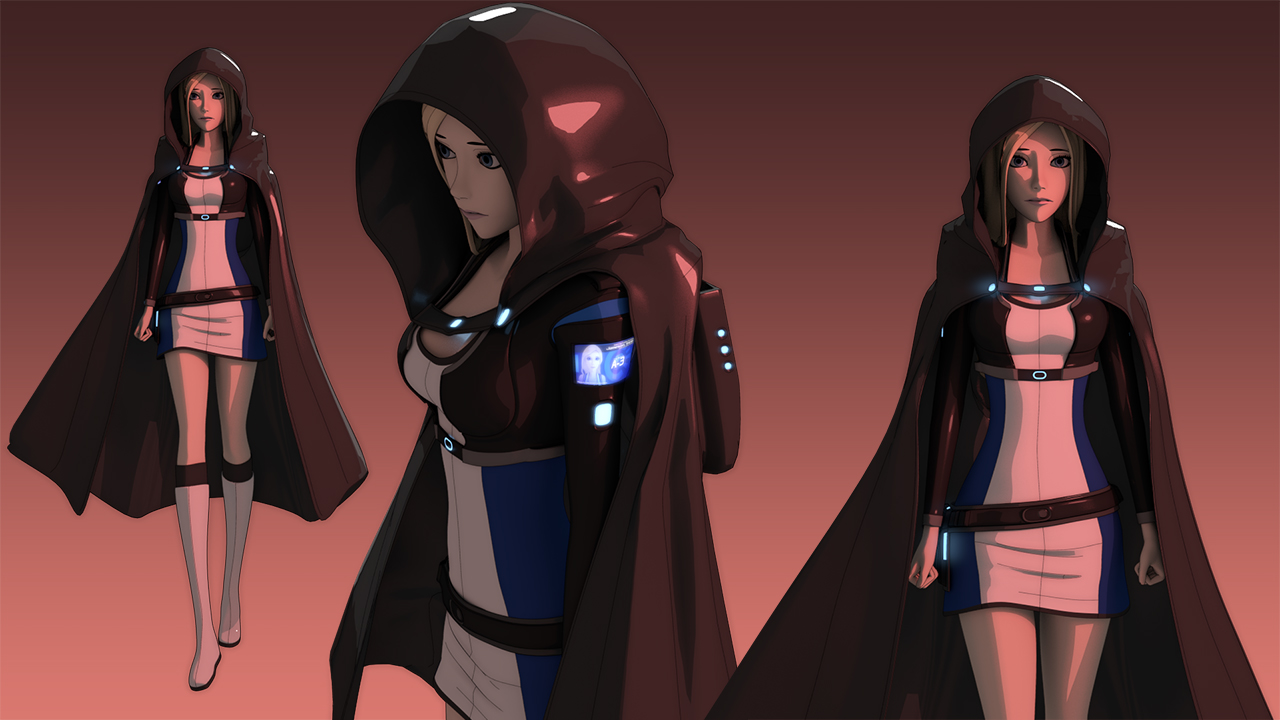
Less compressed 1080p version: http://fc04.deviantart.net/fs71/f/2014/095/f/c/2525__irene_s_cloak_by_shadow_corp-d7d3mf9.png
it’s looking amazing. I love the style you’re going for.
Dude,
Stunning work, I am so much a fan of all your hard work.
You sound just like me…I am only now going through the hard bog of learning how to do stuff, and create some good art with it. I am making some progress but rendering like yours is still a big mystery to me.
I’ve been working on just creating the expressive face animations since bringing things to life rocks my boat.
Did you ever get your face drivers working?
They are a pain but I went through some really good tutorial material which got me through it without too much pain. I now find other things to trip over…f’ig’n endless problems. Get the hammer and hit me now.
I love the style you got going on. I am a big anime fan and I think you have created a really sharp version all your own.
I will keep watching this thread. Perhaps I can ask you questions too when I’m ready to cry into my beer.
You have such a great talent for this…well done. I hope to do as well as you have.
Keep working hard, it is amazing.
peace,
J
it’s looking amazing. I love the style you’re going for.
Thank you.
I’ve been inspired lately by Mass Effect (game) and Claymore (anime) with the art, although I created this character back in the 90’s which was then inspired by WhirlGirl.
I also have a thing for long legged blondes (not unlike the ones in Claymore). ![]()
Thanks!
I kind of did get shape key drivers working, but when I needed to make changes to the model in other areas, the shape keys kind of messed things up, so I just deleted them all and decided not to create them again until I am absolutely sure that I’m not going to edit the base model any more. Recently I had to redo her hands and fingers, they weren’t deforming as well as I had wanted, so the shape keys had to go. The subtle expression in the latest upload was modified by moving verts around, not a big deal for still images but I really do want to get back into shape keys so it making expressions won’t be destructive to the base model, plus it would be better for animation I think.
As for the style…
I’ve visually studied different comic and anime styles and picked out the parts I liked with the intention of creating my own style of anime from it, so it tickles me a bit to see you point that out!
I also worked to avoid some parts of anime, specifically the moe style as I’m not into it; but also I wanted to avoid creating something that looks like I’m trying to shoehorn anime into it, like maybe an American style comic (or CG) character trying to look and feel manga/anime but just ends up a bit generic and boring if not cliche.
I had reworked her face several times since last year just to get her close to a passable anime look from multiple angles, since anime really does have a lot of iconic angles that in my opinion defines that art style.
Attached is a “stages” image of the wire to final render.

I really like her character design, and the compositing of cycles and Freestyle to create the visual style. Any chance you’ll ever do a tutorial on how to create that kind of style (and maybe what material settings and techniques seem to work best for it, if that’s applicable?)
I’d love to be able to create a style similar to this for the 3D animated web series I’m continuing to develop, but I really have no idea where to start.
Hey thanks for the feedback. ![]()
Materials & Lighting:
I’m not sure I’m Tutorial Making material, but I can share what I know in a general sense or if you have specific questions.
I can start off by giving this blend file. It’s a UV Sphere using the same lights and materials node setup I’m using for her skin in the most recent upload. I also copied and pasted this node to create materials for the uniform, jacket, cloak, hair, etc. All I did was change its base color and it pretty much did the rest. And other than setting up the Surface and Ambient Occlusion in the World Tab in Cycles, it’s really not that difficult to get the look I did (in this case in a dark reddish setting).
Also, the file is setup with Freestyle to render after Cycles and then are combined together in the compositor.
On the character creation and design:
On creating the character, she’s a simple model with just only enough vertices for soft subtle shapes, nothing complex. The character art style for her is just me, not sure if there’s a way to teach that, but http://images.google.com has been very helpful for references, especially for the eyes (more based on human shapes than anime). But just scale the eyes up a bit, simplify it and it gets closer to an anime style.
On designing, as I’ve posted before I just studied anime and comics and tried to use what I liked best about them, and really tried avoiding things I don’t like about them. This may be an unpopular opinion, but some of the worst designs I’ve ever seen were in the Final Fantasy games, especially FFX series. Pants with one legging, a skirt chopped in half, a sleeve down one arm and not the other, bikini tops that don’t provide protection, panty straps exposed for no reason, etc. I look at that and think, “Why? Why does that exist? For what purpose?” My biggest thing is to avoid adding something for the sake of doing it, to create more details that wont help and thanks to 3D, it’s easy to go overboard.
However, sometimes more is less. So I try to keep it clean, sharp and simple and I get into designing with that in mind.
When I design something, even as something as simple as my character’s uniform, I try to create a back story for it on what its uses are, why it’s useful, why it looks the way it looks, something that is logical and within reason, made to be attractive but not distracting; and it has to fit the character’s personality, the self expectation of themselves and it has to fit in that universe somehow.
In the case of my character’s uniform design, it’s really all she has right now considering she’s stranded with nothing more than what she’s wearing and has on her, otherwise she’d be wearing pants while traversing this alien world. The clothing she is wearing however is actually technology that provides her with minimal protection against the elements, weapons, etc. It has it own back story and it aids her a lot in her own story.
Cool, looking over that blend file answered some of my questions right off the bat; thanks for sharing. You think that material setup (or a similar one) would work well enough for materials such as metal, plastic and carbon fiber?
I think it’s possible, I haven’t done any scenery work or anything else that would use those kinds of materials outside of the this model I’ve been working on.
I think that if you can add some noise and gradients to the nodes, you can get those effects in a toon way. It would be something I’d have to experiment with myself as well which will probably be sooner rather than later since I want to move on to other objects now.
For carbon fiber, I did experiment once on her jacket with a texture using the same node setup in the .blend file, it looked too obviously CG generated, but that was before I really had a handle on texturing. I might try again and would post results and nodes.
I like the hair and the toon shading.
Thanks for the wireframe, too. Face topology is my weakest area.
Thanks!
Face was also one of my weakest areas, which is why half of the modeling time from last year up to now has been on the face alone. I just hope I thought ahead enough to create new female characters from this one model, one of the reasons why it took to long to get this far — all that pre-planning and such.
Although my goal was for an anime-ish girl (face and all), I’ve designed and modeled her face by studying real-life female faces first, and then attempted to stylized it from there based on both anime and comic references.

It was a moment of truth today as I experimented with creating another one of the main characters from my novel. The original “Irene” model was designed to be a template for most of the female characters; so I decided to create “Cameron” from this template, Ren’s buddy from the Academy.
I was hoping that I would be able to at the very least modify the face/head enough so that Cammy’s would looked different than Ren’s. Of course the uniforms are the same as they’re standard at the Space Corp Academy, but I did try to modify body shapes a bit.
What do you think? Do you think they both have their own “looks”? Anything I should consider changing/trying? Any suggestions would be appreciated. Thanks!
ITY-2525 Project page: http://intheyear2525.com
Official ITY-2525 Facebook: https://www.facebook.com/InTheYear2525
Looking great…well done.
The only ‘give’ away was the hair… the hair part is exactly the same for both. Other than that small thing I think you have a win with your experiment here.
I gave it my tough 20/20 eyeball test too! you passed.  Hey I can be very fussy.
I know, the hair!
I’m going to remodel both their hairs individually at some point soon. It’s more of a place holder when I first attempted long hair like a year ago, I just haven’t revisited yet. But obviously my devious attempt to pull it back didn’t fool anyone. ![]()
I’m really amazed by your work. The 2 girls looks different and I noticed the hair “problem” only because James pointed it out.
Keep going, I can’t wait for another screen
Looking really good. You certainly have a style. You’ve certainly put a lot of thought into it.
I’d really like to see how you weighted the model for rigging, and what you did for corrective shape keys. I haven’t been able to find a good guide or tutorial on that in the past, and I’m going to need it for my project. I’m sure many others would benefit greatly from it as well.
In terms of the 2 characters, it seems a bit obvious to me it’s the same base model. Change their proportions slightly. Make one shorter. Alter the facial features slightly as well. You have a very light mesh, so you can’t do anything extreme, but using the same base mesh should offer you enough flexibility to do this.
Thanks. ![]()
I didn’t have to do any weight painting or use any shape keys. Automatic Weights worked perfectly. It was the placement of bones (from both Rigify and adding new bones) and several weeks of just doing nothing but that which helped with the deforming of my model. I also used those added bones for maintaining volume in some parts of the body. I know there’s an armature option for that but alone it always doesn’t work well, at least in my case it didn’t.
The topology for my model is very simple, just simple rows of loops going down from top to bottom (except on face and breasts which are a bit more complex). Nothing I did really follows the flow of muscles like it does in the Jonathan Williamson tutorial. But then again I needed that kind of simplicity for the toon design I’ve been developing, which probably never would have worked with the JW tutorial to begin with.
Here’s what the armature looks like:

I like what You’ve done here so far. Keep it up!