I am still relatively new to blender and I am having a lot of issues with getting proper passes from my image.
Here is my current issue.
I have a scene, from which I want to export a depth pass (I need a seprate pass, I am not looking to use the composite node to create post DoF).
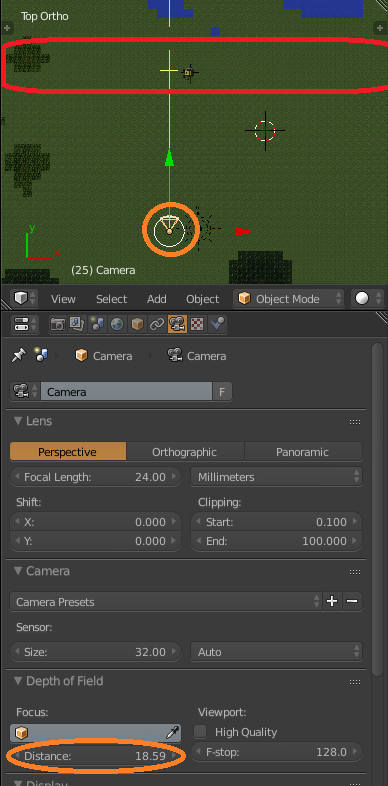
Anyways…here is what my scene looks like from a top view : The orange circle is my camera, and the orange ellipse is the distance form my cam to my focus point.
The red part is the ONLY part of my scene that I want to have in focus.
Basically its almost like a linear ramp. Darkest at the closest point to the camera, and whitest at the furthest point from the camera.
And I want it to only be dark (in-focus) on the center part (the red area in the top view picture), and all other areas of the image to be white.
Basically I need a way to determine the limits of my depth map somehow. (In Cinema4D you can use a start and end point for your camera’s front and rear blur, but I cannot find anything similliar in blender)
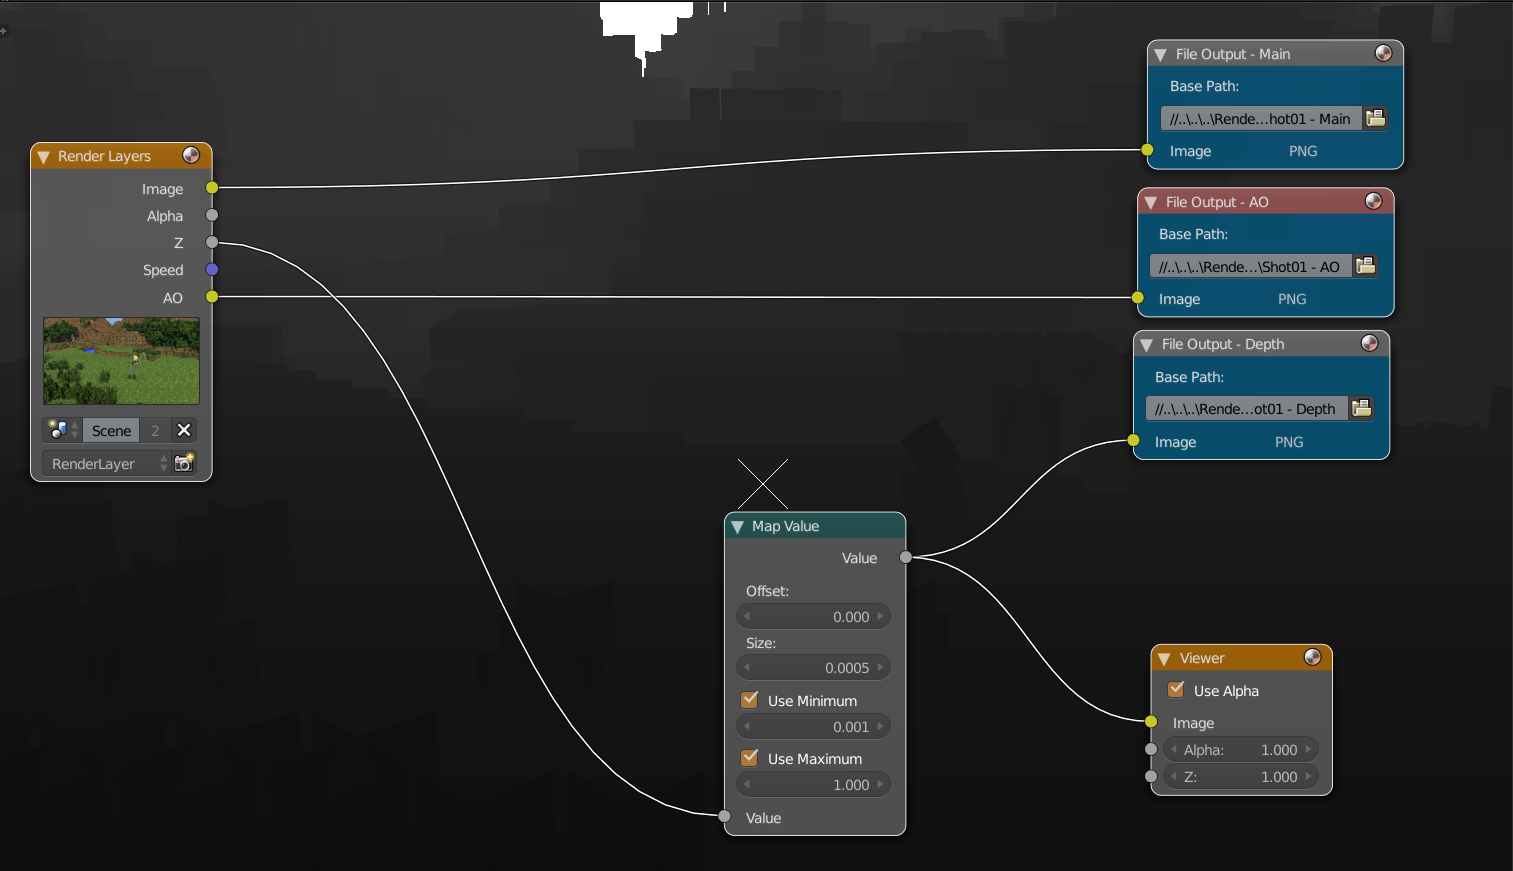
Depth map is exactly what it is, a depth map. Pixel values are distance from camera in blender units. What you describe is some kind of focus map. You can achieve it with math nodes or the map value node as you did. There is no real point in giving this to user as a render pass because you can always generate the focus map from depth, but not vice versa. So baking focus area info would lose the ability to focus on another distance or change dof. All zdefocus filters generate focus map from depth pass using focus distance and other parameters that user sets.
What do you need the focus map for? Maybe giving the exact use case could help determine what you should do.
You can always create a custom gradient by way of a color-ramp (so the area in focus will be white while it fades to black on both ends).
I’m not sure what you’re going to use it for though, if you plan on rendering the scene in Blender, I know that Cycles at least has a native DOF option with intensity controls.
Hey. Thanks for the responses, and thank you for taking time out of your day to help me…as to what I am looking to achieve…
I need that “focus map” for adding DoF. But I want to have it only focus on the object I need.
Here is an example of why I need my depth map to look the way I described :
You see how both the front and back pencils are out of focus, and only the center ones are in focus.
This is what I am trying to achieve with my scene.
kesomnis… how do you suggest I do my focus on only the parts I need? I do know a way of doing this (using Frishfluff’s DoF plugin for After Effects, but I do not own this plug in so I can’t really do that.) I’d be very grateful if you suggest some way (I would prefer if it is using After Effects, but if you are not familiar with it, I guess a trick with the blender compositor would to it as well)
In Aftereffects there is (or was?) a Camera lens blur filter that rendered dof based on depth map. In blender you can use the Defocus node.
But as I said, almost all Z Blur filters take the depth pass as input. The filter internally generates the focus map (or depth slices) based on the parameters you set: focus distance, aperture, dof width etc. You just have to make sure, what kind of depth map format the filter supports. There are different variants (values inverted, normalized etc).
If you need/want to manually create the focus map and use that for pseudo-dof, you probably should use a more general weighted blur filter that takes blur radius from focus map. But keep in mind that focus map loses some occlusion info (pixels in front and behind focus distance get the same value so it impossible to create realistic occlusion) and for this reason you will not get as “real” or accurate result from this.
Frischluft’s filters are hands down the best DOF filter for AE, in my opinion. They shine particularly well when “bending” light when objects at different depths coincide. Brilliant stuff. Some find them pricey, but they’ve been worth it.
As kesonmis suggests, you can use the AE-native Lens Blur filter. It’s slower, and has some noticeable aberrations where close and distant objects intersect. The stronger the differences in depth, the more the native filter will disappoint, in my experience. So try to avoid massive differences if possible.
For instance, in the pencil example you posted above, I might create an “invisible” plane just behind the pencils that helps moderate the distance between the pencils and the distant back wall (which is plain white, so doesn’t require accurate DOF information). Apply a Holdout shader to a plane – this will keep it out of the scene, but will register as depth information. ALWAYS have something in the background – if you render with nothing in the background you’ll get super-high numbers in that region that will throw the DOF filters off-kilter.
You probably know this, but just in case: always render depth with at least 16-bit imagery (when remapping the values as in your example; if you’re taking the Z data raw, then you’ll need 32-bit). Also, Frischluft filters read white as “close” and black as “far”, so you have to invert the Blender gradient at some point (the FL plugin itself has a checkbox for this). I’m not sure how the native DOF plugin does it, but keep an eye out for it: whether the intersecting object is closer or farther away will affect how it is rendered in AE.
Finally, careful of pushing the DOF too far in post. A little goes a long way!