Layer texturing terrains

Hi Blenderartists :slight_smile:

I’m sure Blender must have such a node or method in Cycles for layer texturing terrains - say snow on top of rock at high altitudes and on defined slope angles, grass on lower slopes, etc. I have seen a few texturing methods that use 3d paint and masks, but nothing procedural where I can define where textures should go.

Can anyone please point me n the right direction?

Thank you, Eppo - looks like the materials development for the Ant landscape stopped a few years ago - this is the sort of thing I was looking for. Similar to how it works in Carrara - be great if this could have been completed. If he had concentrated on importing textures instead of trying to generate them…?

The one by Kaluura looks promising, if I can wrap my head around it :slight_smile:

Hey there Roygee!

So your best bet is to use Vertex Painting!

Lets say you have 3 different textures that you want to apply to a terrain of mountains/valleys. One texture is for the grassy plains in the valleys, one for the rocks, and another for the snow on top of the mountains. You can go into Vertex Paint mode on your mesh and create 3 different paint layers to define exactly where you want your textures to go (you can even apply a small amount of blending with the different brush types as well as overlapping the painted areas ontop of one another). Name each layer according to what you are going to use it for later, as you will be referring back to it later in the node editor.

Once you paint your landscape’s vertex’s you will have to apply the textures to them in the Material Node Editor.

For precise control, you will need to UV unwrap your terrain. The best way to do this is to use Project From View (bounds) from a top view.

There are a couple different ways you can look at building the material for the terrain. You can either do one composite material with all of the textures within one node-setup, or create three separate materials and map them using Vertex Groups (different from Vertex Painting). Personally, I find that creating one large composite material with all of the textures in one node setup works best for me, so that is what I will detail below.

After unwrapping, bring in your three textures in the node editor, and give them each a seperate “Mapping” node as and plug in the UV noodle from the Texture Coordinates node into the Vector input of each Mapping node.

(I am going to assume you already know how to create normal/displacement maps for your terrain, as well as the height/specular map. So skipping that step…)

Focusing on the material for the rocks, I typically combine a Diffuse and Glossy node, controlled by a custom fresnel node to create a physically based render shader (tutorial here: https://youtu.be/6pJrlEzbNek). I plug the Color of the Rock texture into the diffuse node, and then plug in any normal or bump maps I have generated into normal/vector inputs of the Glossy and Diffuse shaders.

After setting up one part of the composite shader for the terrain it can be combined with another set of (texture +diffuse and glossy mix) with a mix node controlled by an “ATTRIBUTE” node. Type in the name of the Vertex Color layer you created before (if you can’t remember the name you can find them in the Mesh Options Panel of the properties window). Plug the output of the yellow, Color noodle into the fac of the Mix Node between the two different textures/shaders. Woila, a composite terrain node material!

Sorry for the long winded post. Hope that helps!

Thanks you, Lvxejay - that looks like exactly what I’m wanting to do :slight_smile:

Being fairly new to blender, it will take some digesting and experimentation, so thanks for the detailed explanation:)

On a second thought… Have you seen this page on Mike’s Pan blog http://blog.mikepan.com/post/26950891126/procedural-terrain
Video here https://www.youtube.com/watch?v=PTQVWZuzqkE

Also very interesting - I did see a video earlier today on something similar, using masks and painting using photo’s as brushes. Pretty complex, but I’ll catch on with more studying :slight_smile:

Just as an aside, I’m rather surprised that such an advanced nodes system doesn’t have options for distributing textures by altitude and slope - Carrara has had it for many years. Although Blender does have a math functions node - could probably get something like that going with better knowledge of the system?

You can use a mix of gradient textures, vertex color channels, and vector operations.

For slopes at least, you can use a node setup similar to this one.


Made with an early version of Cycles, but it should still be relevant. With this you can even make masks for overhangs as well.

Thank you, Ace Dragon - I copied those settings, plugged in some photographed textures of rocks and got some interesting results :slight_smile: Pretty much monkey see, monkey do at this stage!

Once I get a better understanding, I’m sure I’ll be able to get specific altitude and slope distributions.

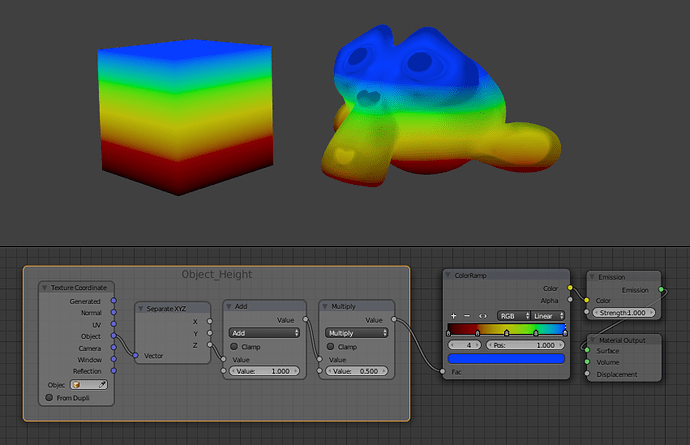
Object height is Z value; it can be depicted using this noodle soup:


Suzanne is a bit different - Emit node does erase all form you get from shadows usually; here color values after the Color Ramp are multiplied by dark color taken from Vertex Paint Dirt.
There is no need to do this if Diffuse is used instead of Emit.

Thanks again, eppo - I was trying to figure out where the vertical setting for color ramp was hiding :slight_smile:

Now to get that mixed in with the previous one for slope!

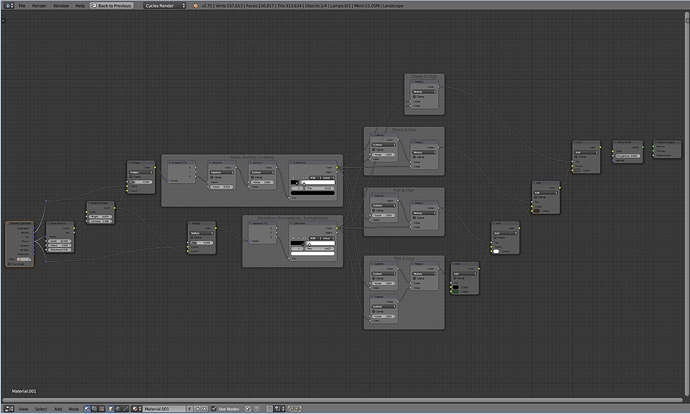
Here is one I quickly set up:


It’s pretty simple, although it doesn’t cover overhangs (didn’t think of that until I saw ACE’s version, which may be better, I haven’t tried it): Elevation and Slope multiplied in a couple of ways giving you four outputs to play with; Steep&High for gray cliffs, Steep&Low for brown scrubs, Flat&High for white snow, and Flat&Low for green grass. Color ramps to control transition, and some noise stuff. I’m just multiplying in a factor of the noise, but could probably be used better.

Oh yeah… Oops. I’m using Object Z as elevation as is, be sure to use Eppo’s version here :smiley:

1 Like

Hey, thanks, CarlG :slight_smile: You guys never cease to amaze me with your knowledge and willingness to share!I’m starting to get some understanding of the nodes system - a lot more logical than the shader tree system I have been using, but so much more complex.

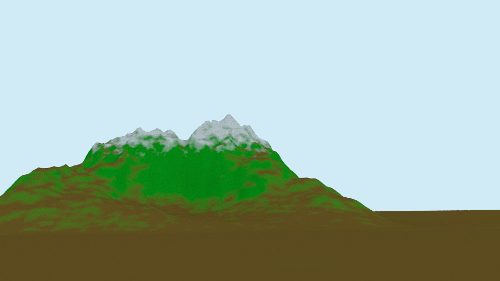
EDIT: I copied your node setup and it works great! Here’s a quick and dirty render of the default settings. Just need to plug in some external textures and play around with the settings.

Attachments