Here Andrew Pricey in Blender render arranging 3 textures. On the top he puts clear snow texture, on the middle he puts painted black and white map or mask of tire tracks, and below he puts ground texture. Then he goes to displacement modifier choosing his black and white map as a texture, and where was white now becomes bumpy, where was black becomes flat.
How to create this in cycles. Let say i have similar two textures snow and grass and painted map. How to go to node editor and arrange nodes?
The Displace modifier works on a geometry level and therefore has nothing to do with the render engine you use. So, as far as the displacement is concerned, just do what Mr. Price does in his tutorial.
Still wondering what you mean by “use it as a displacement for bump”… Displacement and bump are totally different pairs of shoes.
I meant that black and white image together with displacement modifier create bumpiness. And I don’t believe that what Price done in Blender render is not possible in Cycles. It must be possible. So, please what will be it looks like in node editor. How to connect there three textures.
Again: The Displace modifier has nothing to do with the render engine.
The workflow is exactly the same, no matter if you use Blender Render or Cycles… You add a Displace modifier to your mesh and add the hand painted map to it. Since displacement is a geometry modification, it is not added on a material/shader level (apart from some highly experimental Cycles features, which you should better keep away from) in the node editor.
“Bump” and “displacement” are very clearly defined technical terms in CG. I have a strong feeling that you keep confusing those two.
No, I already understand that displacement creates real deformation, but bump or normal is just something like play of shadows and lights, but no real bumps.
Did you really watch that tutorial?
It doesn’t use nodes at all to create the displacement… It also uses the Displace modifier for that. So, what’s your point?
Bump and normal maps are added in the node editor. Displacement is (if you want a reliable, non-experimental solution) added outside of the node editor with the Displace modifier.
I don’t mean that I need special displacement node:) Yes I know that displacement must be added outside. But
judging by this tutorial it is possible to create black and white map in cycles and then mix it with image of snow and image of the grass. Then, yes displacement must be added outside obviously. I just don’t know what will be arrangement of the nodes in node editor for those three images - snow, grass and black and white, what should be on top, what should be below. Which of them should be connected to the height input of the bump node and which of them to diffuse. What I am saying makes sense or I mix up something?
If I understand right I have to connect this three images in node editor somehow. Then I go to displacement modifier and choosing black and white map as a texture, adjusting the strength and it will be done?
Are you talking about the part around 8:50 into the video where he uses the black and white tyre tracks “texture paint” as a stencil for the tyre track texture to overlay onto the snow?
yes, moony. Simply saying i want this black and white image together with white snow image and black snow image to put into the node editor and achieve effect of tyres in Cycles, not in Blender render. Where to find this stencil in node editor… What will be arrangements of nodes? And how i have to use displacement modifier?
Ok that makes a bit more sense now. The stencil part for the tyre tracks and the displacement part are two separate things.
The displacement part will be exactly as it is in the tutorial.
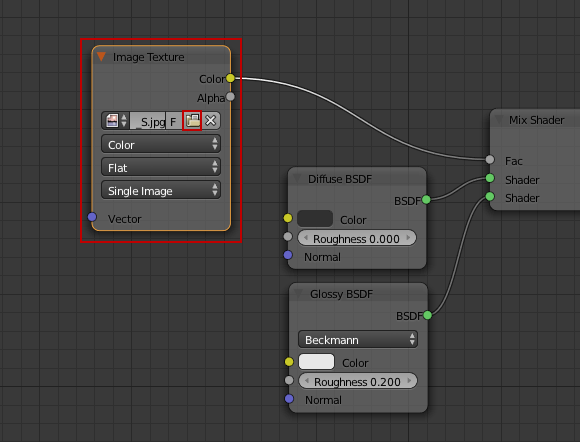
To stencil in cycles you would use the mix node. Your snow material would go into one slot of the mix, with your tyre tracks material in the other. Then plug an image texture into the fac slot of the mix node and assign your black and white stencil texture:
Your node setup should look something like this (but obviously your snow and tyre track materials will be slightly more complicated than the simple diffuse and glossy shown here).
Moony, from your image nothing is clear, because i have three textures, but your image shows one texture and 2 different shaders.
I have image for the white snow, black and white stencil image and snowy grass image (let say i want the snowy grass to be revealed only where i painted black and white and i painted it around the river)
Apart of that you mentioned that i have to create another material, but i thought that i can use one with three different textures.
So the question will be how many materials i have to create and where do i have to combine them in SHADER NODES OR IN COMPOSITNG NODES OR IN TEXTURES NODES? Then you are saying to assign texture (or material?), but assign button doesnt exist in cycles.
So i was trying something but failed. I need to know this for learning purposes. Here is a photo and blend file.
Looking at your nodes and the textures placed in them (assuming the textures are named correctly) - you have the snow and stencil textures the wrong way round.
The stencil texture must plug into the fac slot of the mix shader. It is that which controls where the snow material and where the tyre track material are visible.
In the setup you posted - you are mixing the stencil texture with the tyre track texture - using the snow texture as the stencil.
So, now i dont know why Ikari Shingi told me that i cannot make displacement on the ground by using stencil image in Cycles. Its turn out to be so easy.
You really don’t get it, do you?
You don’t make “the displacement by using stencil images”. You use a texture to control the distribution of different materials/shaders. And the displacement is made with a texture and the Displace modifier, as I told you a gazillion times. But it seems you’re still confusing your technical terms…
How is it my fault that you don’t know your terminology?
Here’s a little hint for the future: If you want to know about mixing materials based on textures, it’s not at all helpful to start a thread asking for “displacement” and “bump” and talking gibberish.