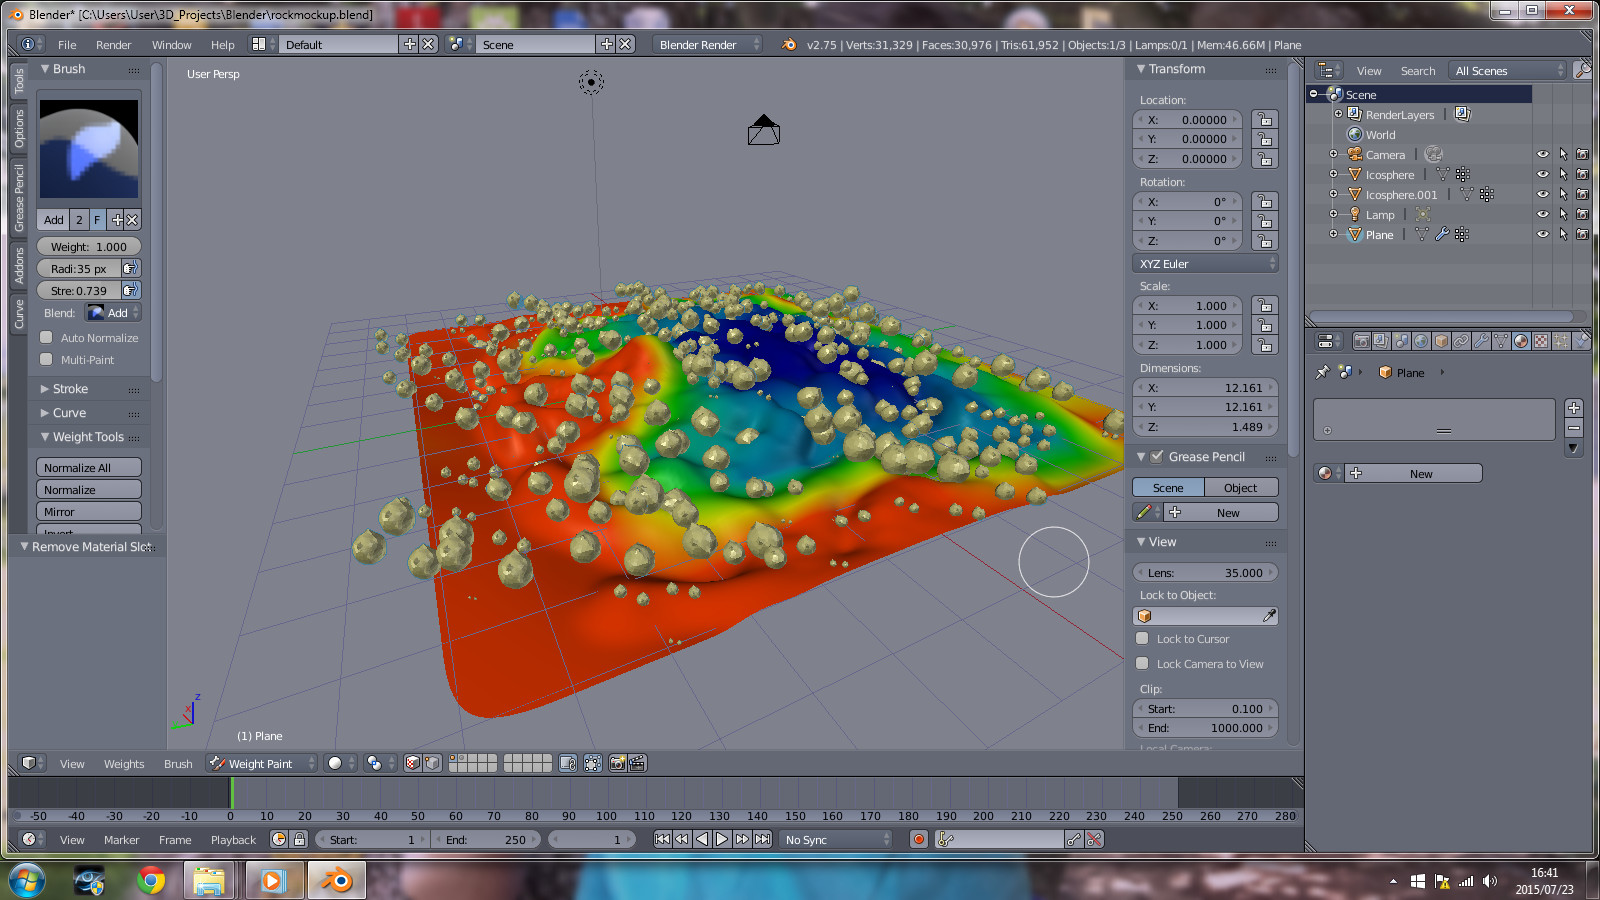
I’ve attempted to follow two tutorials where rocks are used in particle systems - in both cases, my rocks end up floating in the air, under the ground, all sorts of places but sticking to the ground! The tutors never make mention of this - theirs simply work without comment. With some messing about, I’ve found that there seems to be a relationship to the pivot point and/or the origin, as to how the replicated instance conforms to the emitting base, but haven’t quite figured out what it is - there are so many possible combinations.
Another problem is that mine don’t distribute according to the weight-painting - they are all over the place. Another thing the tutors don’t mention - it simply works for them!
The attached is a simple mockup of a much larger project I’m trying to complete.
Any assistance will be greatly appreciated rockmockup.blend (1.26 MB)
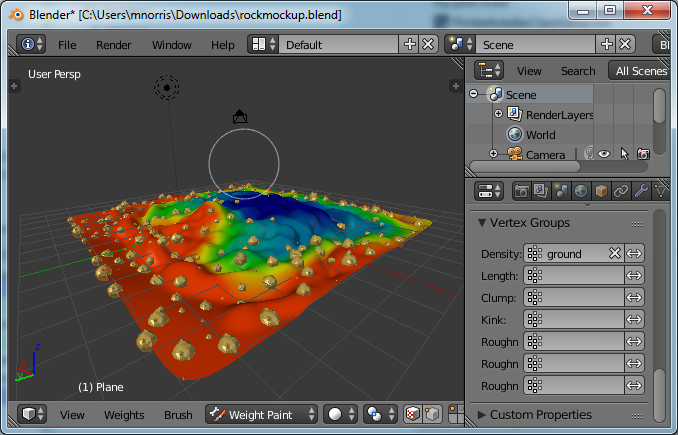
To get the rock distribution to follow the weight paint, set the particle settings vertex group ‘density’ to the name of the weight paint group {‘ground’ in your blend}
When I look at the particle system the rocks are ‘grounded’ :eyebrowlift:
Thanks Martin, that sorted one aspect - I’ve got the replications on my main project to at least generally follow the weight-painting. The placement of the trees and rocks are still all over the place and I can’t make sense of it, even after watching the video over and over for hours
@ArMan - by median point, I’m guessing “pivot point” or “hot point” in other software? If so, they are set to the bottom of the rocks, and location, rotation, scale applied.
I guess I’m looking for advice on general principles for applying instancing. Do modifiers such as multiresolution and displacement have to be applied before making particle systems? Are particle systems the only/best method of doing instancing in Blender? Is the hair setting the accepted method? Do pivot points play a determining role? If so, where should they be placed in relation to the object being replicated?
Please excuse the many questions - only way to learn
I don’t know any other software, and in Blender the point is usually called the ‘origin’ {see menu ‘Object->origin to …’}
Whenever you have a particle it appears with the origin at the spawning point
So for trees and rocks and such having it on the bottom is fine
You do not need to apply modifiers … but … if you want the particles to take into account the modifiers there is a check box for the particle system on the properties ‘Particles->emission’ for ‘Use Modfier Stack’
So for example if this was NOT checked, and you had a displacement on the object, the particles would spawn at the unmodified position of the geometry
You can also instance objects in other ways.
For example using empties and groups, or using the array modifier
The advantage of creating object duplicates with the particle system is that you can create a lot of them easily
I would say the hair settings are great for hair like things.
Hair is just a specialized type of particle system so if I was doing something that was not hair like, I would go straight for a normal particle system.
Origin ‘pivot’ points can be important if you want objects to appear in a certain orientation or displacement
I think you get the idea that if you want the particle object to hug the object where they are spawned then the origin is at the bottom
But it all depends, if I wanted the particle object to emerge from the spawning object, then it might be useful to have the origin on the top.
Thank you so much - using this info, I have been able to achieve a reasonable result for a first try in Blender
You mention that instead of a hair system, you would go for a normal particle system - is that the emitter? That is the only other particle system I found. When I tried that, my instances vanished!
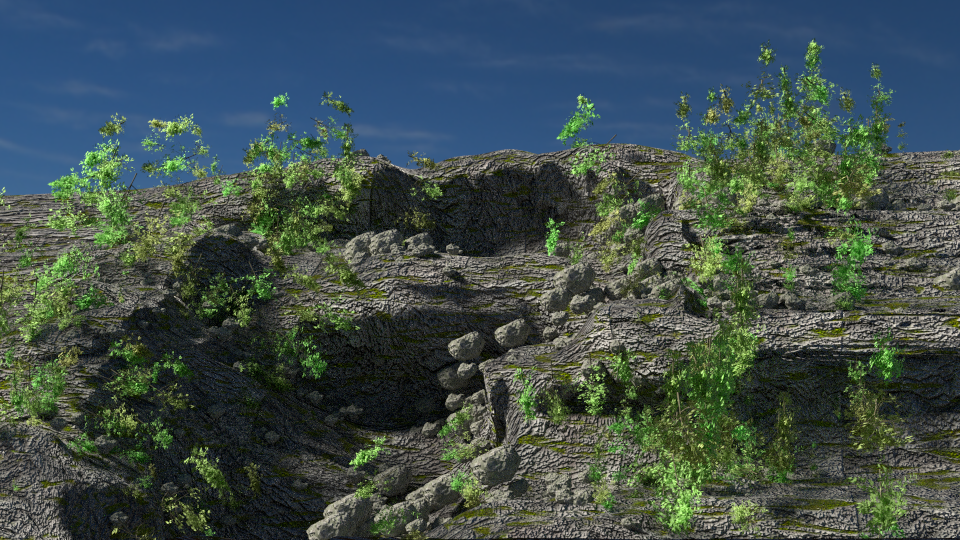
Attached is a render of my latest effort - needs a lot of tweaking on the materials, but it is getting there, although most of the rocks and a good number of trees are growing on the underside of the supporting mesh and some are growing where the weight is zero. I’m impressed at the render speed, although the UI becomes very sluggish when the trees are made visible.
The Blend file is 9 megs - is this too big for me to upload? If not, I’d very much appreciate it if someone could take a look and see how the instancing can be improved.
Most people use PasteBin {or something similar} for uploading .blend files
Though maybe the easiest thing to do is exclude textures and things that are not (obviously) connected to the area of interest to make it smaller and try attaching it here
Yes, emitter is what I mean.
I can think of 2 reasons the instances disappeared - the render settings for the particle system are not set to the instance object; or the time settings are set for spawning a certain number over a time span, you need to make the end spawning time the same as the start spawning time and make them equal to 1 so they are all created at the beginning
The instance objects might have a rotation or initial velocity or some other property that sets their orientation, which is then causing them to appear under the mesh, but …
The one obvious thing that could be improved is to have a random orientation for the rocks, because at the moment they are all showing the same face to the camera
You could further improve the rocks by having various different instance objects.
Create ‘n’ rocks with different topology, and assign them to a group.
Then set the rendering options for the particle system to use the group instead of a single rock object.
That way there is more variety in the rocks.
.
Just move the pivot point of rock object to where it should touch the “ground”. By the way, the natural rocks usually a bit “grounded” to the surface.
The example I gave was possibly oversimplified - just a single rock. Got that right by moving the pivot point to just above the bottom, so it would rest nicely slightly sunken into the ground.
In my actual scene, I have a group of 5 various-sized rocks. I’ve set the individual pivot points to just above the bottoms of each, but how does the pivot point for the group as a whole work? Same thing with the trees - a group of 5 different-sized trees.
Another puzzle is the random rotation - I don’t see anywhere to confine random rotation to an axis. For instance, not very important as far as the rocks are concerned, but the rotation of the trees should be confined to the Z-axis.
Hi riveter - yes, I’ve seen that statement made several times in tuts. When I try, the trees fly all over the place! I ascribed this to improvements made since the making of the tuts
I’m not having much trouble getting the trees aligned to the surface, although, like yours, they are aligned to the normals, which is not how trees grow - they should be vertical, regardless of the angle of the normals.
My problem is more that the distribution does not adhere very well to the weighting - there are replications where the weighting is zero. The other challenge is to confine the rotations of the trees to the Z-axis, so as to get a bigger apparent variety and avoid too much of a pattern.
Something I’ve noticed in all the tuts is that when it gets to the point of controlling distribution, rotation, etc., the tutors get themselves into some confusion and play around with all sorts of settings, as if they themselves are confused by the particle system, which is why I’m trying to get the basic principles sorted.
I get the feeling that the main cause of my problems is trying to replicate groups. What I’ll try is to make one particle system per item, instead of grouping them - my initial tests seem to show that this is a lot simpler. I’ll also explore replication methods other than particle systems. From what I have read, it appears that Blender’s particle systems need a total overhaul?
Thank you for your assistance - I’ll soldier onwards:)
Its years old problem, when particle modifier thinks “now its the time to lock rotations” you cant change them anymore. Good example is you set particle options in different order than last time (although same settings after all) and result is rotations are different.
After more searching I found what is for me the clearest explanation https://www.youtube.com/user/ward7299/playlists - the sixth video in the series. Haven’t had a chance to try yet, but it does make more sense than others I’ve seen
Seems that there is a setting to make replications follow normals orientation or not - also what juhaW writes seems to be the case. I can change some settings and they have an effect, others seem to be locked.
Hopefully I can start new tomorrow, see what comes out