I am trying to bring up the specular highlights of a CGI porcelain object, in the compositor, to give the illusion of direct sunlight. I have taken the “glossy-direct” output from “render layers”, and fed it into an RGB slider—darkening everything except the brightest highlights. The RGB output is then fed into the bottom socket of a mix node, with the “image” output from “render layers” in the top socket. A viewer node shows me the mixer output.
However, when I apply “screen” in the mix node, the image actually darkens. Plus, the contrast shoots through the roof. On top of that, the brightest areas of the highlights, now turn black. I get much the same result, if I try to use “add”.
One thought: could it be trying to display in HDR mode?
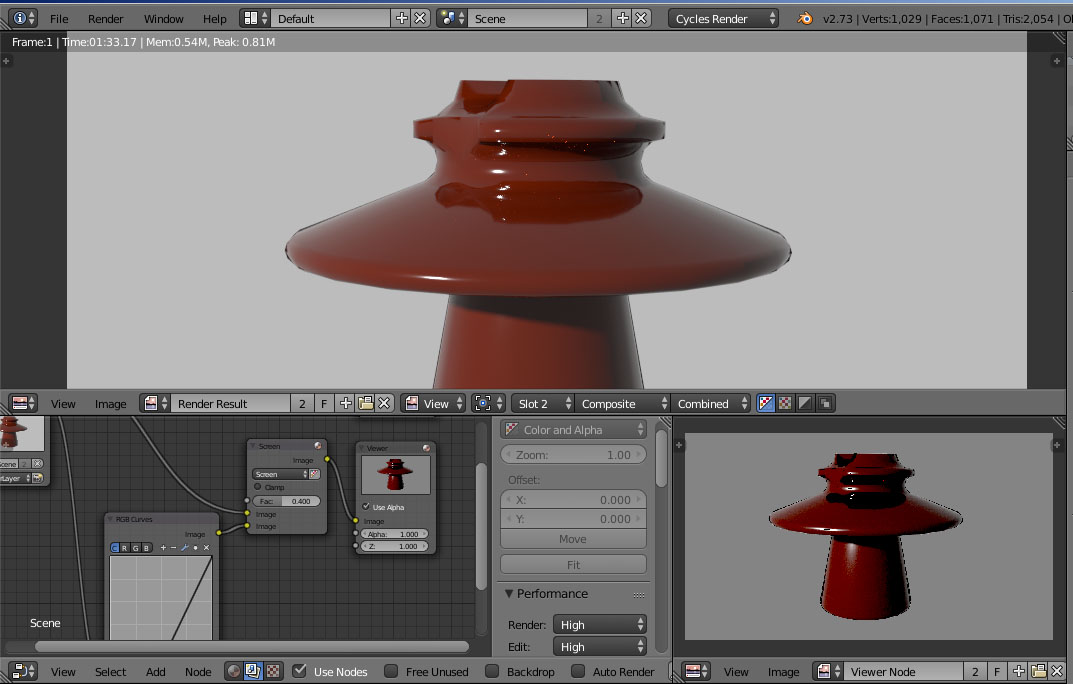
The top image is a standard render, and the lower, smaller image is from a viewer node. Note how the viewer image is darker and more contrasty, even though I am using “screen” as the mixing method. Also, there is a black dot in the middle of the brightest highlights.
(Don’t worry about the jagged edges. I am intentionally using a low-polygon model, as this object will be small and numerous in the intended scene. The small size is also why I will need brighter specular highlights)
Honestly, I have no idea how to upload a Blender file, to this forum. I only see links for uploading images. Perhaps, someone could explain the procedure.
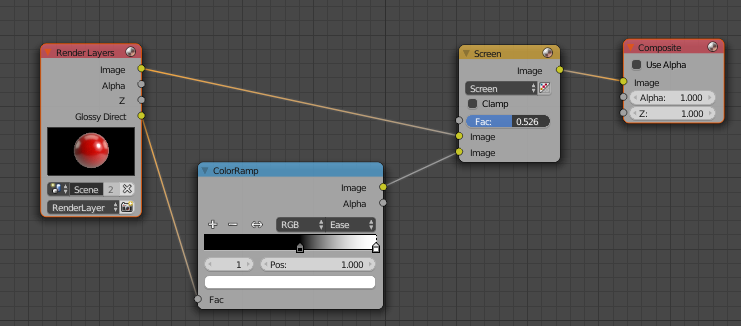
I did though, add a couple more viewers to my nodes (which I should have done earlier). Here is a new screenshot:
The leftmost viewer shows the output of the “Glossy Direct” socket, of “Render Layers” (I’m using “Cycles”)—the same output that is fed into the RGB node. In the RGB node, everything but the specular highlights is darkened to black. The second viewer shows the output of the RGB curve. Notice, only highlights. This is being mixed (in screen mode) with the original image. The third viewer is the output of the mixer.
I really don’t know how I could be getting negative values. Oh, and using “Add” instead of “Screen” produces the same results.
Thanks. Using the color ramp (instead of RGB curves) gave the effect that I wanted.
Perhaps, while we’re on the subject, someone could offer a tip, on another small problem I’m having with this project. Cycles render is excellent, at rendering indoor scenes. But, it seems to fall a little short, in the realm of bright, contrasty, direct sunlight. To produce the effect of direct sunlight, I had to increase the sunlamp’s brightness to 20. In turn, that washed out the diffuse color of the object—forcing me to invent this rather unusual set of material nodes:
To bring the color of the object back down to “normal”, the output of the diffuse node is sent to the bottom socket of a mix node. The top socket is left open, to produce black. This mixer output is then used as my diffuse output, and mixed with the glossy output.
Does anyone know of a better way to replicate direct sunlight, in Cycles?
Couldn’t you just use two sun lamps: One with normal intensity, which is invisible to glossy rays and a “cranked up” one, which is invisible to diffuse rays? Thereby you would get the glossy highlight of the high-power sun and the lighting of the normal-power sun…
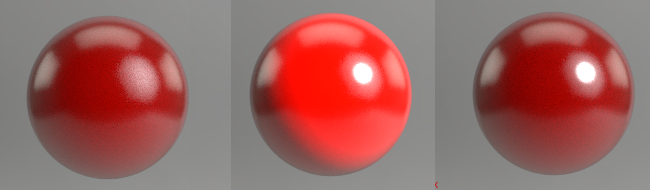
Left: No sun. Middle: Sun with power of 10. Right: Sun with power of 10, but invisible to diffuse rays.
Thanks. I’ll have to do some experimentation with the two lamp system, that you mentioned. Looks promising.
Is it also possible to use a trick of this type, to boost the contrast between light and shadow, for direct sunlight? Here is the material node setup, similar to the one above, done for a sunlamp test with the “default cube”. I used a simulated sky world environment:
[ATTACH=CONFIG]386207[/ATTACH]
And, her are the results of the tests:
[ATTACH=CONFIG]386208[/ATTACH]
The first image used a sunlamp intensity of 1.2, with no mixing (or, a mix factor of 1.0). A second, black cube was added, to show shadow detail. Notice how the shadows are way too bright, and the sunlit area is showing far too much blue from the sky background. The second image has a sun intensity of 5, with a mix factor of .400. The third has an intensity of 10, and a factor of .225. The fourth, intensity 10, factor .125.
The best result for sunlight, seems to be between intensities 5 an 10. Is there a way to tone-down the effect of cycles environment light, to achieve this with a normal sunlamp, without dimming the background or surrounding objects?
With the help of the Light Path node you can basically use as many environments as you like:
One for the camera, one for the diffuse lighting, one for the reflections…
In fact I do that quite regularly: I often use e. g. a low res HDRI for the lighting, a high res LDRI for the reflections and another image as backplate for the camera - all driven by the Light Path node.
Then again - without seeing your attachments I’m not exactly sure what effect you want to produce…
Thanks for the tip on the light path node. I will have to study that one further. After watching a couple tutorials, I can see that it is a pretty powerful tool.
Essentially I am trying to the effect of environmental lighting, to get a higher contrast between surfaces lit by a sunlamp, and surfaces in shadow. I am looking for an effect similar to bright sunlight.
I don’t know why the images did not get posted. Perhaps, I exceeded some limit, on how many images could be posted in a single thread.
Thanks also, for the tip on how to upload a blend file.