Okay, first time posting a WIP on here, so I’m not sure what to expect as far as advice goes…
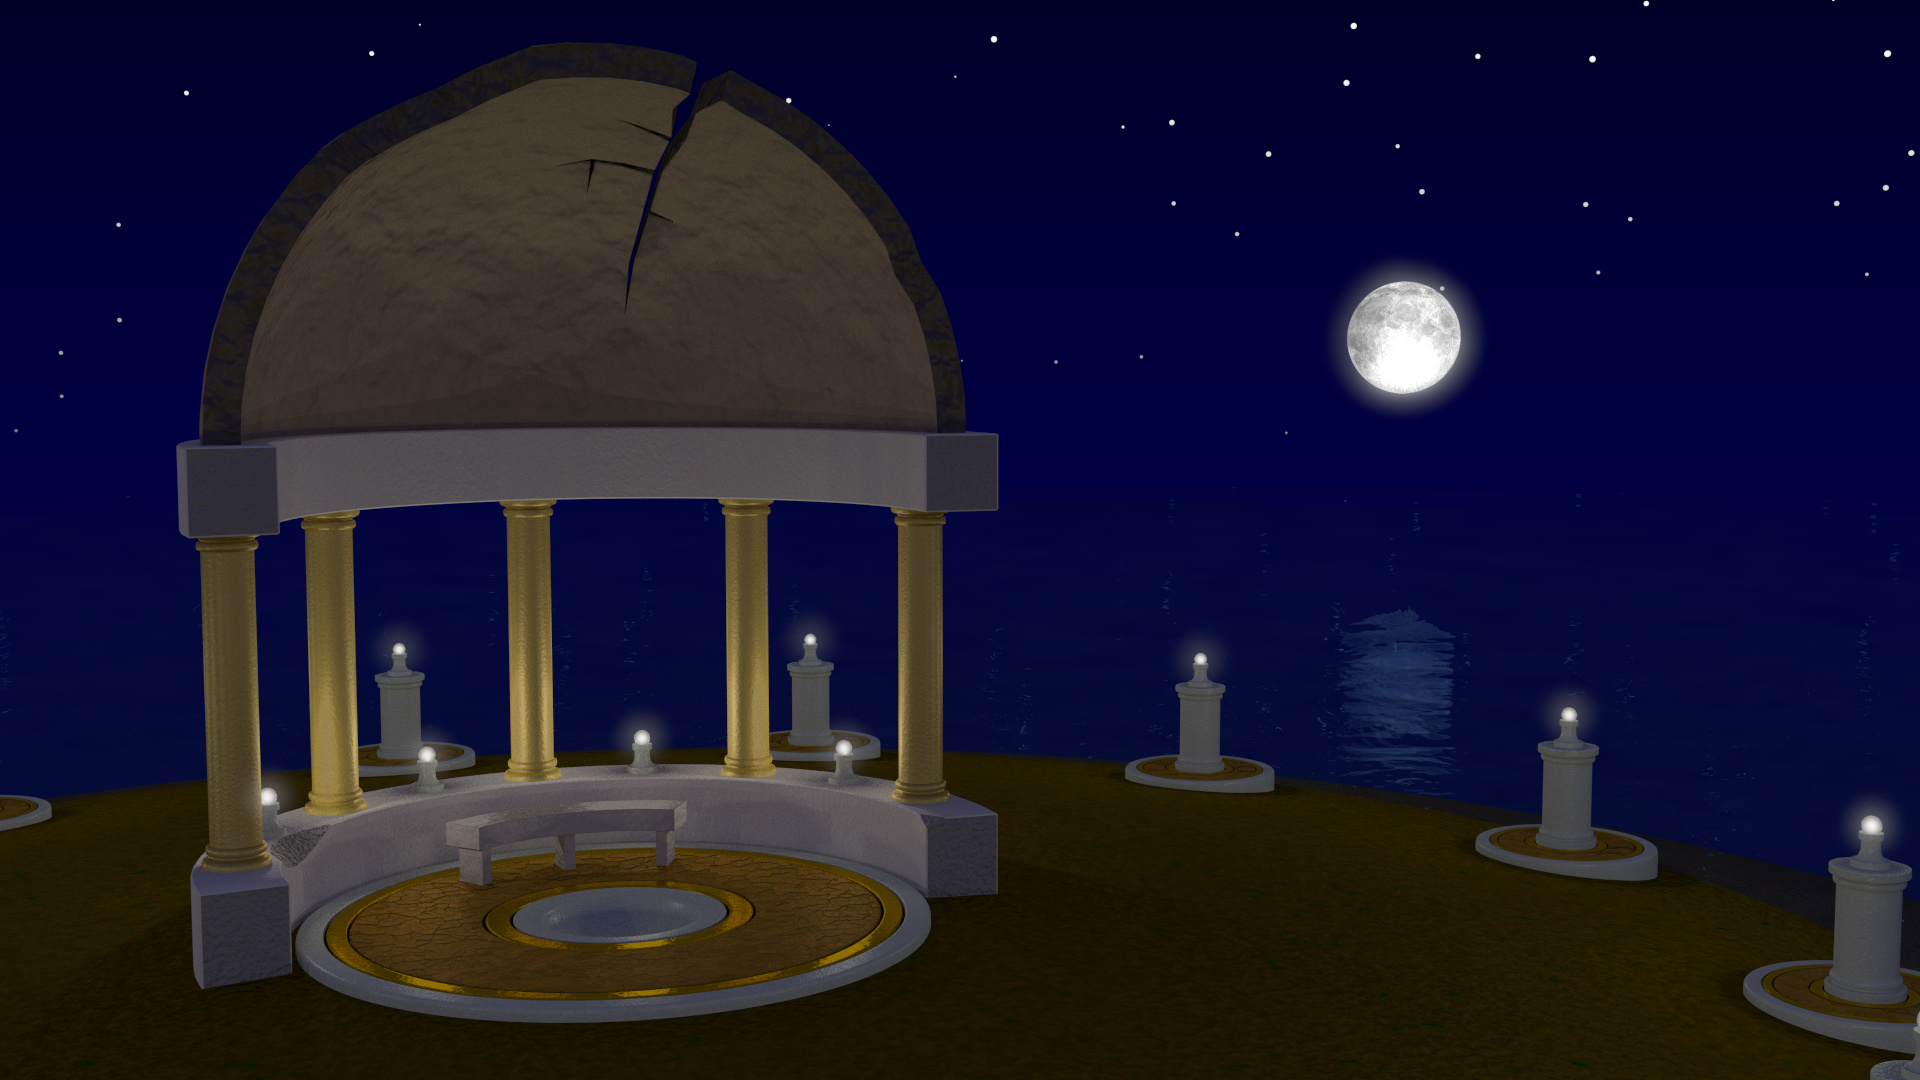
A somewhat broken-down gazebo on a desolate island. Almost everything is subject to change here, as I’m sure I can do more to weather the structure, and I’m quite sure the dirt is about the worst dirt I could have come up with…
Composition wise you could consider aligning the gazebo and the ocean in a rule of thirds manner (you can enable a grid in the camera settings). You could also make the waves a lot smaller and add a few rocks on the ground.
I’m exited for the next version 
Unfortunately I’m about at the end of my creative rope here. I can see that it lacks, well, “stuff” that will make it “better”, but I’m not clear on what needs doing or how to do it.
(despite having used Blender for almost ten years, I still have loads to learn about modelling and such)
Well, here’s another render, using the rule of thirds for placing the gazebo, and since it looked a little lonely, I included the moon I’d used for a separate close-up of one of the lamps around the edge of the island. I also lowered the ripples on the water, though I might need to completely redo the water shader, as I’m now getting confused as to how it works… =0.o=
Anyway, here’s the next update:
What? I didn’t think it was that lousy… >.>
Any suggestions for ways to make the gazebo look even more run-down, or how to achieve a really good dirt-and-rocks look for the ground? Or how about whether it would look better with vines covering it?
Well, you are obviously a beginner and for a beginner, this is a great result! I think you should just keep plugging away at it until you get a little better Maybe focus on making good materials and developing good modelling techniques
Looks better already Sorry for the late response time…
The moon is a good idea, but I would maybe make it a little smaller or less brght to make it less striking. Otherwise you are going to have the moon as the main point of interest even though it should be the gazebo.
For the ground I would model some larger rocks that are scattered over it (maybe use a particle system for that) and then use a dirt texture for the rest. Here’s a really good tutorial about realistic texturing if you haven’t seen it already: http://www.blenderguru.com/tutorials/the-secrets-of-realistic-texturing/
Vines would be an excellent addition to the scene 
To make the gazebo look more run down you can basically add little surface cracks to everything.
As for postprocessing you could think about adding some mist and/or a vignette
Hope this helps
I’m starting to think I jumped too quickly from modeling into shading and lighting. Anyone else think I should strip off all the shaders and continue modeling from where I left off? I think somebody mentioned something about being able to get the modeling right (or better, or something) if you didn’t start to add the shaders until much later in the process…
Unfortunately, NID, I can’t just “keep plugging away at it”, as I’ve reached the end of my creative rope. I’ve spent ten years in Blender relying on a great deal of symmetric, hard-surface modeling, so anything that smacks of organic modeling freaks me out.
Tachyon, I’ve decreased the size by 30%, but that looks far too small. I’ll bump it back up a bit and figure out if it needs moving around, especially as it seems to look great with the current distance between the moon itself and its reflection, but that changes too much when shrunk…
I’ve rendered the same scene again with the moon 30% smaller than it had been, but at the final resolution I’m aiming for:
The slight bump maps on the columns and two of the parts of the gazebo are much more noticeable at this resolution, which probably means I should vary them a bit more than this, right?
The slight bumps on the pillars are alright at this size. You could check out this tutorial on surface cracks: https://www.youtube.com/watch?v=h_QUlIqVIpw
Huh. Good tutorial, though I’m not quite sure what I did wrong. While I’m able to get a visible crack, the bump map isn’t showing up at all…
The cracks look really good
As for the bump map problem, maybe you could post a picture of your material node setup
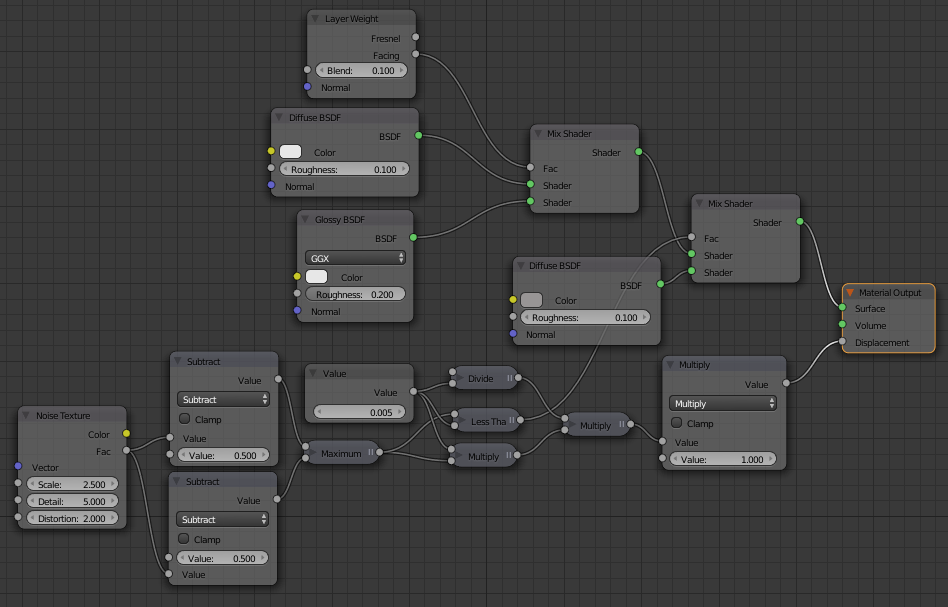
Here’s the node setup:
Note that I’ve tweaked his setup a bit, in order to (hopefully) make it easier to specify how deep the cracks should go. Not sure if that’s causing the problem, though…
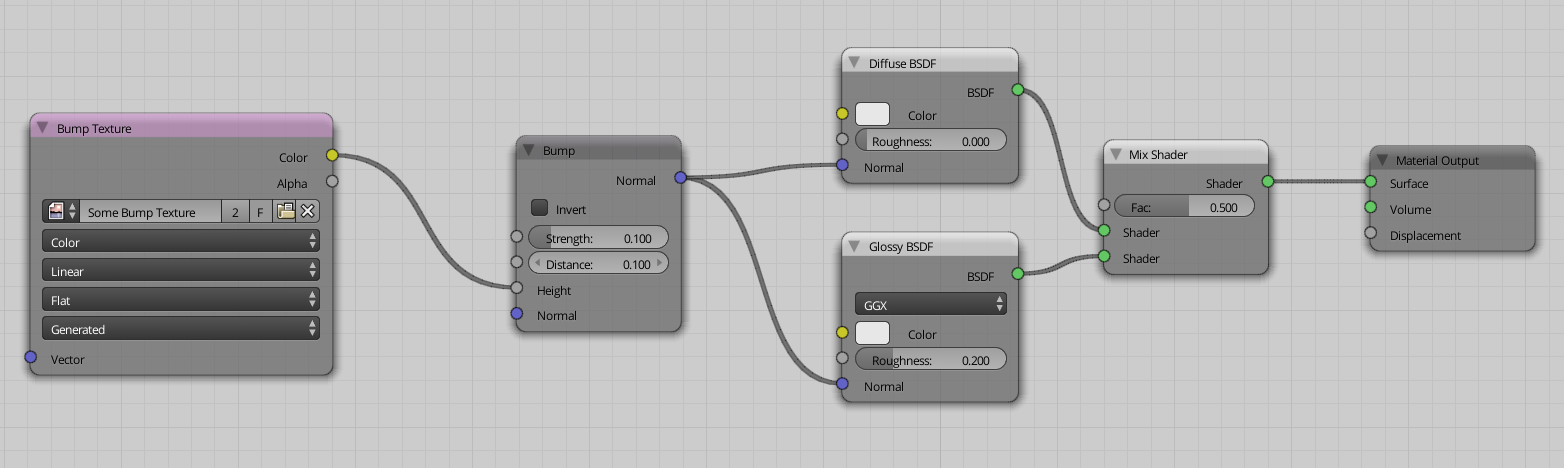
The reason you don’t see the bumps is that there is no bump map plugged in anywhere 
You need to plug a texture into the “Normal” input socket. You could do it like this:
This works with almost any texture but you may have to tweak the bump strength a little bit to work right.
Or you could just use a normal-texture as direct input (so without the bump node), which can be made for example with CrazyBump.
Odd. The video just used the Displacement input on the Material Output node, so I assumed that was enough.
(I remember when either the Displacement input or Shader Normal inputs were added, and they were said to be equivalent at the time…)
Not terribly impressed with the results, as it still doesn’t look like much here, but I guess the lighting has something to do with it. Probably not enough on the right angle.
I guess I sort of need to redesign the lighting a bit, though. It’s a bit too dark at the edges and too bright in the middle, with the contrast between the two being a little too distracting. Plus, the pit in the middle really doesn’t need two lights in it like it does…
Okay, so it’s not just me who can’t see any difference between the two. It really does need a few bushes, but I have absolutely no experience with organic modeling, etc, that I’d rather just add a walkway around the edge of the island and call it done…
For the bushes you could try using the sapling addon and make one out of a tree. Or you could just add some planes with a leaf texture on them and spread them over the ground. A walkway would be a nice addition as well. I think you can also experiment a little more with the lighting, making the water a little darker and maybe try a white marble material on the pillars.