How to constrain axis to path

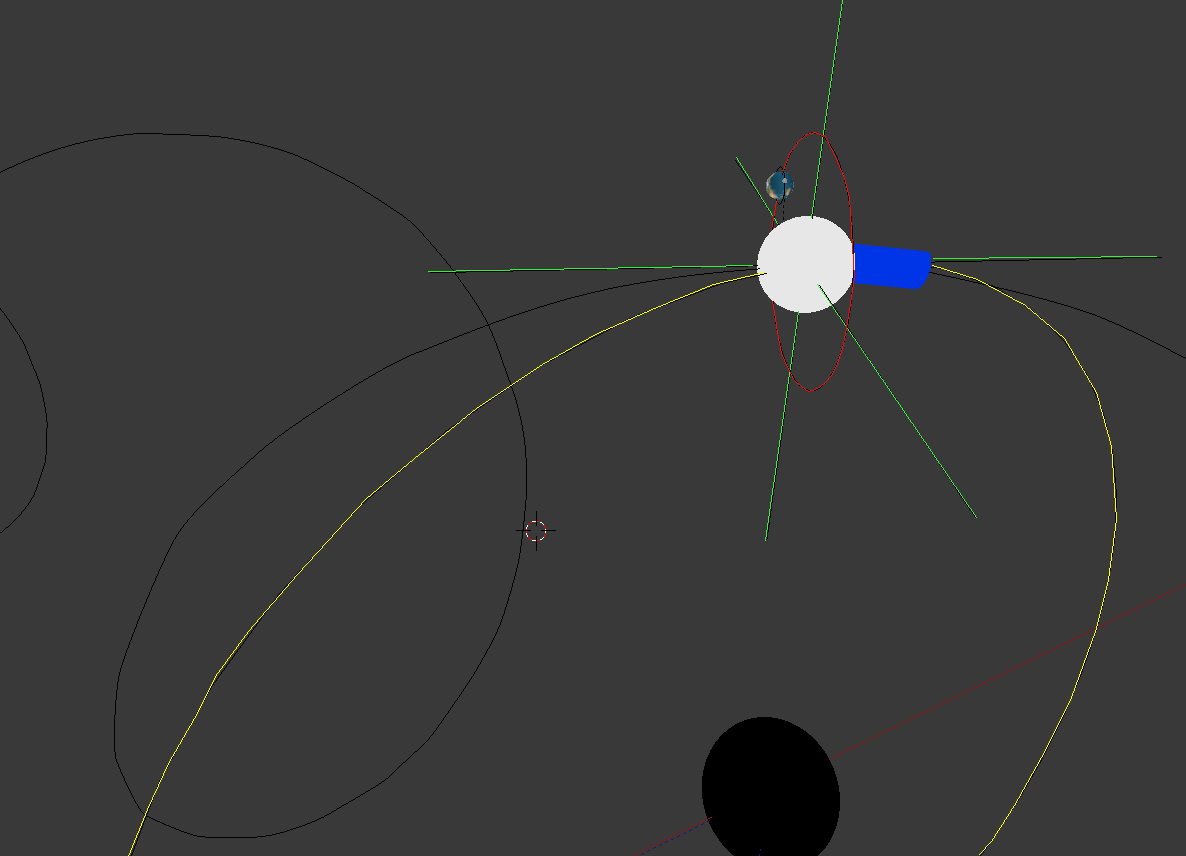
In the picture below, I have a white object (Sun) is parented to a green Empty, it rotates around the yellow line (Bezier-Curve Path-Sun), while rotating around another bigger Bezier-Curve (Path-Dark-Star), and traces out a path in black that spirals (Travel-Path-Sun), and I need the empty to constrain to the axis of that path, so it stays at a right angle as seen below, but have no idea how to do this after a day of trying different methods, the idea is that I want the bezier-curve in red, which is the Path-Earth, to be at a right angle to the path as shown here, instead of what its doing, which is wobbling. I hope I was clear in describing this, I attached the blend file so you can see what I mean, thanks for any help.


http://lightwizzard.com/resources/home/lightwizzard.com/phd/Dark-Star.blend

I am not sure if I did this as a best practice, I did it the only way I could figure out how, the Travel Path Sun is done by hand as a path, and I just animated the count of an Array. The whole project is the Suns path through a Galaxy, not to scale or any kind of orbit rate, just trying to get the movement illustrated for a paper I am writing, any ideas how to make it better are appreciated, it has a long way to go, but I am stuck on this one part, I don’t want to have to animate it all the way around, because I know it will look wobbly if I do.

Thanks

Without looking at your file, which I will do later, these thoughts occur to me.

The Sun travelling around a path - the curve, to do this add a “Follow Path” constraint to the sun object with the curve as the path. Then click the “Animate Path” button on this constraint. To move the sun along the path, keyframe some “Offset” values.

To make anything always point towards something else, add a “Track To” constraint to the object, chose the target axis and then whenever you move it, its target axis will always point towards the target object, even if that is moving as well.

Herewith an example:

roller-coaster.blend (1.05 MB)

The cars on the track use a follow path constraint, the camera uses a track to constraint, this should help you, as ever with my animations, just press Play - then take it to bits to see how it works. :smiley:

Cheers, Clock.

That is what I am doing so far, but I have another Dimension to deal with.

Think about the Roller Coaster having another dimension to it, lets say you want it to spin in a Circle while going around track, the Yellow path is the Circle it needs to travel around in a Circle on, and at the same time it needs to travel on the track at the same time.


Leave it with me, I’ll have something for you tomorrow…

It’s late here and I need to make a new blend file.

Cheers, Clock

Thanks for the help, this one is driving me crazy, after keying in 2000 points to make the path that shows the Track, I figure there must be an easier way to do that also.

I also have a Path-Companion-Dark-Star which needs to rotate, and I am sure its the same deal, so if I can figure out how to do one, I can figure out how to do the other.

Actually this was easier than I thought - blend file attached, just watch it from the camera view (I think I saved it like that, if not press 0). or watch from an isometric view. Press Play as ever, you should see a misshaped sphere spinning in orbit around the first car, whilst rotating in two of its own axes.:smiley:

roller-coaster.blend (1.1 MB)

Cheers, Cock.

PS. You might like to count the number of keyframes I have used in total…

PPS. I presume you have checked “Autorun Python Scripts” in your User Prefs - File Tab…

EDIT:

There are some more hints on the layers not currently displayed!

Almost forgot - to make a spiral - read the first part of this tutorial on my website:

http://www.lafavinie.f2s.com/blender/cordtut1.html

That should make your life easier!

Cheers, Clock.

I read this tutorial before, but could not figure out how to get it to spiral like below:


I have a lot of things going on, I have the Galaxy in the Center (Halo), the Dark Star rotates around it, they do not spin, but then I have the path of the Sun (Earth and Moon) and Sirius, the Sun, Earth and Moon are Spinning as well are rotating, also I have a Companion Dark Star that does a Figure 8 around both as they are rotating around each other, the Figure 8 also needs to Spiral around the Suns, and the Earths Plane must stay at a right angle to the direction of the Sun.

I spent a day working with the Curve Modifier just to learn it, then could not figure out how to make it do a circle, so then I looked at the Spiral, and had the same issue with it, but ultimately, I could not figure out how to get the Circle Path to follow the Spiral even if I did make it, I know its all about timing the animation path length to get it to line up, but I am just not that good with Blender, even though I have been using it since 1.x, so I do very basic stuff, nothing very fancy, you can see some of my work here https://www.youtube.com/watch?v=uj4-Ba00Wmk, I subscribe back, so if you want more subscribers just subscribe, I would like to follow your work.

The truth is that I never was very good at blender, and tend to do things the hard way, which is why I took the hard road, which was manually creating a path and animating something on it.

I did watch your Rope video, it was great, and I thought about it for a while, but could not figure out how to do it either, do you have a tutorial on it?

I am sure this could be done a lot better, I think I should start over and do it right the first time, I have a lot more things I want to do with this when its done, I will post it with the blend file when finished, all my blends are available, its all open source so to say, I work on Science, this is for my PhD on the Trinary Universe, this is the basic configuration for my Universe, the videos at my site explain the whole thing, or will when I am finished with it.

This is the Video of what I have so far (a minute and a half long, 78 mb)
http://lightwizzard.com/resources/home/lightwizzard.com/phd/Dark-Star.mkv

Thanks

I figured out what my whole problem was, it was very clear when I started to compare it to the Roller Coaster, I made a very bad analogy of the Relationship in my previous post, I realize now that the Roller Coaster is like the Trail the Sun makes, but the Sun is not riding it, because it was made by hand, its not perfect, so if I tried to parent Earths path to it when its parented to another path, it locked up, because the two paths were not exact, nor could I just have it ride the path, it was a little too erratic, lets face it the path is not perfect, I made it by hand, so it is a little wobbly, I notice it, but most people would not is my guess, my wife said she did not notice it till after I asked her about it, so then the answer came to me, I need to animate a Empty on the Suns path and do a Track to on Earths path, now it always points in the right direction and angle, but I know this is just a hack way of doing things but it works, if you have any idea how to do a better job with the Trail it would make it better, but for now I got one problem solved. I am making another video, it will have the same link, but it will take a while to render the file and upload it, and its getting real late, so it might be in the morning for me.

Thanks for the help, it really did get me to see the problem, which is that I am doing things the hard way because its the only way I know how, because I know a screw modifier should be able to do this, but I just can not figure it out, but in reality that should be a lot easier to figure out then what I am trying to prove in the Rendered path of the Universe, but I have had 50 years to work on that Theory.

I can see you are putting a lot of effort into this, so to help you out I will post this: :yes:

How to Make a Curved Helix:

  1. Create a Plane mesh at some location - go to Edit mode and delete all bar 1 vertex, move this to be the correct distance from the target axis.

  2. Add a Screw Modifier - set the Steps, Iterations, Axis and Offset as appropriate.

  3. Create a Bezier curve or circle for the track of the helix.

  4. Add a Curve modifier to the helix using your new curve track, make sure you set the correct axis.

Optionally for a circular path - Apply the Screw and Curve Modifiers, then choose the first and last vertices in Edit mode and use CTRL+M to merge them together.

A picture says a thousand words:


A blend file to help you:

circular-helix.blend (463 KB)

This produces an accurate curved helix in under 3 minutes! :smiley: 
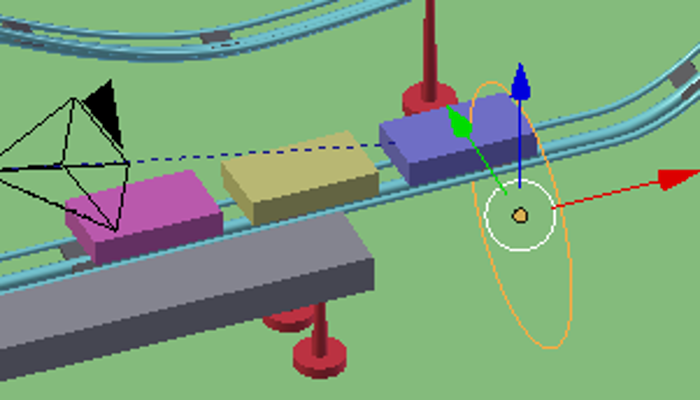
I suggest you put an empty in there with a Follow Path constraint, then parent your “Figure-of-Eight” curve to that, then animate the empty around the helix as I have shown you in the Roller Coaster blend file.:spin:

Cheers, Clock.

EDIT

If you read the entire Cord tutorial, it shows you how to build the “Rope Trick” on the last page…

Thanks, how do you do your offset for the origin for the BezierCircle?
How did you calculate how much to offset it, and can it be done without the offset…

This appears to be the closes I can get the two curves
http://lightwizzard.com/resources/home/lightwizzard.com/phd/Dark-Star-Test.blend
It seems that it would take a lot of manipulating to make it right, maybe it has to do with that offset, or some other setting to make them match up, but then it has to be able to be tracked from the Path of the other objects.

After this is complete, its a mesh, can I can convert that to a path, I heard of scripts that can do that, I have never done that before, where do I go from here.

Would I still need to animate an object like I did in my original project?
Or is there a way to animate this?

If I can convert this it would have saved me a days work, as it is, this one I made is actually very accurate, if you compare it to the one in this link above, so for now I think I will stick with what I have, since its not going to make it better at this point, I updated my files, you can look at the video and see if it can be made better, grant you I am not using cycles because I use Noise a lot, and Cycles does not have a good Noise generator yet, at least one I found usable, but I could do a 50/50 mix of Cycles and the old engine like I did in my videos for the Light Wizzard, because I could do a few things like Lightning a little better, but the Noise generator is a must for me.

Thanks for showing me that trick, I will use it in the future, and I will continue to work on this one just to see if I can get it to look better.

The Offset describes the pitch of one revolution of the spiral, so mine was 1/15th of the circumference of the circle that the spiral is wrapped around. I had 15 interactions around the circle. I would then just merge the first and last vertices by selecting the first, then SHIFT select the last and key ALT+M (Option+M on a Mac) and select “Last” so they are merged into a continuous loop. The circumference of a circle is pi (3.142) x the diameter, then your offset would be that value divided by the number of iterations.

To get precise mathematical values you can type something like (10 * pi) / 15 into the box and Blender kindly works it out for you. This is true of most, if not all, key entry number boxes in Blender, where you can use most mathematical operators or operands, don’t forget to use parentheses (brackets) where appropriate, since 100 / 10 * 4 is not he same as 100 / (10 * 4). Sorry If I am “teaching my granny to suck eggs” here, but it makes a difference.

To convert a mesh into a curve, select the mesh and then key ALT+C and then select “Curve from Mesh” in the popup, your mesh is now a curve that can be used in a Follow Path constraint.

One more thing I noticed in your file and that is “Unapplied Scales and Rotations” of some of your objects. This is not good for animations, etc. so what you should do is to select the objects and then key CTRL+A, and chose “Rotation and Scale” from the popup to set the rotations and scales back to 0 for all objects. It is good practice to do any scaling in Edit Mode, not Object mode as these scalings in particular can affect animations and parentings.

Also on your Screw modifier - make sure that the Render Steps are at least the same or higher than the View Steps or your render will not be as smooth as the view display.

To animate a Follow Path constraint, simply set the frame in the Timeline and then RMB click the “Offset” value box and Select “Insert Single keyframe” then go to the next timeline frame you need (this could be the last one) and key a different value and key frame it again. You can keyframe any number box in Blender, for example I frequently keyframe the Focal Length of cameras to zoom in or zoom out during an animation. Don’t forget to click the “Animate Path” box in a Follow Path constraint before you keyframe values.

Apart from that I see good progress. If you ever need help with the serious Maths - let me know, that is part of what I did for a living…

Cheers, Clock.

I have just noticed something else that I did not really like… :no:

The way you have done the path around the figure 8 in the first part of your animation, where you have used an array modifier with about 3 million counts (I exaggerate slightly) - this is not the best way to do this. With a curve you can add a bevel item to the curve and animate its position, as I have done in the revised blend file below:

circular-helix.blend (472 KB)

Just press Play to see it working. You can keyframe values for the start and end values, between 0 and 1 to move the profile around the track. This is a MUCH better way of achieving what you have tried. :smiley:

Here’s a picture of what I am rambling on about:


Cheers, Clock.

Much better way of doing it, thanks, I can use this technique to animate the path of the other objects as well, I will get back to working on it, I have a lot of clean up to do, maybe I will start over and see if I can do a better job from the start, I am not clear about when to do an Apply Location, Rotation and Scale, it seems some people say to always do that, but never say why, the biggest problem I have is when to parent an object, and when not to, or what order, i.e. do I create an Empty then parent the object to it, or do it the other way around, this makes more since when you look at my model, I have the Sun, I animate its spin, if I parent the Earths path to it, it moves along with the spin, so I have to make the Empty at the top of the Parenting, but then I parented the Earth to it, when it had a Follow Path constraint and I was wondering why it acted so funky and had to clear its location, then I tried to Apply Loc, Rot and Scale to fix that, all because I did not understand the basics.

I got into Blender to make my videos, now I need it to prove a point, my problem is that I only learn enough to get the job done, and when I realize that I can not find any other work to look at that is close to what I am trying to do, then I have to ask questions, even then some of the concepts are hard for me to put together, because they rely on other things that you take for granted, like the offset, and how to determine it, because its the Math that makes this all work, at first I though about writing a script to animate this whole thing using math so I could at least get the ratios right, but I have no idea how to do that, but I might take the time and learn it, now that I have a project that I would like to do the right way, instead of one hack after another.

As I was writing this my wife told me that John Nash and his wife died because a Taxi Driver did not know how to drive, its strange how things like that effect me, being an Aspie myself, I somehow related to him, he had a Beautiful Mind.

Thanks again.

Don’t apply location, it sets the mesh back to having its origin at 0,0,0

Objects with a set scale and rotation are inherently unstable and prone to erratic behaviour when you least expect or want it.

So if you have scaled or rotated an object in Object mode, you should always apply the rotation and scale so these are set back to 0 or 1 as appropriate. This operation does not resize the object, just set its rotation values to 0 and scales to 1.

There is a thread here some way back where a user had scaled the armature in the Z by a factor of 8. This resulted in the cubes in his mesh being lozenged, rather than deformed correctly. Simply applying the scale to the armature cured the problem.

You can always post your requirements here and someone will point you in the right direction.

Cheers, Clock.