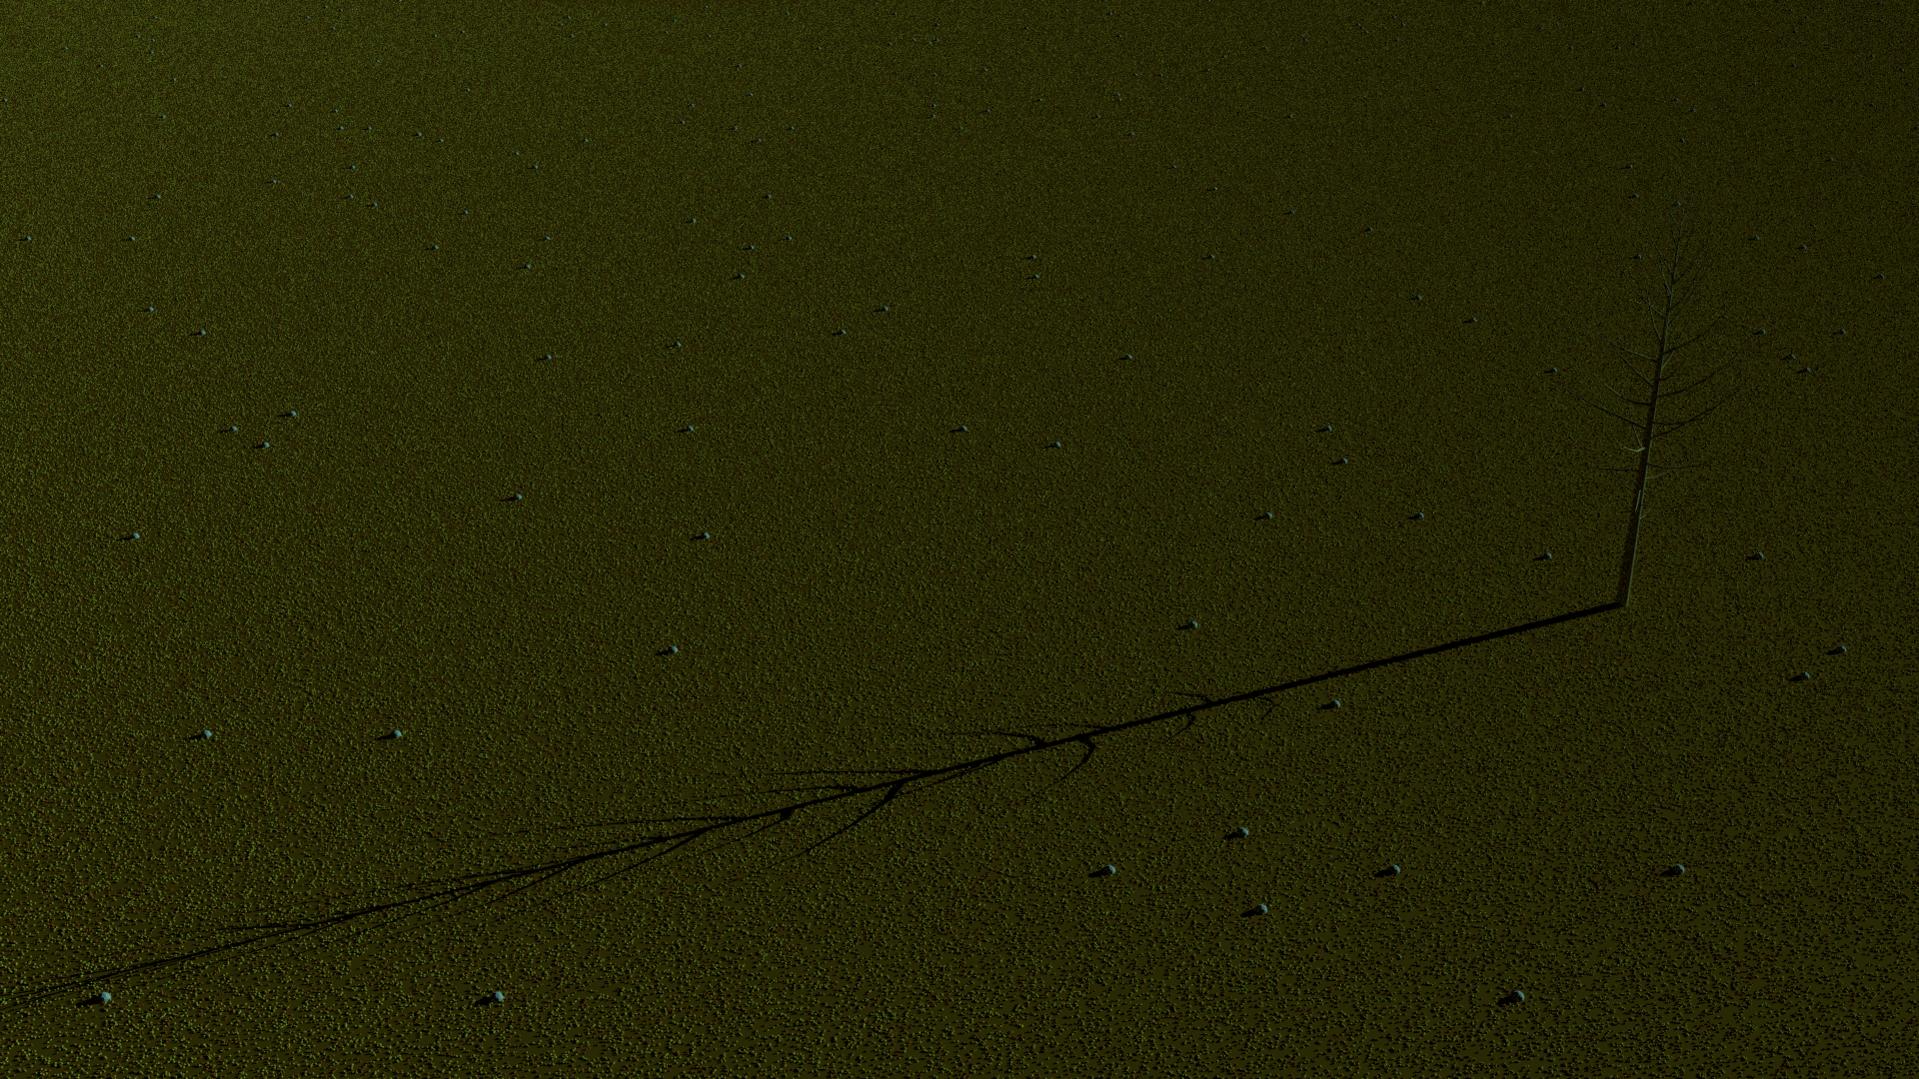
It is a pretty simple scene; a subdivided mesh with a plain diffuse material (dark orange), with 3 particle systems consisting of 2 identical-size ico spheres (diffuse yellow & orange, 500,000 each), and one larger ico sphere (light-gray, 200) for small stones to cast some shadows. I added a plain leafless tree using the sapling add-on (converted to mesh, light gray-brown), for an object of focus. I then changed the background from the default dark-gray to black, removed the default lamp, and added a hemi lamp close to the ‘horizon’, with a light-blue tint and strength of 4, to simulate a full-moon.
Strange, first my original post did not appear (I got a white screen), then most of the words were replaced with computer-language. I see others posting much more content, yet when I try I get the white screen and it disappears. So since I could not fit everything in the first post like I tried, I will have to add it in additional posts. To continue…
It is by no means realistic, and that is not my goal anyway, I am making a CG-cartoon kind of scene, so somewhat realistic-looking. I am fairly happy with this result, but am wondering if there are any improvements anyone can suggest to make the scene look better. Also, I will be printing the image, so it needs to be ‘bright’ enough. It looks fine on the screen, but prints much darker, so detail disappears. I made this image screen-friendly so it does not appear unnaturally-illuminated like it needs to be for printing.
Personally I was hoping for a more ghostly white-blue look to the tree where the moonlight hits it. I was able to get that with a sun or spot lamp, but the sun did not create a nice sharp shadow like in the image, and the spot did not illuminate the scene evenly, so this is the best I have found so far. I am also not sure the ‘sand’ looks enough like sand, even for a CG-cartoon look.
I also pondered whether to add some tiny sparkles to the sand, so I made this test image to see how it looks. I added another ico sphere particle system, with a glossy white material instead of diffuse, set at 0.1 roughness.
As you may notice the stones moved, that is because I had them at jittered for the first image then changed it to random to see what difference it made. I saw a post saying that the random setting is no longer working correctly, but it seems to at least give a different pattern if wanted. The sand particle systems are all set to random.
My main question is about the moonlight, I know the question regarding the sand does not belong in the lighting forum, I just figured I may get a suggestion here anyway, and do not want to post the same image with different questions in another forum.
So, Is the moonlight sufficient? Is there a better way to achieve this? Any other tips for the look I am after?
I ‘wrestled with the darkness’ myself for a while. Two things I found helped, taken form the movie business:
-Desaturate your image. You don’t see colors when your eyes have adapted to the dark. You might add a slight blue tint.
-Make shadows realistic for a night-time scene. This is more obvious but takes more care than a day scene because you need to light things up without them actually looking like they are lighted. Having a moon helps.
Yeah, this is just a simple example of what I am after. I am working on both those things for the project, but trying to keep a little colour without making it look totally unbelievable is not easy. Do you think the blue-tinted hemi lamp is insufficient for a moonlight equivalent and adding that full-moon bluish tint? Do you have a suggestion for the shadows? I want that eerie/spooky tree-branch shadow, but perhaps it needs tweaking?
Actually I found that desaturating the image made ALL the difference for me. You can leave a very slight amount of color for artistic reasons. In order to make up for the desaturation you would have to make the moon as blue as possible. I slight amount of ambient light to keep shadowed things visible also for artistic reasons. If an object is lighted brightly enough you could chose to keep some of it’s color but you would probably have to do that as a render layer composition with nodes.
If would want to go to the trouble, create a glow effect around the dark objects using the node system and composite that in.
an advice a follow for night scenes is that contrast is key. that’s why so many night scenes in tv and movies feature puddles of water: they add a shiny thing to contrast with the darkness of the overall scene. i’m not sure it fits with what you want to acheive here, though.
by the way, hemi lamps are not supported in cycles (as of 2.74). if you want crisper shadows for sun lamps, simply reduce the size.
I added a plain medium gray diffuse to each objects material, increased the particle number for the sand ico spheres, moved the hemi lamp to highlight the tree better, and obviously gave it more of a blue tint but also lowered the strength a little. Considerably better, right?
@oris; I did mention in the first post that I am using 2.73a, I found 2.74 has some issues with some of the things in my project. I am assuming since it rendered that I have no worries? Just to compare, I replaced the hemi lamp with a sun lamp (the tab with the light size was minimized so I had not noticed the light size before).
I was going to post the image here but the site said I “do not have permission to perform this action”, not sure why as the FAQ says I can post 3 images per post. maybe the file size? Anyway, with either the hemi or sun in the same place and with the same angle, colour and strength, and the sun lamp light size at a lower setting to about match the shadow made by the hemi, the rendered images look almost exactly the same. Are they supposed to? Are there any differences between these lamps that I can make use of with this kind of scene to make one better over the other, or does it matter which I use?
I would tweak that blue some, it’s too aqua looking. You want something with less green, but not too purple either. Instead of having to adjust the color of single material I would suggest looking at how to use nodes, it’s not hard at all. You can use a color-adjust node in the scene compositor to desaturate the entire image and add just the right amount of color, WAY easier to do and it can be adjusted in real-time.
I still think you want only the faintest of colors because right now it looks like there is a colored light shining on things. SnowyAcres makes a good point. Use some nodes to play with the contrast, maybe a little gamma.
Maybe I don’t know of the bigger picture of your project, but I know that loss of color feels like you are removing the ‘pop’ of your scene.
I played a highly reviewed point-n-click game called The Lost Crown and it was ALL in gray-scale, even the day shots, but it was set on the rainy english coast. One advantage for him is that he was blending real-world images with CG and removing the color made it easier to match the mediums. He did use the occasional spot of color here and there as accents. At first I was disappointed but quickly grew to appreciate the mood it set. Going black and white in a game (or image) is the same as the movies; it forces you to pay a lot more attention to lighting, and you have to compensate by paying closer attention to contrast and texture. A couple of modern movies that were shot in black and white to great success were Pi (not Life of Pi) and Sin City.
Yep, have been experimenting with the nodes, adding multiple colours and even different materials to see how each works. The colour-adjust node was actually one of the next things on my list to try, I recently remembered seeing it used in a tutorial a while back so thought I should see if it helps.
Yeah the choice of monochrome-only or a touch of colour is quite a tough one to choose, both have their merits and can look fantastic. In my case I want just a hint of colour, but as you said it is still very blue. Is it necessary to have the gray-tint to all the objects like I currently do, or is it better to leave them as they should look in the daylight and simply desaturate with the colour-adjust node?
a quick google shows that hemi lamps were never supported in cycles. they might be supported in the future, but not right now. when you switch to a hemi lamp, there is a message that says so in the lamp panel, and that the hemi is treated as a sun lamp.
it may be to dark for printing, idk.
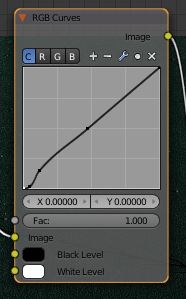
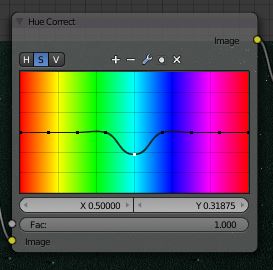
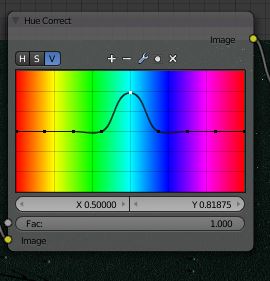
the main idea is the node setup: only 2 nodes in this case - rgb curves, which i used to increase contrast in the shadow area (lower 20% of the image), and hue correct node (which allows to change hue, saturation and value based on selected hue), in which i desaturated the azure hue and increased it’s value.
to me it looks more like a night scene this way. i hope it helps somewhat.
Next time I get on Blender I will watch for this message, I have noticed on occasion (with other projects) an error or warning message appear somewhere for a moment, usually I cannot see what it says before it disappears so I have to try and figure out what it may have been.
Very nice result! I like how the tree is lit pretty much exactly like I want without the area around it being equally illuminated. I have been working with these nodes, but do not understand them much yet, any chance you could post a screen shot of the node setup to give me a better idea how to utilize these tools?
i noticed that most of the colors in the image are in the range of vlaues (as in hue-saturation-value) of 0-0.2. this node allows me to tweek those values. X axis is the input image. Y axis is the modified image, after applying the curve. in this case, i added 2 control points in the lower left corner of the curve. the first one is at position (x=0.05, y=0.02), which means it takes all pixels of value 0.05 and lowers them to value 0.02; also, all pixels of values smaller than 0.05 will be lowered by the curve as well (all of them will be smaller than 0.02 after this node), in accordance with the shape of the curve.
the second point is in position (x=0.12, y=0.15), which means it takes all pixels who’s values are higher than 0.05 (the first point location on the x axis) and raises them according to the curve. in particular, all pixels of value 0.12 will be raised to value 0.15.
in effect, all pixels of values between 0.05 and 0.12 are stretched to the range 0.02 and 0.15, while values lower than 0.05 are “squashed” (values higher than 0.12 are also somehwat squashed).
i hope i haven’t confused you to much so far. :eek:
the nice thing about rgb curves is that you can create gradients of transition, so that all those stretching and squashing of values are not shrap (which would make them noticable), but gradual.
hue correct.
now that we know something about using curves, let’s tackle this one. it was very confusing to me also until recently. in actuality, it is a combination of a keyer and a hue-saturation-value node, since it allows you to make changes in hue/sat/value to specific pixels, according to their hue.
so i noticed that this azure color is dominant in the light falling on the tree. the hue of this color (in the hue-sat-value color wheel) is around 0.5, which is the X-value of the highlighted point. now, you can see in the upper left corner that the button “s” is pressed, which means the changes i make here affect the saturation of all pixels who’s range of hues is around 0.5. in this case, i lowered the saturation (the Y-value of the highlighted point is at 0.318). again, i stress that the effect is limited to to pixels of azure hue.
at the same time, i decided to raise the value (in the hue-sat-value color wheel) of all pixels who’s hue is around 0.5 (again, azure hue). so i pressed the “v” button in the upper left corner, and now the changes to the hue affect the value of those pixels.
again, the effect is limited only to the hues around the highlighted point.
Thanks oris, that taught me few things I did not know, and gives more options than I thought there was for adjusting lighting and all that. I did not think a night scene was going to be so difficult, it makes the day scenes seem much easier and simpler. After a few tweaks and renders I managed something a little more realistic-looking, maybe what I need, maybe needs more work, either way for now it is much better than the original.
I was going to post the image but I got a message saying “You do not have permission to perform this action”, I get this sometimes for some reason. Anyway, thanks again shadowphile and oris, much appreciated!