Rigging a simple character -- can't get IK settings right, other issues

Hi everyone,

I just typed this all out and then lost most of it when I was automatically logged out :confused: - Anyway, I’m very inexperienced with 3D, but I’m excited to learn a little bit. There is awesome potential in 3D, but SO much more to go wrong than in 2D.

I’m making a game in Unity that is mostly 2D. You can check out the demo here. Basically the idea is to keep stuff from falling into the hole. It’s a very early version still.

I have been thinking recently that it might be cool to replace the main character with a 3D version, probably using some kind of toon shader, but leave everything else 2D. I tried my best with the model – If you think there’s any way it could be made more interesting or closer to the 2D version I’m open to suggestions.

I followedthis tutorial, except my character doesn’t have feet and I haven’t changed the shape of the target bones to spheres (that’s just cosmetic, right?). I’ve got the basic structure down, but it’s definitely not animation ready.

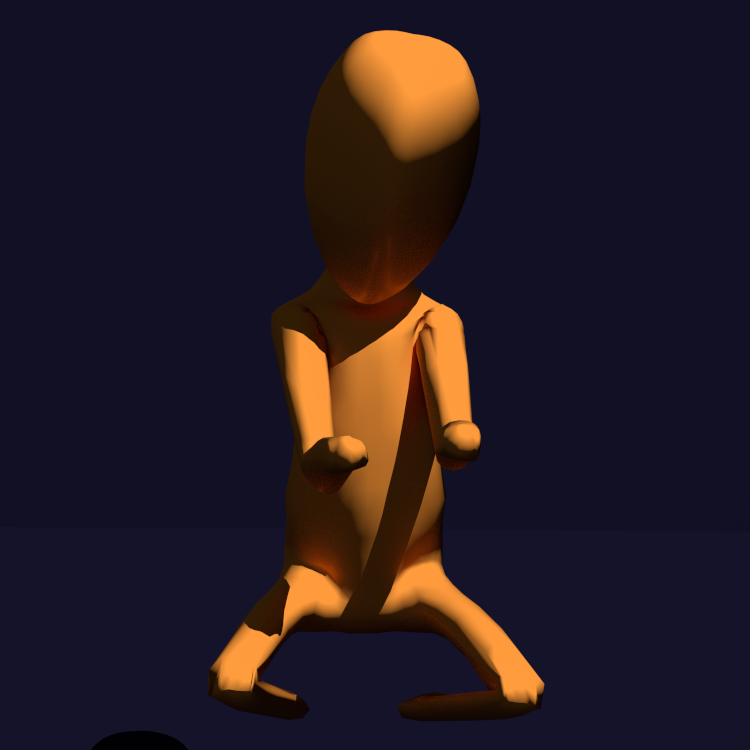
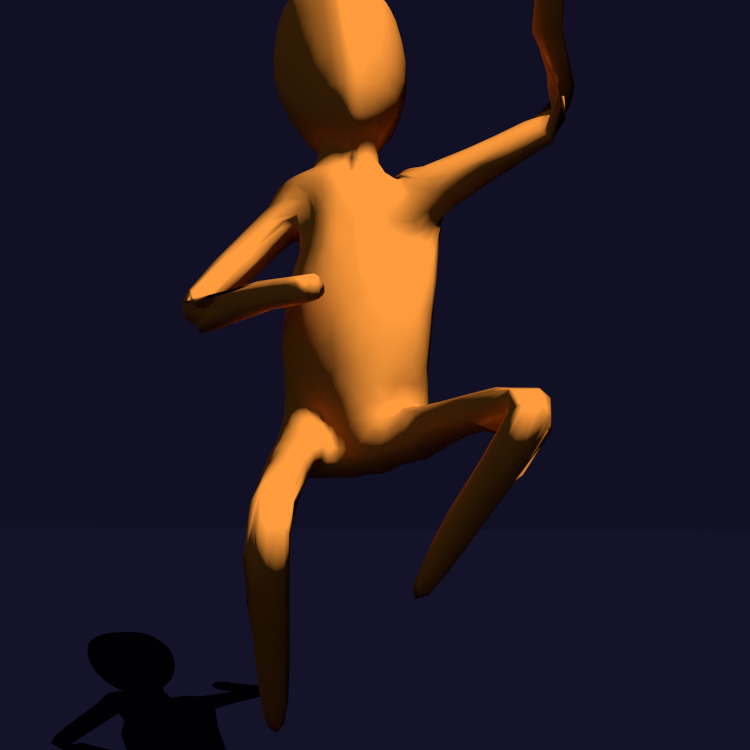
The arms are very messed up. Within a very limited range of motion, they look kind of cool, but in most cases the shoulder area and the direction the elbow bends isn’t natural and looks bad. This character’s animations are very dramatic and involve lots of extreme positions of the arms and legs (including the main animation, throwing) so I need to get the rig as good as I can.

The legs are in a little better shape, except on one leg a big flesh bridge will form when you move around the IK bone. Not sure why it’s only one leg, but maybe it has something to do with a vertex that was accidentally moved or something after I applied the mirror modifier.

I’ve attached two renders of poses with the current setup, and my .blend file. I’ve tried to thin the neck out a little bit since these pictures since I noticed it was looking really thick when deformed.

Any advice at all would be appreciated.

Attachments

guardian.blend (740 KB)


You got a couple of issues there… Let’s tackle the simple ones first…

The elbow pole targets are in the wrong place, they need to be behind the body. Look at the knee pole targets, they are in the right location. As the leg controller is lifted, moving the knee pole target around moves the knee around. Likewise, your elbow pole targets want to be behind the character, because that’s the way the elbow bends, backwards, not forwards like the knee.

When you move the elbow pole targets behind the character, that will totally mess up the IK constraint’s poll angle setting, you’ll need to adjust that. To help this, in the armature properties panel, under display, check the axis option. This will display the bone’s x,y,z axis, try to get the arm bone’s x & z axis arrows to match in pose mode like they are in edit mode by adjusting the pole angle in the constraint. A little rotation is fine, but a lot of rotation isn’t.

Although the character has no feet, the bones that control the leg ik are pointed backwards. That confluzed me for a minute… I couldn’t figure out which was the front and which was the back… the feet are pointing this way, the pole targets weren’t on the front and backside of the character, and I couldn’t really tell by looking at the mesh. Took me a min to figure out what was front and what was back view of this…

Now on to the bad part of this…

The top pic you posted, the one arm is pinched at the body, roll angle issue to fix maybe… But the whole mesh isn’t suitable for animation. You have several problems in this area and that’s causing the poor deformation.

Simple fixes for this simple of a character. You need to cut off the arms & legs at the body, leaving holes in the body. Select any of those holes in the body and extrude out to the end of the limb. Then loop cuts need put in at the joint area, 3 there, and maybe 1 or 2 at the body joint of the limb.

I’m on a temp computer and without my normal files to show you what I mean about the body mesh…

Randy

Wow, thanks a lot! I will work on all those issues, although I am a little confused about that tutorial now because in the video the elbow targets are in front of the mesh like mine and he puts the leg IK bones behind the legs too. I might have to check out a couple different tutorials. When you find out that you have things you need to change in your mesh, do you usually unparent the mesh from the armature before editing and parent it again when finished? Thank you!! I’ll post an update when I’m done with the changes

When you find out that you have things you need to change in your mesh, do you usually unparent the mesh from the armature before editing and parent it again when finished? Thank you!! I’ll post an update when I’m done with the changes

Yes, un parent the mesh. Most likely, you parented the mesh to the armature and choose an auto-weighting option to let blender weight the mesh to the armature. Since you will be fixing the mesh, you will have new parts that aren’t weighted to any bones. When you choose this ‘auto-deform’ setup, blender adds an armature modifier to the mesh, look in properties -> modifiers. When you un-parent the mesh, make sure the armature modifier is removed from the mesh.

I might have to check out a couple different tutorials.

Certainly will be helpful to view other tutorials. Not every tutorial is as good as the next one, some pretty bad ones out there… Look for game character modelling and/or rigging tutorials. For the modelling part - fixing your mesh - see this old tutorial here:
http://wiki.blender.org/index.php/Doc:2.4/Tutorials/Animation/BSoD/Character_Animation/Neck_shoulders_and_arms
Look at the section - ‘Extruding the arm’ to get an idea of what the arm mesh should look like so it can be animated and deform properly.

Hope this helps,
Randy

Great, thanks a lot!

I tried to fix what I could - redid the arms and legs. The arms and legs actually look better this way, but I still don’t know what I should be doing to fix the bones. I’ve tried unparenting and resizing them a few times to see if their automatic weighting would improve… I kind of don’t get why the default setting of an IK constraint twists the mesh though – shouldn’t the rest position be where it’s not modifying the position of any of the vertices yet? I guess I might have to manually change the vertex groups before this is totally ready to be animated?

My new .blend:
http://www.pasteall.org/blend/35587

Hey Dogboydog…
welcome to the Blender community…

my first suggestion when ever it comes to Rigging is to start watching this set of videos…
you will be glad you did…

these really are the best and the guy who Narrates them (Nathan Vegdahl) really knows his stuff…

Looking at your latest file that you have posted…

Allow me to make another couple of suggestions …

Select your Armature >
goto to the Properties Panel >
find Object info(the box Icon) >
Find Display >
the Maximum Draw Type you will see “Textured” >
Change that to “Wire” by selecting in the feild and choosing from the scroll up menu…

this will make it easier for you to see your mesh and your Armature at the same time…

Second…
With your Armature still selected >
in the Properties Panel >
Find “Armature data” or “Object date” (the little man Icon) >
Find “Display” >
check “Axes”

This will now allow you to see every bones individual axis orientation
when in Edit mode and pose mode…

now that you have your Axis where you can view them properly…

I would first set my Root Axis so that the Z axis is pointing up…

you of coarse need to do this in Edit mode… not pose mode…
note that any change you make in Edit mode become the default pose of your Armature in pose mode…

for me the most effective way to change any bone’s Axis is to open the Right hand Tool bar with the "N"Key…
then with your bone selected find the “Roll:” parameter in the Transform Panel…

adjust it by LeftClickGrab scrolling the mouse cursor over it or simply typing in a number…
in the case of your Root bone you have it set to 180… type in zero…

Now your Z axis on your Root bone is Oriented the same as the Global axis…

note Idealy you want all the Root bones axis alighned with the Global axis…
(note the Global axis can be seen in the lower left hand corner of your 3D window…)

but Don’t worry to much if they don’t all line up right… just if you get the ‘Z’ pointing up… you should be good for this project…
but you later might want to Reorient your future character models so that they align with the Global axis…

All that said… what really makes a difference in axis alignment in your Armatures is trying to avoid bone flipping and Gimbal lock…

note that if you select your any of your spline bones they all have their rolls set to zero…
That’s good…

note however if you select your legs… their Roll setting are not set at zero…
I would set both leg segments to zero and the foot to zero for both legs…
(which it looks like you have x-axis mirror set so just doing it to one leg should set the other)

I also would set your Roll on the Hand and Arms to zero also…

you also have your elbow and Knee bones set almost strait…
this will cause problems with IK solver their is not at least a slight bend at the elbow and Knee to start with…

On the subject of Knees and Elblows…
select your Armature >
Tab into pose mode >
select the wrist.L bone >
goto Properties Panel > bone (the bone icon) >
inverse Kinematics >

here you will find you can lock off certain Axis in the IK solver such that a Knee or Elbow will bend only around one Axis…
pick witch axis that is…
in your case I can’t really say which axis that should be since your character at this point has no hands of feet…
but judging on the placement of your pole targets for the elbow I will say the “Z” axis
Thus you will Lock off the X and Y axis in this panel… leaving the Z axis unlocked… and free to move…

now before you do anything else…
Select your Hand bone and move it so that the elbow bends…
Now select “wrist.L” bone again…
goto the bones constraints panel (bone/chain icon) …
and note that there is a Roll setting there for your pole target …
adjust that so the point of your elbow points at your pole target…

when I did it after having done all the other changes above… 180* seemed to be the best setting
note the Right Arm will almost always work out to be be set the opposite… that is 0* for pole target rotation…

anywayz… do the same for your Legs and Knee targets…

that’s all I have time for now…

hope that helps…

Thank you so much for all your help. That was really amazing of you. I only got an email notification of your first post, so I didn’t realize you had provided all that other help until now. I will take a look at everything you’ve sent my way (including these tutorials, which are great - I’ve watched the “Mr. Squeegee Feet” ones so far and will continue").

After that, I’ll come back with my updated model/armature which I’m sure will still be riddled with problems :smiley: But I’m getting closer at least.

all things in 3D are complicated… Rigging is just a small part of the the total 3D package… just give your self some time to learn it all and practice with it… and before you know it you will be doing all kinds of cool stuff…

Okay – I’ve made a little tiny bit more progress. I’ve watched a couple more hours of tutorials and now feel I understand these things better conceptually. I started over with rigging, this time by modifying a rigify skeleton but not using the rigify button, then adding some constraints.

I’m kind of excited because I found out the basics of how animation works and how I would import the animations into Unity, so I feel I have more of an end goal in sight now. Also, 3D animation seems a lot more fun so far than 2D, once you get past all the rigging at least. I made a little test animation which you can play if you download my new .blend.

One huge issue I’m still having is the horrible creasing happening around the hips when you bend the legs too much. Is that something I would solve with weight painting? I haven’t done that yet, but I am taking a look at some videos about it.

I haven’t added IK targets for the arms (/elbows) this time because I noticed they were working pretty well without them. I think the arm area looks pretty decent now but am open to feedback of course. I have the shoulder bones copying rotation from the arms a little bit so that the shoulders/chest will move a little more naturally with the arms, but maybe that’s bad practice or there’s a better way to do that. Including them in the IK chain didn’t work well.

I also tried a little bit to scale one of the bones on the spine in pose mode so that I could create a breathing effect, which I think looks kind of cool. (Nevermind that the game takes place in outer space, he breathes magic)


It’s so nice that there’s a forum like this to come to, and a free program to learn all of this with. I’m learning a lot, it’s making me feel really interested in doing more 3D work, but that will mostly have to wait until I finish this game. I just found out about the skin modifier yesterday, which is really exciting to me, because like 7 years ago or so when I was trying 3D as a teenager, I had a trial of Z-brush, which I ended up making a cool 3D model with using Z-spheres, and the skin modifier seems really similar to that.

Side questions for the future: If I decide at some point I want to reshape the model some without adding any new vertices, can I do that and have the existing armature setup work okay? or would I have to re-do the automatic weights and manual weight adjustments? Also, if I want to allow transitions between animations, do I omit keyframes on 0th frame so that whatever position the bones are in before the animation starts, they can interpolate toward the first pose of the new animation? Or I guess, how does that work in general – I’m wondering how you should choose a starting pose for an animation

Attachments

guardian.blend (996 KB)

Side questions for the future: If I decide at some point I want to reshape the model some without adding any new vertices, can I do that and have the existing armature setup work okay? or would I have to re-do the automatic weights and manual weight adjustments? Also, if I want to allow transitions between animations, do I omit keyframes on 0th frame so that whatever position the bones are in before the animation starts, they can interpolate toward the first pose of the new animation? Or I guess, how does that work in general – I’m wondering how you should choose a starting pose for an animation

a lot of questions there…

but sounds like your making progress…

will look at your blend file and study some of your questions and respond soon…

Thanks so much – take your time of course. And the side questions are not essential right now, just things I’m wondering for when the rig is fully working and I start using it in my game.

If I decide at some point I want to reshape the model some without adding any new vertices, can I do that and have the existing armature setup work okay? or would I have to re-do the automatic weights and manual weight adjustments?

Nope…
and
Yes…

Nope… when you add in some more geometry to your Mesh… (which frankly you might as well get ready to have to do this often)
you will not have to redo your Ctrl+P apply automatic weights again…

unless you really mess it up really bad and just want to start over again…

which some times yes… I do mess up things so bad I just decide to start over again and do that…

and if you do that… be sure you clear out your Armature Modifier from the Mesh…
and goto the Mesh’s vertex group panel and delete all vertex groups before you redo your automatic weights…

however…

if you are only adding in a few vertices… then yah… all you do is weight paint the new ones in or weight ‘assign’ them in…

see Nathans “Mr Hotdog” video for weight assigning information… he explains it much better than I can here…

if your adding in an extra bone…
then what you need to do is…

Select your Armature > Tab into Edit mode > add your bone(s) in the areas you need them…
Tab into Pose mode
select your mesh > Tab into WeightPaint mode >
select your newly added bone (which should still be in pose mode)
hit ‘w’… > select “Assign automatic from bones”…
your new bone(s) will now be added into the vertex groups and have some automatic weighting applied to your mesh…

I will have to look at the rest of your questions tomorrow… it’s pretty late where I’m at … and I’ve had a long day… so… I had better hit the sack… or else I will be telling you all kinds of crazy things…

Thank you very much for all your help!

Sorry I’ve been away, but norvman’s got ya covered.

Yes, to a degree, weight painting will fix some of it. Part of the problem is the upper leg bone’s root is too far up in the body. A human’s hip joint it at the bottom of the pelvis bone. I lowered the root of both upper leg bones and auto weighted it again. Didn’t see much improvement, so then I weight painted the left leg/hip a bit and that improved it alot. See attached file and notice the difference between the left and right sides. What I really noticed is as the upper leg is rotated, parts of the stomach collapsed inward and shouldn’t. Also remember a real human’s body creases in that area, look at yourself naked and sitting down.

The real problem with that area is the mesh topology, the edge loops aren’t flowing correctly. Edge loops there need to be flowing from the bottom of the crotch, upwards and outwards, towards the top of the pelvis bone (a human pelvis bone that is).

2 choices here: you could remodel that section and all that work, or you could use a ‘corrective shapekey’ to fix it. First time setting up a corrective shape key can be a bit rough to get it ‘dialed’ in correctly. With this method, you pose the character, create the shape key and now you can move the vertices around by hand to fix the problem. Then you set the shape key to be automatic, so as the leg bends, the verts move. Before you decide on shapekey route, make sure it can be sent to the game engine and works there.

Sorry if I’m getting too deep.

I haven’t added IK targets for the arms (/elbows) this time because I noticed they were working pretty well without them. I think the arm area looks pretty decent now but am open to feedback of course. I have the shoulder bones copying rotation from the arms a little bit so that the shoulders/chest will move a little more naturally with the arms, but maybe that’s bad practice or there’s a better way to do that. Including them in the IK chain didn’t work well.

I didn’t look at the arms, I was looking at the legs only. Elbow targets will allow you to point the elbow as needed. Shoulder bones copying rotation of arm bones. That stuff is all up to you. You’re animating it, you know what you want it to look like. Does it work for you?, If not, then you refine it.

Also, if I want to allow transitions between animations, do I omit keyframes on 0th frame so that whatever position the bones are in before the animation starts, they can interpolate toward the first pose of the new animation? Or I guess, how does that work in general – I’m wondering how you should choose a starting pose for an animation

This really depends upon the game engine, I think. I’m not sure how they work in game engines. You might want to look at their forums…

Randy

Attachments

guardian.blend (878 KB)