Screenshot attached, since it shows the problem better than a rambling description.
Questions are:
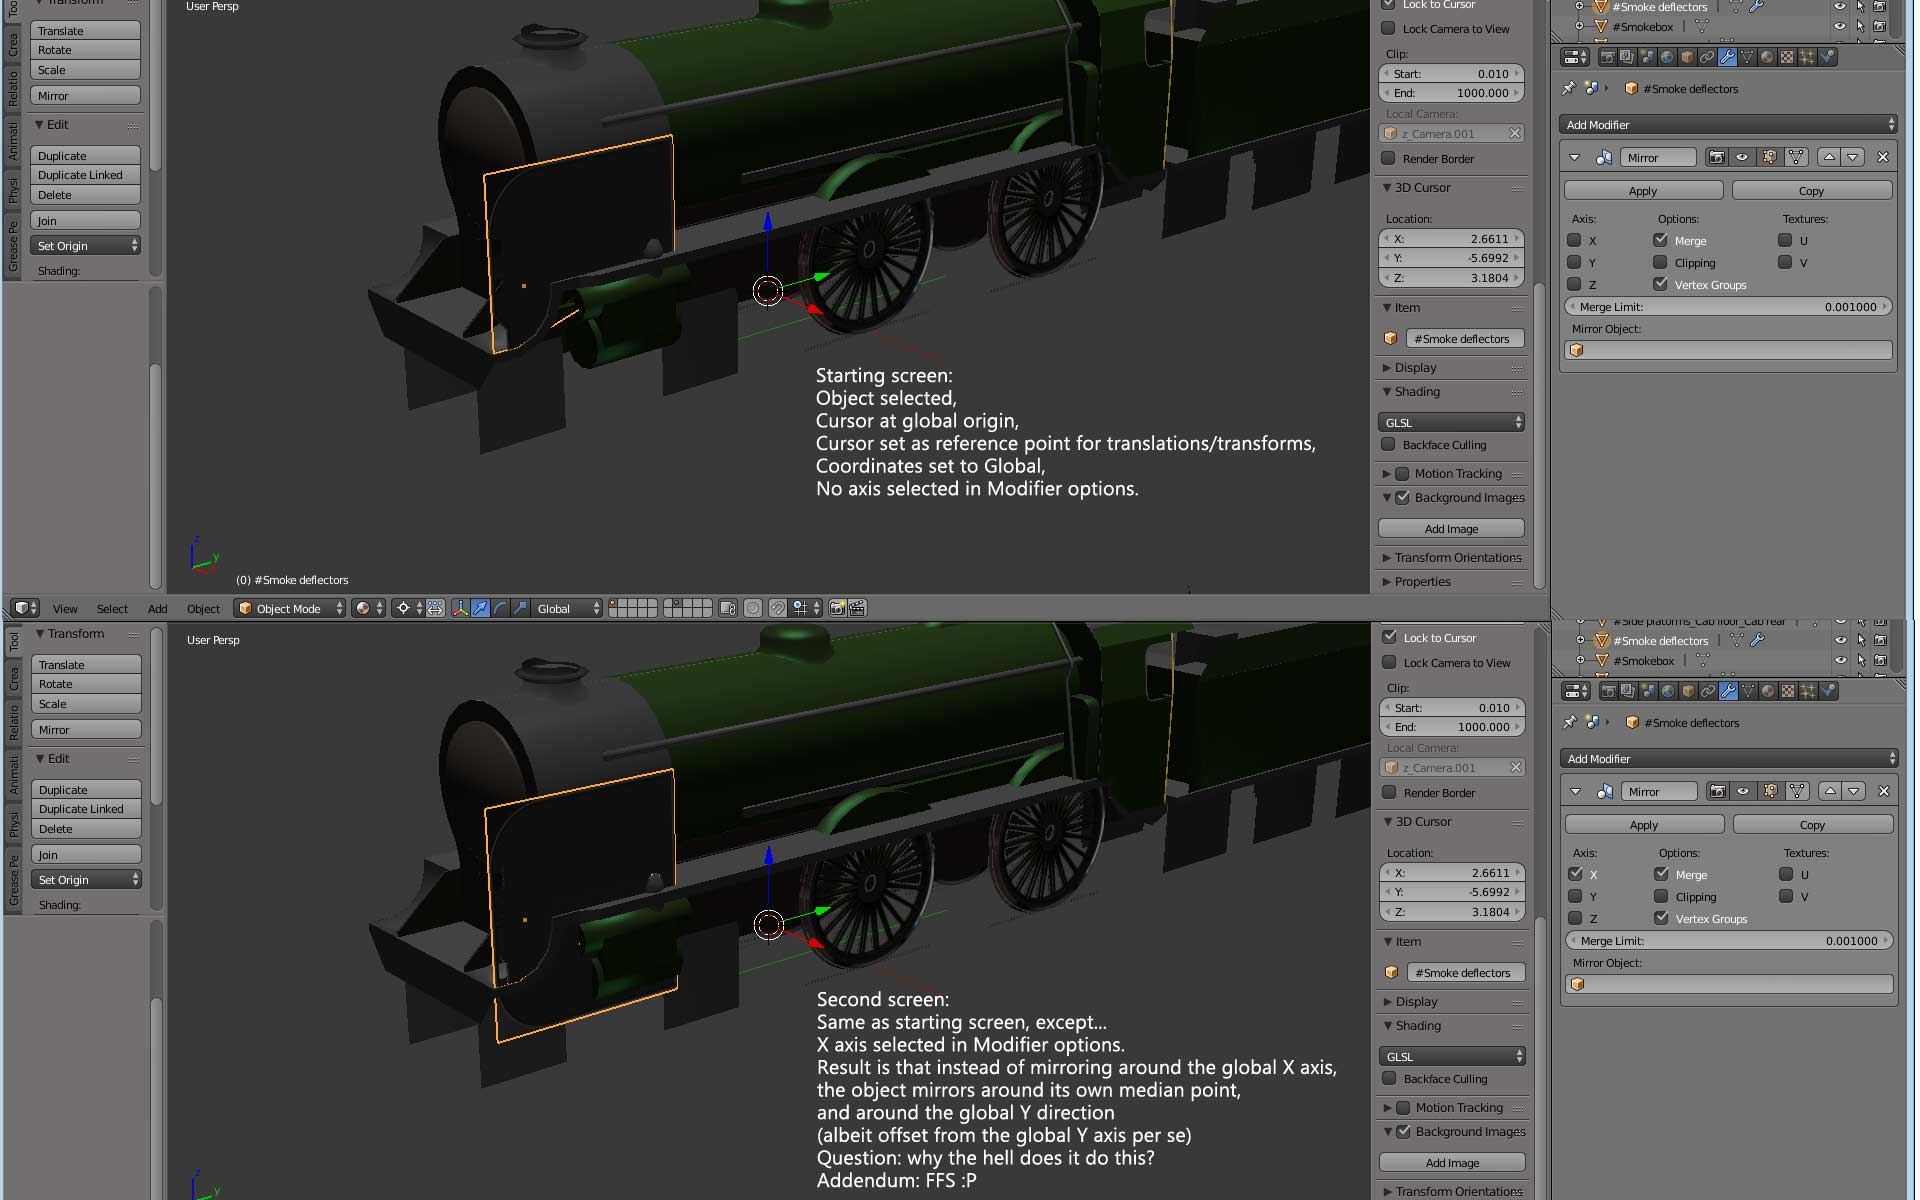
1/ Why does it do this instead of doing what it ought to?
2/ How do I make it do what it ought to?
(It ought to mirror about the global axis selected)
Screenshot attached, since it shows the problem better than a rambling description.
Questions are:
1/ Why does it do this instead of doing what it ought to?
2/ How do I make it do what it ought to?
(It ought to mirror about the global axis selected)
3D Cursor has no effect on Mirror modifier. It mirrors object along its’ local axes around its’ origin, unless you’re using a Mirror Object, in which case that object’s axes and origin are used.
Damn. That really is a nuisance. Ok, so is there a way of conveniently modelling laterally symmetric objects that are offset from global axes?
How exactly is it a nuisance? Local axes and origin are way more flexible than fixed world axes and location. If you want to mirror around a specific point, put an Empty there, rotate it accordingly, and set it as Mirror Object in the modifier settings 
Another way is to apply the object’s location/rotation (Object -> Apply menu), but that may not always be feasible.
Well, it’s a nuisance if you actually want to use the global frame of reference. Local is good if you want to use local, but not if you want global. It’d be nice if that option was selectable.
Anyway, from the “rotate it accordingly” am I to assume that this means I’ll have to figure out the geometry so that whatever transform I apply will be the correct angle on a line drawn from whatever location this Empty is at to the median point of the object to be mirrored? (If so, I can see that being a source of great amusement at times…)
ETA: All I’m really after is an automatic way of mirroring any object from global +X to global -X, without any change in its global Y or Z coordinates.
What would be a source of amusement is that “global reference”: which axis would you choose if your symmetry line is, say, 45 degrees to a global axis? Or if you want to rotate your object, or even animate its’ location/rotation?
You don’t really need to “figure out” anything. When using an Empty (or any other object, really, empties just minimize clutter) you can enable its’ axes display: this way you always know which way your symmetry axis goes and where the mirror horizon is located. Though in this case when transforming the object, you’ll likely need to take the Empty with it, otherwise the “fun” I described above will happen.
And if your object should de-facto be symmetrical according to world, it simply doesn’t need to have any rotation/translation (that is, should have the transformations applied).
Yes, but in the cases of current interest to me the symmetry plane is the global Y-Z plane through the global origin. This means global frame of reference is the preferred option. Horses for courses.
Anyway I’ll play around with Empty mirror objects and see what I can get. Thanks for your time.
Ok, so an Empty set at global origin works if it is set as the mirror object for the bits I want to mirror. The only catch is that the mirroring is still somewhat counterintuitive, at least to me.
It says “Axis”, but instead of mirroring around the selected axis, which is how transforms usually work, what it actually does is mirror the position along that axis. IOW, it mirrors coordinates rather than mirroring around the selected axis. That’s fine now that I know it, but it’s a bit odd IMO.
Anyway problem is solved for now. No doubt more, and more interesting, problems will rear their heads in due course.
Yep, along: the origin and axis define a plane of symmetry (the “mirror”). You can’t define more than one unique planes from a point and a normal vector. But to define a plane parallel to a line, the line itself is not enough: we’d need to have settings like XY, XZ, YZ.
And symmetry is not confined exclusively to 180 degree mirrors, or even Mirror modifier itself: you can use other tools like linked duplicates or array modifier to create symmetrical objects. I’ve attached an example blend that shows a relatively complex symmetrical shape with a minimum amount of actual editable geometry. The Y symmetry (flipped along Z axis) is achieved with Array modifier: its’ Offset Object is simply rotated 180 degrees around X. The Mirror modifier provides a 90-degree symmetry in two directions (the Mirror Object is rotated 45 degrees around Y).
symmetry_example.blend (97.6 KB)
Cool. I’ll take a look at that tomorrow. I’m generally ok on 3D geometry.
Speaking of arrays, I’ve realised I should have used those recently when I modelled a locomotive driver just for practice. Would have made for a quicker and easier workflow, but at the time I cbf’d learning how to use them. It still turned out ok. I did paint myself into a bit of a corner on the topology around the hub, but fortunately it didn’t matter much in this case. It was a good basic learning exercise. Got me into using Beziers, among other things.
Even though this topic is marked as solved, there’s also an alternate method.
After you place an object in a scene, place the 3D cursor where you want the mirror center to be. Then set the object’s center to the 3D cursor. (Shift CTRL ALT C, then menu) By default the mirror modifier uses the object origin to mirror around, so you’d be good to go.
Of course the method with the empty gives more options like rotation, etc.
Ok that’s a handy tip, because for modelling trains all that’s needed is to mirror X coordinates. It’d only save one empty (because the one can do all components) but it would save having to set the empty as mirror object for a lot of components, so that would slightly speed up the workflow.
One thing I did figure out fast: if using an empty for the mirror object, give it a name that puts it at the top of your list of objects, so you don’t have to dig through the whole list to find it.
And just for the hell of it, I name my #2 sun lamp Sun Tzu.
So long as the mirror modifier on all objects is named the same (i.e. the default “Mirror”), you can use the Copy to Selected feature: select all other objects, select the one you’ve already set Mirror Object on, right click that property -> Copy to Selected.
And also, you can ctrl+c the name once, and then simply ctrl+v it while just hovering the mouse above the property (don’t need to click it).
Another handy trick. Thanks. I still like having it at the top though, at least while things are WIP. I tend to name lamps and cameras with a z_ prefix just to shunt them to the end so they’re not mixed in with the model’s components, and I kinda like having the modifier also shunted out of the general listing. This means most of the list is just actual model components in alphabetical order.