I’ve been trying to develop a decent workflow for building decent skin SSS materials in Blender Cycles. I’ve been reading Ben Simonds article (http://bensimonds.com/2010/05/31/three-layer-sss-in-blender-demystified/) and to some extent, Kent Trammell’s realistic head tutorial, but they both seem to be using Blender Internal rather than cycles, and a lot of the stuff they use is either missing or ambiguous in Cycles.
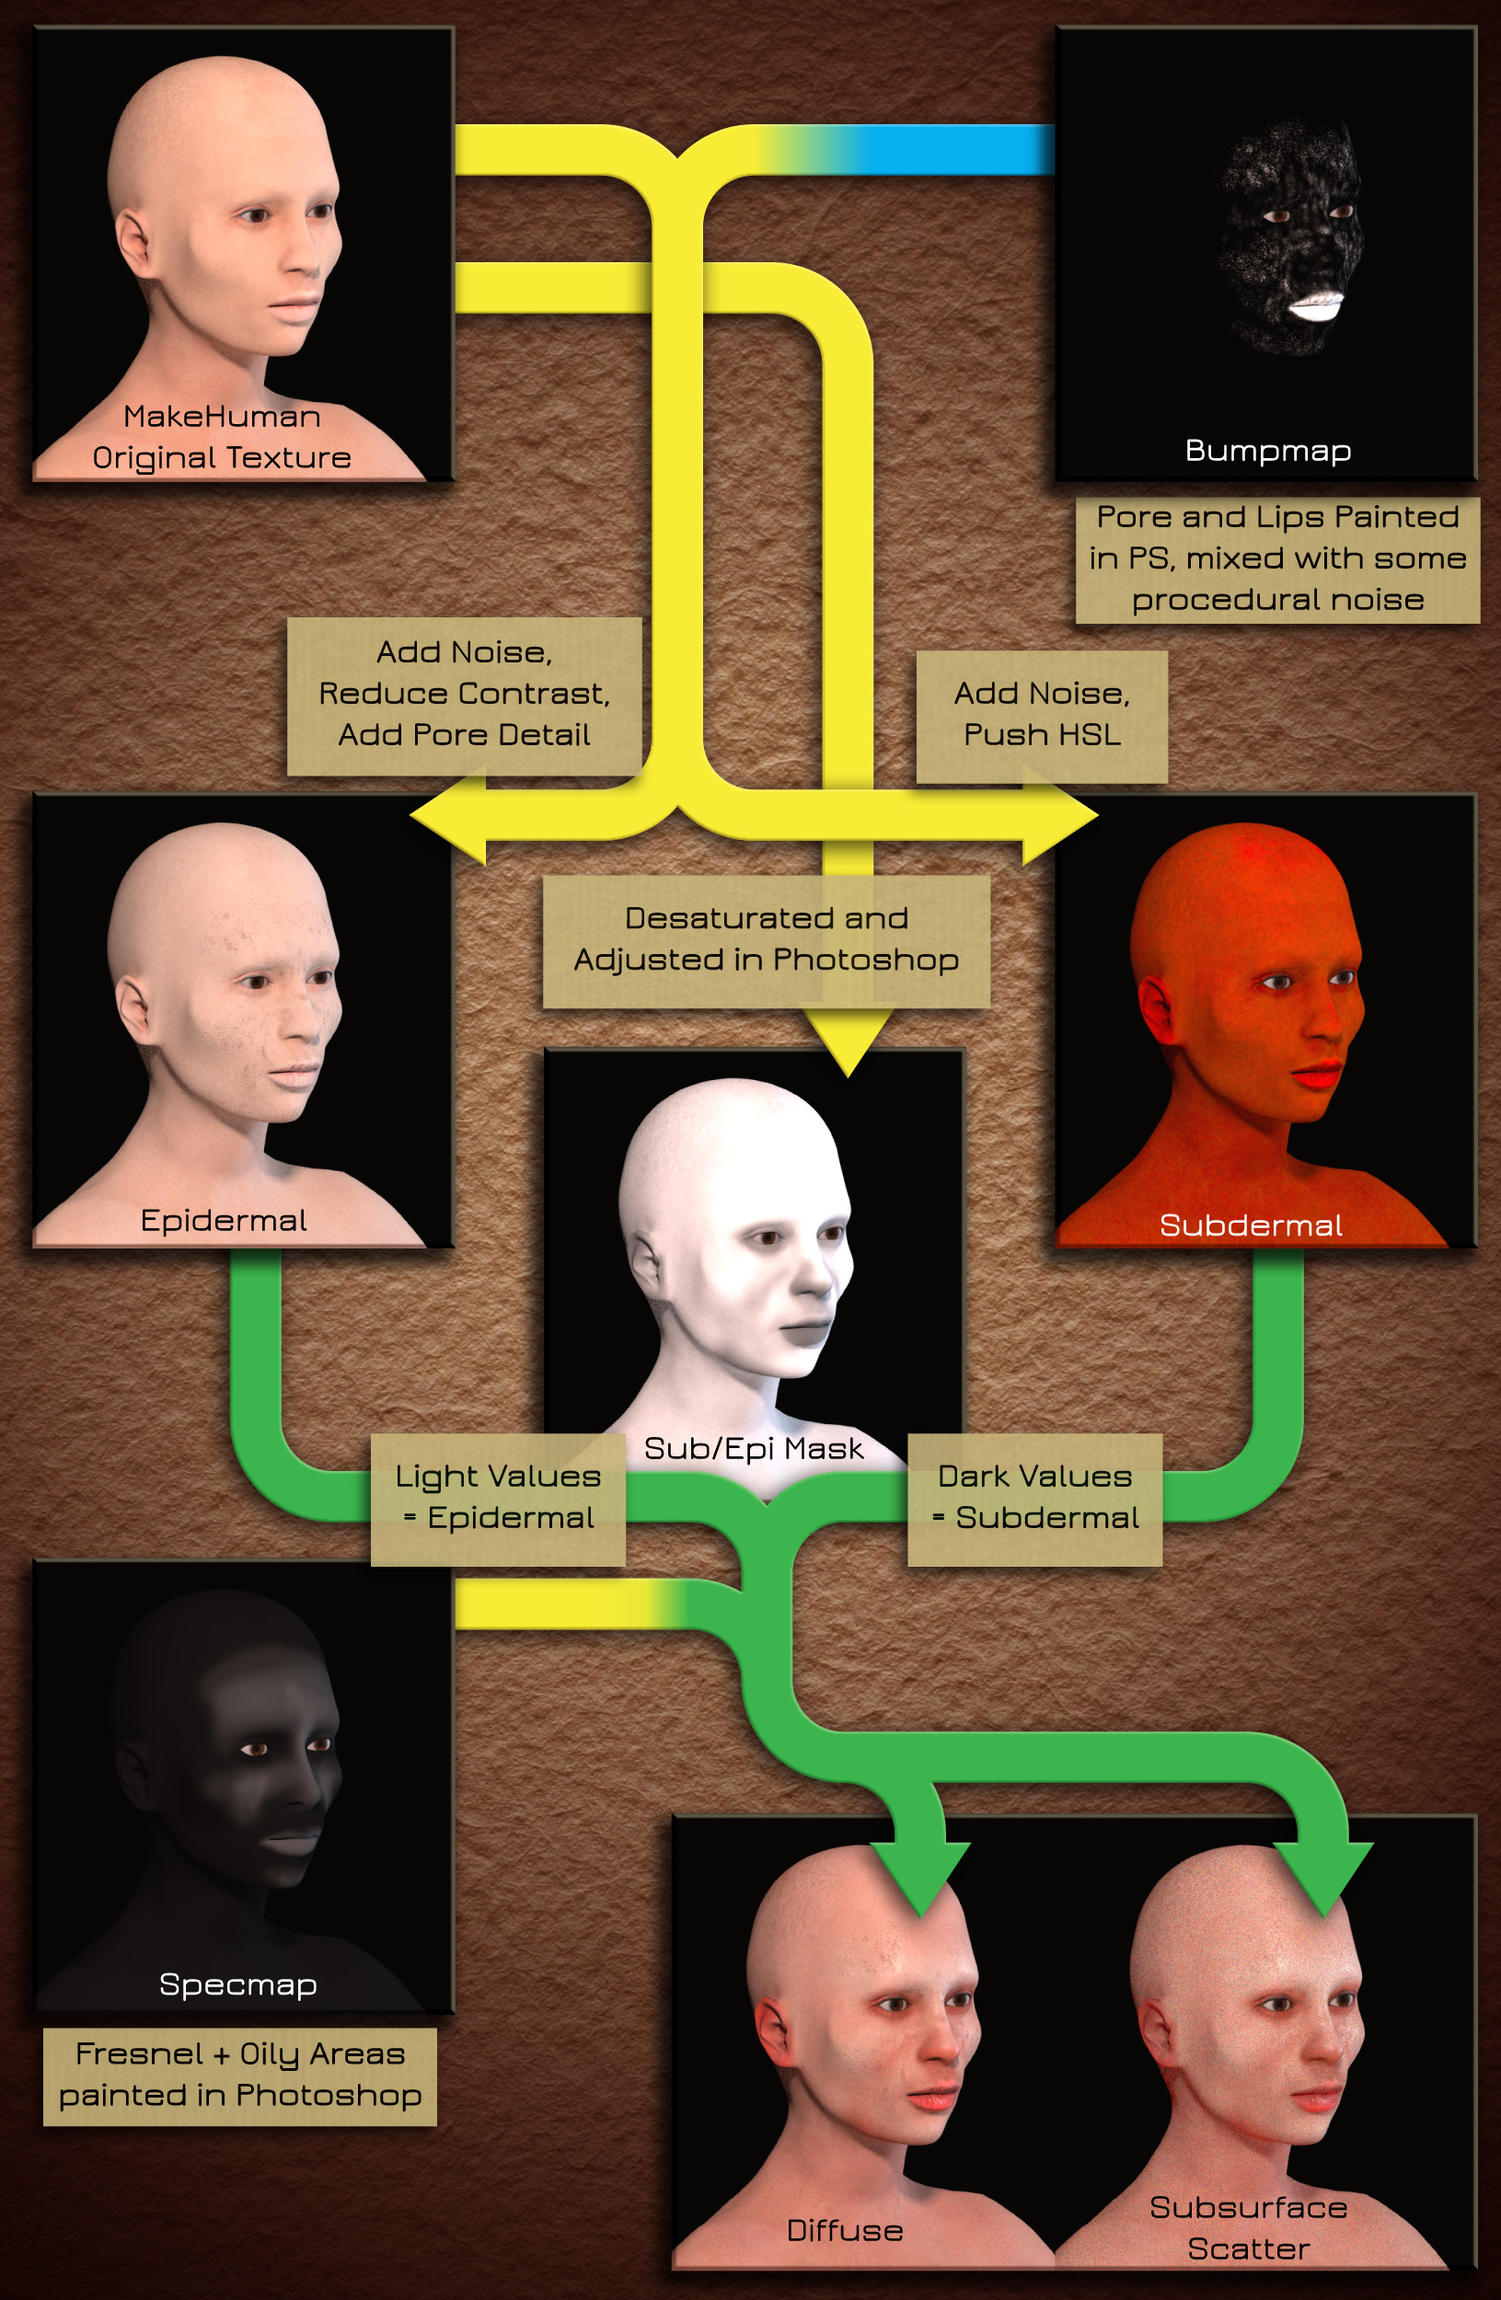
I’ve had no joy at all simulating the backscatter layer, so I’m limited to a two-layer SSS model. My current approach has been to create subdermal and epidermal textures, and then a mask texture to mix between the two, then adding spec and bump textures.
The example is a MakeHuman model, including the texture. Everything is super exaggerated because I’m trying to learn the principles at the moment rather than make a nice looking model.
So, what do you think? Am I making any obvious mistakes? Is there a better way of making a nicer SSS skin material in Cycles? Any thoughts on how to get a backscatter SSS effect in Cycles? (I’ve tried playing with backfacing/transmission lightpaths, but I can’t get it to only affect the most translucent areas, like in Ben’s article - I end up with a gratuitous subdermal effect across the model).
Thanks for the response! I think I had glanced at that, but because it uses the model Kent used as a splash for the “creating a realistic head” series, which used the Blender Render rather than cycles, I assumed that it was older and therefore wouldn’t shed much light on using the cycles BSSRDF node, but it looks like I’m wrong about that. That combined with the fact that it’s behind the CG cookie paywall, and I’m currently to poor to afford the subscription (yes, I am that poor, sadface) means that I hadn’t looked terribly closely at it.
I’m now curious about the magical secrets within, perhaps it will tempt me into splashing out on a CGC sub (instead of eating this week… :P)
On your spec map, you are better off using the full greyscale range. In other words the cheeks should be pure white. Then in your nodes you can narrow and adjust the range using color mix, colorramp, or something else. And you definitely need a really good bump/normal map. Almost always I use a separate mask for the lips. They are just so much different that it’s hard to use the same map for cheeks as for the lips. They have different procedural components too, so it’s good to isolate them.
I haven’t done much with mh lately, this was created about 6 months ago. It uses a sum of gaussians sss node setup. It’s decent but definitely right there in the valley. I want to track down the creator of the node group and see if he or she is ok with me re-sharing it.
Photox - thanks for the great advice! I’ll take it all on board. Although just to be 100% clear, this was mostly about understanding the concepts that go into putting together an SSS material in cycles, rather than trying to make a high quality skin render here - the effect of SSS is so subtle, that I needed something really exaggerated to get a real grasp of what the effect is. I felt like until I understood how the shaders interacted properly, spending a lot of time perfecting the maps would be a distraction, and I’d be tempted to “fix” the material by tweaking the images, rather than getting the shader nodes working together properly.
And it is a separate map for the bump on the lips - I believe the lips are actually using a completely separate UV layout, to get a kind of pursed look on the voronoi texture without distorting the skin - but for simplicity in the diagram, I just plugged the mixed image that was about to go into the vector bump node into a diffuse texture.
When you say it’s a “sum of gaussian sss nodes”, do you mean it has a series of nodes and then using add shader nodes to blend them together? This is the bit that I keep getting confused over - I’m using a grayscale map to mix the sub and epi layers, but Ben Simonds talks about adding or multiplying them together as if they were color values rather than shaders.
SSS isn’t really “done” like that anymore now that we have real SSS approximation rather than ugly, fake dipole methods. Backscatter should never be a function of the material in a good material system, but rather the effect of lights behind a scattering medium.
Photox: I’m assuming you’re referring to my sum of guassians setup, and unfortunately I can’t allow you to share it here. It’s a relatively decent income source for me, and as it isn’t an addon is not covered by the GPL.
Okay, you’ve piqued my interest and said very little! Would you mind elaborating a little on which particular techniques are irrelevant and which are preferred?
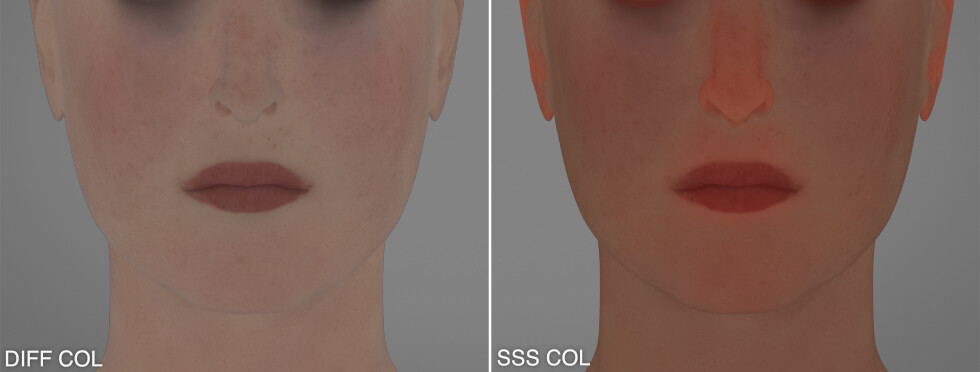
If you want my opinion, don’t bother with all that tri-layer business when you’re working in Cycles. My diffuse texture is very close to the final skin color, and the SSS very close to that, save for some minor reddening in the thinner more fleshy areas:
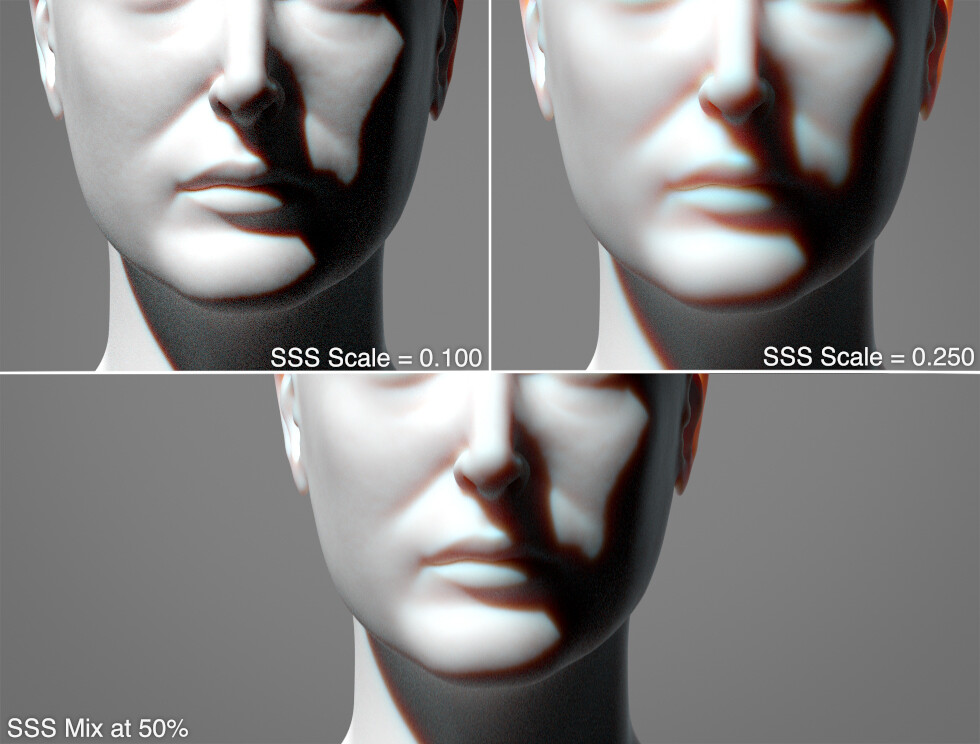
For the SSS shaders, I set the radius to my liking, then duplicate and mix the two SSS shaders. One has a low scale and one has a high scale. The result, I find, is quite pleasing.
Photox - Yep, I’m right with you on all of that, including the “driving you nuts” part. I’m still curious about the guts of m9105826’s shader - obviously I don’t want to steal their work, but I’m really curious about the mechanics of how the shader goes together. I saw a multiple-SSS-node shader here: http://blender.stackexchange.com/questions/12315/cycles-sss-seemingly-incorrect-colour-for-thin-surfaces-or-small-objects that I think is designed to iron out some of the colour distortion; is that along the right track?
Also, I’ve got a coding project to try and produce high-quality skin texture (including bump and wrinkle) procedurally, including a simulation of skin stress lines to distort the shape of the bump and wrinkles. I know how big a challenge that’s likely to be, but I’m going to have a crack at it anyway…
Zeke - yeah, I’m happy to ditch backscattering. I managed to hack a quite nice effect with heavy backlighting, but it looked atrocious under normal lighting so I gave up.
The part I’m interested in with your setup is how do you mix the shaders together? You indicate that you use a 50-50 mix of the two SSS shaders - do you think there’s any point in using a map to control that (with more translucent tissue biased towards the larger scatter and the more opaque tissue biased towards the smaller scatter), or is a flat mix across the model the way to go?
Also, I’ve been using SSS instead of diffuse, rather than mixing with a diffuse shader. If you get better results that way, care to comment on why? I guess you can kind of thing of diffuse as being SSS with a scatter of zero, so you’d use it as a third layer on top of the two SSS layers. Again, is that just mixed at a flat value, or are you controlling it differently in different areas?
Thanks for the responses guys, lots of food for thoguht here.
You can either do that or use the map to control the scale of the shaders themselves. I’d personally opt for the latter, but honestly I don’t think it makes too much of a difference.
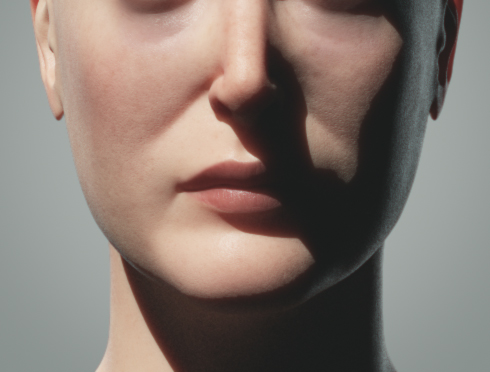
I like to keep the diffuse component in there to better define the surface and to maintain depth in the skin. A diffuse shader gives the skin a slightly fuzzy look which I also think looks more realistic. If you also want to use a map to differentiate these, you certainly can.