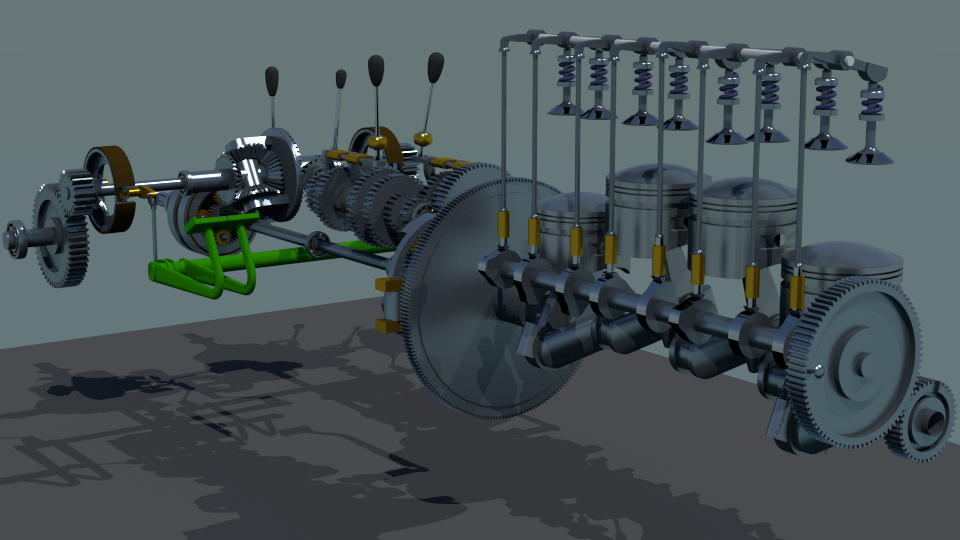
Something I have been working on over the last 5 months. It is still far from finished, but everything in the picture to date is rigged and works as it should. I know the materials need some attention, but I will get to that once I have finished the modelling. It is mostly rigged with Empties, Drivers and Constraints, but there is the odd armature in there, like for the differential for example, where flinging empties around in multiple axes caused me a few issues, but the armature works well here. I intend to add a front axle with steering and control the differential by turning the steering wheel.
The gearbox has twelve forward gears and 4 reverses, as did the original David Brown 770 I owned for many years. On the model these are all operated by the two gear levers, which in turn are operated by simply sliding two empties in one axis. The clutch, differential, brakes, PTO gearing, engine parts and torque splitter all work as they should. The rear wheels turn in the correct ratio to the engine depending on which gear is selected.
There are more pictures on my website at: http://www.lafavinie.com/blender/trans1.html - This page is also far from finished, but will eventually explain how I made and rigged this model.
I hope it is interesting to at least someone, sorry it’s not a monster or expensive car, but this type of thing interest me far more
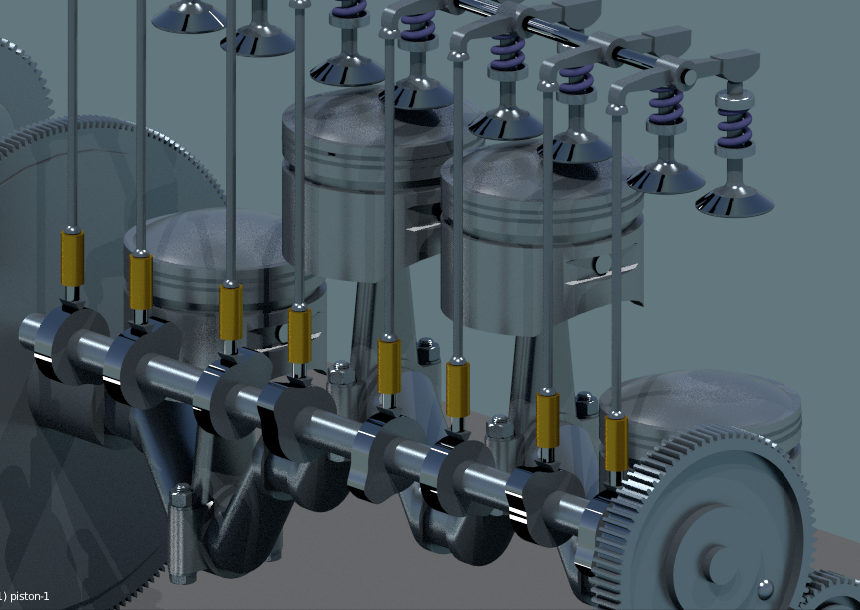
Not sure I understand HDRI map - sorry. I am going to need some help with materials, I am struggling to do cast and turned metal - I have an idea that I am going to need textures as well as Glossy/Diffuse mixes. I also think I need to look at how I light it so that you see some lights reflected in the metal. I have achieved this on some wooden meshes, but this is a much more complex model to light. My efforts with the engine are below:
I am getting somewhere with the polished metal, but the rest needs a lot of work and research. For the cast metal I saw somewhere you could highlight the sharp edges, but cannot remember how it was done. I will report back once I have some progress. Maybe I need to use a Displace modifier on the cast metal with a “cloud” texture, that’s my thinking for now.
On your engine, is it the valve gear you need help with or just pistons, gears, etc. I can give you some pointers fairly quickly rather than you wait for the tut, which may be a month or more away.
OK if you let me see the front and side views of the pistons and valve gear, I can get you started on pistons, P51 engine was a Packard V1650 , (RR Merlin copy) if I remember correctly, so it’s a 4 valve per cylinder V12 with a single overhead camshaft per bank, I seem to remember its a 60 degree, but I’m not entirely sure. At least it’s not a double cammy! I can of course help you with this - this is one thing I do know something about. Here is my test piece:
got to get back to that one !LOL
yes it is 60 degrees and as I remember it had one camshaft on each side
will try to find some nice pics showing this !
did u find the HDRI set up in sample file I uploaded in other thread ?
is it worth opening another thread
might take many posts and don’t wont to make your thread fill with all kind of other things!
Yes, When you are ready - open a thread in “Animation & Rigging” and I will respond to it. I got the HDRI link and will study it. I haven’t got McGavish’s engine yet - failed to download first time.
Yes! got some HDR’s from (Including the Studio15) from ************ Shhhhh. It looks really good. Not so good when I used the Grand Canyon one! Will do some serious work with this then post a new picture. I looked in the manual for Environment Texture in the World panel. I need to do more to understand it, but it looks good at the first attempt.
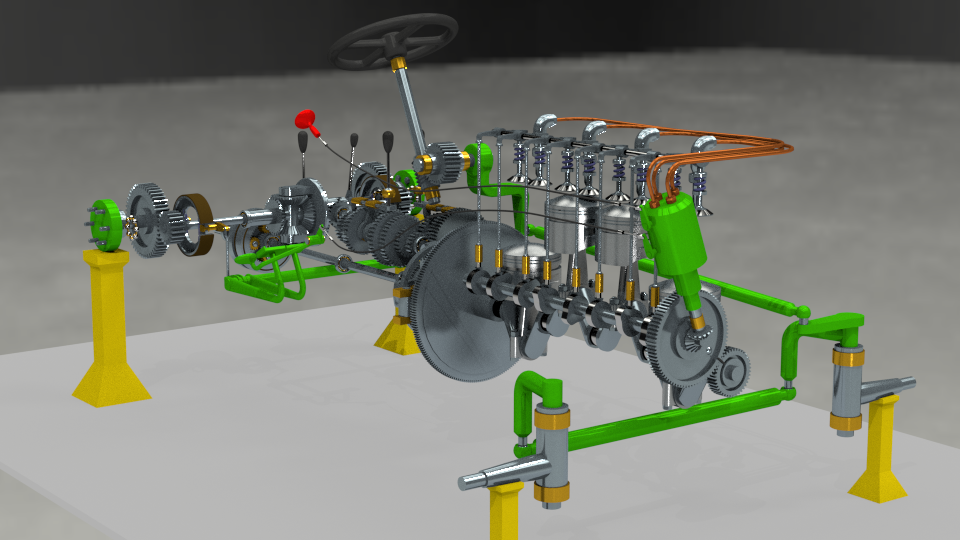
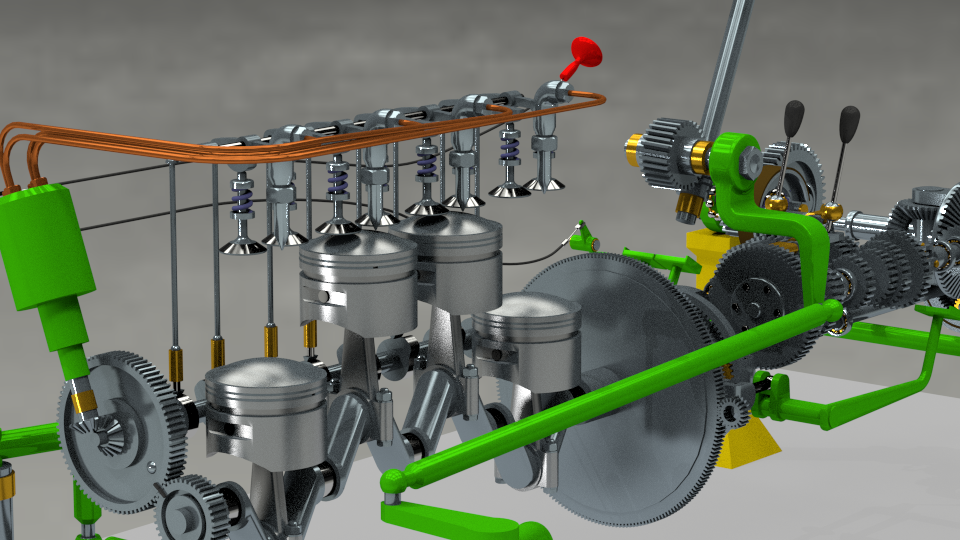
Ok so I have now added my first HDR background in the World panel. I think it looks much better with all the additional reflections, maybe I need something lower down to catch the clutch backplate. This is a big expanse of metal to have no reflections, maybe I should add some more features to it? I now have the steering assembly in along with the throttle, engine stop, injector pump, pipes and injectors. I even have some working cables now! So the detail is coming on. i am going to do some work on the materials in a separate file with just some simple meshes to see if I can get a better material setup. I am quite pleased with the green, but I need to make it more of a sprayed finish, so is this “bump” maps or displacement nodes? I will have a play…:yes:
For the gears I used the standard Blender Gears (Extra Objects) Add-on, but, and it’s a big but - it has some serious failings when it comes to bevel gears; it can only do equal sized 45 degree angles correctly. Worm gears; it can’t even begin to do these properly, Epicyclic “annulus” or outer gear with internal teeth - it cannot even attempt these. So most of them other than straight cut conventional gears, I did myself from basic principles - yep a lot of hard work… I could yap endlessly about the failings of this add-on, but it would probably all fall on deaf ears, and it gets most folk started, so it’s not all bad.
Here’s my test - the sphere is much more defined than the gears, is this because there are too many polys in the gear? These came from the number of teeth - perhaps I will try remaking the centre section.
Elub thread contains like 100 of nice material
it takes time to go through all pages but very good and worth it
you can build your own mat lib
new mat looks good but add it to your big scene and see what it gives
that is always the best test
may be think about adding something around in your scene
Hey; Looking good, I know how much effort & time goes into a project like this - I’ve done several. I have been an engine builder for 30+ years so if you need any help just hit me up. As far as your gears go - the texture is still slightly too rough, the shiniest part will be were the gear teeth contact each other & not the whole tooth either. The machined parts will be a little less shinny but with a tiny bit of roughness even tool marks. The parts that have no machining will of course be the roughest. I use a normal map along with my textures to achieve such things. Also I seen in your earlier post about the gear add-on, if you take the front or back half and rotate it parallel with the center the correct amount you will have a bevel gear (do in edit mode). Don’t forget the keyway in those gears too. On the valves - intake is usually larger (head dia.) than the exhaust & a bit too much “tulip” shaped. As far as lighting an HDRI is a must - don’t use an outdoor one for this since it gives the results most people are not used to (like a shop setting).
Are you modelling this after a particular tractor ? I’ve worked on quite a few of them. Keep up the good work…
About 300 hours of effort so far as far as I can remember! The materials are way off the mark at the moment, I need to do a lot of experimenting and research, I have found that they look OK in one angle but as soon as I move the camera - wow! they are all messed up, so I have lots of work here. I still have a way to go on the modelling itself. This is slow as each time I add a bit, I then do all the animation work, like setting drivers, etc. so the bit works with the rest of the assembly. My top level animation is a simple frame based driver - ((frame - 1) * pi / 100) * (var / 10)) where var is the Z value of the empty controlling the accelerator pedal, for the engine - press the pedal, the engine speeds up. Everything else runs off this, depending which gear is engaged, if the clutch pedal is depressed, how much steering lock is on for the differential, and so on - and its getting harder to coordinate everything as I add more.
Thanks for your input on the gears and valves, I will mod the valves straight away, The basis for the model is my old 1968 David Brown 770, which I reluctantly sold about 1 year ago (long story and too painful to repeat), so all this is from memory. I should say it’s loosely based upon the DB, that did not have epicyclic PTO gears or a torque splitter - just wanted to see if I could model and animate these! I am now using HDRI lighting - it looks much better, also I have just bumped the Cycles samples up to 1000, my poor Mac is complaining and getting warm. I think the materials side is going to take me a long time, but I am making progress. For the valve profile, I will look on t’internet to see about a better shape.
On the bevel gears, it’s the diff pinion and crown gears that caused the biggest alarm. The width is not taken down the tooth when the gear script does its thing, so for a 4:1 set the conical angles are 14.03 and 75.97 degrees, using these setting, the gears produced are way off, also the addendum and dedendum for the gears is modelled normal to the shaft in this script instead of normal to the tooth tip, so the teeth are different heights, hence doing it myself.
Ok I have been working on some materials for my own knowledge, the green “spray” finish on the cylinder may need toning back for the model - perhaps it’s too bumpy, but it is my first attempt at a non-smooth semi-glossy paint finish. I would be grateful for some feedback on these so I enclose the blend file that they are contained in and the render at 500 cycles.