Here is a quick proof of concept I made a while ago.
It shows an implementation of an inventory, inventory builder and inventory viewer. You can use it, modify it, learn from it as you like.
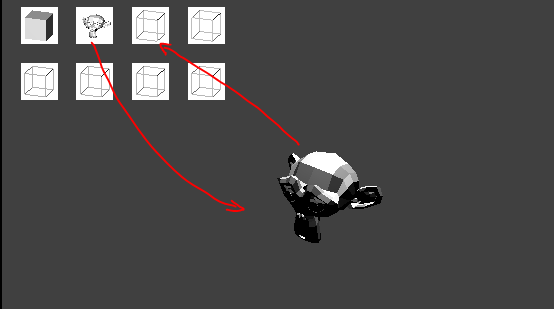
Usage:
click an object to “put it into inventory”
click a slot to “get the object back”
Components
A) The Inventory.adder just adds the object where it is. There is no logic that moves it around (such as moving under the mouse cursor). Feel free to add any logic you like.
C) The Inventory.mouse.collector
I) Collectable items (objects) should be placed at an hidden layer. Then add create a group with it in the level. This is because the object will be deleted when collected and you can’t get it back when there is no copy.
(Attention: currently there is no filter. Any detected object will be treated as collectable => modify inventoryController.collect() to adjust that behavior)
Inventory viewer:
There are two viewers to the inventory:
P) Have a look at the console. Inventory.printer prints the content of the inventory to console (sort of a second view).
It is there for debugging reasons. You can remove it.
GUI) This is a complete overlay scene, and will be added by the SceneManager. This allows you to toggle the inventory viewer on your demand.
The inventory view consists of 8 slots, the prefix of each slot determines it’s slot id (0 - 8).
Each slot has a child that acts as clickable button.
Each slot has a child “Item.Empty” which presents the slot content (with the mesh that represents an empty slot). When the slot content changes, the mesh will be replaced. Make sure there is a mesh with the name: “Item.<collected object name>”.
Example: collectable object: Suzanne -> mesh name (in the inventory scene!): Item.Suzanne
The objects in both scenes communicate via messages. This means you can exchange the level scene, or remove/add the inventory (not included in the demo file).
Inventory Builder
The first object requesting the inventory (inventoryController.getInventory) triggers the creation of the inventory. So there is no explicit inventory builder (with configuration etc.). If you want to create such an object (e.g. with reading the parameters from properties) it can call an own implemementation of createInventory(). As you might see the current implementation hard-codes a slot limit of 8 (no explicit relation to the Inventory Viewer).
Architecture:
MVC - Model, View, Controller (see Wiki)
The model contains a list of slots. Each slot contains one item. An item is the name of an object.
As said, this was a proof of concept. You can use it, or just look how things are done and implement your own ideas.
I hope it helps you.
Thanks Monster, am I correct in assuming this uses a bit of Video Texture to display an image of the actual mesh on the HUD? I will be testing and report my findings.
Okay, so I just opened the blend and got the error message “cannot find lib …//MessageAnalyzer.blend”. The file still works as intended (I think), but it appears it is linking to something not included. Anyway, this is great, thanks again.
You can ignore this error/warning. The MessageAnalyzer is my debugging tool to see what messages flow throw the scenes. It does not influence the normal processing. I simply forgot to remove the hook.
The items in the slots are all in the HUD scene. This allows to have different models (which they finally are) for each collected item. You can have items at any detail, but they must fit the box.
For example, you can create “iconic” models, planes with textures, alpha models, text …
Using VideoTexture is a nice idea, something like … snapshot from camera before putting things into your pocket :). Unfortunately I think it is a little bit impractical as the captured image strongly depends on the game’s situation (e.g. you might see nothing, or something else).
I hoped to evolve this prototype to something more general. So you could set up a few parameters, some models for the items and you get a full featured inventory.
I see, I will be delving into this as soon as I get though my current work load. I admit I didn’t see any images in the file, but I only did a quick check through the UV image editor. The Video Texture idea would rely on models that don’t change location or orientation, so each snap shot will always look the same. I was thinking you could have every “item” in another scene with the camera set up to take your snap shots from the correct angle. Now that I think about it, you would need a camera for every item, which as you said is very impractical. Unless there is a way to save snap shots created with the video texture, then all the items could occupy the same space and you could just toggle visibility as needed. This idea gets complicated really quick.
Well, I will wait and see what the next version brings. Thanks again.
If you think about the idea, you will quickly notice a simple (and safe) solution would be to make the screen shots beforehand. Nevertheless it is up to the required situation (development process, maintenance, desired visible appearance …) how to to implement that.
It already uses different scenes.
If you want to use the same inventory with different game scenes:
A) ensure you have item meshes for all collectible objects from all potential scenes in your inventory scene
B) ensure you have originals at an inactive layer in the game scene you want collected object to appear.
I wonder if it is possible to change the way to collect the item … for example when the player approaching the item and click a button…
sorry for English I use google translator lol
I did a test using logick bricks but I could not
I created another sample scene in his work … arrows move the player
The demo(see object “Inventory.mouse.collector”) uses a mouse left button and a mouse over any sensor. The later one is needed to identify what object is supposed to click.
You can change that to any sensors you like as long as there is an hitObject attribute (ray, radar, near). Be aware in case of multiple sensed objects any of them will be picked.
According to your example you need a:
near or radar sensor + a keyboard sensor (alternative a message sensor if you redirect the pick up request)
–> Python controller Module: inventoryController.collect