Some kind soul or was that sole, asked me to add a version of one of my posts to the tutorials/tips section, so here it is:
The question related to making bones spin at or beyond 360 degrees and the problems associated with them “snapping back” the wrong way to get back to 0 degrees rotation, which they do with monotonous regularity, Shouting at them doesn’t work so I looked at a different, more reliable solution.
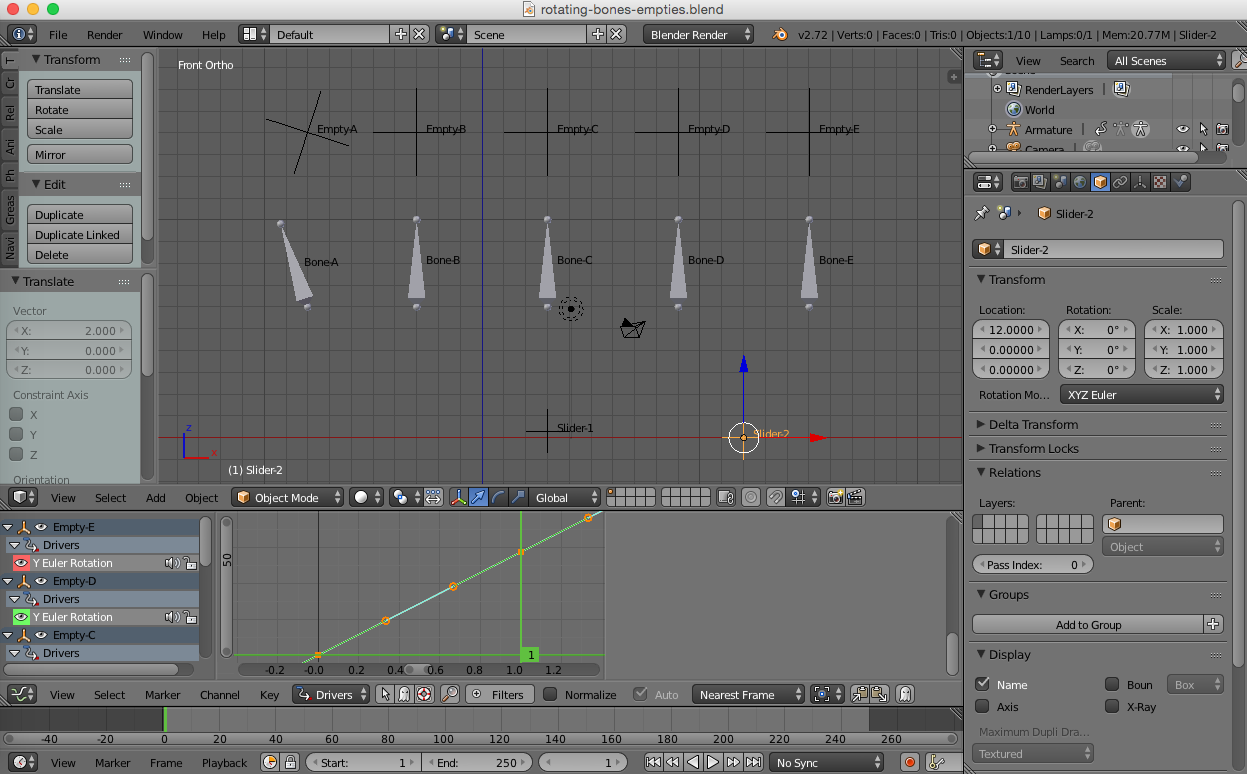
Here’s a picture, I like pictures:
The Solution:
That should read “The Solution - or one of them”
Key framing rotations of bones over 360 degrees does not work reliably! Please feel free to prove me wrong, if you know better. This is particularly true if you key frame say 90 degree increments, then copy your first frame to be the last one - the little blighter will snap back the wrong way. I gave up on this approach after struggling to make four radiator fans spin using an armature, sometimes you can type values in the transform box and keyframe these, but you must increase the value all the time, so the sequence might be 100, 200, 300, 400, 500, etc. making sure you never use multiples of 360, but still the little varmint will snap back occasionally, so it’s not a reliable method.
Drivers are the answer, see the above figure, just insert a single driver on the rotational axis transform box, To do this RMB click the box and select “Insert Single Driver”. Then go to the Graph Editor, select Driver Mode to see your driver setup, you may have to press N to see the expressions menu, Then do one of the following:
-
To make a bone rotate all the time, use a Scripted Expression of say (frame * pi) / 10 this will cause the bone to rotate a complete revolution every 20 frames, if this is too fast, use a bigger number.
-
To do the same but have the bone at rest in frame 1 the expression would be ((frame - 1) * pi ) / 10. In the example above the bone would be rotated by pi / 10 radians on frame 1. Come on, the maths is not that hard!
-
To control the speed and direction of rotation, add an Empty at Z = 0, X and Y anywhere you want. Then add a variable to your expression, this being the Empty as the target - Transform Channel - Z location.
Your expression will then be ((frame - 1) * pi * var) / 10
The bone will now not move if the Empty is at Z = 0, at Z = 1; it will rotate the same speed as before, at Z = 2; twice as fast, at Z = 0.5; half as fast, etc. At Z = -1; it will rotate the same speed but backwards, and so on. You can of course key frame the position of the empty in your animation.
- To make a bone rotate say 2.5 revolutions one way then rotate back 1 revolution, etc. Use the empty as before placed at Z = 0. The variable is the same as above and the scripted expression is (var * pi * 2) When you move the empty to Z = 2.5, the bone will rotate 2.5 turns, When you move it then to Z = 1.5, the bone will rotate back one turn. When you move the Empty back to Z = 0, the bone will rotate 1.5 revolutions back to where it started. You can of course key frame the Empty’s position in your animation.
If your bone is going the wrong way (ooh err missus!) with the expression, simply insert a minus sign immediately in front of one of the bits, e.g. -pi making sure you don’t have a gap. This is a foolproof method, I think and the bones will always behave themselves.
You will note that you do not need to remember the value for pi (3.1418 will normally do) because you can use “pi” in the expression and Blender kindly works it out for you. You can also use “math.pi” as an expression in Python scripts.
Don’t forget you must have “Auto Run Python Scripts” checkbox set in User Prefs > File tab, to run scripted expressions and also scripted expression turns are in Radians not degrees, there are 2 * pi radians in a full circle. This means that if you rotate an object by a value of 1 in a scripted expression, it will turn 57.29199821758228 degrees (approximately). To rotate an object a precise number of degrees, the expression will be of the form (N / 360) * 2 * pi, where N is the required number of degrees, this of course can be simplified, if required, so 90 degrees is pi / 2.
Here’s the blend file:
rotating-bones-empties.blend (467 KB)
Just press Play (ALT-A) and move the sliders in the Z axis.
Hope this proves useful and reduces the bad language resultant from bones not behaving, Cheers. Clock.
EDIT:
See the update below…
