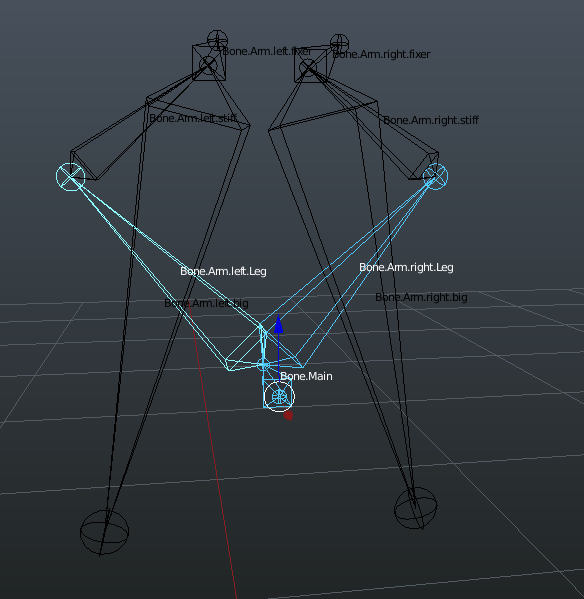
Bone.Main = should be controlling this on, by pulling up and to the side
the Bone.Arm.right and the Bone.Arm.right.stiff should be fixed in angle, just like one glued part
so, what should happen is:
dragging .main up/down: opening and closing the big legs
pulling main to the side: pulling the legs sideways
it’s all based on kinematic, so maybe the ik constraint does this,
but I’ve never used any before …
I tried to but I did not work, it’s kind of too difficult for my knowledge state :spin:
anyone can give me a hint…
In Inverse Kinematics, any bone with a IK constraint will have this constraint targeted to the TAIL of the target bone. This often means adding a small extruded bone to the operating bone, so you can IK a bone to it. In order to drag a bone, its tail must be free, i.e. not attached to another bone. One last point - I don’t know if you have used Quaternion or XYZ Euler bones, but you will need to use XYZ Euler for the IK’s on this rig. I’ll look at your blend file later today/tomorrow. In order to have one bone copy the rotation of another - use a Copy Rotation constraint or parent the bones together and check “Inherit Rotation”, if you parent a train of bones with Inherit Rotation, all will inherit the rotation of the first.
Last point - Look at the Bones individual IK stiffness values - these need to be either locked or have some stiffness assigned.
OK I have had a quick look - move bone “main-up-down” up or down to spread the legs, or sideways to twist them, move bone “main-side” to move the whole rig. I am not sure I understand exactly what you mean by “pulling main to the side: pulling the legs sideways” Let me have your thoughts. If you need a bone to connect head of “arm.L” to tail of “leg.L” just add it - I do not know why you have this bone there since it forms a triangle preventing movement of your rig.
Also … while IK is one way to do it, it’s not without its problems. IK will produce a solution that causes the bones to track the target, but it might not be the result that you’re looking for and, if not, it can be hard to adjust.
Another way to do it is by defining “actions,” and using the NLA Editor to blend those actions together. This gives you a fine level of control, although it is somewhat more difficult to initially adjust them. You can also define a series of “drivers” which are influenced by a “control bone,” and use the actions to manipulate that bone.
IK is handy for “quickly blocking-out” a movement, and it might also be fine for routine shots. Particularly-important shots might then need to be animated a different way.
is there any video/tutorial online, I’v not heared about this, but I also never used the actions and NLA …
any tutorials on especially NLA…
I could imagine it would help me with another thing I could have made faster
-> instead of copying the ipo curves of a animation to a second point of time
(yes I do it… ) using the action again … !?
 - very exciting examples… !!