I'm getting unwanted texture on jeep seats when using A.O

I am having a hard time following a tutorial showing how to use Ambient Occlusion on my jeep. https://www.youtube.com/watch?v=oeCPxRQaYFg&list=PLBbfFcNW4C9fTv2N6A4mKwSCLDoPCsU5W&index=12 I was able to bake the AO alright. But then he shows two ways to combine the AO with the texture already on the jeep body. Doing it within Blender using Multiply for the blend influence option. Or combining the texture with the AO outside Blender. (He used PS and I used Gimp). Either way I try, I keep getting unwanted texture on the seats. The seats should look like the wheels, steering wheel, gas can and lights. No texture. Can someone tell me what I am doing wrong?

After I uploaded the blend file below, I noticed the boxes under the seats were too high, so I lowered them, but I still have the same problem.

http://i1130.photobucket.com/albums/m539/Blanco111/help01_zps0779cb63.png

Blend File: http://www.pasteall.org/blend/32978

You’re not using ambient occlusion on the seats.

Texture that has AO added is assigned to material that is jeep2_texture. Seats use “jeep texture” material but that’s not the problem if you want to use that particular material. Tires don’t have material on them.


Seats are not mapped properly to use the same texture as others. Either you would need to make room for the seats or use another material and texture.

Most of the objects in the scene have unapplied object scale. Tires also have non-uniform object scale which can cause troubles in the UV map (Blender warns about it). Unapplied scale might give wrong ambient occlusion results where occlusion distance value doesn’t match corresponding result. Most scales aren’t that far off though (around 0.3) and the distance is the default of 10 (big).

Object scale can be applied in object mode with Ctrl+A -> scale.

I went around the jeep in object mode and crt+A -> scaled everything. Now what do I have to do? Do I have to start all over with unwrapping and texture painting? (The seats, lights, gas can, wheels, steering wheel, dash knobs and shift sticks aren’t supposed to have texture yet per the tutorial.)

http://i1130.photobucket.com/albums/m539/Blanco111/help2_zps0a33f10e.png

Blend file: http://www.pasteall.org/blend/32985

No, you don’t have to. It’s about what you want and what you’re happy with. Just mentioned those things because they can affect the results you’ve got so far but if all you need is to not have texture on the seats, remove its material.

Rotation, location and scale can be applied on multiple objects all at once.

Just additional information, nothing that would require you to do everything all over again. Even if you wanted to combine textures and map UV’s from multiple objects to use one image texture, there are ways to remap them without doing everything again (namely baking). Here’s some more related information:

The way datablocks work could be thought of like a hierarchy:

  • object 0
    [LIST]

  • object data 0 (mesh)
    [LIST]

  • material 0
    [LIST]

  • texture 0

  • material 1

  • texture 0

  • texture 1

[/LIST]
[/LIST]

  • object 1

  • object data 1 (mesh)
    [LIST]

  • material 0
    [LIST]

  • texture 0

[/LIST]
[/LIST]
[/LIST]

You have different objects you manipulate in object mode (jeep body, seats, tires, so on) and they have their mesh that you manipulate in edit mode. By default materials are bound to object data and materials can have textures. Each of those can be shared (linked), as in the example object 0 and object 1 have separate mesh data but share one material, which of course uses the same texture.

In the example though, material 1 uses the same texture as material 0 so if you went and changed the texture on object 1, you would change how the same material looks in object 0 and also how material 1 looks on it. https://www.youtube.com/watch?v=pJAs7QjalTg

You have shared materials in your file. The seats and the jeep body share same material, although in jeep body that material is not assigned to anything (material covers 0 faces). The way you could change the texture on the seats and not affect anything else (visually or otherwise) would be to either break the material link so that both objects would have unique materials, remove that material from the body since it’s not covering any faces, or replace the material on the seats with a new one.

Or of course, remove the material from the seats and decide what to do later.

Thanks for responding. However, I plan to start over. I have so many materials and textures, I can’t understand which goes with what. I don’t understand data blocks even after watching the tutorial link you provided. It’s something I know I should learn, but I am completely lost. I indicated “solved” on my original post because I don’t want someone to explain what I should do since I am starting over. Hopefully, I’ll be able to keep my material, texture, and Ambient Occlusion working better.

Didn’t look like a mess to me.

Perhaps the confusion comes from following the tutorial too carefully, meaning following the steps. There are multiple ways to go about these things, which is good because you have options but not knowing about them might make one feel lost when following one strict path.

Here’s another explanation, maybe this is more straightforward way to explain and understand

(Here’s the same image in case forum scales the original too much http://www.pasteall.org/pic/show.php?id=80220)


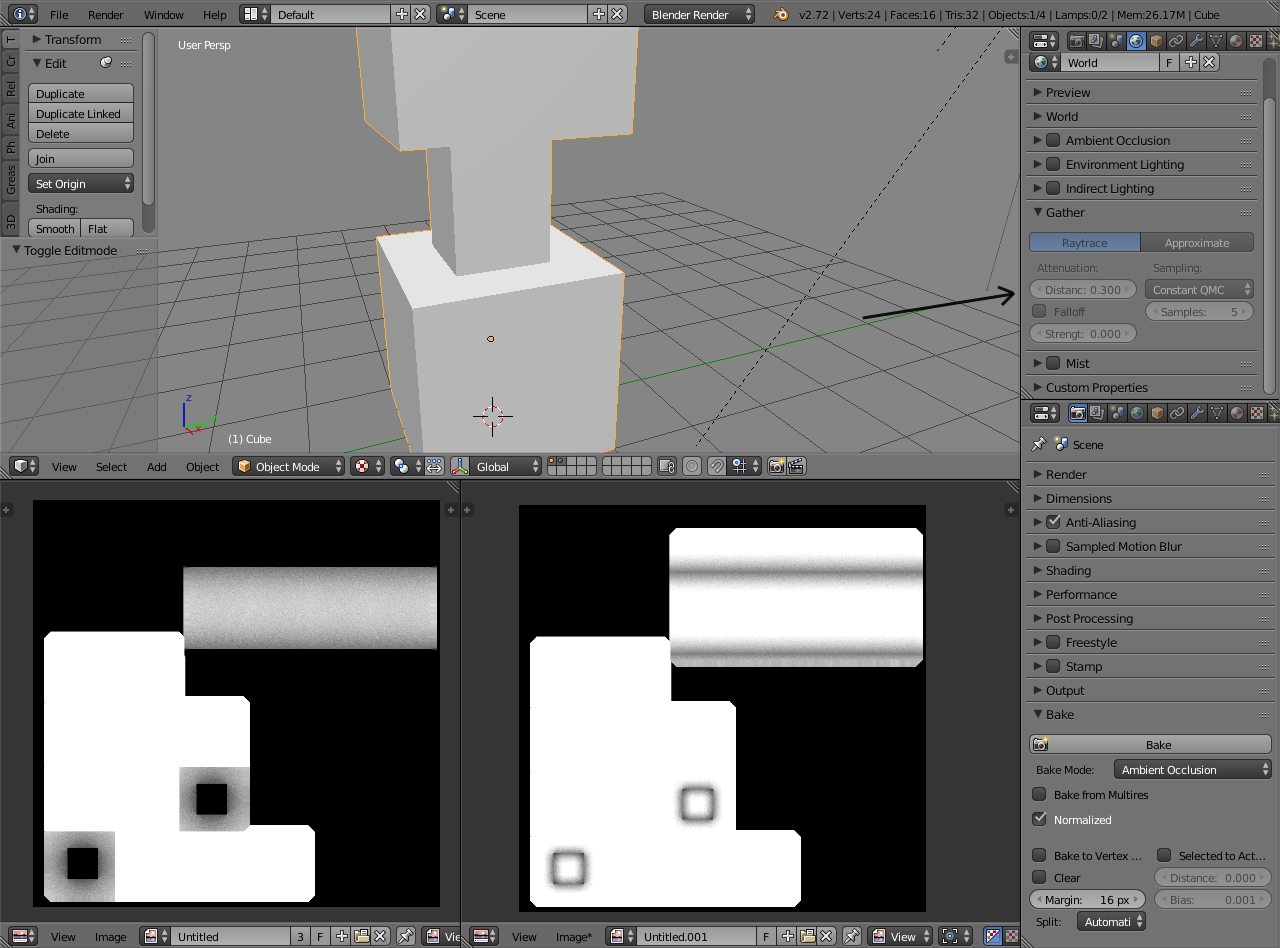
The example task is to add a cube and put a image texture on it. I’ve annotated and numbered the properties editor buttons. The workflow goes through them from left to right, or deeper in the hierarchy if you think it like that.

We would start in object mode, shift+A -> add mesh: cube. It puts a new object in the scene and since it’s a primitive, it also has visible mesh data (vertices/edges/faces). That’s numbers 1 and 2 covered. Next we would like to give it some color so we would go to materials (3) and add a new material. But a solid color is not very pretty so we go to textures and add a material texture (4) which is a image type.

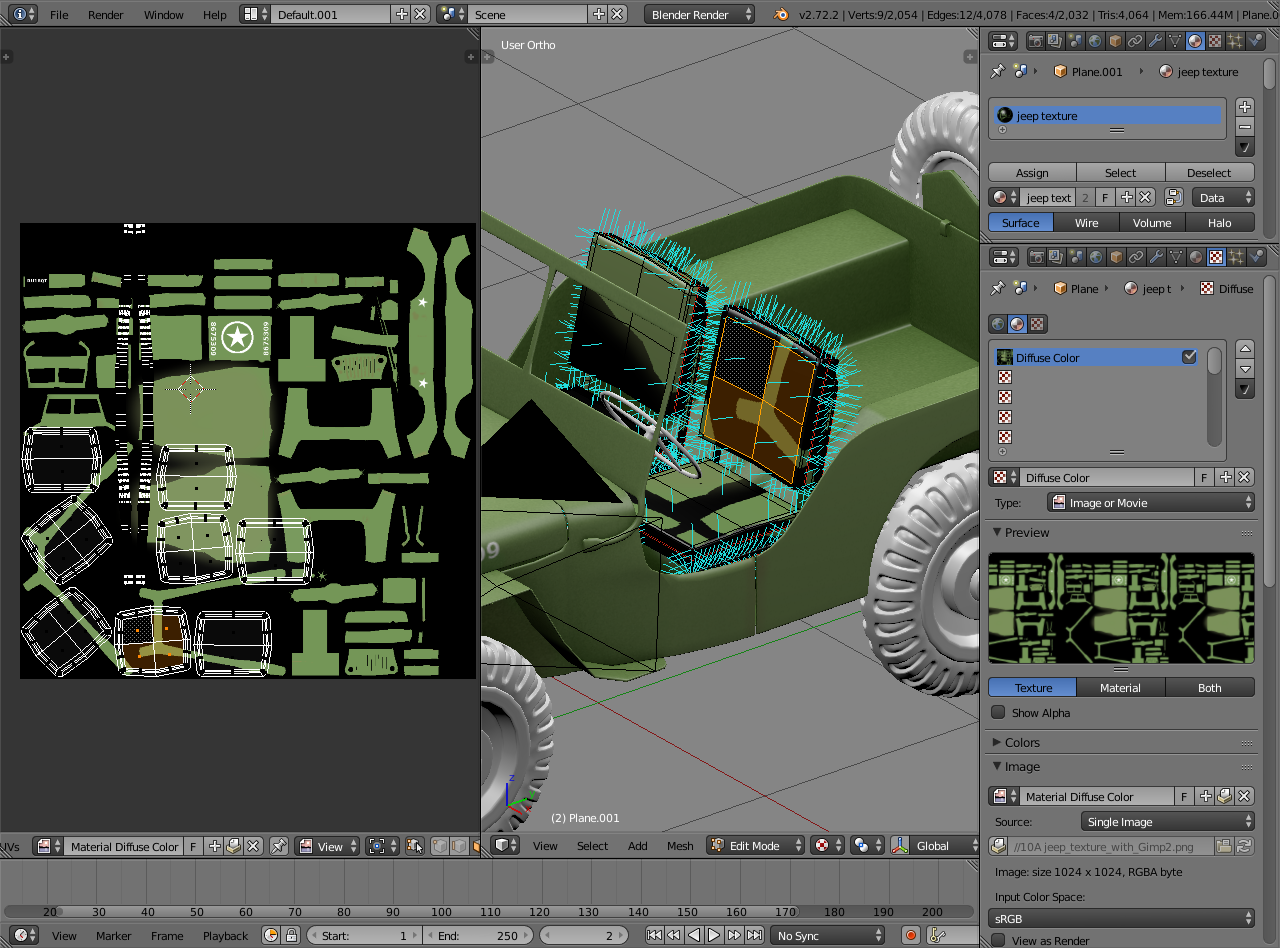
And then the result reminds us that image textures don’t look nice with the default mapping and we got ahead of ourselves, so we would go back to the step after adding the cube, UV unwrap it in edit mode, and we get a UV map in object data (2). It gives us controllable mapping between 3D object surface and 2D texture.

So the order is add object (with its data), edit mode to unwrap as a preparation for image texture which neatly puts it in object data, then material, and then material texture. On that texture we would go from top to bottom: tell it’s a image type, then tell it to use UV mapping, and then how to influence the material.

Could also think them backwards as how those influence each other. Texture influences material properties (color, specularity, mirror, etc), material influences the mesh (you can have several assigned on it), and mesh influences object (object structure).

Sharing/linking is just a semi-automatic way to save resources - you don’t want a new copy of everything every time, it would be wasteful, and you certainly wouldn’t want to go through the process of setting materials and textures again and again. Blender exposes this functionality so that you can use it to make changes on how those resources are shared and what they use as a source.

So after reading through your posts and watching a couple of data block youtube tutorials, I selected the seats and noticed (lo and behold) they had material and texture. So I deleted the texture and the material for the seats. I have no idea how the seats got material and texture data blocks. All is good, I think.

I’ve got these dark lines on my mesh hood and seats when I render the jeep. But I think (hope) that’s the lighting. I’ll probably have to post a separate question in the lighting and rendering subforum. At least I didn’t have to start texturing all over again, and I continue on with the tutorial.

http://i1130.photobucket.com/albums/m539/Blanco111/help3_zps934308cb.png

Blend file: http://www.pasteall.org/blend/32998x

Yup. It’s good. Deleting the material is enough because objects can’t have renderable textures on them without materials.

Yes. The lines on the seats seem like they’re shadows. At least they’re gone when rendering without the windscreen frame


The line on the hood comes from uneven subdivision because there is a hole underneath it. Need to go and merge vertices so that the surface gets connected like they are on top of the hood. Easiest way to do that is to select both long edges, scale to 0 along X, and then W -> remove doubles to merge vertices.


Edges pulled apart to show that they’re not connected underneath the hood. Render showing the black line that appeared and fixed version.

It took me some time, but I fixed the edges under the hood. Now all the hood has are the shadows from the windshield. I’m wondering if I should do the ambient occlusion over again based on your comment above. Should I?

http://i1130.photobucket.com/albums/m539/Blanco111/help4_zpsb11df83c.png

Blend file: http://www.pasteall.org/blend/33006

Most of the objects in the scene have unapplied object scale. Tires also have non-uniform object scale which can cause troubles in the UV map (Blender warns about it). Unapplied scale might give wrong ambient occlusion results where occlusion distance value doesn’t match corresponding result. Most scales aren’t that far off though (around 0.3) and the distance is the default of 10 (big).

Object scale can be applied in object mode with Ctrl+A -> scale.

No. You wouldn’t get a different result just by applying object scales and baking again. Tested if object scale has an effect on ambient occlusion bake and it doesn’t. It would only have an effect if the object scale was non-uniform and would screw up the UV unwrap, which it uses to bake onto the image. All the baking you’ve done so far hasn’t been affected by that.

Another reason why you wouldn’t get a different result, no matter if the object scale was taken into account or not, is because you used the default distance for ambient occlusion which is 10. The distance means how far something can count as occluding geometry. Usually a corner or a crevice gets occluded by geometry that is in close range but you have a setup that bakes occlusion for a corner that takes the whole car into account. Is it bad? No. Even if it can take the whole car into account, doesn’t mean it will or that you would want to change it to much less than the default.

Because in the end it doesn’t matter. The only thing that matters is the result you’re getting and if you’re happy with it. You used it for the textures which look alright so just move on.

Anyway, here’s a comparison of AO distance


Top: baked object, arrow points to the distance setting (yes it’s grayed out by default but still works, don’t ask why)
Bottom left: AO bake with the default distance of 10
Bottom right: AO bake with the distance of 0.3

I was wondering where the default distance 10 came from.

I’m supposed to add mud to the wheel using brown color with the cloud texture mask, but I can’t get the texture brushes to put anything on the wheel. I was at one point able to paint it brown, but I must have done something so now I can’t do any texture painting on the wheel at all. Can you tell me what I am doing wrong?

http://i1130.photobucket.com/albums/m539/Blanco111/help6_zps507c1903.png

Blend file: http://www.pasteall.org/blend/33014

There is no material (texture image missing too) on the wheels :


Thanks for responding. I have no idea why, but it’s working now.

http://i1130.photobucket.com/albums/m539/Blanco111/help7_zpse5d04533.png