My very first attempt for a basic armature (your opinions?)

Hey Everybody! :slight_smile:
I’m new here and still learning Blender (2.72b).

So, In other software I used I had very bad experience with the “skeleton” and binding part.
When it gets to color weight and stuff… I always gave up because it never worked for me.

This is my very first attempt on Blender, as you can see the object is VERY simple, no hands no fingers.
But still, I didn’t make it skinny because I wanted to experience the “problems” and learn how to solve them by myself.

So what I show you now (screenshot attached) is the armature before bind with the object, I would like to know if you think I put the bones on the right places.
I’ve tried to put them considering where the volume of the object will be able to bend and rotate, but I’m not sure.
It’s hard to see but I took the elbow a bit back so it’s not 100% straight line.

My goal is to make this weird character animatable without… glitching errors of bad weight influences or whatever they called (sorry about my ignorance I’m very new to this all thing).

What should I do next, automatic weight? or do you recommend me to try something else?
Do you have any tips for me from the current stage?

BTW - I have no clue how to continue to the next stage but I will check out some tutorials but what I did so far is from what I understood while playing with blender.

Thanks ahead and sorry about my bad English.


It would be good if you posted wires, or just screenshots of the mesh in edit mode so we can see the topology. If it’s a learning excercise, post the entire blend, as most likely there will be 3 -10 issues with the mesh that should be adressed before auto weighting.
Is is perfectly mirrored? Is it perfectly centered. is the scale and rotation applied. Are there doubles?.. and more. You can post the blend as if it were an image. If it’s too large for some reason, pasteall.org and dropbox are good for links.

Just from the object mode here:
She’s looking rather large, by default 1 blender unit is 1 meter so this guy is like a two story house.
The armature should be mirrored
It’s a bit boxy, but for a test/learning case that’s not a big deal.

Thank you for the great tips Photox!
OK, I’m going to share what I did, trying to follow your tips:

1 - Changed the size of the mesh into around 2 meters (he supposed to be a big guy or something hehe).
2 - Clicked ctrl+A to apply the rotation & scale, I also apply the location so everything will be reset.
3 - Applied the same 3 for the armature.
4 - Selected the shoulder and arm bones (3 bones) shift selected the Hip to the leg and foot (6 bones).
5 - Duplicate the selection, changed the pivot to 3D Cursor, I mirrored the selection and flip names (All .L become .R)

I’ve attached the blender file to this thread, but I didn’t parent the bones yet just to progress step-by-step I didn’t want to jump ahead and do more mistakes before more people will be able to have a look and give more tips.

Please remember, this creature mesh is not really important I didn’t waste too much time on it because my goal was to test the armature in Blender for the first time and learn from the experience.

I believe that if I’ll parent the mesh to the bones next I will have weird results in some areas… and will have to find out how to use the weight painting tools in blender (I have no clue…).

But I will be surprise if I did put the bones on the correct place for first attempt and the mesh won’t go crazy after parenting the armature to the mesh.

I’m not looking for perfect result but for a working one, and learn the pipeline to get it work. :slight_smile:
OK, what do you think?


Attachments

Humanoid_Character-1c.blend (883 KB)

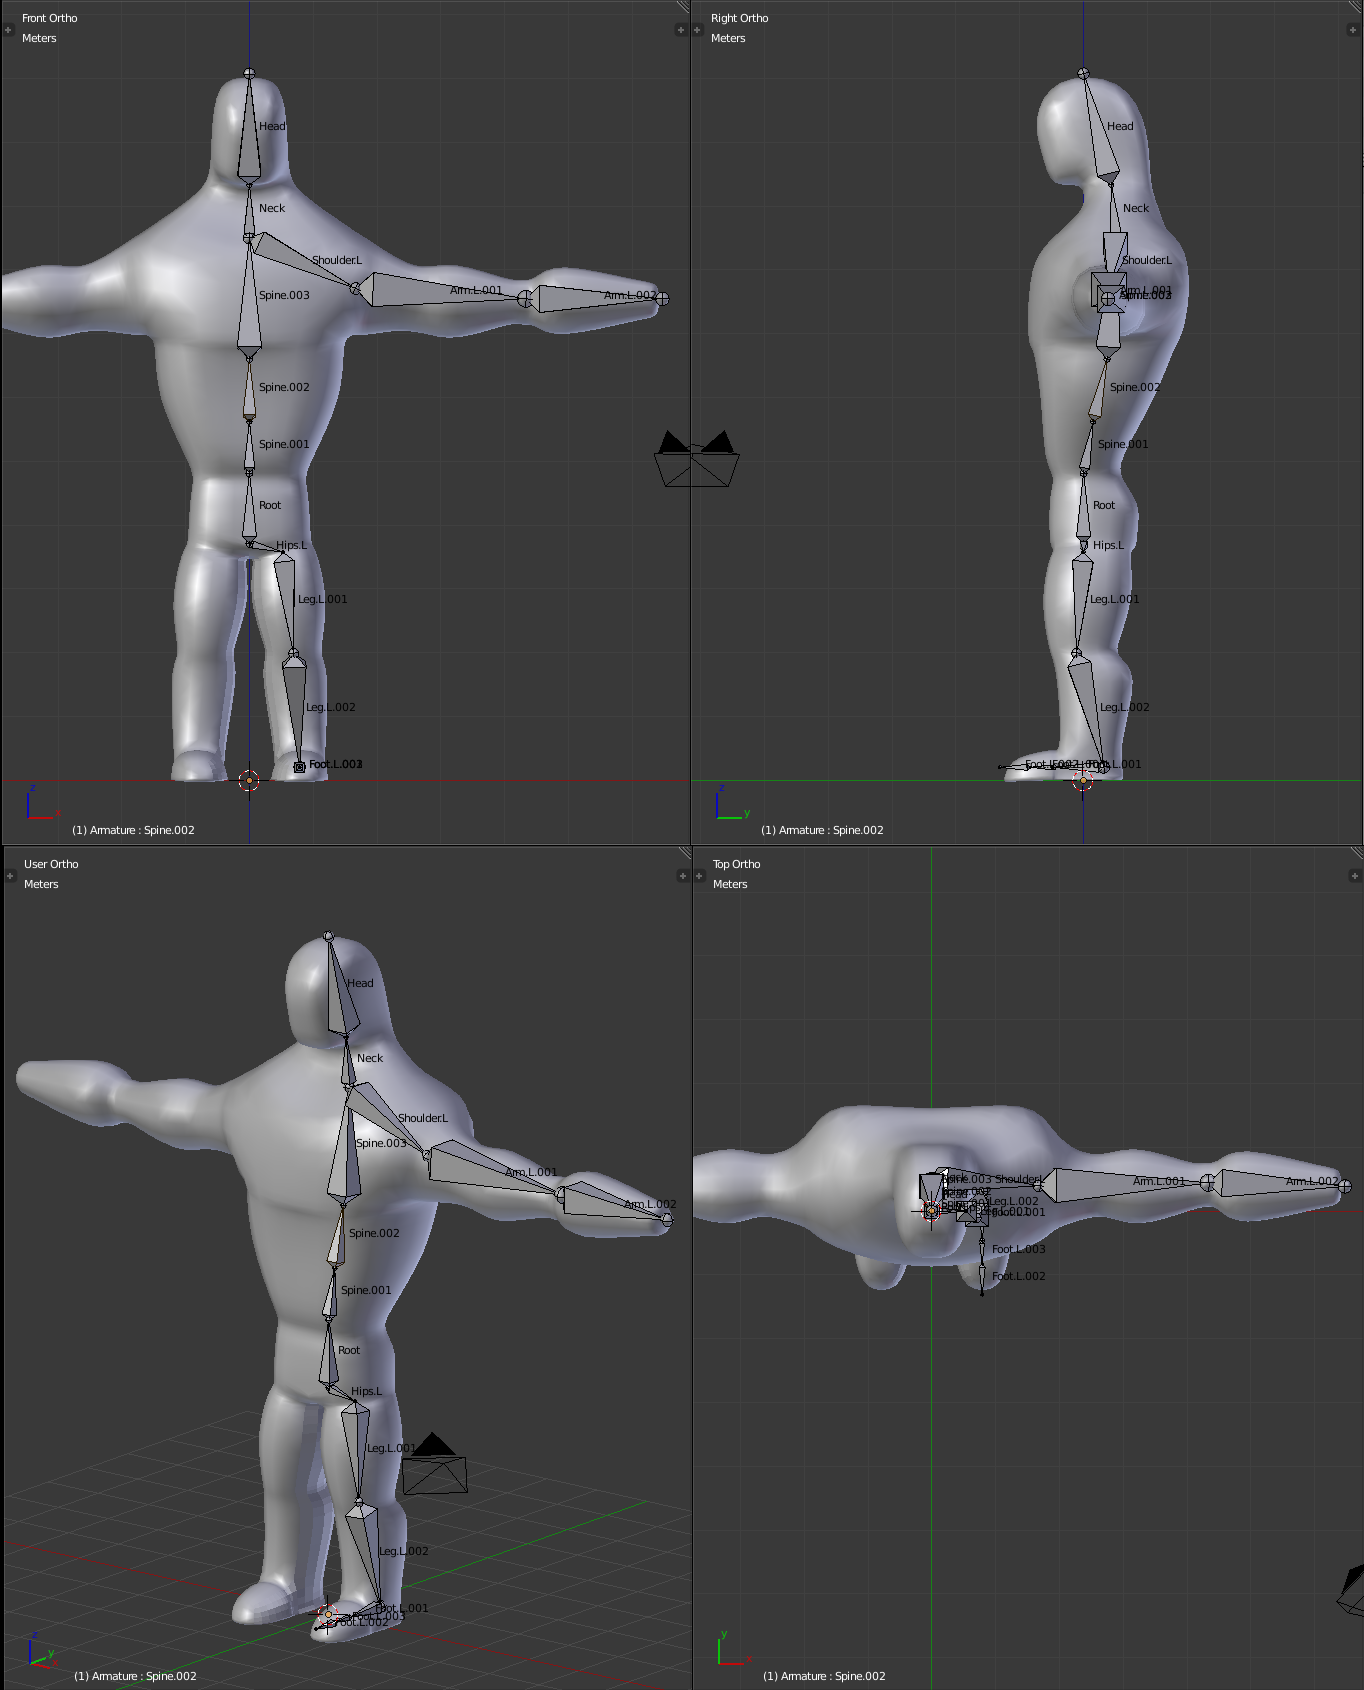
Overall, This will work. Hips.L and Hip should have the root as the parent. Select the armature, hit tab into edit mode, select the hips, and in the bone tab (bone icon) make the parent the root bone for both of them. That way when you move the root bone the whole rig follows.

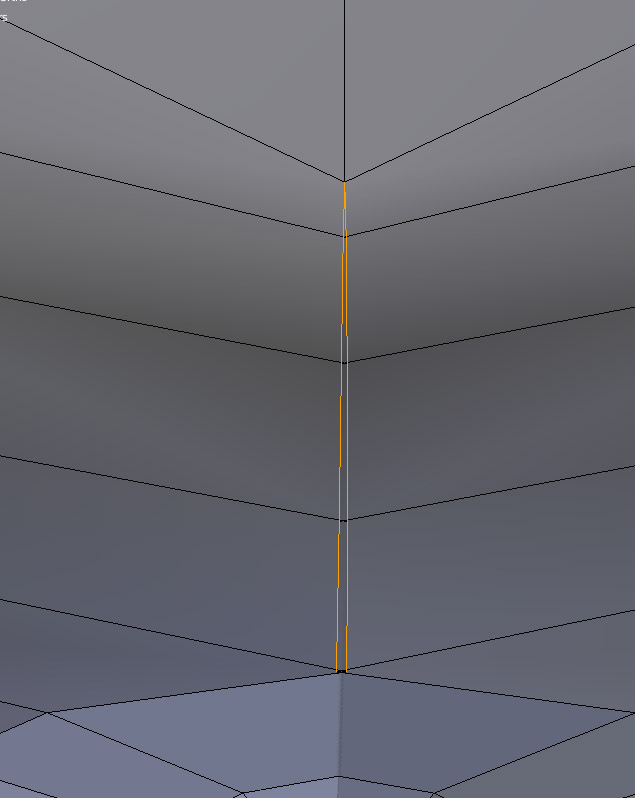
Also, and there’s never an easy way to say this, there’s a problem with the butt crack. It’s the only little part that not’s manifold (Closed and continuous – see screenshot at bottom (pun intended!) :cool:

You could auto weight now (but hold off), select the charcater in object mode, hold shift select the armature ctrl-P choose auto weights. It will work, and you will be able to pose, as is, but I would do the fixes lower down first.

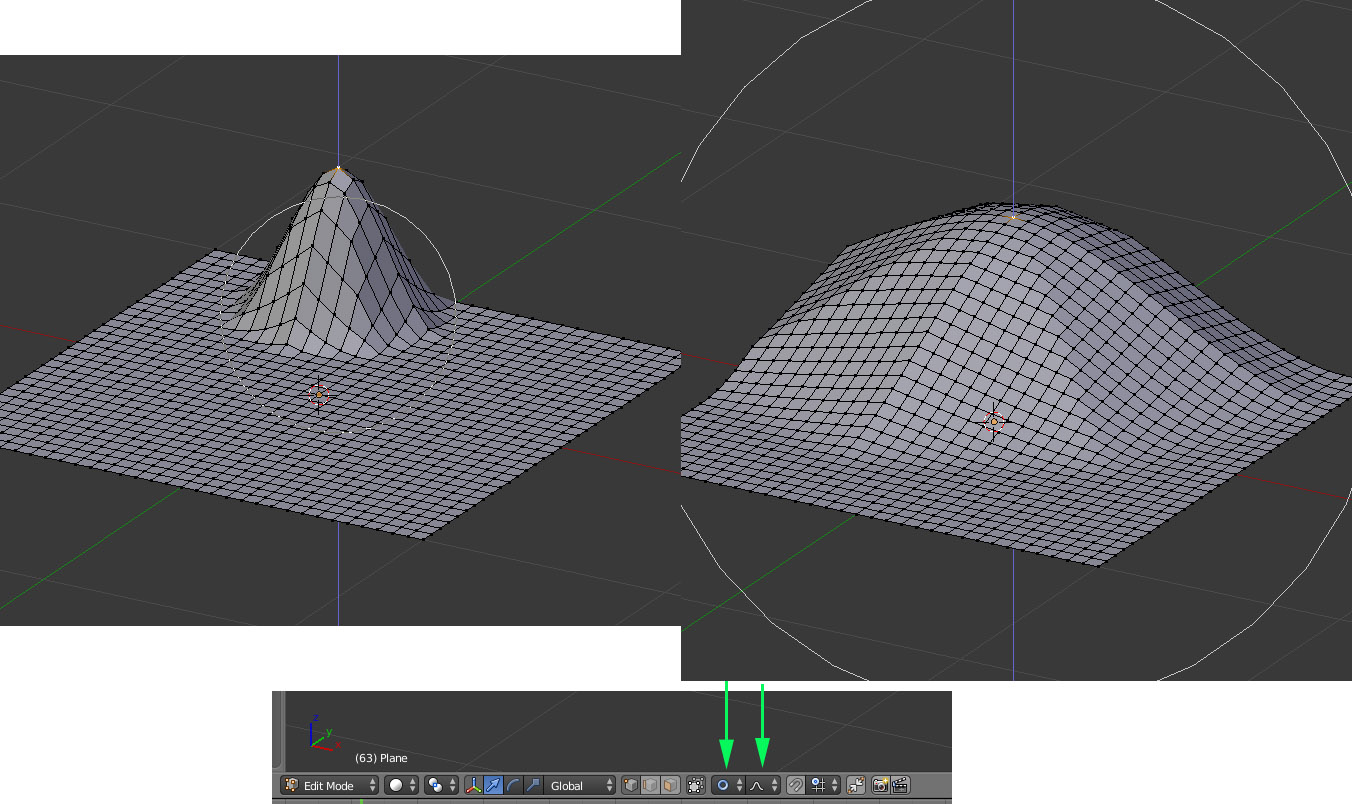
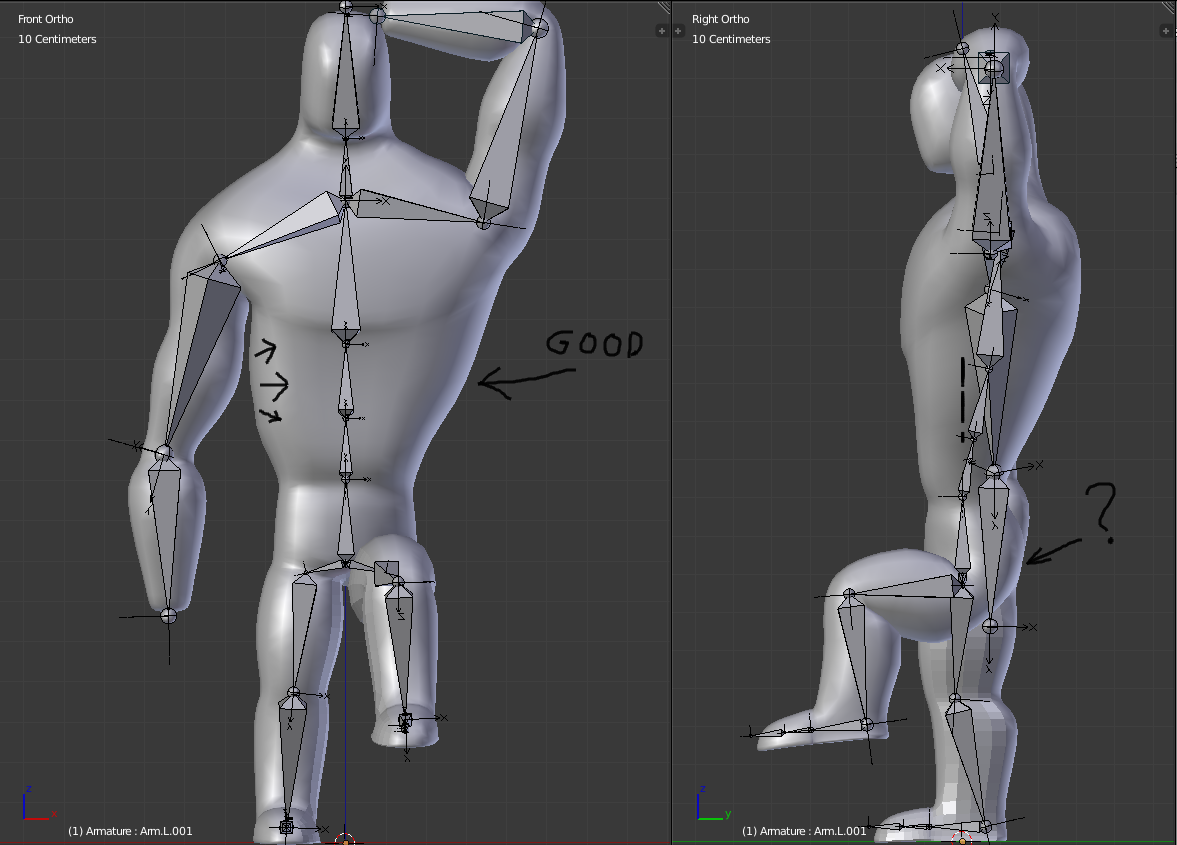
Then select the armature, go into pose mode, select a bone, and rotate it with r. you can use global coordinates, to rotate hand above head it would be R Y 90. But you should get used to using and knowing that bones have their own coordinate systems, in which the y axis runs along with the bone itself. In the data tab (man or rig icon) check the ‘axes’ checkbox to show the bones local axes. This is very useful and it’s quite common to bend a knee using the local axis, by hitting R X X (you hit the axis twice for the bone local cordnate system) this is because when the leg as a whole is roatated to some odd global angle you still want the knee to bend perpendicular to the legs bones. Hope that makes sense.

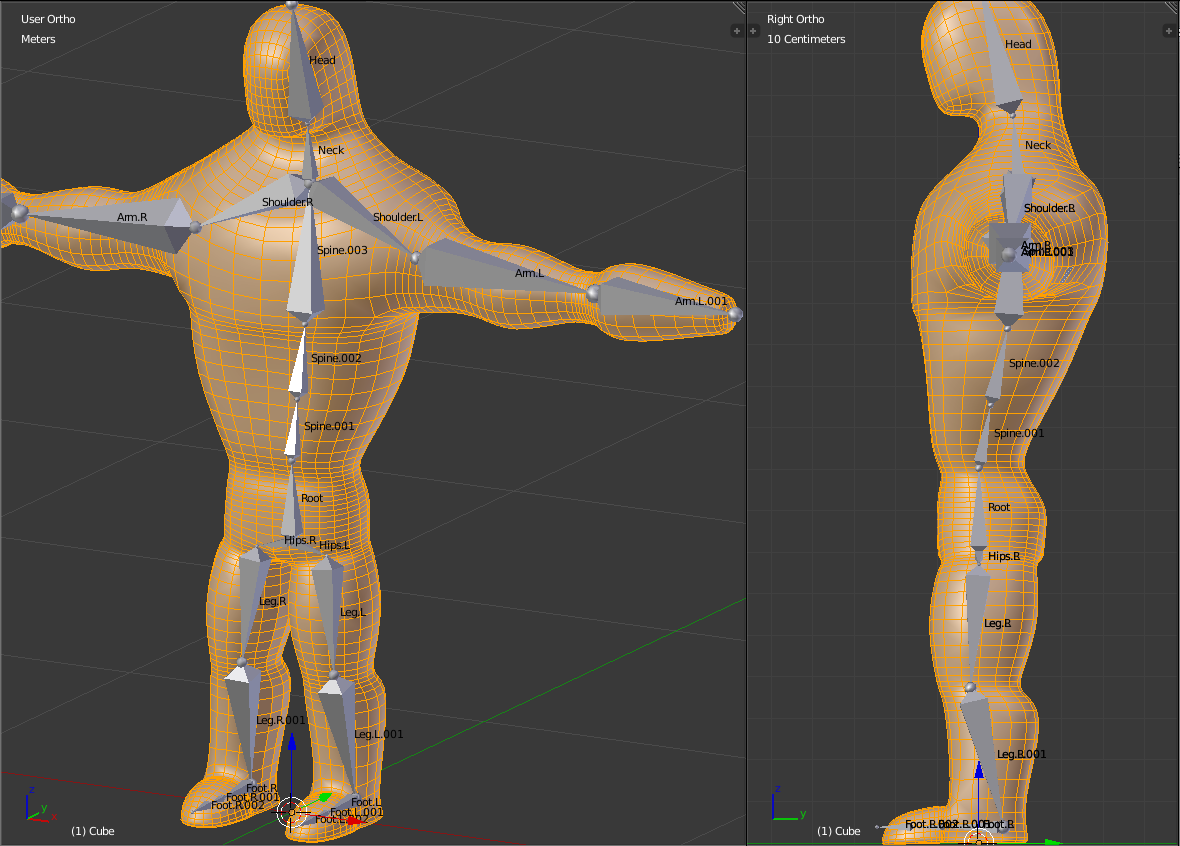
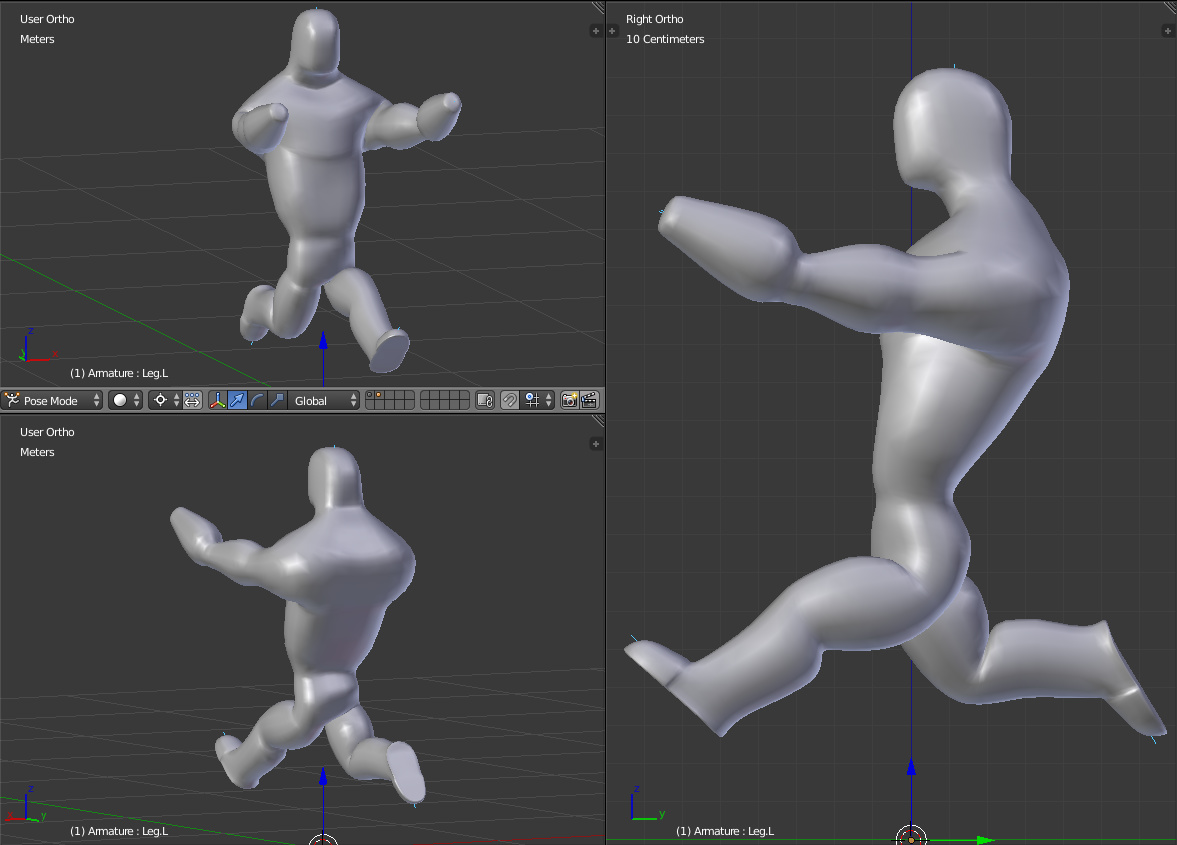
The deforms are pretty good, I didn’t see as much pinching as I though I would with the mesh density as high as it is.

But I would hold off briefly on doing the auto wieghts, and do this first:

I would probably make the basemesh lower poly (and fix the butt while your there, won’t take but 5-10 minutes)

I would do this:
save a new version of the blend
delete the left half of the mesh (leave the centerline)
add a mirror modifier, and enable clipping (check the the checkbox)
you can use alt right click to select loops.
hit x and choose edge 'edge loops; to get rid of the edge loop while bridging/maintaining the manifold loops around it.

You can safely delete around 1/3 (every other, or eveyr 3ns other other one) try and keep things as even and square as possible.

Fix the butt issue on the back.

Save a new version (or duplicate the object) so you have the old mirror version in case.

Apply the mirror modifer.

parent it to the armature with auto weights.

There’s an add on called ? 3-dprint toolbox. go to user, prefs, add ons, type print into the search, 3-d print toolbox will appear. check the checkbox next to it, click save, close prefs.
in the tools panel (hit t) on the left you’ll see it, in object mode with chartcter selected hit ‘check all’ and it will report back on non-manifold areas. It’s a requirement for 3-d printing, but except for specific cases (eye sockets) your mesh should be manifold.

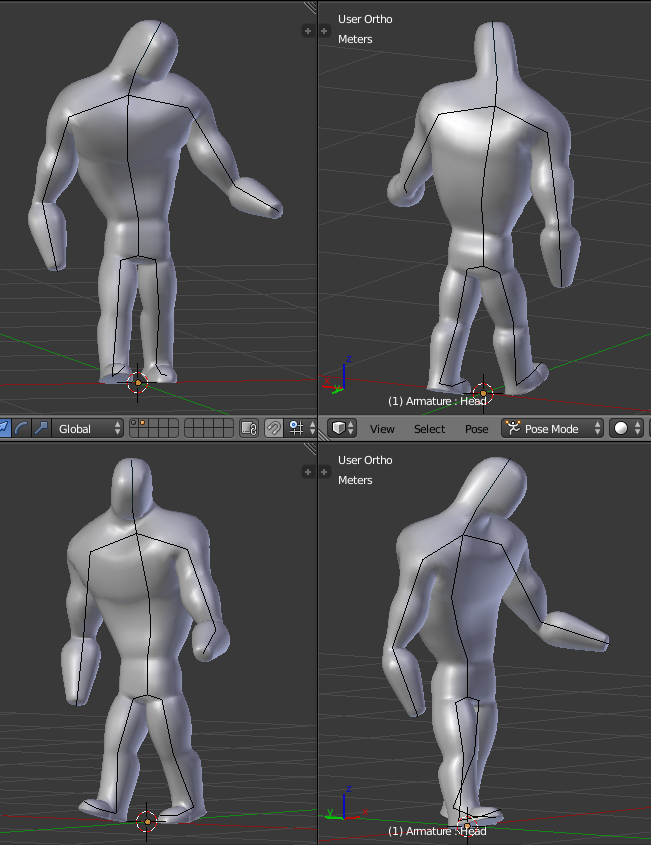
For a first charachter this looks really really good, and you have avoided many many common pitfalls and it’s almost ready to move on.


It may be too late to say this but did you follow the “Gus” tutorials in Blender Help? I worked my way through both “to the letter” and learn’t so much from doing so - not least some of the pitfalls with basic modelling and rigging!

Once again, awesome guide and walk-through step-by-step by Photox! :smiley:

First thing LOL! I fixed the butt problem (it was all around the edges to the front) I chose each double vertices and merged-center, now it is perfectly even and centered. I wouldn’t even see this without you telling me about it since I did everything so fast, Thanks!

I know I should delete some edge loops to create a lower poly mesh but for now I skipped that because the mesh is not that heavy as it is right? I mean for the purpose of make a working animatable character and mess with it as is.
The reason there are more loops on specific place is because I wanted the bending parts to be smoother when animating. but as your earlier tip there are no huge gap between many small faces to little huge faces, it’s kind of balanced… I hope.

So… I did use ctrl+p for automatic automatic weights and messed a bit, rotating the arms, shoulders even the foot.
and I must say I’m very impressed with Blender!

My experience with blender so far:
I used to “play” with the big software out there a few years ago, I believe they all changed and updated but my experience were not good with auto-binding, I always have really bad results and needed hours to fix parts… and I always gave up on trying because it was too much for a very basic thing.
From what I experience now with this test-mesh Blender is very forgiving and helpful, the auto-weight result in this specific mesh is pretty good compare to what I’ve expected.
The reason I’ve modeled this THICK “meaty” creature is that I wanted to challenge blender as a very new user!
I would get much better results on a skinny creature because of the weight influences, so this is pretty much amazing for me.
For example the upper legs area where there are rounded big muscles, are separated very good… blender didn’t stick them together or anything I was expecting by auto-weighting. while in other software this would be a total mess.

Anyways,
The current problems that I want to fix are:

1 - the butt (when rotating the leg in 90 degrees) is not keeping it’s shape which should stay rounded.
2 - The other part which I’m wondering about is the ribs area, when I rotate-down the arms the ribs stretched inside… so the torso not keeping is original shape.

I’m not sure how to fix these yet because I don’t know how to use the manual painting weights in blender yet, but if it’s easy and friendly to use it will be a good thing for sure! :slight_smile:


For a first rig, and first posing I would say it looks terrific. I’m not 100% sure what I’m looking at, but having x-ray on can be very cofusing, I wish there was a way to occlude bones based on the mesh. I think what you are seeing on the right image is the right arm bones, they appear to be infront of the butt, but in fact they are behind the mesh on the right or back arm.

In the image on the left are you saying you want the abdomen to push inward (toward screen right)? elobarate on that.

Blender allows you to create vertex groups, which are a set of vertices. Sometimes you make these yourself. You select verts one by one, or select multiple loops (shift alt right click) and get a bunch of verts you will want to be selecting and not have to select them all manually each time. In the object data (triangle) in vertex groups click the plus sign for a new vertex group. you can rename it by control clicking on the default name which is ‘group’ you select the verts you want and click the ‘assign’ button. By default you are assigning the verts with a weight of 1 (full influence) You can assign lesser weights by hand although it’s uncommon to do so, usually you would weight paint them for a faster smoother look if you need softer edges on the influence.

Weight painting sounds complicated but it’s really not, it’s just another way to visualize a vertex group. When you assign vertcies to a vertex group it will change the visual appearance of the weight paint. And when you weight paint it will adding removing vertices and influences to the vertext group.

When you parent a mesh to an armature using auto weights, blender creates a vertex group for every single bone and attempts to give them sensible weights. 9 times out of 10 you will need to do a little bit of tweaking to those weights.

There are two quick ways to select a vertex group, and weight paint it. The first is in the vertex group list, in object data, just select on eof the vertex groups. Then switch to weight paint mode. Red is full influence (1) and blue is no influence (blue)
in the tools panel on the left (hit t)check ‘autonormalize’ and then under options check ‘x-mirror’ this will mirror not across the x axis literally for the group but it will paint the corresponding opposite bone’s vertex group if there exists a matching bone with the .L .R naming convention. Anyways, back in the tools tab with a mix brush (click the big image) if it’s a different brush, it defaults to ‘Add’ or increas einfluence, you can switch that to ‘Subtract’ and you can adjust the influence. Yoyu can hit F to resize the brush, and just paint.

You can also select charcter, switch to weight paibnt mode. Then select rig and switch to pose mode, select a bone, then select the charcter and blneder should automatically select the vertex group (With the same name) as the bone you last selected, this is a quick way to paint a bunch of bones. iso it’s : select bone, select mesh, paint, select new bone…

As for pushing the abdomen inwards as the arm comes down, that will be bit more complicated and may require shapekeys and a driver, but I would play around with the weight paint a little a get familair with it.

As always if the rig is more or less working, save a new version before you start painting/destoying it.

It’s pretty uncommon to get this far on your first rig, so I’d say you are makign excellent progress.

Thanks again for your time and help, you’re truly awesome!
I will try the weight painting soon, hope it is easy as it sounds from you hehe :slight_smile:

I’m not expecting for too much from this twisted mutant creature… but I’m still surprised for how it react so far.

I think there is another solution but I’m not sure if I should do that, maybe I will give it a try if the painting weights won’t do the job.
The idea is to add an extra bone for each side, like a fake ribs with one bone per side that it will keep the volume of the chest / ribs area of the mesh. I’m not sure if that’s the common solution in blender or not but it worth a try.

I like it so far because it is very minimalistic but works, no controls or I think they called “drivers” ? in blender (not sure, feel free to correct me so I can learn). and no vectors or extra null objects to control the elbows and knees for easy rotation yet.
I may add these if I’ll find out how to do such thing hehe.

A bit off-topic:
Speaking of shape keys… I didn’t mess with that yet like in many other things since I’m very new to blender but I’m curious about something:

Let’s say I’m making a new character, nothing fancy but with a face.
I guess I’m supposed to create the shape keys before I even make the armature and make it ready for animate BUT!

What if during animation process I need to add EXTRA shape keys to the model (that is already attached to armature).
Do I need to go back to older version before I applied the armature to the mesh OR… blender is awesome enough to let me just go to edit mode and add the shape keys that I want without ruin the all animatable object. (ex: surprise face, or whatever faces I need).

I wonder if blender is dynamic about it, because in other software from what I know once you binded your object with the skeleton (armature) you can’t add morphs (shape keys).

Hey Clockmender!
Actually I’m just looking around YouTube and trying to understand specific features, and I mixed everything together trying to accomplish what I’m looking for and at the same time learning blender as a very new user.
I see some great tutorials but some are very old or hard to follow, and some are pretty good.
Since English isn’t my native language video tutorials are much easier for me to follow compare to reading because I can see the actions in movement step-by-step. :slight_smile:

Just fooling around with the armature… and it’s SOOO FUN even that there are no IK settings or drivers (controllers).
I still didn’t animate anything (because I have no idea how… yet) but maybe I will be able to animate a character in blender one day! :slight_smile:


Attachent is invalid?

It’s probably putting the cart before the horse, but if you want to make your first “animation” here is the super basic way to keyframe 2 poses. Forst you memorize (and commit forever) the mantra, preferble in a british voice inside your head:

  1. Go to the Frame
  2. Make the Change
  3. Insert the keyframe

1a) Go to the frame:
Go to frame 1 on the timeline

2a) Make the change
Go into pose mode and rotate bones into some random pose. Hit ‘a’ (once or twice) all so that all bones are selected and blue/green.

3a) Hit i and choose ‘Loc/rot’ (location and rotation of the bones)

1b ) Go to he frame
Go to frame 25, or some later frame.

2b) Make the change
In pose mode still, rotate bones into another pose. hit ‘a’ until all bones are selected and blue/green

  1. Insert the keyframe
    Hit i and choose ‘Loc/rot’ (location and rotation of the bones)

If you scrub through the timeline, blender will interpolate the two poses using a bezier interpolation which makes the motion kind of slower and smoother at the start, faster in the middle, and slow again towards the last keyframe.

You can add new shape keys at any time, before after during rigging.

Here what you can’t do. You can’t add or remove geometry to the mesh after shape keys have been made. So in general shape keys come toward the very end once you’re completely happy with the model. You can certainly rig up a human without face bones, and afterwards say ok, I want to add a shape key for a smile, make the shape key, add a new bone and set the bone to control the shape key using a driver. Soi when the bone has 0 rotation the shape key has 0 influece, when the bone is at 90 degress the shape key is at 1, or full influence.

shape keys are used mostly for custom deformations that wouldn’t be easy for a traditional weighted bone. Blinking (eyes closes) smiles. They can also be used as corrective shapes, it is somehwat commong for the rigg to work prefectly – except when the thigh is beyond 90 degress and there’s some weird pinching. So you create a shapekey to fix the the pinching, and create a driver that activates that shape key when the bone is rotated beyond a certain point. I wouldn’t worry too much about that now though,.

And yes, your ideas about making a bone for the abdomen could certainoy work. I have similar things to control odd spots (butt/jelly roll area is tough sometimes) whether to use another bone or a shapekey is kind of a coin flip.

Dear Photox!
You have no idea how much you are helping me with your very detailed tips! thank you so much :slight_smile:

I don’t know why the image didn’t appear on the above post, I re-uploaded it maybe it works now (it’s very simple and before I actually messed with the weight painting).

Now, I did play with the weight painting, it’s kind of nice at least on a simple character like this one I made for testing. I guess more complicated characters will be more challenging to deal with on this area.

I’ve managed to fix in 2 minutes that ribs area, I just painted it with 0 (blue) as you explained, and tried to blend it. with less strength…
oh, and I used the mirror option it was a huge time saver.
I wish it has a special “smooth” brush to be even easier to accomplish.

Mirror a part of the pose?
Is it possible to pose one side of the armature for example rotating: Shoulder + Arm.L + Arm.L.001 and then mirror the exact pose to the other side?

I think I should start playing with animation stuff, I’ll try to follow your guide and hope it will work.
I’m very excited to learn this and hopefully to get into more complicated animation freedom tools such as the famous NLA editor which looks really awesome! but I still have much more to learn.

The good thing is that I learn kind of fast consider I’m very new to Blender so far… so good. and most of it thanks to your kind help Photox I appreciate it a lot Master!. :yes:


If your bones are named properly, which they are, you can copy x flipped poses. pose the bone(s) you want flipped (mirrored) and then select all the bone(s) you want flipped, hit ctrl-c , let go, and then hit ctrl-shift-v all together and the corresponding bones will mirror the pose. The general rule in blender (and a lot more) is never duplicate effort, so if something is symetrical you should always be using some type of mirror with it. That can mean an old fashioned mirror modifer (that never fails) there is x-axis mirror on full meshes, x mirror on weight paint, copy x flipped poses…

Feel free to keep going about the master stuff. :cool: Just kidding, I don’t think you can ever truly master blender. It’s just too deep and layered. But that’s what is so great about it, you will never run out of stuff to learn.

The first time I opened blender I just kept trying to left click the cube for about an hour. I remember my first render of a blue cube and feeling like it was the most incredible thing I had ever seen.

Cool! I love that concept of mirror in almost any mode.
I just tried the tip you gave, it works like a charm! thanks again :smiley:

True it’s a neverending experience, there are lots of things to cover… I barely know anything but I have so many ideas I want to learn and try.
When I first open blender a few years ago… the moment the mouse buttons felt weird (right and left clicks) related to most 3D applications I gave it 2 minutes and gave up. I didn’t even wanted to change buttons or mess with the interface.

But this time I just flipped right & left and I think I’m already used to some of the short keys such as the T and N and still have to learn many other hot keys because I love using them while working in any software.

After I’ll try to animate a short move… I think I should try go for the Cycles thinggy… everybody talks about it, and I think this area of lighting and rendering is much more complicated compare to what I’m doing right now but the most terrifying thing I think is the materials in that Node editor… maybe it’s only scary because it’s new to me, but I hope to fell in love with all the different modes.

oh, and I still hate UV mapping but I will try to practice with it too… I found out that ctrl+e then mark seam is useful… but I didn’t use it to unwrap anything complicated like a face so there are many tests to do. (I wish ptex will be available in the near future of blender).

Here’s 8 /12 minutes with audio of me setting up a rudimentary scene with your guy, a key mesh light, an IBL HDRI with nodes 101. Audio video synch gets off by a couple seconds. Hopefully it can demystify the node editor. You can go into (and out of ) full screen mode in any window by hitting shift space together. It’s quite useful as the blender gui is so packed full of tiny little widgets.

The hdri image I use is called hamarykyi bridge, and is free from sibl you should get a bunch of hdris as they have HUGE impact on how your scene will look. I download, and unzip them into c:blender\hdri

Thanks for taking the time to make a video showing the setup, it looks really good compare to my current boring openGL.
I still need to get into the shaders, the way you tweaked them all together and created the material you wanted looks complicated for me but I guess I need to understand the all cycles thing because the materials settings are not like what I saw on other software (specular, reflection, etc…) I understood it’s the same but split into other names in a way.

I think I understood the mixer shader, so it let you put two shaders into one if I’m not mistaken sounds like the node editor is like a Lab to build all the shaders!

I like the idea of the lighting with meshes as the lamps, it’s really cool!

I wonder how would you light a huge scene! for example a desert with rocks and sand (or huge city) so no matter where you’ll put the camera the render will look good and not just for a specific side with weird shadows stretching. so if you have a character in any area on the desert you won’t need to put lights wherever the character is… I guess there is the “sun” light or messing with the world settings but I’m not exactly sure.
I think that first I should focus on a smaller setting like in your example, it’s challenging enough for a newbie like me haha :smiley:

For a very large scene like a dessert you might use an hdri of a blue sky with a bright sun, as well as a sun lamp. A sun lamp can be thought of a shooting parallel rays, so it makes no difference where the sun lamp is, only the angle it is pointing. The size setting in the sun lamp determines how hard or soft the shadows will appear. A very low size .01 say will give super crisp hard shadows like noon on a cloudless day. Sometimes you might want this, although it tends to give a slightly phony cg look. a higher size .3 softens the shadows considerably, but you lose the crispness.

Don’t forget that this is cg, so a “huge dessert scene” might (probably not) be modeled in 1 blender unit. You can model a galaxy from a circle one half blender unit, or an electron at 5 blender units. Very large and very small scales it’s kind of up to you. If you are modeling real world scale stuff, rooms, people, cars you should try to model in metric with one blender unit as 1 meter.

Thanks for the explanation! :slight_smile:
I think getting into real world sizes is a good habit I should use.
I even changed the units of the scene into metric so everything make more sense.

Another character animation related question:
Let’s say I want to add a lattice deformer to a specific part of a character (not necessary this guy but in general).
For example a lattice to the all arm for creating weird deformations and animate it, or a lattice for the head, maybe even for the eyes or mouth?

How does it work, do I parent each lattice to the specific bone or bones? and they will follow the bones as animate also I will be able to key the lattice deformers by themselves?

I think about how “elastic” things can get if I’ll understand how to combine it or maybe even other deformers (I have no clue how to use these stuff but I’m curious as usual hehe).

Before you go too far with lattices, famialarize yourself with proportional edit mode and shape keys. Proportional edit is a way to move multiple vertices in a smooth and simple motion. Normally when you select a single vertex and grab it (move it) you will be moving that vertex alone. If you move it any considerable distance it’s going to become a spike. Now if your turn on proportional edit and select a single vertex you are given a sphere of influence, and so the other vertices around it will come along for the ride. Vert farther away are not pulled as strongly and the result is that you can smoothly create lumps and bumps in edit mode. It’s actually quite similar to sculpting, but this is in edit mode. There are two main modes, connected and enabled. in connected mode it will exert infleuence only on those verts connected in terms of edges, regardless of how close they are in global space. In enabled mode it exerts influence equally in global space, according to distance, regardless of how far apart the verts are on the mesh. Usually you to want connected mode. The other paramters (on the right green arrow) in the image controls how the influence falls off. I usually use smooth, but there are other options, like spherical.

The big gotcha on proportional edit is that often times the circle of influence is extremely large, and cannot be seen, or is very small, and also cannot be seen. You control the size the of the circle using your middle mouse wheel, and you can see the size in numbers of the radious towards the bottom of the screen. Some you sometimes need to keep scrolling and scrolling if it’s too big too small. It is something I hope will be fixed in future versions. or an option to like ‘fit to screen’

left, G Z with a smaller circle

right, G Z with a alrger circle