Although Apple, over the years, has used GPUs from both NVidia and AMD, the trend of late, at least for their higher-end machines, seems to be leaning toward GPUs from AMD (unfortunately). The Retina iMac announced yesterday, and the Mac Pro that came out at the very end of last year, both use AMD GPUs.
Blender still doesn’t officially support OpenCL on AMD, but it can be enabled by setting the environment variable CYCLES_OPENCL_TEST to ‘all’.
Now, this should be done with caution. There’s a reason the fine folks at the Blender Foundation don’t enable this by default. Turning this on will increase your chances of crashing significantly. On the other hand, it will also speed up your viewport work and rendering quite a bit - when it works. I’ve had good luck with viewport rendering, but have seen some problems with actual F12 rendering. It doesn’t do well with very complex scenes due to (if I understand it correctly - and I may not) memory issues on these GPUs.
Still, if you have a new Mac Pro with dual FirePro GPUs, it’s probably worth enabling this. You may have to disable GPU rendering before doing a final render on complex scenes, but having it enabled during modeling, texturing, and sculpting will greatly improve the day-to-day use of Blender.
Unfortunately, Yosemite, the version of Mac OS X released yesterday, took away the part of launchctl that allowed us to set system-wide environment variables on launch.
If you want GPU rendering on AMD without having to manually set an environment variable and launch from the command line, you can still do it, but it requires a one-time setup. Here’s how to do it.
First, create a shell script (plain text file). I save my scripts in /Users/jeff/bin, but you can store it anywhere in your home directory you want. The contents of that script should be as follows:
#! /bin/sh
launchctl setenv CYCLES_OPENCL_TEST all
Next, open Terminal.app (located in /Applications/Utilties). You need to make the script you just wrote executable, which looks something like this (replace path and filename to the appropriate values for where you saved your script):
cd /path/to/scriptfile
chmod +x scriptfile
After that, you have to create another plain text file. This one’s a property list that will tell OS X to launch that script you just wrote. It should look like this (replace the path with the location of that script file you just wrote)
<?xml version="1.0" encoding="UTF-8"?>
<!DOCTYPE plist PUBLIC "-//Apple Computer//DTD PLIST 1.0//EN" "http://www.apple.com/DTDs/PropertyList-1.0.dtd">
<plist version="1.0">
<dict>
   <key>Label</key>
   <string>com.user.cyclesgpuscript</string>
   <key>Program</key>
   <string>/path/to/cycles_script</string>
   <key>RunAtLoad</key>
   <true/>
</dict>
</plist>
This file needs to be saved in /Users/[your name]/Library/LaunchAgents and needs to have the extension .plist. The convention is to use reverse dns names, so I called mine: org.blender.customcyclesgpu.plist
The actual name doesn’t matter, though, as long as it ends in .plist and is saved in that folder.
And that’s it; you’re good to go. Next time you restart your machine or log out and log back in, that environment variable will be set automatically system wide and Blender will see it. If you don’t want to reboot now, you can just run your script from the command line. If you give your script a .command extension (e.g. gpucycles.command), it will be double-clickable from the Finder and you scan skip the terminal.
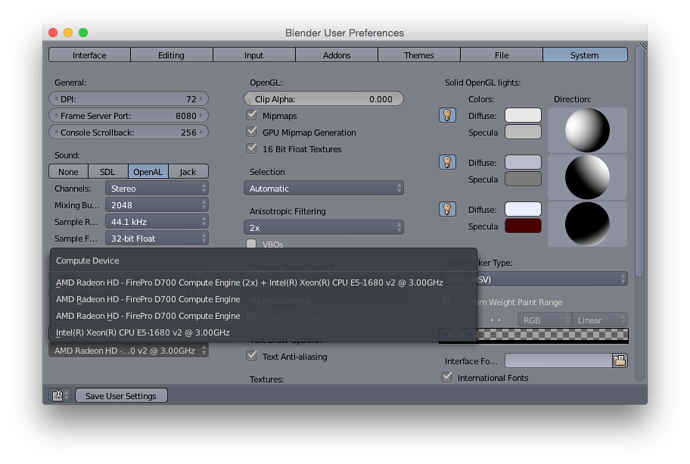
Once you’ve either rebooted or run the command, lo and behold, your AMD GPUs show up as compute devices:
If you have any questions, let me know, otherwise good luck, and make sure to save frequently if you opt in to OpenCL rendering.
