Hi there. I have a question about drivers, because i can’t find answer anywhere.
I need to drive a custom property by location of an object. But - I need the custom property to bee “0” until a centrain amount of location, and then change to “1”. For example, the custom property is “0”, object starts moving. As it reaches “0.5” on Y axis, then custom property switches to “1” and stays at this value. Is there a way to do this?
You can do this with a scripted expression, but that’s a bit of work. You can also do this by creating custom control curves in the graph editor. See the attached file, in it there is a lower cube that can be moved on the y-axis. Once the lower cube passes the center, the shape key on the top cube switches on.
This may be the same answer that Randy gave you because normally I would DL his file and look at it but I can’t right now, so to give you a direction, in Python the value of a comparison is 0 if false and 1 if true so
driver_variable=value>0.5
should work.
@ DruBan - Good thinking on the scripted expression.
When I was thinking this out, I was thinking of a python if…else… statement, which I don’t know if it would work in the scripted expression field in the drivers properties. Dunno how many characters you can fit in that field. So my next thought was to create a python script that has a function that would be called to evaluate the driver and return a value. A bit of work to set up, but really not that hard to do. Then the idea occurred to me, why use scripted expressions at all? (I was probably thinking scripted because that’s what the OP asked for)
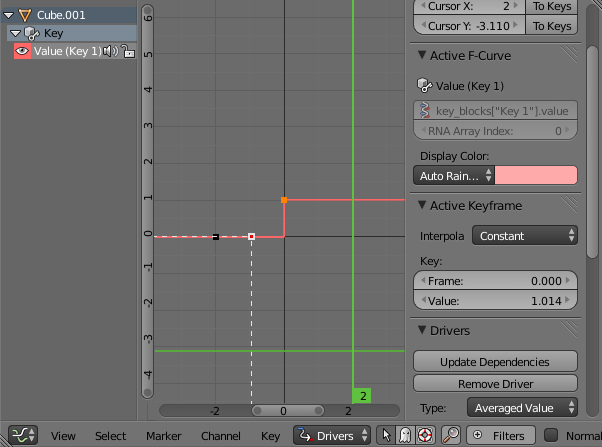
So instead, just create a custom control curve to control the behavior as wanted. So I added a control key at x = -2 and y = 0 and added another one at x = 0 and y = 1. Set both keyframes to be constant interpolation and ta-daa…
Any negative value given to the driver, and it will return a zero, any positive number you give it, and you get a 1 back. The OP wanted 0 at anything less than .5 and 1 at anything over a .5 input value. So move the 2nd key from x=0, y=1 to x=.5, y=1 and your there.
Now that I think about my route, and DruBan’s solution, his is probably easier than mine…
Goes to show you there is usually more than one way to do something in blender…

 But thanks anyway