Hello all! I can’t imagine that I’m the first to have this issue, but I can’t seem to find anyone having the same problem as I am for some reason, and it’s QUITE basic too (If this has been asked and answered/discussed before, please simply point me in the direction of the thread!). My goal is to rig a bone so that it can rotate between 0 and 180 degrees on one axis while not rotating on other axes (it will be animating a simple lever mechanism).
The simple test case is as follows: I create a bone inside of an armature, apply a Limit Rotation constraint in the Bone Constraint panel, and limit its rotation on any axis (let’s say “x”) from 0 to 180. Regardless of the other settings in the constraint (for argument’s sake, however, my final settings will be to enable “For Transform” and to convert to “Local Space”), the bone flips when it is rotated to or beyond 180 degrees. Changing the limits of the constraint beyond 180 degrees still causes flipping at exactly 180, and the rotation mode (Quaternion vs any Euler setting) has no effect on it one way or the other; the bone reverts back to 0 once it reaches 180 degrees.
Is there some way to place some kind of limit on the bone’s rotation, with a minimum range of 0 - 180, without any flipping? I would even settle for a flip occurring at rotation x > 180, but the flip happens at exactly x = 180 so I can’t get the full range of motion that I need. Any help would be greatly appreciated, thank you!
Has anyone had a problem like this before? I would REALLY appreciate some help with this. It seems like a simple rigging problem, but I can’t get it to work with the way that Blender is currently setup…
Yeah, I tried your simple test case - create a single bone and add a limit rot constraint to it, and yes, it flips around. It’s like the limit rot constraint is buggy, but constraints have problems when rotation hits 180 degrees, it’s like they get confused. I read all the technical stuff on it once, on the blog from the developer who works on this part of blender, and I don’t remember why (reading the article made my brain turn to mush), but constraints often fail on rotations over 180 degrees. Best just to avoid them in cases where rotations hit and go past 180 degrees. As an example, you can’t use copy rot constraints on gears that rotate past 180 degrees, you have to use a driver instead, it’s a limitation of the software.
I don’t know what you are doing, posting a .blend file and describing it would help. In a simple test case of wanting to limit a bone’s rotation to anything >180, why not just not pose the bone more than 180 degrees? If the bone you want to limit rotation on isn’t controlled by someone, who can avoid posing it past 179 degrees, then use a driver to control it.
Here’s a simple test case for you, create a bone and add a limit rot constraint to it. Set the min to 5, max to 175. that’s 10 degrees less than you want, close enough? Now rotate the bone on the limited rot axis, it will stop rotating at 175, but you can continue to rotate the bone past 180, and at 180 it flips.
That’s a good idea, but I’m doing a mechanic rig, so it needs to go between exactly 0 and 180 degrees, unfortunately. I only wanted the limit rotation to help in the animation process, but if I can’t use it, it just means that I need to be a bit more careful during animation…no big deal. It just seems like this would be a common need during rigging, and I’m surprised that there isn’t some kind of work around! Oh, well…thanks for your help!
There are almost always work arounds… read my second paragraph:
I don’t know what you are doing, posting a .blend file and describing it would help. In a simple test case of wanting to limit a bone’s rotation to anything >180, why not just not pose the bone more than 180 degrees? If the bone you want to limit rotation on isn’t controlled by someone, who can avoid posing it past 179 degrees, then use a driver to control it.
So use a driver instead of limit rot constraint. Here’s how it would work, the mechanical part that needs to go from 0 to 180 degrees is controlled by a bone. A second bone would be used as a control. The first bone would have a driver on it. This driver would be set up to copy the control bone’s rotation from 0 to 180 degrees. This would require you to create a custom f-curve to set the limits of rotation. It’s really not that hard, and I would whip you up a file showing how it’s done, but it’s been a bit since I did serious graph editor work and I think there have been changes in this area.
The downfall to using a driver is that the animation lags a frame behind the controller. Rotate the control bone to 180 degrees at frame 50 and key it, at frame 51 the driven bone will hit 180 degrees. It lags 1 frame behind.
It’s not perfect, but it works. Lagging 1 frame behind the control bone would never be noticed at 24 fps, or key the control bone 1 frame before you need the driven bone to hit it’s rotation.
None of this is perfect, but step back and take a second and look at it, does it really need to rotate exactly 0-180 degrees? Would a viewer notice that it’s only rotating from 5 to 175 degrees? You don’t need to be 100% accurate, it just has to look that way…
One of the work arounds is to use a Controller bone… (just as revolt_randy has said)… but you don’t nessiarlily have to use a driver…
but I will discribe a non-driver way and a simple driver way…
First… the non-driver way…
Create a bone… Create a second bone… make the second bone larger than the first…
second bone will be your deformer bone…
be sure the second bone has it’s base snaped to the first bone Base (not tip)… So that they both have the same rotation center point…
Parent the 2nd bone to the 1st (not connected) (because we don’t want it connected to the Tip of the 1st bone)…
Now create a 3rd bone… (this is the Controller bone)…
Move it out away from the other two bones…
Place a copy rotation contraint on both the 1st bone and 2nd bone to follow the 3rd bone(the controller)…
in the constraint on 2nd bone check the “offset” box… (this is key to making this work)
Use the 3rd bone to Control the rotation of the other two bones…
note that as the 3rd bone only moves about 90* the 2nd bone(the final deformer bone) will rotate out to 180* or more… with no flipping…
Create a bone… (the Deformer bone)
Create a 2nd bone… (the Controller bone)
on the Deformer bone set the Rotation to XYZ Euler
on the X channel Right click and pick “add a single driver”
go to a widow with a graph editor and switch it to “drivers”
hit the “N” key to get the Right hand tool bar…
find “Drivers” menu
under "Add Variable find the Ob/Bone: and pick Armature then under that pick the Controller bone
set “Type” to “X Rotation”
this will set the ‘var’ variable to what ever is input by the Controllers X rotation
now above the “Add Variable” button under “scripted expression” type
2*var
this wil cause the Deformer bone to rotate at double the rate of the Controller bone…
Test it out… It has no flipping… but it does have frame lag… (just as Revolt said)
constraints always go the shortest route between two angles, so if the rotation exceeds 180 degrees, it will invariably flip. Maya has some additional options for its rotation constraints, one is called “noflip”, and it works quite well iirc. Haven’t used it in a long time.
norvman’s driver description is the route I was thinking about, up to this point:
Don’t do the scripted expression thing, that’s not what you want, (it could be done this way, but that gets too complicated for something this simple). Instead of scripted expression, choose average value instead. To limit the rotation of the deformer to only 180 degrees, you need to create a custom control curve. To create the custom control curve, you need to ctrl-left click in the graph editor, that will create a control point for your curve. Where you click isn’t important, because you will have to manually enter values to get it exact. From the key menu, choose interpolation mode and set that to linear. Now from the channel menu, choose extrapolation mode and set that to constant. Now at the top of the properties panel (n-key to display the panel) there should be a display of the location of the control point. set it to x=0, y=0. Now you need to create a second control point, switch that control point’s interpolation mode to be linear as well, extrapolation mode to constant.
The location of the 2nd control point is where I get a little fuzzy on things. The scale in the graph editor, when working with rotations, are expressed as radians. So 180 degrees of rotation is 3.14 radians, so your second control point should be set at x=3.14, y=3.14… But here’s what I’m not sure about, I thought there had been changes to the scale when it comes to rotation values. Maybe I’m wrong on this… dunno…
Anyhow, that should limit the rotation bone to only 180 degrees of rotation, as you want, with no flipping, but it lags 1 frame behind the controller. Barely noticeable in an animation Not perfect, but then again, what is?
Hadriscus mentions maya has a ‘no flip’ option, we really could use this in blender. I really think this sort of thing shouldn’t be too hard to code, but I don’t know anything about blender’s code…
Thanks Revolt! I had been attempting to play around with the curves thing in drivers and wasn’t having much success…
this clears up some things…
The location of the 2nd control point is where I get a little fuzzy on things. The scale in the graph editor, when working with rotations, are expressed as radians. So 180 degrees of rotation is 3.14 radians, so your second control point should be set at x=3.14, y=3.14… But here’s what I’m not sure about, I thought there had been changes to the scale when it comes to rotation values. Maybe I’m wrong on this… dunno…
Yes… It may be that when it comes to using the Quarternion Rotations that Radians are not what is being used … I know that in Quarternion Math Radians are not the Unit of measure … rather… Versors (also known as Unit Quarternions) are used… I’m not sure if the the Matrix used to figure Bender Rotations is using Versors or Radians… but that might make a difference when doing the math in a formula for a Quaternion Rotation in blender…
Even though the OP hasn’t posted back, I did look at this a bit more and figured it out, or rather where I was wrong. Just posting this for any one reading.
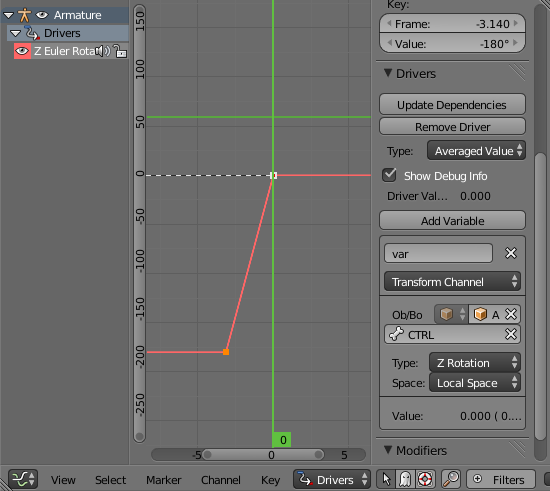
In the graph editor, the x-axis is the driver input value. This value is in radians when working with euler rotations, I don’t know about quaternions, I avoid them when working with drivers because euler rotation is easier to understand. The y-axis is the output value of the driver. This I thought was in radians as well, but it’s not, this scale is degrees. So I was wrong here:
so your second control point should be set at x=3.14, y=3.14
2nd control point should be at x=3.14, y=180, like so:
Here’s a file that has 2 bones, the smaller bone is driven by the rotation of the larger bone, Control. Rotate the control bone clockwise and the driven bone will follow up to 180 degrees, after that, the driven bone doesn’t move, flip, or anything. As previously stated, the driven bone lags behind by a frame. Zoom in close and look at the bones while stepping thru the animaition frame by frame.
@revolt_rand
Thanks for the effort on this… great information… the Radians, Degrees, and Crazy Versors Quarternion Goofness stuff… We are all bending our brains to understand it… I know I still don’t … I figure the more we talk about it the more chance we have of some day … some… day… figuring it all out…