OBJ Thumbnail Render Script


Hello all!

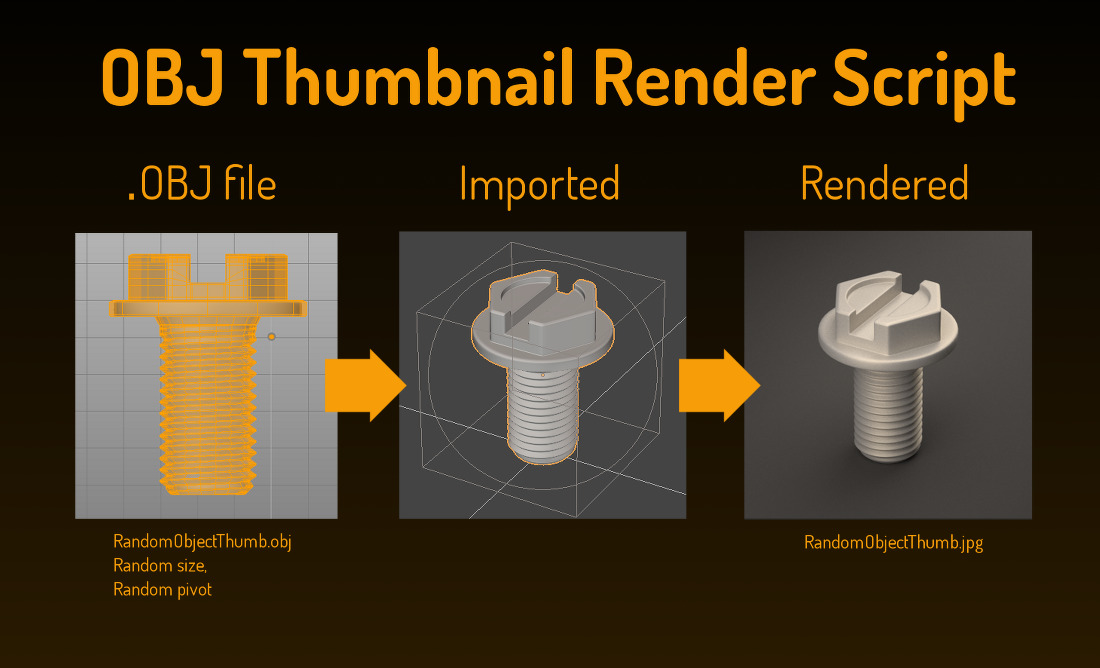
I’m putting together this OBJ Thumbnail Render Script

Latest Version: v.0.4
(download the attached .zip)

      Usage (Windows, Mac, Linux):
  • Open ThumbnailMaker.PY into a text editor and define the Blender path location
    (Default: C:\Program Files\Blender Foundation\Blender\blender.exe") and save
  • Open the ThumbnailMaker.blend, adjust the render samples to your liking and save
  • Drag’n’drop .OBJ files (or a whole directory containing .OBJ files) from any location over to the ThumbnailMaker.PY to render the thumbnails with the same names as the .OBJ’s

Alternative usage (Windows):

  • open ThumbnailMaker.BAT into a text editor and define the Blender path location
    (Default: C:\Program Files\Blender Foundation\Blender\blender.exe") and save
  • Open the ThumbnailMaker.blend, adjust the render samples to your liking and save
  • Drag’n’drop .OBJ files (or a whole directory containing .OBJ files) from any location over to the ThumbnailMaker.BAT to render the thumbnails with the same names as the .OBJ’s

If you want, feel free to give some feedback and improvement suggestions to the code. I would appreciate it a lot :slight_smile:

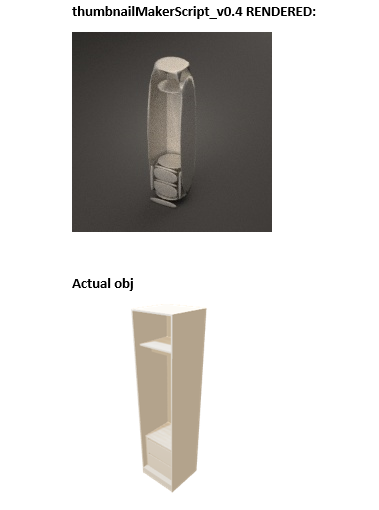
***thumbnailMakerScript_v0.4 code:

ThumbScript (inside ThumbnailMaker.blend):


import os, sys
import bpy
# realpath() with make your script run, even if you symlink it :)
module_folder = os.path.realpath(os.path.split(bpy.data.filepath)[0])
if module_folder not in sys.path:
    sys.path.insert(0, module_folder)

import generator

generator.generate()

generator_init_.py:


# -------------------------------------------------------------
#                        Thumbnail Maker
#                            v0.4
#
# -------------------------------------------------------------

import bpy
import os, sys
import time

def generate():
    
    print (sys.argv)
    dragAndDropFilename = ""
    i = 0
    for arg in sys.argv:
        if arg == "--objFiles":
            dragAndDropFilename = sys.argv[i + 1]
        i = i + 1
        
    print ("Starting to generate " + dragAndDropFilename)
    files = []
    sceneDirectory = os.path.split(bpy.data.filepath)[0]
    if dragAndDropFilename == "":
        files = os.listdir(sceneDirectory)
        objFilename = None
        objFiles=[os.path.join(sceneDirectory,filename) for filename in files if ".obj" in filename]
    else:
        if os.path.isdir(dragAndDropFilename):
            sceneDirectory = dragAndDropFilename
            files = os.listdir(sceneDirectory)
            objFilename = None
            objFiles=[os.path.join(sceneDirectory,filename) for filename in files if ".obj" in filename]
        else:
            print (dragAndDropFilename)
            objFiles=[dragAndDropFilename]

    """
    for filename in files:
        if ".obj" in filename:
            objFilename = filename
            break
    """

    if len(objFiles) == 0:
        print ("No objects found!")

    for filename in objFiles:
        objFilename = filename

        if objFilename != None:
            bpy.ops.import_scene.obj(filepath=objFilename)
        
        
        for obj in bpy.context.selected_objects:
            obj.name = "OBJ"
        OBJ = bpy.data.objects["OBJ"]
        bpy.context.scene.objects.active = bpy.data.objects["OBJ"]
        bpy.ops.object.join()
        bpy.ops.object.transform_apply(location=False, rotation=True, scale=True)
        
        # Determine OBJ dimensions
        maxDimension = 1.0
        scaleFactor = maxDimension / max(OBJ.dimensions)
        
        # Scale uniformly
        OBJ.scale = (scaleFactor,scaleFactor,scaleFactor)
        
        # Center pivot
        bpy.ops.object.origin_set(type='GEOMETRY_ORIGIN', center='BOUNDS')
        
        # Move object to origin
        bpy.ops.object.location_clear()
        
        # Move mesh up by half of Z dimension 
        dimX = OBJ.dimensions[0]/2
        dimY = OBJ.dimensions[1]/2
        dimZ = OBJ.dimensions[2]/2
        OBJ.location = (0,0,dimZ)
        
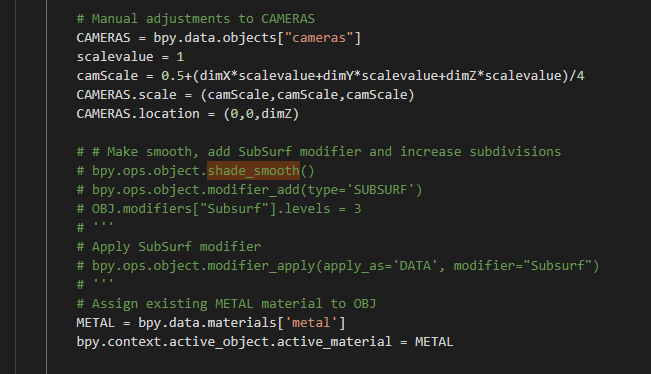
        # Manual adjustments to CAMERAS
        CAMERAS = bpy.data.objects["cameras"]
        scalevalue = 1
        camScale = 0.5+(dimX*scalevalue+dimY*scalevalue+dimZ*scalevalue)/3
        CAMERAS.scale = (camScale,camScale,camScale)
        CAMERAS.location = (0,0,dimZ)
        
        # Make smooth, add SubSurf modifier and increase subdivisions
        bpy.ops.object.shade_smooth()
        bpy.ops.object.modifier_add(type='SUBSURF')
        OBJ.modifiers["Subsurf"].levels = 3
        '''
        Apply SubSurf modifier
        bpy.ops.object.modifier_apply(apply_as='DATA', modifier="Subsurf")
        '''
        # Assign existing METAL material to OBJ
        METAL = bpy.data.materials['metal']
        bpy.context.active_object.active_material = METAL
        
        # Render thumbnail
        thumbname = bpy.path.basename(bpy.data.filepath)
        thumbname = os.path.splitext(filename)[0]
        
        if thumbname:
            bpy.context.scene.render.filepath = os.path.join(sceneDirectory, thumbname)
        
        bpy.ops.render.render(write_still=True)

        # Delete OBJ and start over for other .obj's
        bpy.ops.object.delete()

ThumbnailMaker.py:


#!/usr/bin/env python

import sys
import os
import subprocess

def callBlender(filename):
    blenderFilename = "C:\\Program Files\\Blender Foundation\\Blender\\blender.exe"
    blendFilename = os.path.join(os.path.dirname(os.path.realpath(__file__)), "ThumbnailMaker.blend")
    command = [blenderFilename, "-b", blendFilename , "--python-text", "ThumbScript", "--objFiles", filename]
    proc = subprocess.Popen(command)

    
if __name__=="__main__":
    if len(sys.argv)>1:
        for n in sys.argv[1:]:
            callBlender(n)
            
    raw_input()

ThumbnailMaker.bat:


@for %%i in (%*) do "C:\Program Files\Blender Foundation\Blender\blender.exe" -b "%~dp0/ThumbnailMaker.blend" --python-text ThumbScript --objFiles %%i

Attachments

thumbnailMakerScript_v0.4.zip (563 KB)

4 Likes

For the Python Drag’n’drop functionality I got some help. This could act as a good foundation to start building it:

#!/usr/bin/env python

import sys
import os

def doThumb(n):
    if os.path.isdir(n): print os.listdir(n)
    
    if os.path.isfile(n): print 'file'


stuff='lots of'
ELLO=0

def stuffYouCanDo():
    print 'stuffStuff'
    
if __name__=="__main__":
    if len(sys.argv)>1:
        for n in sys.argv[1:]:
            doThumb(n)
            
    raw_input()

Describe in more detail how to use - and it does not work!

Thanks for the feedback! http://blenderartists.org/forum/images/smilies/sago/smile.gif

Yes, it’s a bit on development still. Although works perfectly on my Windows so far. I need to do some testing on other systems as well.

What’s your system?

Windows 7 Profesional x64

May need to describe in detail how to use! ?? - And then do it!)
Please step by step instructions necessary!

Thank you!
It helped me

Hi Manu, i wrote you a mail yesterday aswell. Still can’t get this to work. all my renders are completely black. the only thing i should do is to drag .obj file to the bat right? I am using Windows 7 64 bit.

This is incredibly useful, thank you. The thing kind of needs a better name is all. :wink:

When used as a cli utility, it does not return properly, which is a little annoying. It ends with the following output and just hangs there:

Saved: /home/user/toolbox/thumbnailMakerScript_v0.4/hose_clamp.jpg Time: 00:11.64 (Saving: 00:00.03)

unknown argument, loading as file: --objFiles
read blend: /tmp/--objFiles
Warning: Unable to open '/tmp/--objFiles': No such file or directory

Blender quit

Also, it saves the image next to the script itself, unless the path to the file is given as part of the argument.

thanks Manu !! this is huge time saver. thum render file apeended in the Asset flinger 0.2 doesn’t work on my machine (Win64 bit 2.77a ), but this one worked just fine!

Hi there, I just try the script, it’s worked great but the result not as I expected. I’ve try to change some on the script but still not make it. Could you please help me resolve this?

Hi there, I just solved it myself by removing those “Make smooth, add SubSurf modifier and increase subdivisions” linesImage%20167

Thank you so much for that script! Super helpful!!
There’s only one thing i’d like to know:

If my .obj’s already have assigned .mtl’s (so when i load up my .obj it’s already textured), which lines in the “init.py” do i need to change?

I assume it’s somewhere here:

    # Assign existing METAL material to OBJ
    METAL = bpy.data.materials['metal']
    bpy.context.active_object.active_material = METAL

can i tell Blender to use the already assigned .mtl files for each .obj?
For me it’s especially important for batch exporting whole folders.

Thank you again and i know it’s been quite a while since you uploaded that script - but since Blender still does not have a proper Asset Browser with preview thumbnails by default, your script is a life safer.

Thank you for finding use for it!

Sorry to say, but it has been too long for me to remember how it worked. You might be on the right track, though.

There are some paid add-ons for Asset Management: https://gumroad.com/l/asset_management - Migth be much more professional those

Thank you for your quick reply.

All i’d like to have is an option to create Thumbnails/preview images for obj files. And your script does exactly that. And i can even mess around with all the render settings with the ThumbnailMaker.blend file. Which is awesome!

There’s just the problem that i don’t know nothing about python. At all.
And the Asset Manager you linked to, doesn’t do the job i am looking for. Your neat script does.

Long story short, if there maybe is another way to create thumbnails from obj or fbx files, maybe you can give me a hint.

The batch processing functions for whole folders full with objs (and their mtl’s) is what is making your script so great.

I LOVE the idea of this script but I can’t seem to get it to work for the life of me… Could someone please point out to me where i’m going wrong ?