Hi All,
I have been down this road a few, but for some reason I am not getting it? I was able to successfully assign my texture or bake render map onto a plane in B Render… When I tried to do it in Cycles I am not getting a result?
Step 1.
I add a material to my plane ( a base material) “Visible in material and render view as well”
> I then select Texture Icon and > add new>
Image or Movie> Navigate to it my image select OK>
In edit mode I “U” Unwrap it.
Then when trying to scale or even see it under render or texture I do NOT?
What am I doing wrong?
Thanks for any details. Feel free to d.load the pic circle or point out and re-upload for me to see
You need to add a Texture node, name that texture that you have UV mapped, and run that color output to the color input of your diffuse node. You also should add an UV node to name your UV map to define the vector for your texture.
Texture mapping needs an image texture input in cycles… The assigning via the UV Editor is old school blender workflow which didnt really make much sense in terms of texturing.
With cycles, if you want something to have a specific texture, you need to specify it via nodes
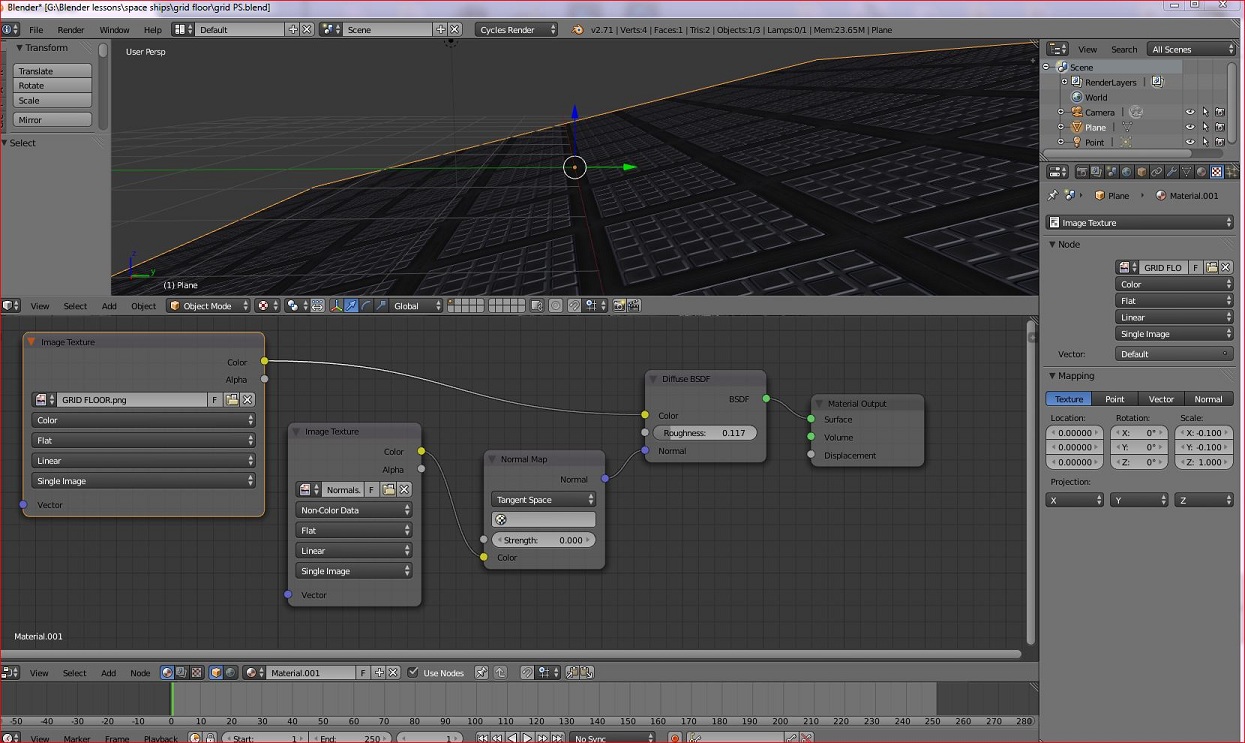
So I wanted to add texture or Bump Like one does in Blender Render but in Cycles… Due to my scene where my 1.5 mil vert floor needs to be replaced! I want to have the ability like I do in B.Render allows to Bump the GEO of the Normals Map, but in Cycles. Here is a couple grabs of what I got going. The Normals is not giving me that bump map look of Geo as it does in B Render as well as it is one or the other when selecting. I do not see a change when adding my Normals Bake texture, like when using GLSL option and (forget the area where you can bump it + or - ~ 5 for 3d look.)
Is this done in Cycles? Or do I need to do it B render and append it within Cycles? Or will that work?
Thanks for any details on this
So, half of your nodes were created with BI enabled (yes BI has nodes)… Half of the nodes were created with cycles enabled.
The two nodes which definitely need replacing are the Material node and the Output node, Instead of hte material node, it should be a bsdf node, try diffuse… The output node should be a material output node.
a)
Why “Normal” as texture coordinates? You want that map to influence the normals, but the mapping is still based on the UV coordinates. So, just delete the texture coordinate node (UV = default).
b)
The strength in the normal map node is set to 0.
Ikari how have you been? Thank you for stopping by and enlightening me. I selected Normal (since you asked) as that is what it is called when baking to use with GLSL in BR sooo… There I go for thinking…
To stay in Blender Internal terminology, there is influence and mapping. Influence is about what material property is driven by that particular texture (diffuse color, specularity, surface structure etc.). Mapping is about how that texture is “projected” onto the mesh.
I do not see a result? from 10 to 0 ??
To follow along your path. My influence from my Normal Map Node is not affecting the scene when cranking it up to 10.
That should give me a bump as it would if I were using it as an influence map in BR and cranking to 5 right?
Wait I am getting bursts when adjust the influence of the Normal Map value. Needs to be in Render view to see it not Texture view BTW
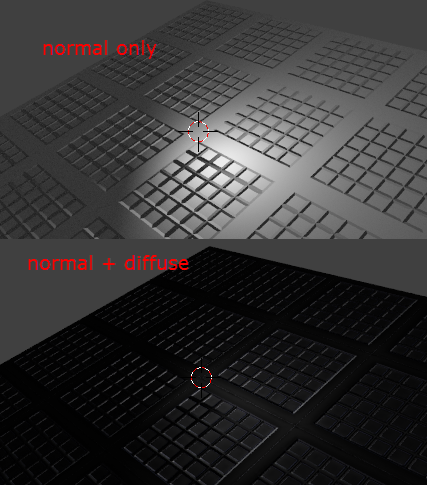
[ATTACH=CONFIG]330945[/ATTACH]
There is something wrong with that material - perhaps some remains from the BI/Cycles node mix. After creating that material anew from scratch it works fine (file).
Thanks Ikari,
I go round and round sometimes over here…(of course ALWAYS thinking it’s me) Thanks for taking a look I will redoux the file and take note of the Nodes and the help I received here.
Regards
NC
I see you did use a mapping (optional) to control grid count and position a bit more…
Well, the nodes are almost the same as yours. I just had to add a mapping node to recreate the tiling, but other than that…
I’m still not sure what was wrong with your material - as I said, I can only assume some kind of software hiccup caused by the fact that this material once included nodes from BI and Cycles at the same time. Hm, after all, computers are but human, too…
UV mapping was correct, node setup was correct. Nothing wrong on your part.