[ATTACH=CONFIG]328537[/ATTACH][ATTACH=CONFIG]328538[/ATTACH][ATTACH=CONFIG]328536[/ATTACH]Anybody know what I am doing wrong? I mean, I watched Andrews price realistic texture tutorial. I did everything he did. not sure if it’s my lighting, the values in my nodes or maybe not using the default settings to crazybump. you can see how the plank gets warped, by the subdividing but, I can’t get and bumps into the mesh though. i raised the normal value to 1.00 and it still looks flat. i have a sun light in the scene and nothing else. I have tried increasing my subdivisions, 3 point lighting a long with a sun and still same results. textures are 2048 x 2048. I can’t figure this out.
[ATTACH=CONFIG]328540[/ATTACH] after 99% it disappears so file is unavailable for upload. here is a pic if I turn the normal up from 1 to 3. isn’t it suppose to stay around 1 and lower?
First of all, the subdivision in the mesh is not made of quads, this can give a lot of problems, add a few loopcuts to make squared faces.
then with a single sun lamp in the top without rotation is difficult to see reflections, first make sure in the viewport that the displacement modifier is applied correctly, you will also need a higher value of Subdivisions to effectively see something, then try moving the light, maybe adding a point light close to the plank to see if everything is applied correctly. ( by the way, you can also see it in the material preview)
The nodes are correct
thanks, I though as long if the mesh has 4 corners you have good topology, didn’t think about the size pf the quad especially that long on this plank and that short of loop cuts.
since I will probably be making high poly models then with subdividing. anybody know of any good baking tutorials? andrew price has one for 2.71 on baking light to textures. is this the same step for all maps and textures? then I transfer the textures onto a lower poly model?
But I thought you already have a normal map, generated from the diffuse map in CrazyBump?
Since that displacement map was generated in CrazyBump, too, and from the same diffuse map, what sense would baking yet another (more or less identical) normal map make?
EDIT
There are a few things in your file that caught my intention.
a)
The displacement modifier is limited to Z direction, that’s why the sides of the plank don’t get displaced at all. Set that to “Normal” and the look should be more uniform.
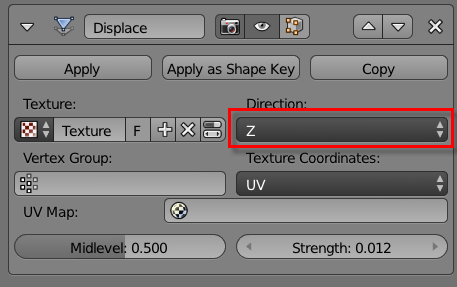
And Thanzex is right that a subdivision level of 2 is not very much. Caution, though: Every level of subdivision will quadruple the number of polygons.
b)
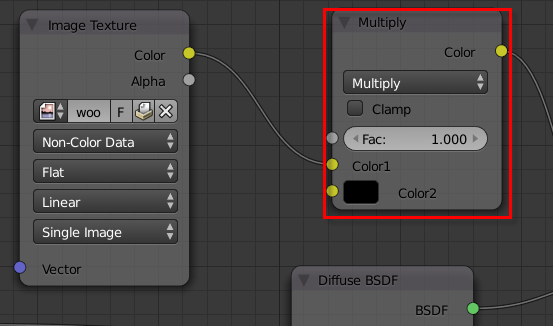
You multiply the specularity map with 100 % black. Feeding into the mix shader, this will completely wipe out any glossy component of your material, as any value multiplied with 0 (black) = 0. And 0 means the upper mix input will be used exclusively. Tune down the Fac value of the multiply node and the material will get progressively more glossy.
thanks so much for your explanation. The reason I was asking about baking is because if i did like 12 boards like this and the rails and cement. Blender would either freeze or crash. so looking for a away to replica the look of the high poly subdivision mesh onto say like a 4 corner plank but with the same outcome of the high subdivisions.
Always ask yourself: Do I really need that much detail?
For a close-up “hero” shot of a single plank you might need the displacement, but if you only see them from farther away the normal map will suffice in most cases. If you want a little variation, just model in a few bumps and dents here and there. Subsurf at high levels will most likely be a total overkill.
EDIT
Left plank: roughly 300 vertices, just normal map + a little sculpt mode for irregularities.
Right plank: roughly 50,000 vertices, displacement + serious subsurf.

Do you see a difference on short distance? Of course.
But from further away? And does that difference justify a hundredfold increase in the vertex count?
OK, i see what your saying.
is this why in animation films, they always have the camera blur focus, depth of field mixed in with dust particles ,volume light and compositing( for rgb curves and color grade). so it keeps your attention on what is up close instead of the background?? so in away it hides the lowpoly mesh?
do I still use a sun lamp in environment lighting?
I heard using a plane for lighting in cycles is a flat light and the sun lamp will help bring out the normal map.
also, I think maybe my texture scale issue may have been finally fixed tonight. I always apply a CTRL A to reset my scale but, if I changed the dimension of all three axis that would be the same like a rotate correct? so…
maybe this whole time I had to use CTRL A and Rotate to fix my scale texture issues.
I know how to unwrap and mark seams . I tested out the uv grid to the object, and can get the squares perfect but… i couldn’t figure out how to apply that to my mesh with a texture image so the uv grid didn’t help me either. so maybe… its reset scale and rotate regardless of not doing a rotate if I changed all 3 axis y,z and x axis in the object dimensions panel ?