Is there any way to make a seamlessly looping animation when using the fabric simulator? I’d like to use it to make a flag animation that can loop indefinitely, but there doesn’t seem to be a good way to do this.
I’ve tried using shape keys and harmonic force fields to bring it back to the start frame. Neither of these quite works right.
Shape keys is very clunky to set up and doesn’t look good. Since the shape keys don’t override the fabric, I have to make a second object and animate which one renders. It also doesn’t move right. The parts using the fabric sim flow, while the shape key gives a straight morph and is immediately noticeable as a different kind of motion.
Harmonics are also not an ideal setup and they don’t work quite well enough. I tried running the sim, then applying it once the fabric is moving enough. Then I duplicate this object and set one up with another fabric sim, and the other becomes a harmonic force field set to either “surface” or “every point.” I let the fabric sim run for a while and then turn the harmonic strength from zero up to a very high number. The goal was to pull the fabric back to its start position to allow a loop. What actually happens is that everything moves abruptly and strangely to sort of where it started. It’s not close enough to actually allow a loop, and it moves too unnaturally to look good.
Any thoughts for how to do something like this? The only thing I’ve been able to do so far is find a similar start and end point in the render and crossfade them. It’s really not a good way to do things, but I don’t know if there are any actual solutions.
I dontknow if youtube loops video, here is the rendered avi file. It sounds weird but try and hide the video player timeline from your view, I found that when I could see it (and knew when it would loop) I was moving my eyes and it felt liked it jumped, but when I hid it from my view I absolutely could not tell when the video looped. I would download the avi and watch it on your video player. Looped flag video on dropbox
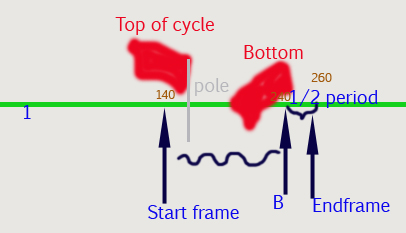
If this is what you want here’s the flow, and a highly polished diagram of the key frames:
Enable newtek mdd pointcache add on
Run a long simulation on the flag 300+ frames that you are happy with. Leave a good amount of simulation frames before and after the frame you think you’ll think you will end on, almost double it.
Find a good start frame. The flag should be at the top (highest point) of a flap cycle. Don’t choose the first time the flags reaches the top of a flap cycle, choose at least the second time it reaches it. Lets say this is frame 140.
Scrub the timeline and determine the average length in frames of a flap cycles. In this test it’s about 40 frames. So the period of the flap cycles is 40 frames.
With the flag selected export to mdd, name it the same as your blend. blendname.mdd
Save a different version of your blend (to be safe)
Delete the cloth sim from the flag.
Add a mesh cache modifier to your flag. In the file path, select the mdd file you just saved.
The flag should now behave nearly dientically to the sim.
In the timeline, change your startframe to the start frame you chose (140) and go to that frame.
In the modifier insert a keyframe on the influence of 1.
Scrub forward a few flag cycles until you come to a frame at the bottom of a flap cycle. In the test it is frame 240. Call this frame b.
Insert a keyframe of influence for 1.
Scrub forward the number of frame of half a period of the flap cycle. The test period was 40 frames, so go forward 20 frames, to frame 260. This is the end frame.
change the influence to .05, insert a keyframe
Add another mesh cache modifier, change the file path to the same mdd.
change the frame start to (b - startframe) + 1/2 period
In my case b is 240, startfarme is 140 and 1/2 period is 20
so: (240-140) + 20 == 120
go to start frame, keyframe influence of 0
go to frame b, keyframe influence of 0
go to final frame (b+1/2 period) and keyframe influence of .95
Re-enable visibility on the first modifier
set your end frame in the timeline.
You could experiment with offsetting the second modifer by one frame and using full influence on the keyframe (instead of .95), but this works pretty well.
The diagram is so bad I’ll include a frame of rendered flag: