I started another tutorial by David Ward doing the Stylyzed dragon.
Every time that I use the sculpt tool to grab or smooth my topology messes up I have to fix it.
Am I doing something wrong or is there a button that I need to be using.
I started another tutorial by David Ward doing the Stylyzed dragon.
Every time that I use the sculpt tool to grab or smooth my topology messes up I have to fix it.
Am I doing something wrong or is there a button that I need to be using.
There are multiple things that can go wrong. Would help to describe the problem with images and post a .blend.
Ward likes to use sculpting tools while modeling but it’s not something a beginner would do or should be doing. Sculpting tools have been updated many times since that tutorial.
JA12 Thanks for suggesting to stop using sculpt I won’t be using it any longer.
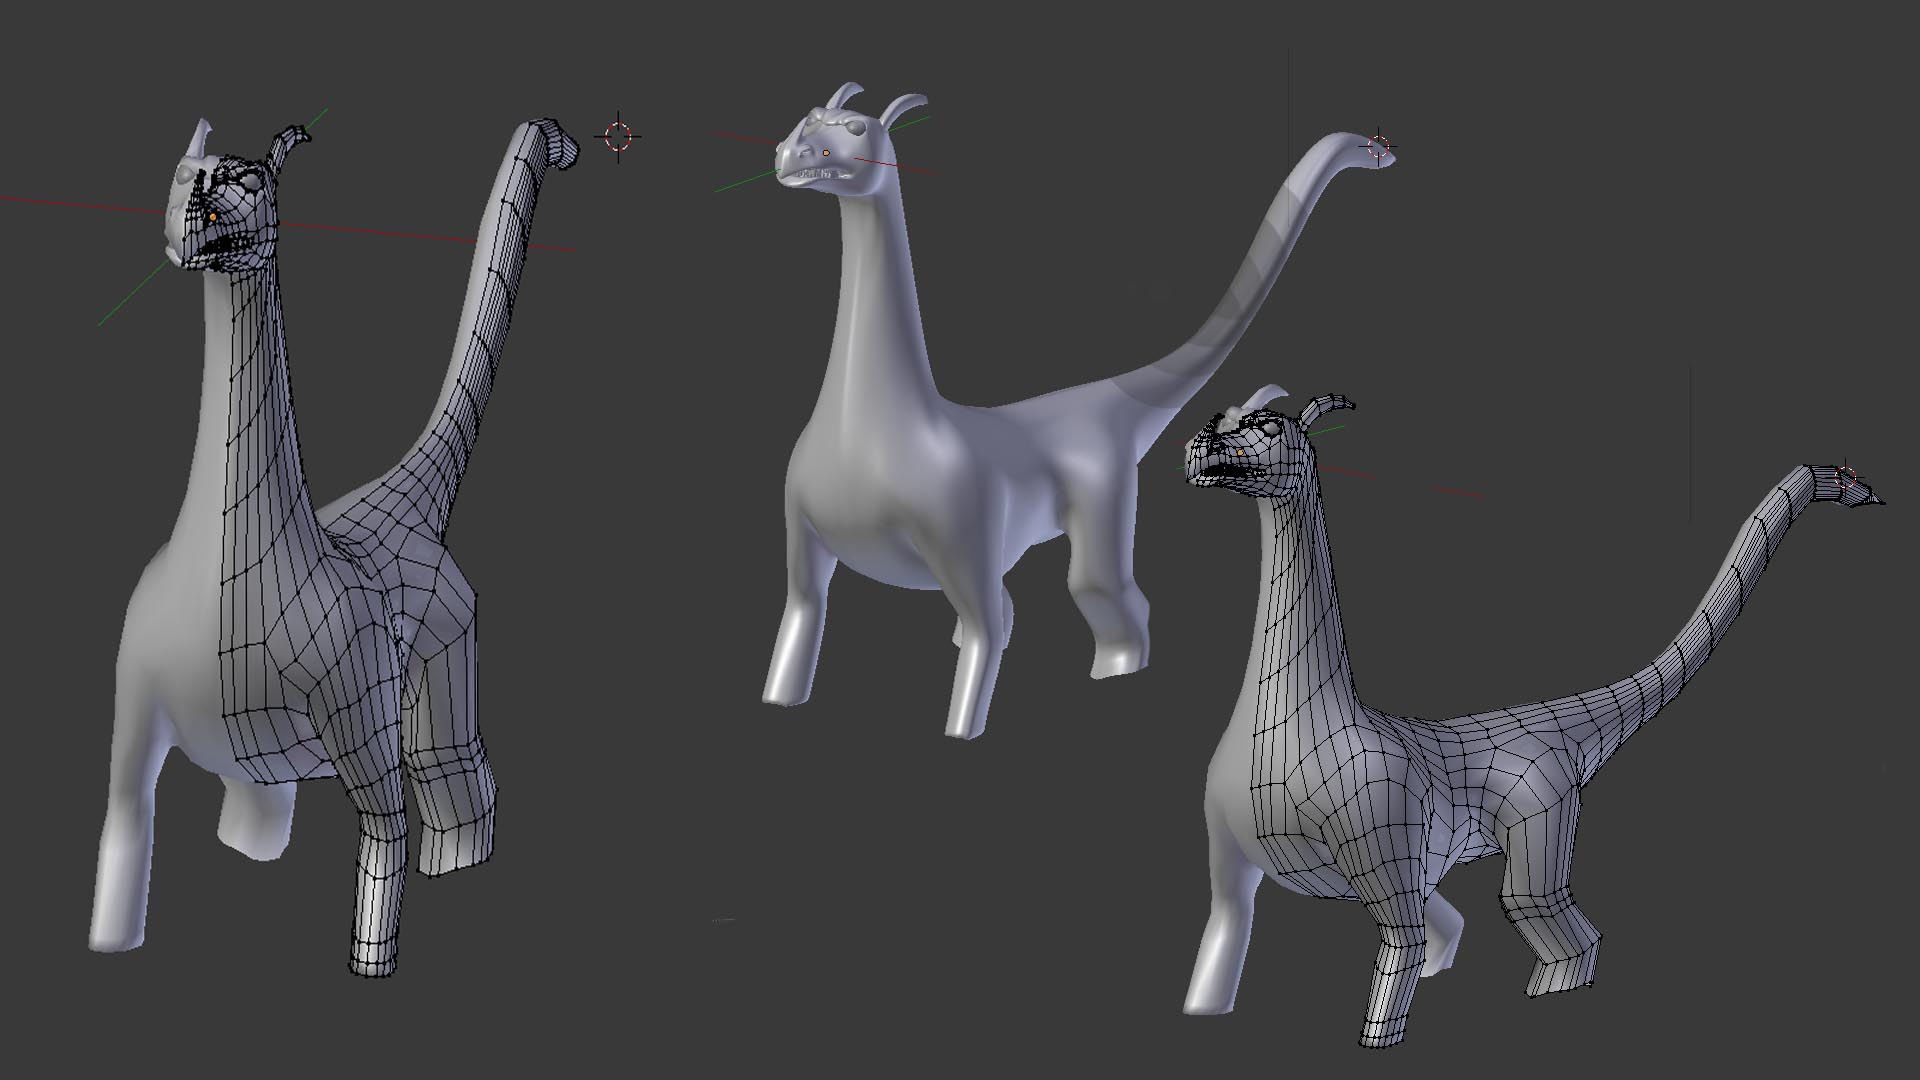
I would like to get the topology better than what I have now. The Tail and the nose claw is not correct since I used the sculpt tool on the nose claw. The end of the tail I did several re overs I want that to be more pointed. I have no feet or any details on this dragon. There is more detail that I want on this but It will depend on the topology.
The Image that I am following at least for the body. I have something else in mind for the head.
http://muddycolors.blogspot.com/2012/09/dragon-anatomy.html
Please let me know what I can do to improve on the topology. Or if this will be alright. In the tutorial there will be animation that I want to try. I hope to make that work.
http://www.pasteall.org/blend/30391
It’s not bad topology. But it’s not good either. There a few n-gons (bottom lip) and some extremely dense poles (horn on nose). These will wreck havock on sculpting. There are many long rectangular quads, which will make sculpting tough as well. As for using a sculpt brush in leui of pushing verts manually, or proportional edit I would agree with JA12 that’s you should probably model the low poly by hand in edit mode. That being said I sculpt meshes all the time! Your edge flow is not great either. The loops in your mesh should be smoother. And focus on keeping your quads as square as possible.
When you will be sculpting with mutlires down the line, you want to focus on these things:
This mesh is almost at the point where you could do some decent multi-res. But the more time you put into making the low poly have good topology pays off 1000 fold down the road, when you try and rig/sculpt/bake… Great start!
Photox
Your edge flow is not great either. The loops in your mesh should be smoother
What do you mean by this? How to smooth loops
Have a question Is there a way that I can at least clean up that mesh by combing some of the vertices, quads, edges without damaging that mesh.
The good thing is that the general shape of the dragon is correct, so you can do most of the smoothing with vertex slide. In edit mode, in vertex select mode, normally to grab and move a vert you would hit ‘g’. Well, you hit ‘g’ ‘g’ and the vertex can be slid along any of the edges it belongs to. You move your mouse over the edge to be slif along and the vert will 'jump to that edge. Now just look at the vertices close to it, are they forming a smooth curve or are they zig zagging? You keep doing it for each each vert in the loop, then you do the next loop…
I took about 3 minutes to slide a bunch of your verts to show you very quickly the direction to might want to head. Can you see how the loops are smoothly flowing, and not zig zagging?
Also you should work with subsurf off most of the time as it can fool you into thinking things are looking better than they are.
Here is an update. I worked on the mesh all day (had interruptions) and It finally is looking so much better.
Photox Thank you for your suggestions. I still have a lot to do.
CC are always welcome.
Great improvements! Assuming you got rid of the ngons on the mouth and cleaned up the nose horn (it’s hard to tell from the angle, but I think you did) it’s probably good enough for multires sculpting. One idea to consider is modeling the tail as a perfect cylinder straight back, and then just using a spline ik to curve it. Whenever you have a nearly cylindrical segment like the tail you want the loops to run perpencdicular to it, and not an angle. so I would consider straightening those tail loops out. I would probably add at least 1 more loop cut (ctrl-r hovering in between loops until purple guide appear, then click and slide and click again) on the hind leg thigh and calf. Close out the bottom of the feet, and make sure everything is manifold (or close to it, eye sockets don’t need to be) makes sure it’s all quads, and then you can probably start mulrires sculpting.
Here is a 5 minute sculpt session in multires using only a clay brush. I have a bunch of scale texture brushes if you want them I will post them. This illustrates 1) how easy and quick it is to add non descructive detail to a mesh like this one b) the issues you will face with uneven mesh density.
level 1) gross detail, enlarge major muscle areas. You can’t do too much at the low levels
2) continue gross details
3) start spine ridges, minor muscles
4) enhance medium details, start major veins
5) fine detail, scales, pores, minor veins, tiny muscles…
and of course, you would bake normals or displacment from 5 to probably 2 or 3.
Execllent progress, look forward to seeing it get better.
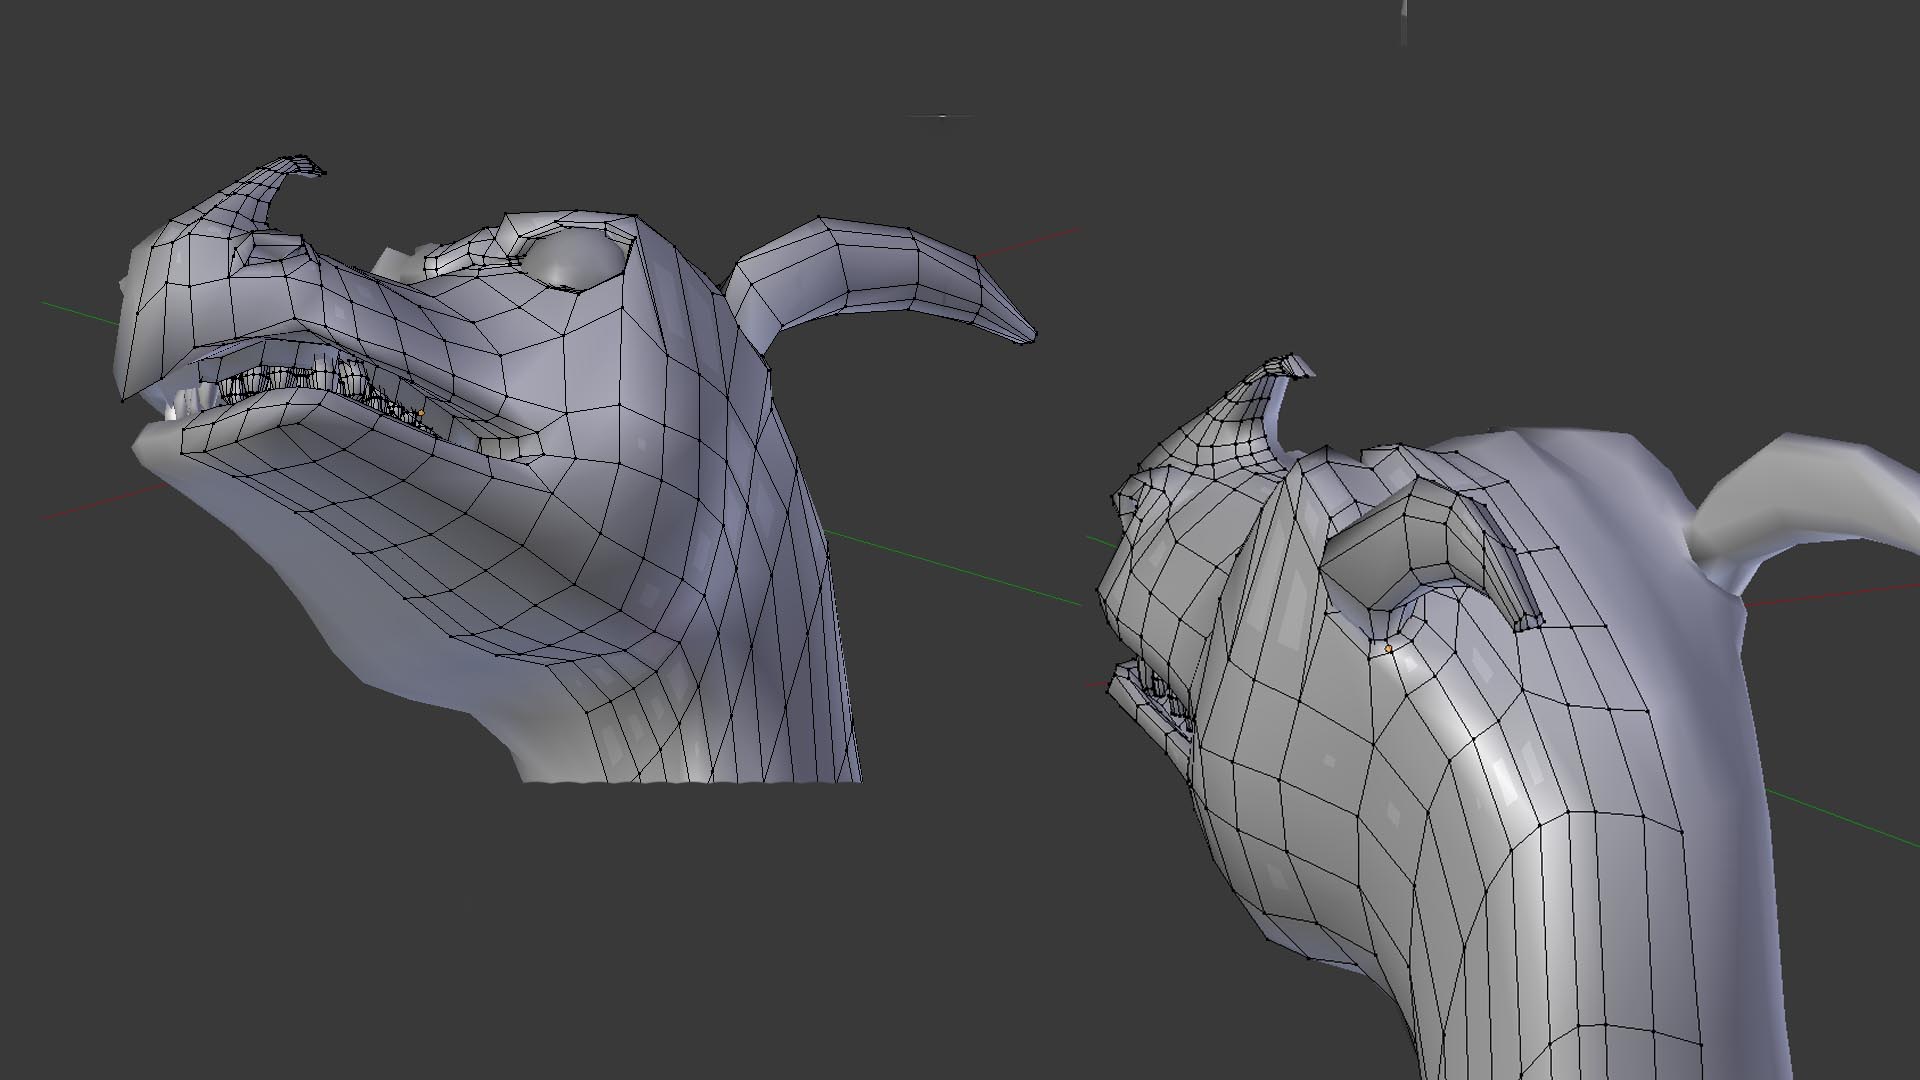
As you can see from the image of the head that I have the nose horn more square than I wanted. I would like it to be a point. I messed it up last night when I was working on that tail. I unchecked the clipping thinking I was being careful and the rest of the object wasn’t being effected. I will be working on that more. But is there a better process to get that to be a point.
About that tail I have re done that several times and it is round but when I get to connected with faces it messes it up. What I want on it is a Cobra Head with open mouth and tongue. Not sure if that will work because of that point. I will see about trying later.
One idea to consider is modeling the tail as a perfect cylinder straight back, and then just using a spline ik to curve it
I like this idea about the tail. This tail is round and I make it as straight as I can but at the end (point it really messes it up.) What is a Spline IK? Do you know of a tutorial that I could look at to see if that is the direction I want to take.
I like the idea for the multires but I need to work on the feet yet and I am in the process of adding the toes and claws yet. Then I will be adding wings. I have Blender 2.67b and I would like those sculpting brushes Please tell me how to download into blender to get them to work.
Thank you so much for your help
By the way I saw your worms post it was awesome. I will fix the head as you suggest. I will post again soon when I have more of it done.
Thanks Photox
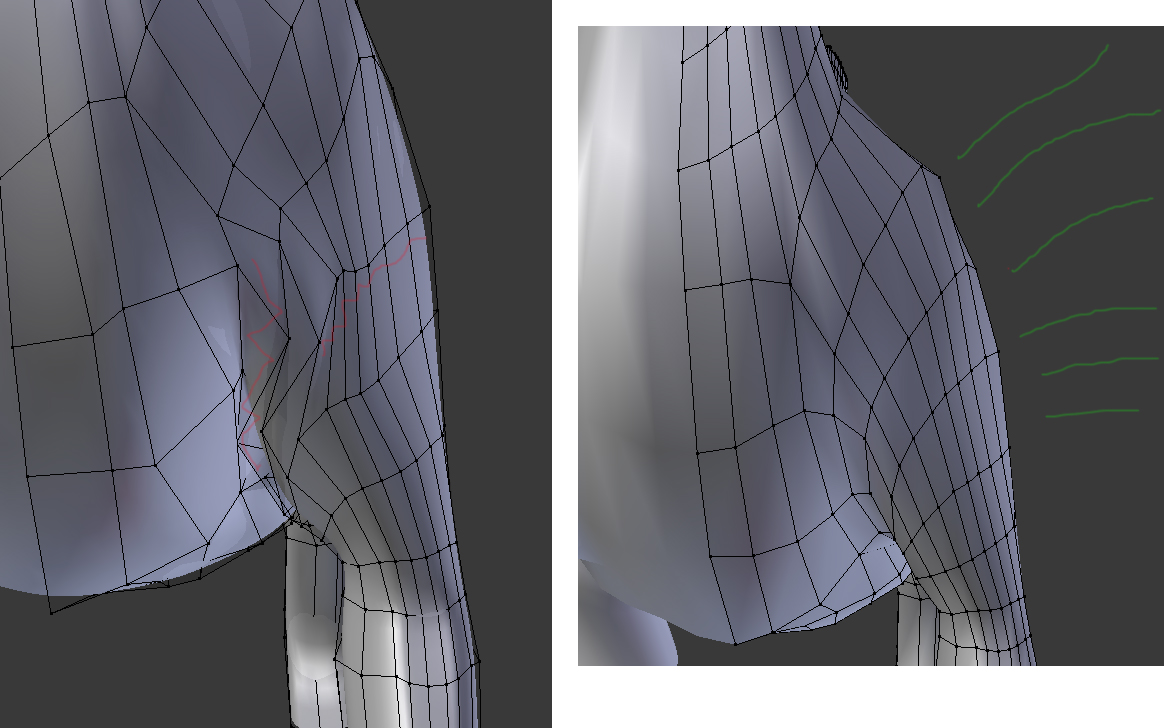
I started doing the wings on the dragon. The Back of the upper arm has four faces and I noticed that the bottom of the
wing has 3 face and as you are aware they don’t match up going from the bottom of wing to the back of the dragon. I have it highlighted to so you will see what I am talking about.
What did I do wrong?
http://www.pasteall.org/blend/30473
Thanks for the help
Anyone that can help me would be appreciated.
First, your model is looking great. You’ve made excellent progress. Learning topology is a long road and you need to make alot of mistakes along the way. I looked at the faces you had selected and I don’t really see a problem with those ones. The biggest issues I see right now are
Open your tools panel (hit t) and in edit mode, go to the ‘select’ menu, choose select faces by sides In the gui that shows up on the elft, choose number of vertice ‘4’, and ‘not equal to’ this will show you all not quad faces. Your immediate task is to eliminate all these so that your model is all quads.
Make sure looptools addon is enabkled. User prefs, addons, type ‘loop’ into the search, check the checkbox for loops tools, save.
n-gons below the mouth. in edge select mode, select the single edge between these two n-gons, hit x ‘edges’ The n gon is gone but you need to fill some faces. I’m not going to tell you exactly how I’d do it, but give you some ideas for tools you might not have tried before. Save a new version of the blend. It worries me a bit that you’ve posted multiple blends with the same exact name. You want to be saving versions with different numbers regularly.
in vertex select mode (the cube with a orange vertex toward the bottom in edit mode) hold alt and right click any edge in a loop, this select the entire loop. Hit x and and choose ‘edge loops’ , hit ctrl-z to undo what you did.
loop cuts.
look for 2 loops on the neck. move your mouse in between the loops. hit ctrl r to start a loop cut. Move the mouse around until a purple loop cut line appears parallel to the loop you want to cut , left click and slide the loop up and down, and when you’re happy left click again. ctrl-z to undo.
Fixing tris, ngons and odd poles sometimes requires adding a loop.
look at you loops, your edges, ask yourself are they following the topology of my shape. Are they smoothly flowing.
Coming along very nicely, the feet/claws look really nice. Version 2, all quads.
I fixed the Tris which I believe I did get all but the two. I did go to user preferences and got those tools you mentioned.
So when would I know when to use them.
I worked on the wings but when I had to attach to the body I added loops and then I did alt M to last. When I went to object mode it looked to be split even though it isn’t. I went to sculpt mode to smooth that out but it didn’t work. What the heck happened. By the way I did change the save file to different numbers.
http://www.pasteall.org/blend/30515
Thanks Photox for the help
Excellent!
As JA12 says it’s just bad normals, happens all the time. I remeber when I was just starting to learn blender I used to delete my meshes and start over (and over and over) thinking I had extruded them wrong.
Whenever shading looks weird you do these 4 things:
If it’s still bad then you’ve probably got a topology issue.
I’ve been experimenitng with the mitsuba renderer which has been alot of fun. I pulled your latest dragon into a chessboard test scene I’m making and rendered him (or her) as glass. I think it looks cool.
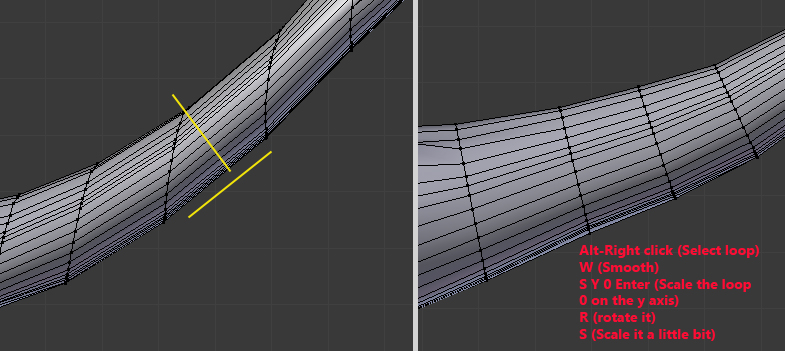
I’ll reiterate what I stated earlier, whenever you have a long cylindrical part of your mesh the topology is simple, the loops flow with the cylinder and perpendicular to it. Your loops on the tail (and neck) have become skewed almost 45 degrees. 10 degrees not a big deal, but later on you may wind up with odd deformations once you rig it. You can use the vertex slide technique I mentioned in an earlie rpost, or you can try this one. Of course save a new version of the blend.
In Right ortho mode:
1)Select the loop
2) W ->smooth
3) S Y 0 Enter(scale it 0 on the y axis)
4) R (rotate it back so it’s perpendicular to the direction of the tail) (This would be R X if not in right ortho mode)
5) S (scale it a little bit if the scaling is off)
Loop tools does all kinds of great stuff, I wind up telling people to hit certain keys sometimes and don’t realize that it’s part of the add-on. If you have two loops with an equal number of vert, but they are not connected with faces, you can select them both and hit w-looptools-bridge and it connects them. It saves a lot of time, instead of filling the faces 1 at a time with the f key.
The dragon is very,very close. Your slow but steady approach is paying off.
JA15 Thanks for noticing those minor problems I went ahead and fixed all of them. I didn’t even notice them.
Photox Thank you. Yes I do agree with you about being very slow with it. This Dragon is my second project that I have done with Blender and I wanted it to turn out for me. Especially when I rig him and animate with flying I hope. Haven’t thought about what to call it yet.
Image of the glass. WOW I may have to experiment with that once I have it done.
Questions:
How did you know about the 45 degree angle on the tail? Yseterday I did some edge slides with ctrl E then I went to sculpt and tried to smooth it out.
About sculpt mode I think I am about ready to do that. I know that I need to add a multires mod but how much of hte sculpt mode should I have? I found on Blend Swap a reptile skin brush for sculpt please take a look http://www.blendswap.com/blends/view/69739
Actually not sure I like it. But I want to know what you guys think
Photox when you mentioned about 4 million vertices I thought about that is so much won’t my computer crash with that. I have Win 7 64 bit ram is 4.00 So I am thinking that will be enough.
Once I figure out how to get some bones onto the back of jay and along his neck then I will be ready to sculpt. I also wanted the bones coming out of the head and down the neck. Not sure about it yet but will work on it today for a little while.
http://www.pasteall.org/blend/30531
http://drawingforkids.org/images/73592-dragons-mystical-creatures.jpg
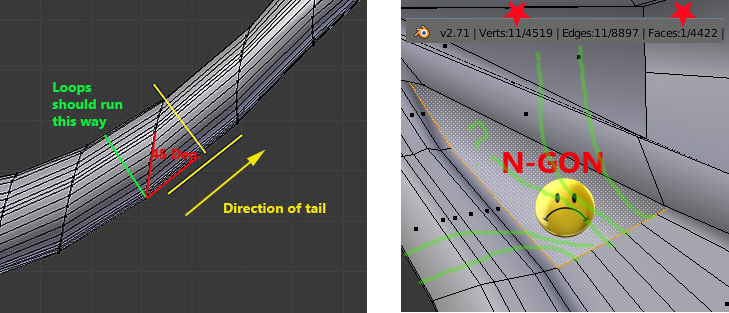
Maybe this image will illustrate the tail (and neck) loops issue better. You see the 45 degree angle being formed by the direction your loops and the general direction of the tail, that needs to be closer to 90 degrees.
Also you have this 1 nasty n-gon. It’ s a face with 11 vertices. You should fix it. Select the face (in face select, and hit x ‘faces’ there’ one on each side of the wing. I would porbably add some loop cuts and redirect those loops. I give a possible generized solution in light green in the image on the right. You would add loops cuts, and fill the faces one at a time by selecting 4 vertices and hitting ‘f’
Just a few more small changes before you can move forward with sculpting etc…
photox I have been sitting here for an hour trying to fix that n-gon in the wing. How in the word do I do that. I deleted that it and put extra loops and I end up with more than what I need. Looks terrible.
On the other side of wing I have a hole that I am having trouble with. How do I fix it http://www.pasteall.org/blend/30546
Thank You for your help
It’s a tricky thing. Always strive for lower poly. You have areas there will edge loops extremely close to one and other, you should delete some of them. Using your loop tools add on, select a loop that is really dense, and hit x ‘edge loops’ the difficulty of topology goes up exponentially with poly count. Another technique that can be handy when you are trying to connect two different regions with different poly counts or densities is the wedge technique. You take 3 verts in a loop, and hit w,merge,a center. This leaves you with two adjacent tris. Switch to face select mode and select both tris, and hit f to form a single quad face from them.
wedge technique.
I’m not liking how the loops gather in one spot, which is what you’re trying to solve but I don’t quite understand the face flow on the wing in general.
One of the wing bones (marked red, makes quite nasty loop all around) comes quite close to the elbow, which probably is there because larger wing area doesn’t have a support otherwise. I don’t know if you’ve planned to spread the wing more open or how that moves.
If it’s supposed to spread more, it might be a better idea to let the outside loops to be continuous. Green loop going from tail and continuing with the orange loop.
I made a simplified example of edge/face flow to explain their function
I made a loop reduction where the green loops start to come near a common point. Even so, all the listed flows are still preserved.
Not sure if this made any sense but hopefully it gives some ideas on how to guide the loops on your wing.
wing_topology_ja12.blend (118 KB)