Hello
I thought that I would share with you my first efforts of an explosion. For nearly a year, have been struggling with an explosion, firstly with blender internal and in the last 3 weeks with the Cycles Smoke and Fire render. Havng had loads of issues with internal, I was naive enough (being a total newbie) to duplicate the project file and adapt the materials etc to cycles.
I think pictures speak louder than words.
A word of warning ! It takes me about 2 days to render the scene in Internal on about 10 machines. The cycles result took me about 2 days per image on more than 10 machines!! In total, nearly 2 weeks. I am sure that it can be optimised as I do not really know what I am doing.
But the goal of sharing this is to show just what the cycles potential can be in the hands of a competent user.
I hope it inspires.
Thanks to all of you that helped get to this … and it is far from finished.
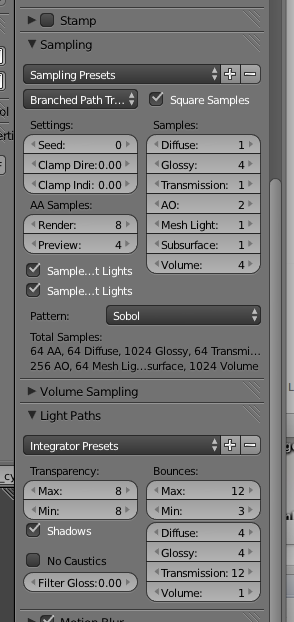
I had to render the smoke twice to cover any issues with debris coming through the flames, so a single pass would take about half the time. The average render machine was an old macpro 2.6 quad core with 8 gigs of ram . I think I was low on ram, which probably did not help, as I saw the ram maxing out. To combat some very grainy initial renders, I finally set the render setting below. Even with these settings, there is still “grain’” in the image. That said, I got the impression that I was rendering plenty of nothing. If anyone can tell me how to optimise all this, I would be very grateful.
Your bounce settings are pretty high. Is there any particular reason why? I usually keep the total bounces to 4 or 5 with 1 or 2 diffuse. If you sent your computer into swap by maxing out the RAM that would really slow things down.
Next, are you actually using AO or the AO pass?
Also, it seems like the branched path tracer and volumetrics don’t get along the best right now, so it might be worth trying the regular path tracer
Thank you for your comments. I used branched as I was under impression that it would concentrate the render time on what I felt were the important parts. AO is for the AO pass as I did not want to to be too grainy. As for the volume pass, I thought that having a high figure would make the smoke look better, but I am unsure. I don’t know if it was really necessary.
Branched path tracing is really good for doing what you said, and it looks like you tuned it for this scene but in the case of this it might not be needed as aside from the volumertrics there only appears to be the debris, so there aren’t a lot of different material types fighting for rays. For better or worse the regular path tracer seems to be a bit more reliable at this point, especially with volumetrics.
For an outdoor scene like that 1 diffuse/2 glossy should be enough bounces, after that the contribution of the bounces to GI is pretty minimal. I’d also turn off caustics and then lower the glossy sampling, because it’s unlikely that you really need (88)(4*4)= 1024(!) glossy samples for each pixel. If the Volume and blur aren’t giving you any problems at that point, you could probably turn down the AA to 7 or 6 and get some really impressive savings on render time.