Hello, I’ve been looking at this site for a bit, and this is like the first time I’m posting.
I’ve been using Blender for some years now, mainly creating vehicles, or simple tracks.
Altough, I wanted to improve my track making skills. All the games I used to mod used Heightmap for terrains. So If I had to make a road I just had to make a path in the heightmap (pretty time consuming), import the HM in Blender and make a road. But this method doesn’t give a perfect matching road to the heightmap, since it depends on the terrain resolution, and the road too! And since I’m talking about games, I can’t go nuts with polies.
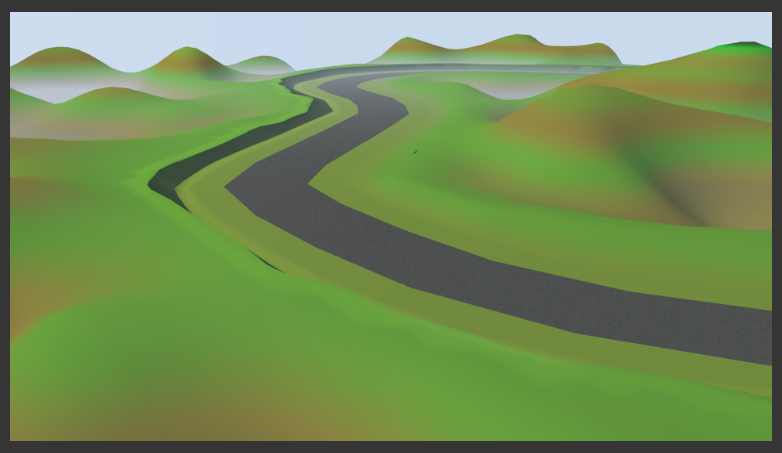
With the help of a program called 3DRipperDX, I’ve been studying how others games have their maps made. I noticed they have somekind of mixed road path with a terrain with a grid-like topology. Here’s an example from Flatout 1:
And one from Motorm4x:
You can notice that the road is like following its own curve, and the terrain around has its own grid like topology, and it’s merged with the road.
I tried looking around for any more explanation about this kind of method, but I hadn’t much luck :
So, my question is:
How that works? You start from a road (Plane with Array and Curve modifiers) and then make a terrain under it and merge it somehow? Or there is a particoular way to do that?
I don’t like to bump stuff (I don’t actually known if it’s allowed there), but I find it weird that such thing has no documentation online, not even a single tutorial I found. I mean, I found that kind of modelling in a game from early 2000, it’s not such an innovative thing. Anybody?
I got in contact with a Next Car Game artist, and he told me that there are different ways to do that. One is to make the terrain, the road out of a spline and merge them together manually. But that’s not really that descriptive, so my question is still staying.
Use of a subdv edged curve as a bevel object for a “path curve”(3d) easily makes roads then a subdv plane can be sculpted for terrain and stitched to road.
personally, I would make the terrain using displacement, apply the displacement modifier, then sculpt in the road with dynamic topology enabled, then use the decimate modifier, and then use retopo to place my path.
Takes 15 minutes to come up with this kind: add plane, select edge and Ctrl mouse click around to get road - track shape, while in top view. Inset several times selected track.
Then extrude gradually outer edges, use Loop tools Gstretch or scaling on edges, connect a bit vertices while you get rectangular ground plane.
Use proportional grab to make elevations or track slopes where fit.
Fill middle part with ngons, triangulate. Texture and GoGoGo!
You might want to use the displacement modifier as Modron suggested. Just one tip for unwrapping the road you could try u follow active quads this will allow you to easily apply the street texture even in curves. I have to admit that creating the street itself will be a bit more work. But you could try to create the streets with staight parts and curves first and then go ahead and build the environment around it. I hope that helps.
Stitching is not scripted (yet?) in blender but is doable and doesn’t take long.
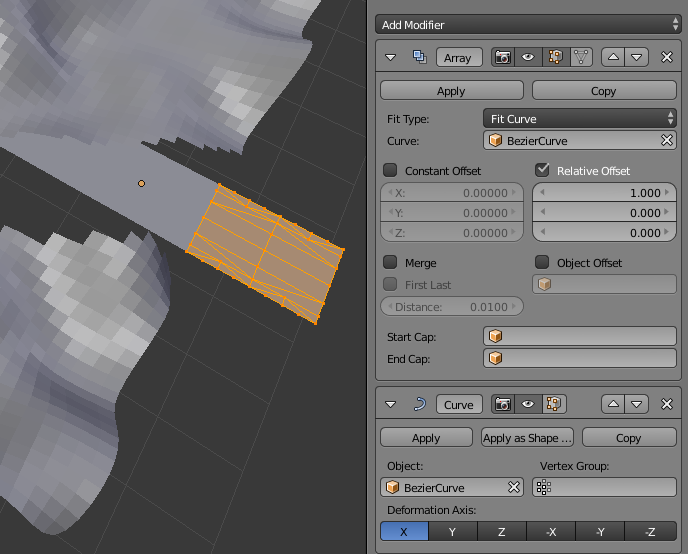
Generate terrain:
Add plane, in edit mode scale 4 or so, subdivide 20 (or so), add Displace and subsurf.
C select and delete faces where you want road.
Add road plane patch like in image where outer edges have approximately needed vertices count to match ground faces.
Add curve to match road center line.
Make road patch Array on curve and add Curve modifier. Apply these.
L- select one side of ground plane. Use Select- Boundary Loop and deselect like in video; assign selection to Vertex group.
Do the same with other side. Select group and using Proportional edit scale Z to 0. Use LoopTools Relax to smooth out verts on road sides.
Join road to ground.
Select road side vertices (to which you applied modifiers beforehand) like you did with ground. Assign verts to the same group.
Select vertex group, invert selection, hide. You’ll be left with 4 lines- select 2 on one road side and use LoopTools addon Bridge.
Paint, enjoy.
Gstretch uses Grease pencil hand drawn line to put selected verts on this line equally spread. So top view draw Gpencil line (D and move mouse or Ctrl-D and draw straight line), select vertices you want there and click the button.