I have some footage done with someone talking to the camera. A green screen was used so we can composite her into a virtual room. This would be my first time trying this with Blender. My plan is to animate camera movement in the 3D environment, save it as a movie, then bring both the 3D footage and the live footage together using some tracking in a composite. What is the best method to do this? I opened up Blender 2.7 and went to composite mode. When I tried to add a movie clip node, it was as though it was greyed out. In fact I couldn’t add any nodes in the beginning. Did I miss a step? Would it be better to composite the live footage into the actual 3D scene instead?
Did you enable the ‘Use Nodes’ option
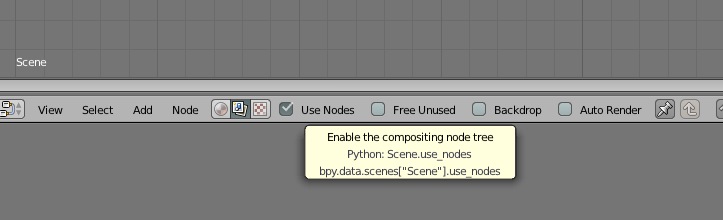
When you enable composite nodes a Render Layers input and Composite output node will appear in the compositor window and all the other nodes will become available to add
Thanks Richard. I just had a DUH moment.
Now to learn how to setup the workspace for what I’m trying to do. I’m thinking: Timeline, Node Editor, and some kind of viewport to see what I’m doing. Any suggestions are welcome.
Greenscreen is a locked off camera? if so what i would do is
A) process the greenscreen and output a image sequence with alphas (exrs or pngs… not jpgs)
B) set up 3d environment and add in a plane, with the same dimensions as your outputted image sequence, and have it always facing camera… have the texture of this as a image sequence texture.
C) render it all together.
If you animate camera movement, the real footage will have to be recorded with a camera moving exactly the same way - so perspective on the character moves.
The way to do this without robotic cranes to move the camera, is to track the recorded footage, and have the camera in 3D moved.
Try to google “Blender motion tracking” to see some tutorials on this.
Basically you record your greenscreen scene, and have some tracking markers on the green screen. These markers are tracked in blender and now the camera movement can be solved. Add your 3D scene around the isolated actor and combine in compositor.
Thanks for the replies. The actor is actually standing still so no worries. I’m actually gonna start without animating the 3D camera now that I think about it as I’m reading your posts. It makes no sense unless I do simple zooms or else she will look like a camera facing billboard. So a simple overlay composite will do. In your opinions, what is the best method to get rid of color spill on the actor (the ambient color left from the green screen on the edges of the actor)? I was watching some tutorials and it seems like people are using different methods for cleanup.
The best way is to avoid the spill in the first place  - By carefully lighting the scene when recording. If that is not possible - the keying node have a built in color despill option, but it will alter the colors of your actor as well, when it removed the green.
Can you explain what kind of lighting setup would reduce the color spill when shooting the live footage?
Typically the greencast is because the green screen casts its reflection on to the subject. You can avoid that, by having a white (or if your scene allows it - some other color from the opposite of green on the color wheel shine onto the sides on the actor. Altso a backlight will help illuminating hairs and edges.
Take a look at “3 point lighting”.
Also be carefull not to over illuminate the greenscreen. Illuminate as evenly as possible (helps narrow the isolation) and darker than the subject itself.
You need to illuminate from the sides and have some distance to actor, so you don’t cast shadows on the greenscreen as well.
Thanks nallic. The lights on the sides of the actor sounds like a good idea. Our studio is very small so we have to figure out the best way to place them. I will also refresh my memory of 3 point lighting.
I also was reading that it’s good to light the subject and screen separately if there’s enough room. Plenty to consider on this subject.
Here is an article I read earlier http://lowel.com/edu/lesson_green_screen3.html
and also this http://onebitpixel.com/aml/?page_id=572
I’m sure there are many more articles out there but from reading those I got a good idea about setting up the lighting.
Very good articles!
You can’t always use all the tips, but at least being aware of the different effects will make it better when you set up the scene.
If possible, bring blender to the studio and try out keying out your subject. Also try downloading som “ideal” test footage to see how the settings are on this - if you need to move the tolerances much away from the ideal, you know it will be worse results
You could try out on the “tears of steel” footage. It has been recorded in a professional greenscreen studio.
This thread looks like the closest to what I am looking for. I have a very similar situation.
Green Screen
Virtual Studio
Live talent (full body)
Stationary camera, but talent may will take a couple of steps
My problem is I don’t know how to create a reflection of the live talent on the floor of the virtual studio. Is this possible since both the virtual studio and live talent are 2d videos?
Thanks for your help.
Duplicate keyed footage, flip and mirror it then move it down to the contact point. Won’t be perfect though. Or place your key on a plane and reshoot the plane in 3d with a reflective surface below. But that will pretty much look the same as the rays from reflection aren’t the same as the real world. That is you no longer can see under the subjects feet etc.
Thank you, 3point. That definitely gives me some things to try. Very much appreciated.