Recently I used Kinect to 3D scan a human model; Results were nice but there were all kinds of artifacts in geometry and color texture. I discovered that Blender is a nice tool for fixing such artifacts, as you can see from this video that presents my end result and work process in Blender:
This 3D scan was obtained with Skanect software by going a full circle around the model while filming her with Kinect. Skanect gives a simple interface for 3D scanning with Kinect, creating a watertight mesh, and importing textured 3D models. The downside is that it costs $129.
You can get started with 3D scanning using free software, to see if Kinect scanning works for you. Free scanning software has less integrated post-processing features and getting a textured mesh out of them requires more work.
SCENECT is free Kinect scanning software that has many tutorials about the whole 3D scanning process from start to finish:
http://www.faro.com/scenect
Another free option is Kinect Fusion of Microsoft Kinect SDK:
Alternatively, instead of Kinect you could use a still camera and 123D Catch:
http://www.123dapp.com/catch
There are other commercial Kinect 3D scanning software besides Skanect with similar or higher price tags: KScan3D, ReconstructMe, Artec Studio, and FabliTec.
NOTE: 3D scans with Kinect 1 are not suitable for closeup, since the sensor isn’t accurate enough to capture facial features properly.
Pro tip:
If you want to capture your model in a T-pose, let her support her arms on broomsticks that you later remove in your 3D software.
Finally, I’ll show you what kind of artifacts you can expect in 3D scans, and what you can do to remove them.
Below left is the 3D model exported fresh out of the 3D scanning software, and on the right is the same model fixed using Blender. I mainly used mesh sculpt: First I masked the troubled faces, like the dent on the head. Then I used different sculpt brushes to repair the geometry. Smooth brush is also important, not only for smoothing rough and jagged surfaces, but also for straightening out “cave ins”. An example of such a cave in is the hole in the shoulder, which also introduced donut-hole type topology (these are somewhat common when using Poisson reconstruction for creating watertight meshes). For the problematic shoulder, I had to delete the “bridge” faces so that the two entrances of the cave would become one. Then I applied smooth brush on the inner walls of the cave until it became less deep and finally disappeared.

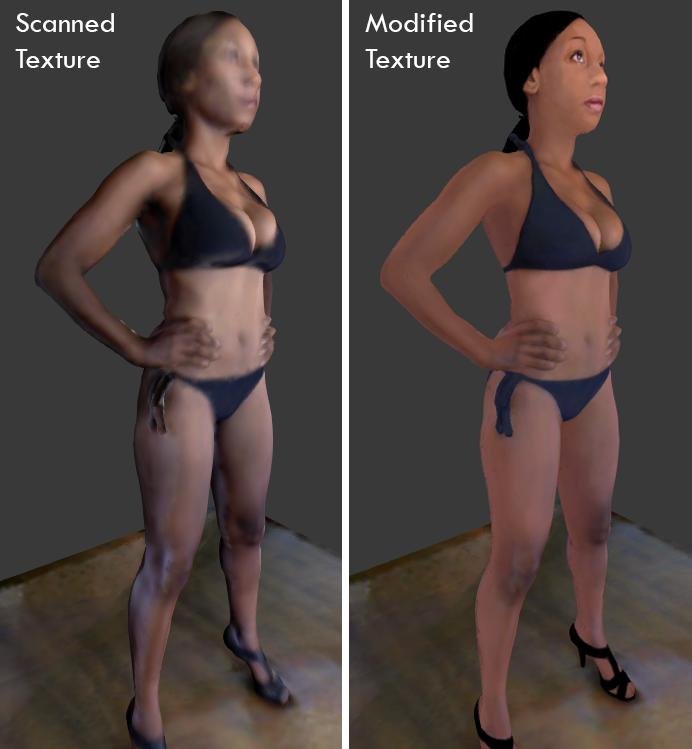
Below left is the color texture as captured by the scanning software. It’s photo-realistic, but way too blurry and has too strong shadows to be rendered correctly with arbitrary lighting. On the right is the final color texture that I used in the rendered video; I painted it in Blender’s painting mode, refining the details and removing most of the “baked” shadows.
If you want a detailed overview about fixing 3D scan artifacts, check out these great tutorials by Infinite-realities:
http://ir-ltd.net/learning-the-ways-of-the-force/
In the videos they use Zbrush and other software, but you can do same operations in Blender as well.