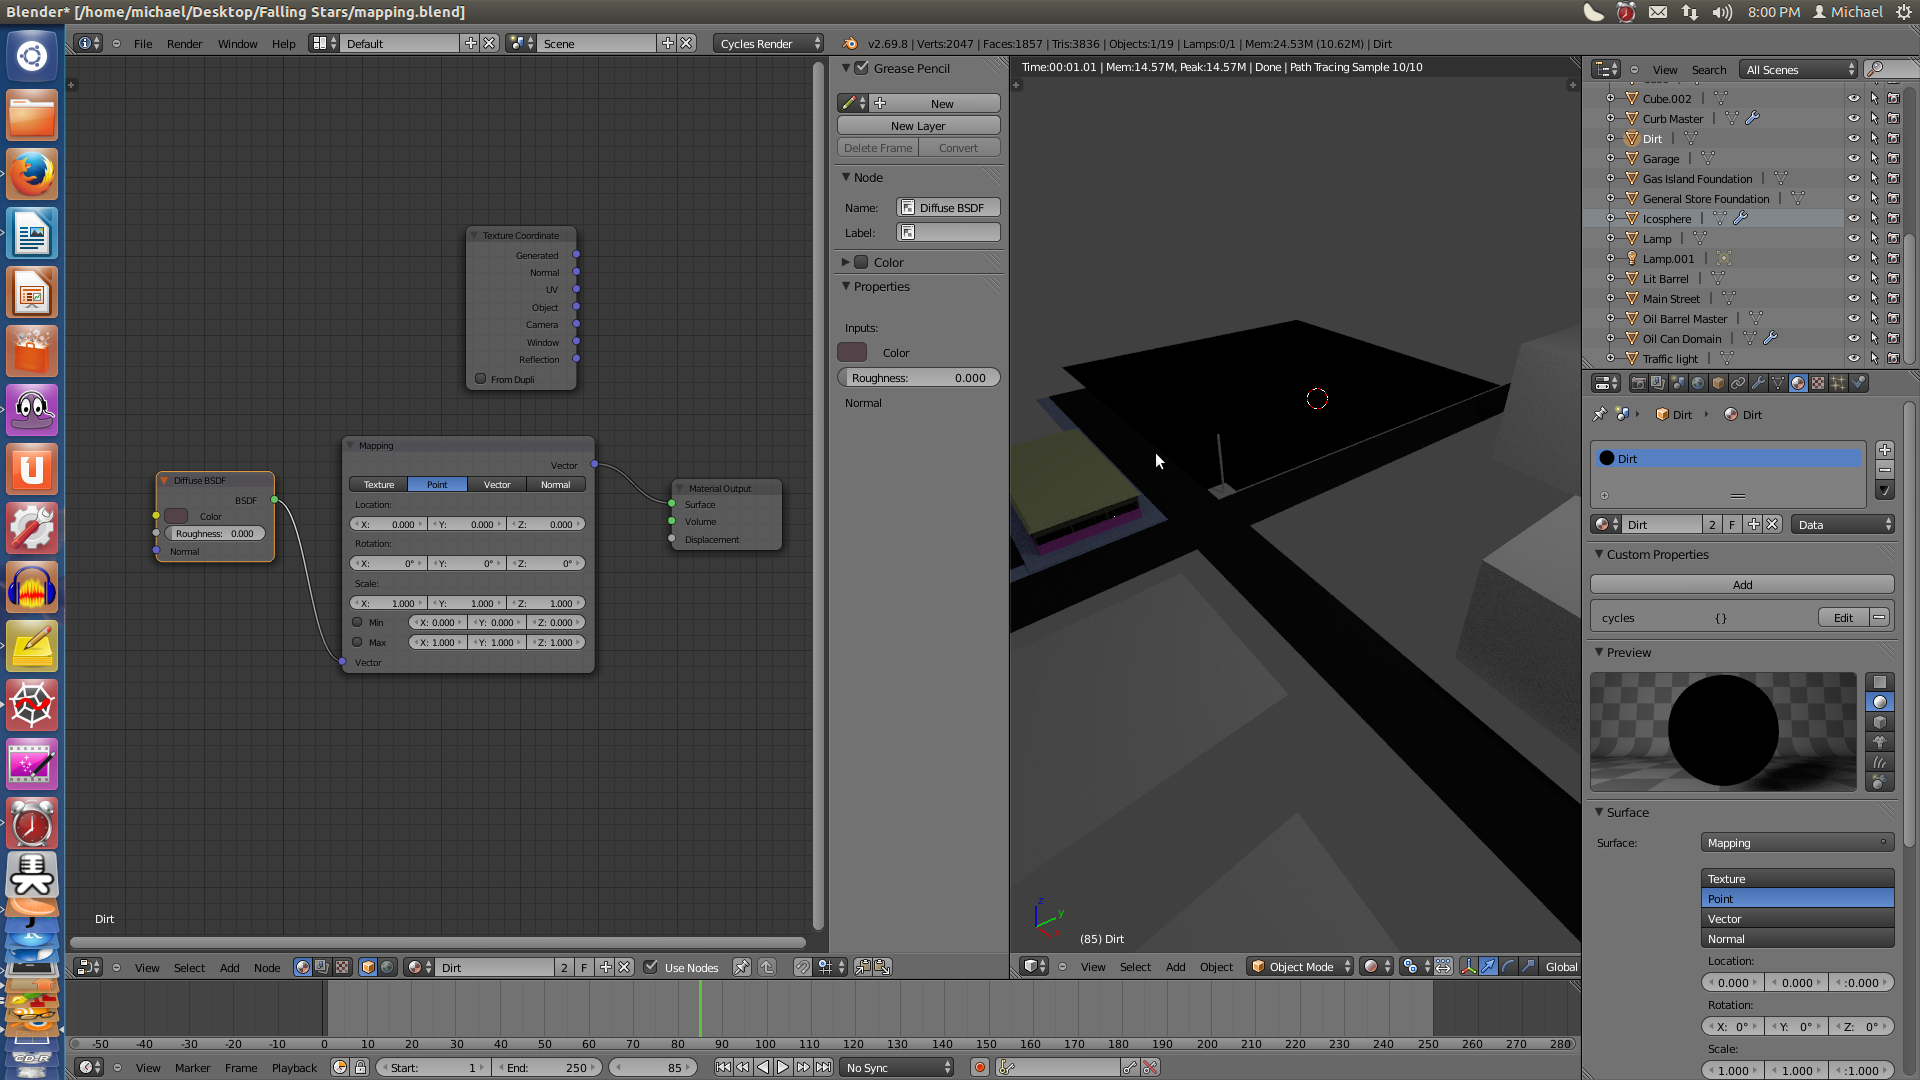
I’ve enclosed a blend file with my unsuccessful attempt to be able to scale a uv texture. I atempted to add a node which in theory might do that. It results in the material appearing black on render. The camera is fixed upon the plane in question.
It would probably be more appropriate to say that I cannot do anything in nodes. I’ve been trying since December. Flailing around blindly doesn’t appear to work. mapping.blend (1.43 MB)
I know this is simple, but I really can’t figure it out. I have loaded and reloaded this scene many times, and tried many different node setups. For someone who never worked with nodes before, the tutorials I find are utterly inexplicable. It works seamlessly in the tutorial, but it never works for me. That’s kind of the problem. Each tutorial that describes the process usually jumps through the initial stemps in less than a second.
If there is anyplace in the world that someone explains how this is actually supposed to work, I’d love a link. I’m including books in that category. I would happily buy any book that would explain this in a rational manner.
I’m attempting to change the way the texture appears on a node, so it tiles appropriately.
When I change vector and a mapping node appears, (automatically created by blender in the node editor,) from that moment forward the object is darkened. That means that if I change settings at random to try to figure out what each might do, nothing changes. Therefore I can’t go beyond that point. Most of the things I want to do seem to extend from that point. I essentially can go no further til I get past this.
I have changed the top four settings, and all the settings below it. At now point does the material/uv become visible again, which means there’s no way for me to determine what’s wrong.
Would someone please tell me how to attach this node? mapping.blend (518 KB)
Upon viewing your blend file I am not entirely sure what you are trying to do. You seem to have a Diff color applied to a few objects. Those nodes constitute a material, not a uv image, and the color of that material would of course be brown (That is if you take it out of the mapping node and just plug it strait into the surface input).
That texture is labeled dirt, so I presume you want to make that plane a floor composed of dirt? If that is the case you go into that texture and where it says color (all the way to the right) there is a gray button. Click it and select “image texture”. Now open a file of a dirt texture and there you go. You now have a picture of dirt on top of that plane.
However before that will work you have to “Uv Unwrap” the plane. Just click it, go into edit mode, press “u” and then select “smart Uv Project”. If you did both of these steps you should then see any picture you want on top of that plane.
Clearly there is allot more to learn about this stuff, so I suggest you watch some Blenderguru videos and Cgcookie videos. You have allot to learn :yes:
I am curious as to what experience you might have had that led you to believe that flailing around blindly could be an effective strategy.
All wrong in your setup but there’s light at the end of the tunnel. One: you need to read the wiki pages on rendering with cycles/ reference. So I don’t have to say all those things here. But I guess I have to say some of it anyway.
Two: you have to watch the colors of the node sockets and match them carefully to each other. You can’t connect an indigo socket to pistachio socket or a lemon socket to an indigo socket - they carry different types of data.
So to begin with the BSDF output must be connected to a surface input or a shader input (on mix and add nodes). Nothing else. Just do that and see what you get. If black then you have more serious problems.
Then an image texture node can be connected to the color socket of your diffuse. Then you can specify the image in that node. See how the colors are still matched. Now a vector coordinate to the image textures vector input. forget the scaling for now. You should wait until you get some image in your render before trying to scale it.
In fact empire arts has said exactly this above. I don’t know how I didn’t see that. I guess I downloaded your file and then did not refresh the page. Hours ago.
In the early days of nodes, when tutorials weren’t available, I put together noodles (systems of nodes) very slowly and methodically, beginning with a color node and an output node, and had a 3d viewport open so I could see the effects when I made changes. I added new nodes to the noodle one at a time, and observed the effect, played with the influence sliders, tested out connecting different sockets. When things went black or wonky, as they frequently did, I learned: “don’t do that!”
Now there are tutorials on using nodes. Such luxury.
you have to watch the colors of the node sockets and match them carefully to each other. You can’t connect an indigo socket to pistachio socket or a lemon socket to an indigo socket - they carry different types of data.
This was a major revelation to me when I first learned it.
The attribute node won’t really help, even if it were a coordinate node, because all image textures in cycles default to UV anyway. You can’t apply an image to an object that has no UV unwrap. The problem here is that you have connected the mapping node to the normal input of the shader, not the texture. See where it says vector on the texture node input and vector on the mapping node output? In any case it is UNNECESSARY in most uses to use a mapping node for a UV texture, unless you plan to change the default mapping. Even that is better achieved by scaling and rotating the UVs.
Your point light should be barely bright enough for you to see your texture but at a distance of 6.4 BU as you have it it needed to be about strength 4000 to light correctly.
There is no automatically appearing mapping node. You picked it from a popup menu, either in the node editor or in the material properties panel.
I admire your charging ahead with it but the node system is not responsive to that approach. Please read theWiki! It will help you and it will help us help you.
I have been to the wiki, and honestly, I think know less now then when I started. I’m serious when I say this… that this is written so badly that it reads me in the wrong direction again and again. At the end of the day I don’t even know what I did… if anything. I think part of the issue is that I don’t know which written material is trumped by cycles, and which isn’t. Half the time when I find instructions it’s dated, or replaced… or something. When you’ve never seen something work, being given blind alleys to go down to is really debilitating.
The doucmentation is just useless. I go there again and again, and it never helps. I made more progress when I ignored it. I’m actually stunned to be referred to it, I thought everyone had come to this conclusion.
I understand that this is open source software and they are working on fixing the code right now, documenting it is probably a distant objective on the horizon. But at some point, since cycles is evidently the only way forward now, they need to write the documentation again assuming use of Cycles, so there aren’t so many false leads.
I guess I’m nowhere. I have no idea how to do this at all…
I don’t know. Maybe I can model this stuff first and render images with the old fashioned version, and then upgrade everything when somebody finally documents it. I don’t know whether to keep trying or not.
Here’s a node setup to tile a texture on the plane. The mapping node needs an input so it knows what mapping you want to change, then the mapping node goes into the texture because it is that you want to change the mapping of. The texture then goes into the shader node because it is the shader colour you want to change with the texture
I’ve read the wiki pages, and I’ve read the blender guru pages. One fo the reasons I hesitated to ask online about this is that when It ried asking questions I was told to rtfm. I read the manual, and at this stage it simply isn’t helpful. I think some of it is the fact that cycles has added an additional layer. I’ve watched many blender guru videos too. I mentioned that last time, and I was told I was an idiot and must not have watched them.
The documentation isn’t helping me at this point. I know very well that there is a right and wrong type of socket. I was trying to find them through a process of random selection, because I just never find a video that explains this clearly. I have looked, swear to god. That wiki is probably the worst documentation I’ve ever read. They keep bringing up stuff that never appears to address how to actually do anything… I assume the instructions are buried in there somewhere but I never seem to find them.
I’ve killed months on this, maybe I should just dumpt he whole thing. I don’t know.
I had access to commercial software once. Maya, all this other stuff… then I ran out of money and dropped out of school. I’m drowning in debt, I’ll never be able to go back.
I wanted to try and learn blender but… its so diferent, and there’s no documentation. At this point I couldn’t even afford to buy a book on it anyway my credit card is beyond maxed. I just wanted to finally finish this model I’ve been planning on. I guess I won’t.
You are not crazy. The wiki is a reference, not a how-to guide. You won’t find instructions on how to do things in the wiki because they are not there, by design. The docs are separated into the manual, which is a description of what each button is called and what it does, and the tutorials which are supposed to be where you find out what to do with those buttons. The wiki tells you how the watch works, not what time it is.
Keep the wiki bookmarked to refer to when you need a technical term or the exact location of some button or data field. Otherwise, feel free to ignore it for now.
There are two places that might be better to search to find out how to work with nodes.
One is right here. Take a look through other threads in the materials and textures support forum, and the lighting and rendering support forum. Frequently you’ll find little mini-tutorials or screen shots of noodles that someone used to solve an actual texture or lighting problem. Treat these as exercises. Duplicate the noodle on your system, take bits of it out and put them back in again, see what they do. Experiment, and document your results.
The other often overlooked source is the developer notes, the release notes. When new features are added or updated, the dev responsible often posts examples of what you can do with the new stuff in the release notes, but fequently that’s the ONLY place you will find that information, until someone incorporates it into a video tutorial somewhere. Don’t limit yourself to just looking at release notes for your Blender version, either. Some functions were introduced in previous versions and are documented there.
Sure documentation could be better but you’re missing couple of key points. One is that manual is supposed to tell what the pieces do, while it’s up to you how you combine them. There are some examples, almost tutorials on how to do something but I don’t expect that from a manual.
Another point is that everyone else use these same resources. They watch tutorials, check the manual for nodes they don’t understand, they explore what they can do with it. It’s not like people were hiding information and making it unnecessarily difficult for you.
This forum is one resource. If you want to use this as a learning resource, open up and tell (preferably visually) which part you don’t understand and maybe that way people can break it down for you. If you don’t understand the replies, ask more information.
What definitely won’t help is stop trying and blaming the learning resources on the forum. Sure they might not work for you and yes everything can be improved more or less, but it’s not constructive and doesn’t solve your problem.
Not understanding/knowing something is not a fault. Blender is large enough software that no one knows everything about it, not even Ton. That’s why support forum exist. If you communicate clearly that you’re trying to learn something, what the problem is, what you want, and someone still calls you an idiot, that’s their problem.
Using visuals about what you mean and giving the .blend is very good when communicating. Perhaps now take it step by step and maybe it will click eventually. Node setups can be quite complex, that is the power of using nodes, but luckily simple setups can give good and realistic looking results.
Check this video out, (see below) you may have to watch it a couple of times or like I did, stop and start when he rips thru a “by the way”
As well as the initial workspace setup is skipped over… I think CTRL Left arrow will get you into compositor mode, which I think is the mode he uses?
It truly is a bit frustrating that such a powerful piece of software (Due to being open source) has no real hierarchy of learning the software itself. 101,201,301.
IGE: If we are going to learn about Spec Maps, lets first identify a Specular map and not use a shortened term for it, like spec. It is supposed to be class, not on the job, where once we know it is often referred to with slang.
Or my favorite (sarcasm) as in that video I shared is the use of etc, etc. (like about 13min in when he goes over the color dots on a node.
Etc is for people who know the job, not in the basics of class!
If you watch that video, I stopped halfway when he adds a new something without telling me how he did it like, when he used Shift “D” in Node mode as if I am to know WTF that does! LOL Watch the whole thing before jumping in. Then watch again. I D.load the movie so I can stop and start without the connect being a challenge.
And I still cannot figure why he (the instructor) plugs a .net site for a resource and they would not even give a resource to share as an instructional piece. OR why if you they chose to give that particular lesson away as an example that a non member cannot D.load a zip file with the assets to follow along.
Just ignore his assets and use yours if you got em. You may have to watch a video on “Unwrap a map” to be able to apply that map to your floor, wall or whatever you desire. Or your assigned map will default to a blend of whatever your map is. Brick with grey mortar will become a red-grey hued color, instead of defined brick.
Hang in there. It is powerful software
EDIT- P.S I see you are in Object mode, there is a white dot next to that tab where you can see it in render mode, have you toggled to see what that shows?
Also when you upload a file, could you pack all the textures ( in the file menu) so we can see what needs to be done with the dirt texture for example.
Nodes are tough as I said before you have to approach it in the way of adding one layer of nodes (shader into an output) and understanding what’s going on before going to the second layer (two shaders into a mix shader into an output) and a third layer (nonimage texture into shaders into a mix shader into an output).
Only if you’re good up to that point should you try to use image textures because they require working outside the node editor in the UV editor.
This is not any official dogma. Cycles is still relatively new and most of the users here started learning Blender before Cycles and the node system so we had a gentler introduction to it.
Many users have posted screen shots of their node setups. You really need to look at them and follow the flow from the output back through the branches and see what is connected to what. This forum is the best way to supplement the wiki and vice versa, if you see a node that you don’t know go to the wiki for an explanation.
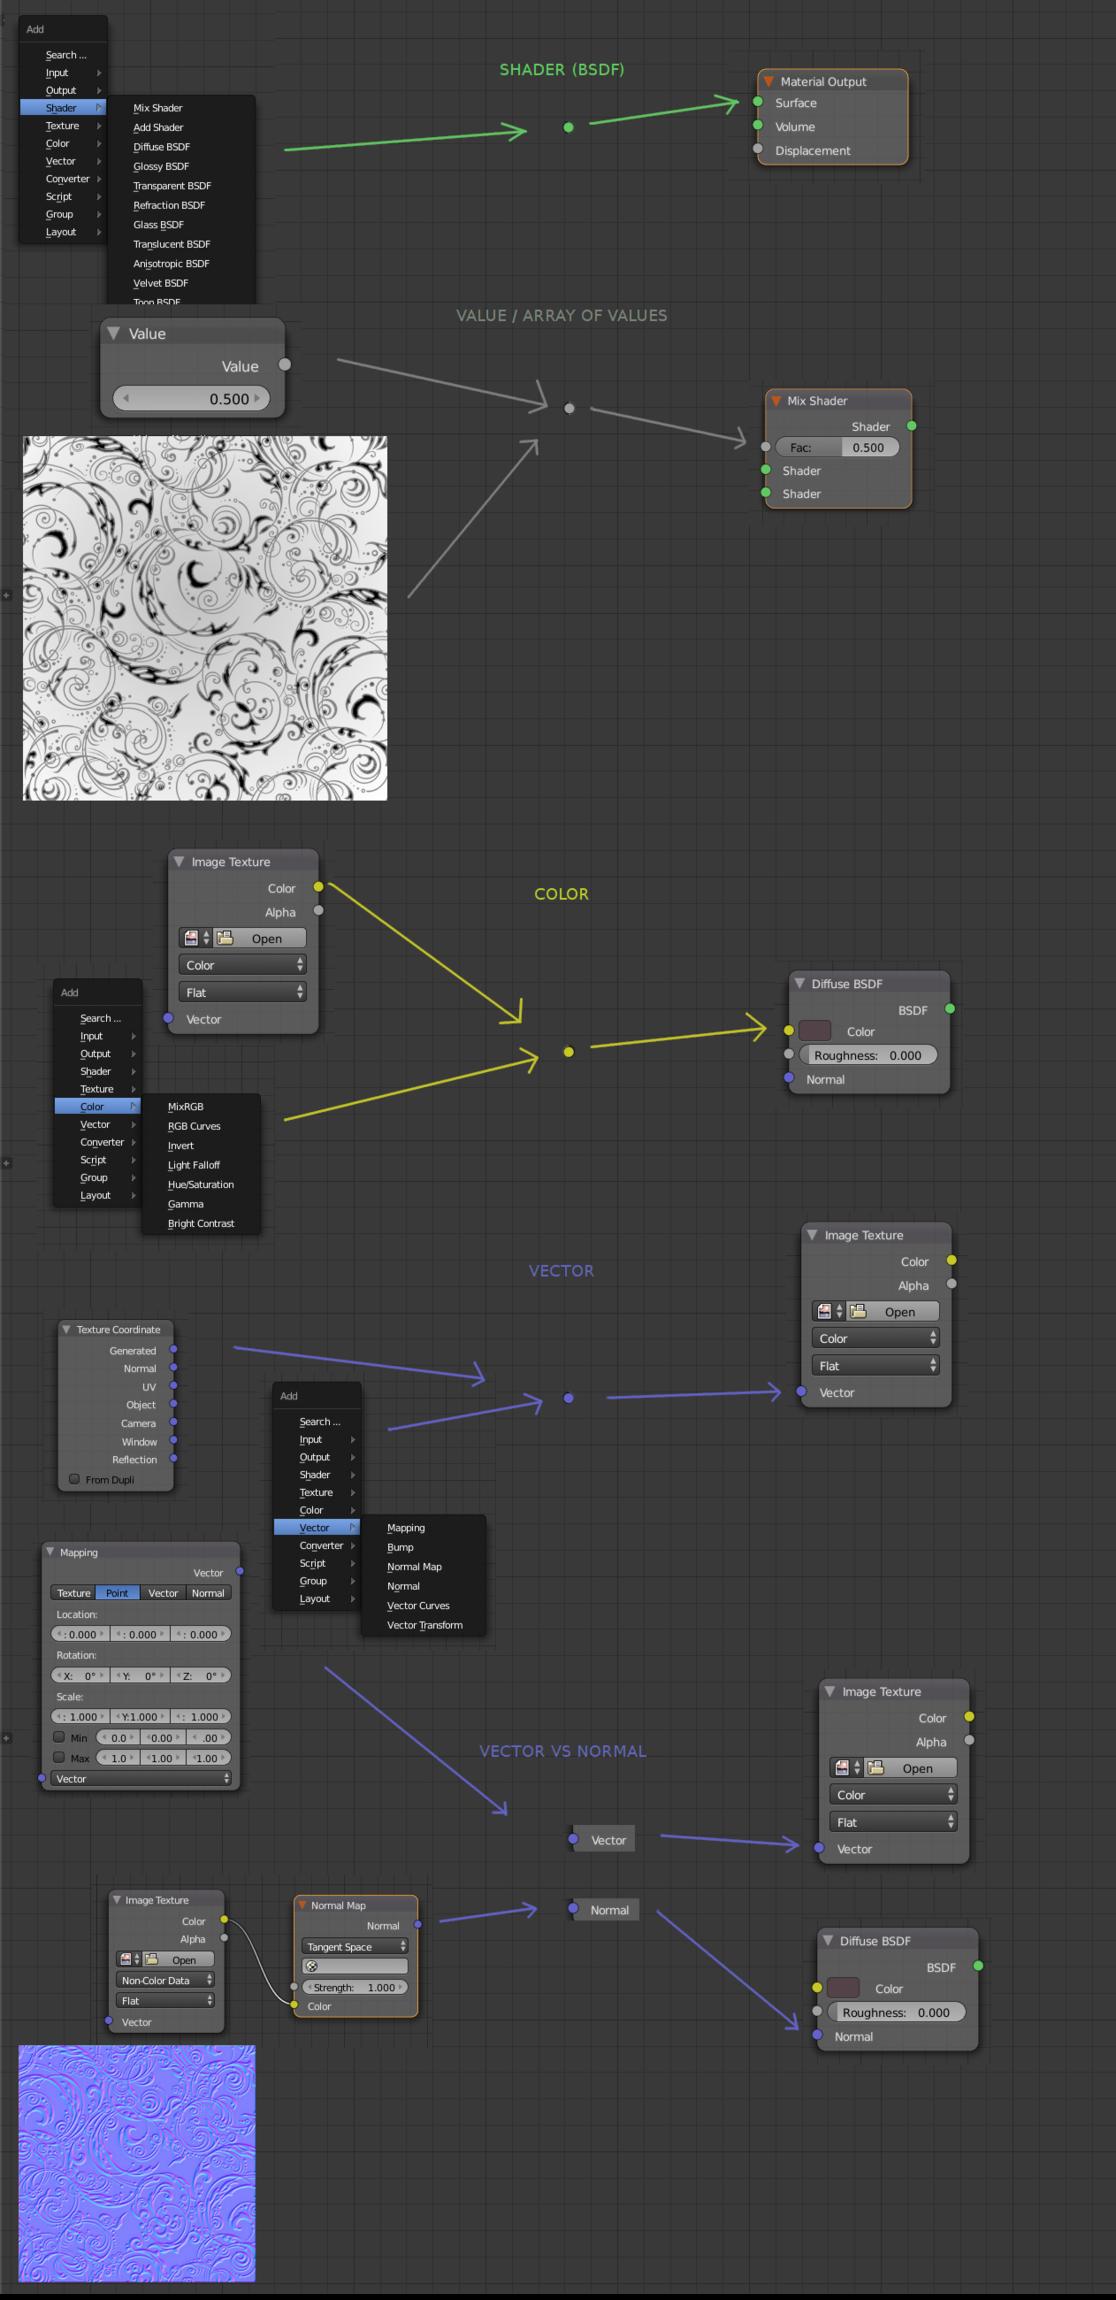
Only shader nodes output, Shift+A -> Shader to add a shader node
Connects to either material output (shift+A -> output -> material output), or mix/add shader node (shift+A -> shader -> mix shader).
Grey socket: One value or an array of values
One value usually given on the node that takes value input
Can use a greyscale image (image texture node), which is basically a 2D array of values
Example: Mix shader node has a factor field. Zero value means the upper input socket is used, 1 means the lower socket is used. Inputting a greyscale image to the factor socket means that inputs get mixed based on the values on the image, where low values get more of the upper socket input than high values, which gets more of the bottom socket.
Yellow socket: Color (RGB(A))
Color input/output. Most of the nodes that handle (and output) color are from shift+A -> color
3 (or 4) channels like in a image. One channel is an array of values (greyscale). A greyscale image in RGB form means all channels have the same value, so two of the channels are just wasted space. This also means you can use one channel from the color input and connect it to grey socket input.
Solid color is usually given on a node that takes color input, as in diffuse shader node, for example
Can also be handled as channels and separated to get a single direction
Example input: image texture node to get the coordinate data. Defaults to UV coordinates without connection.
Blue socket: Vector vs. Normal input/output
Normal input/output is a special vector type, which you usually handle with shift+A -> Vector -> normal map node, or Shift+A -> Vector -> Bump node. Usually connects to a shader
A normal map is an image which contains encoded surface direction data. They are on image channels, but are not color values
[/LIST]
Let’s now use this information to build a Cycles material node tree
Plane has been unwrapped (edit mode, select all, U -> unwrap), and the UV map is shown in the UV image editor, on top of intented texture image. Changing the mapping could be done by scaling the UV map, but we do this in nodes instead just for sake of example.
Node setup, starting from material output:
We want color on the surface. Green socket, which means it wants a shader connected
Shift+A -> Shader -> Diffuse. When compared to Blender render, shader can be considered as a material. This one scatters light to all directions. Fine for now, it needs a color, which connects to the yellow socket
Shift+A -> Texture -> Image texture node. Plane object has an UV map, there is light, and image texture node defaults to UV coordinates, so texture is shown
But that’s not all since the mapping has to be changed. More nodes.
Image texture node takes vector (direction) input. Shift+A -> Vector nodes have those outputs.
Shift+A -> Vector -> Mapping which can manipulate coordinates, but it also needs to know which ones so
Shift+A -> Input -> Texture Coordinate node is added and UV socket is connected to mapping node. Since image texture node alone defaults to UV coordinates, texture coordinate node can be used to change that default. A mapping node in between can be used to manipulate those coordinates.
Hopefully this explanation was detailed and simple enough.
Darn. I see JA12 has been here and very busy. Not much point in following his mini tutorial but I made a file with a few objects and texturing methods for you to look at.
Nice DruBan, first time I see Cycles materials with instructions.
You already know but for those that can’t tell: not allowed to scale the UV coordinates directly is sarcasm in my post, tried to lighten a bit because of the long explanation.


 Not much point in following his mini tutorial but I made a file with a few objects and texturing methods for you to look at.